












Workbench ITSM
Workbench is the entry operations platform of OpsAny. It provides the common management tools and personal settings that users need, such as ticket management and credential management, and also offers a set of convenient operations, including data dashboards for the main platforms, so that users can understand the overall status of the related business environment through the interface.
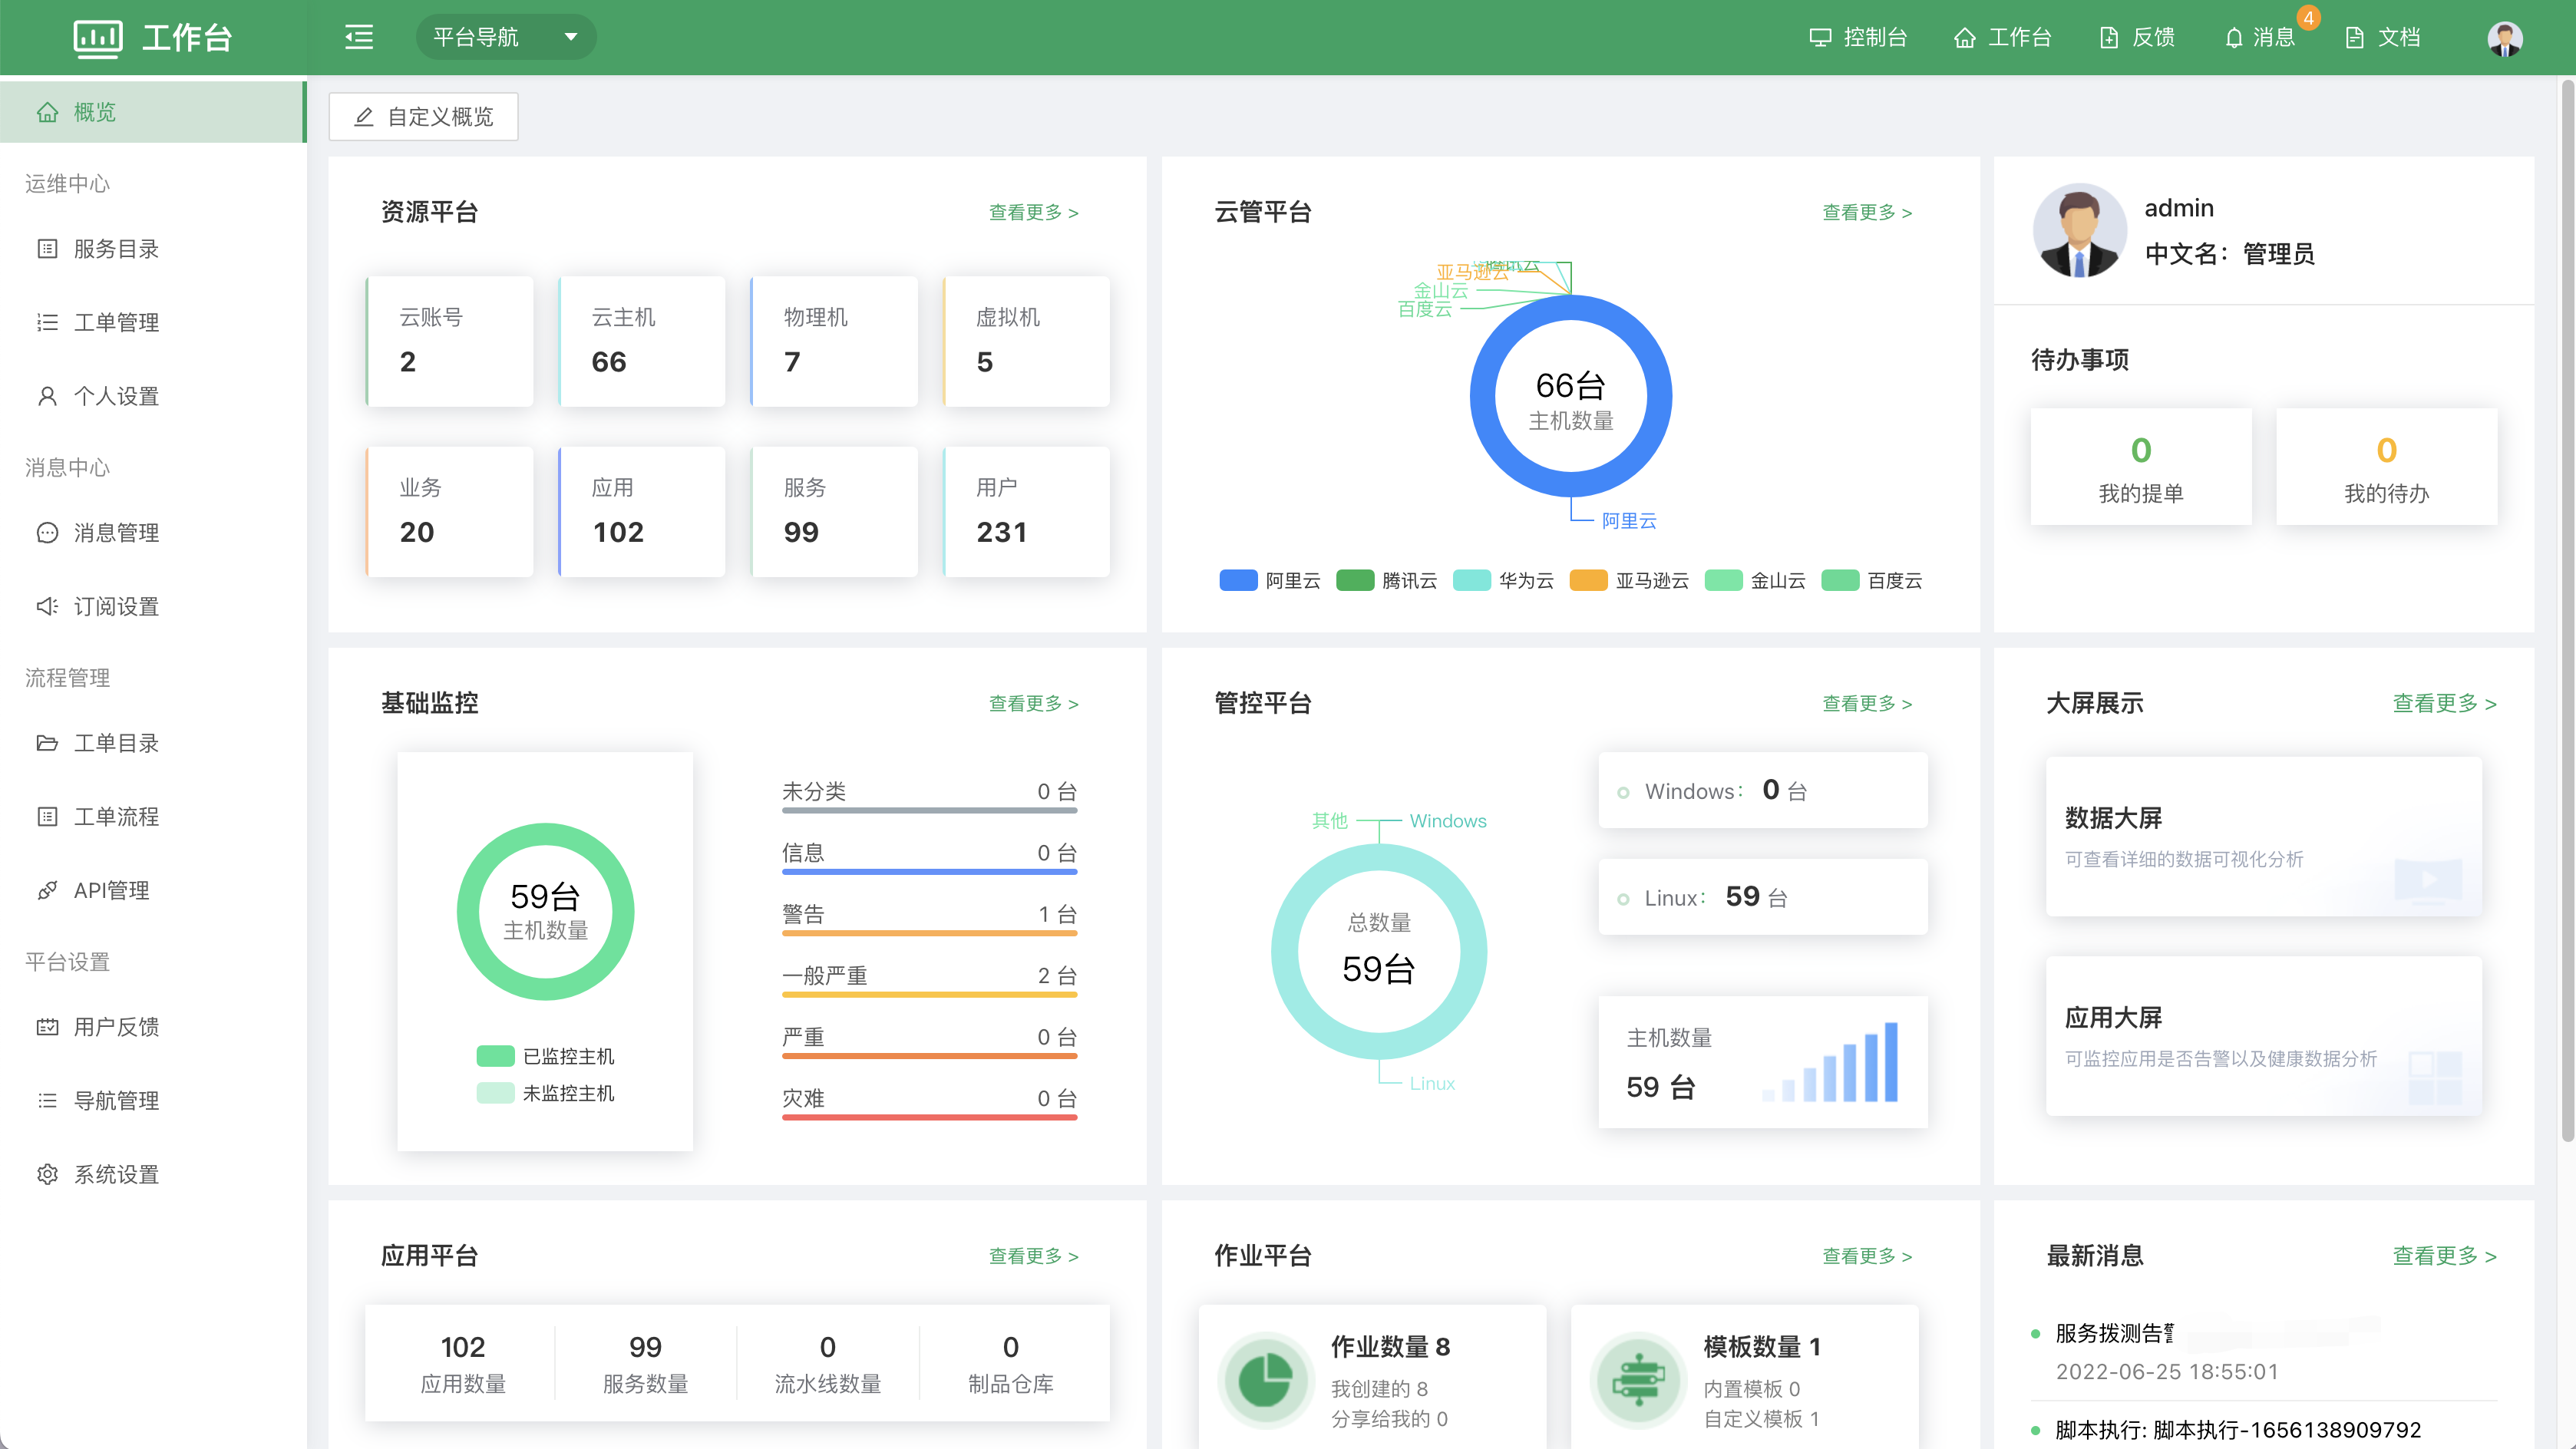
The platform navigation at the top lists the entry points of all OpsAny platforms, so users can quickly jump to the corresponding platform for O&M management.
1. Operations Center
The Operations Center provides the functional modules related to an enterprise's daily management, including the service catalog, ticket management and personal user information management. Personal settings include security settings, credential management and other features.
1.1 Service Catalog
Deliver the services that every department can provide to business users in the form of tickets. Typical scenarios for the service catalog include leave requests, host requests, and automatic task execution through API nodes. Users can flexibly build personalized services based on their own scenarios.
1.1.1 Quick Ticket Submission
On the Service Catalog page, all services that the IT department can provide are delivered to business users in the form of tickets. All users can submit tickets quickly here, depending on whether they have the permission to submit tickets.
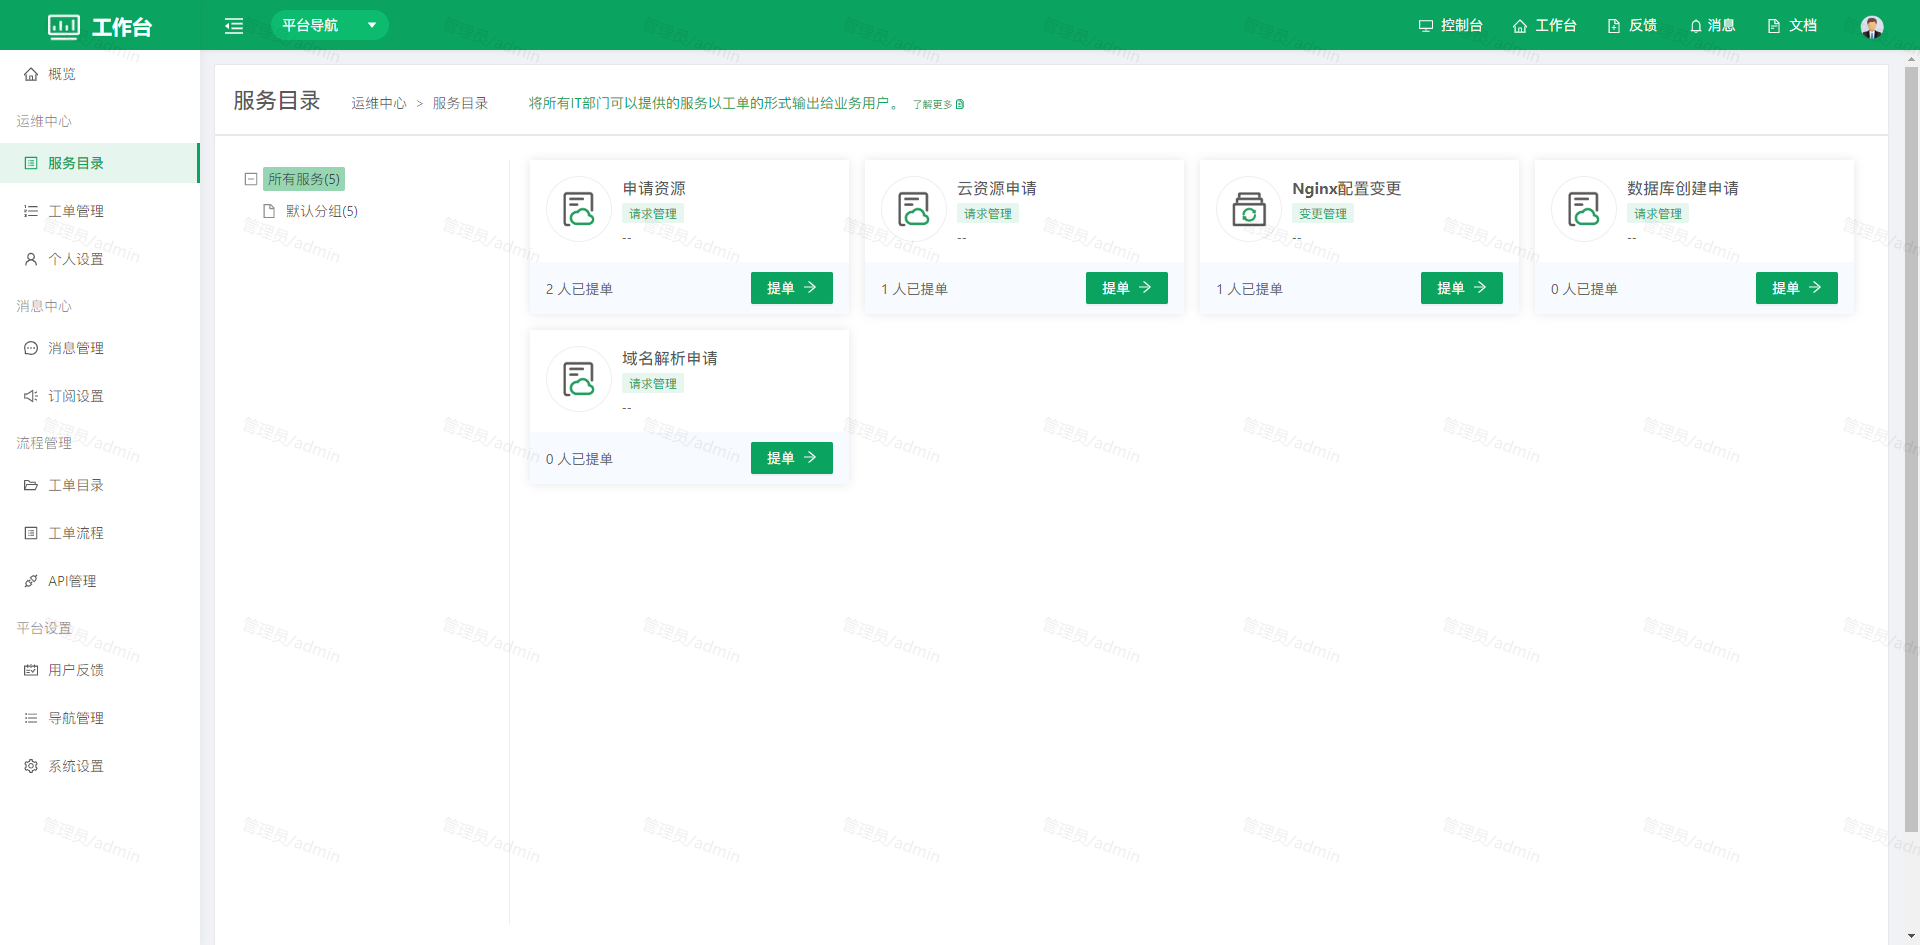
- Click Submit Ticket to open the ticket submission page:
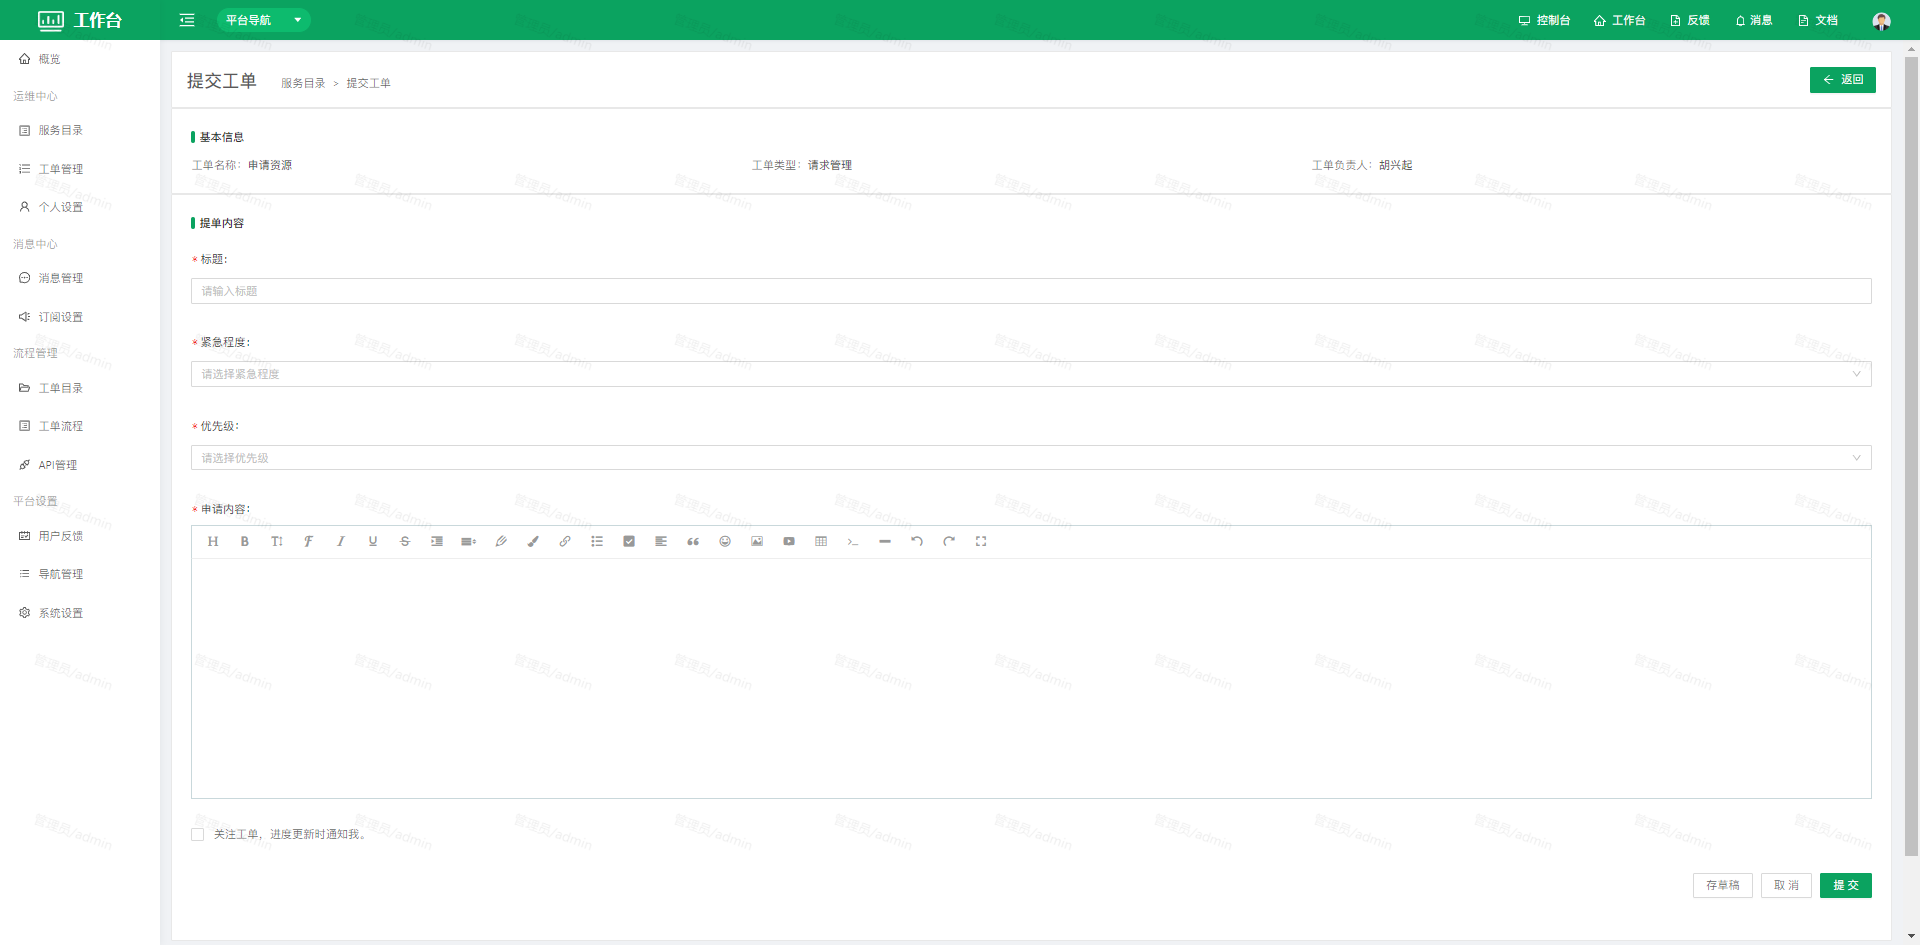 Fill in the fields on the ticket submission page, then click Submit Ticket to complete the submission.
1.2 Ticket Management
Ticket management lets users submit tickets, process tickets and check ticket status. It helps enterprises standardize internal management processes and improves communication and management efficiency among internal staff. Before using ticket management, administrators must define and configure ticket processes and tickets according to the actual situation of the enterprise. Once the tickets are published, users can submit them in ticket management.
1.2.1 Submitted by Me
Shows the tickets submitted by the current user.
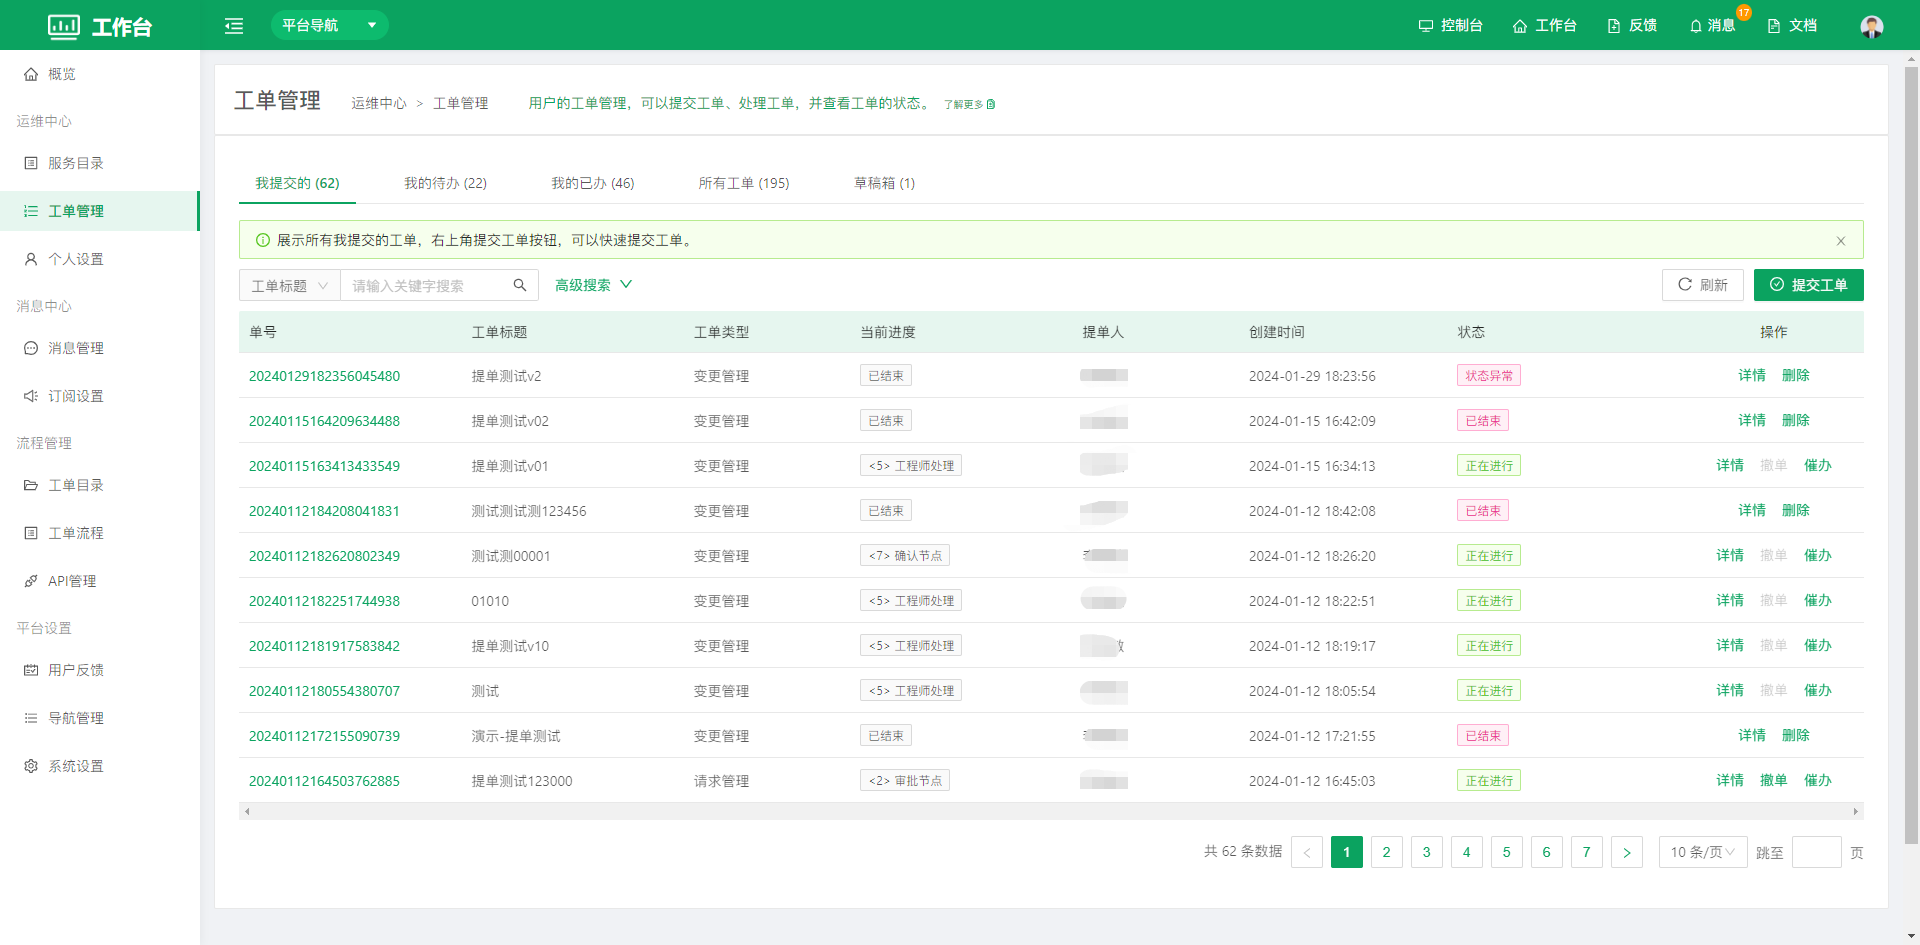 Click Submit Ticket to open the ticket submission page and submit a ticket. After a ticket is submitted, it appears on the Submitted by Me tab. Cancellation is supported: the submitter can cancel a ticket before it is processed.
- Click Details in the list actions to view the specific information and progress of the ticket,
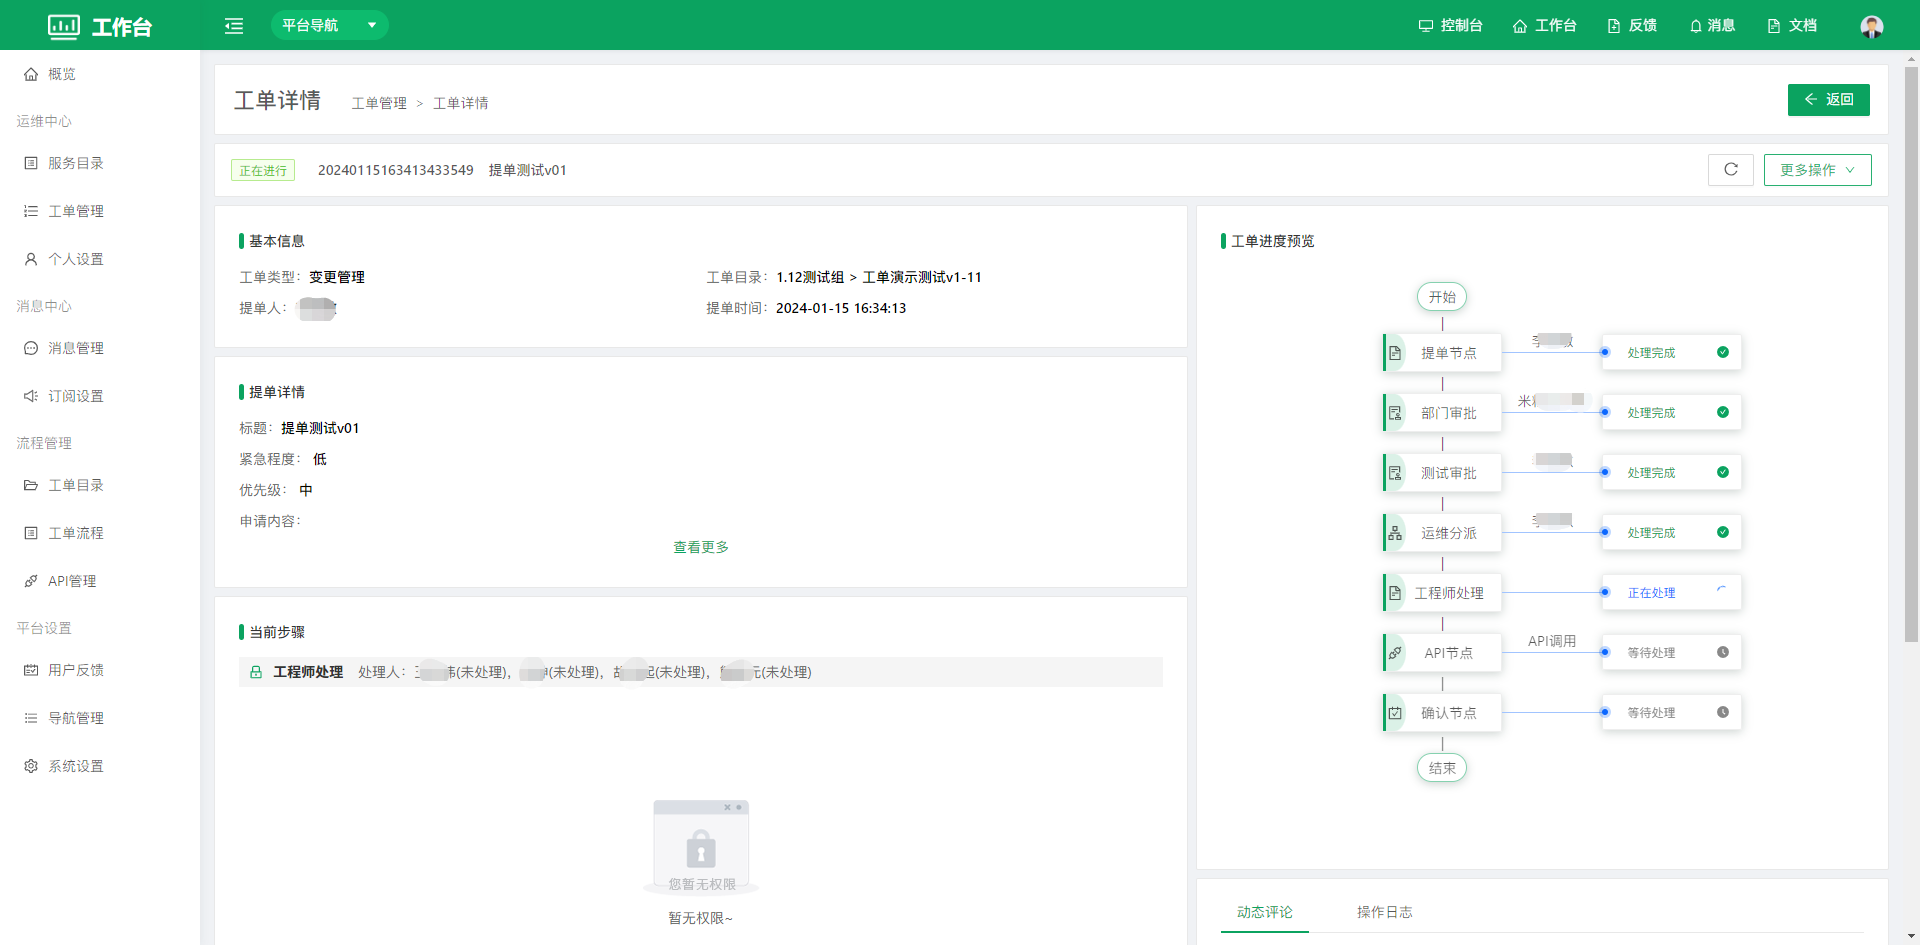 The ticket details page provides activity comments and operation logs. Activity comments: comment on the whole ticket; operation logs: view the operation logs and details of each ticket node.
1.2.2 My To-dos
Shows the pending tickets of the current user.
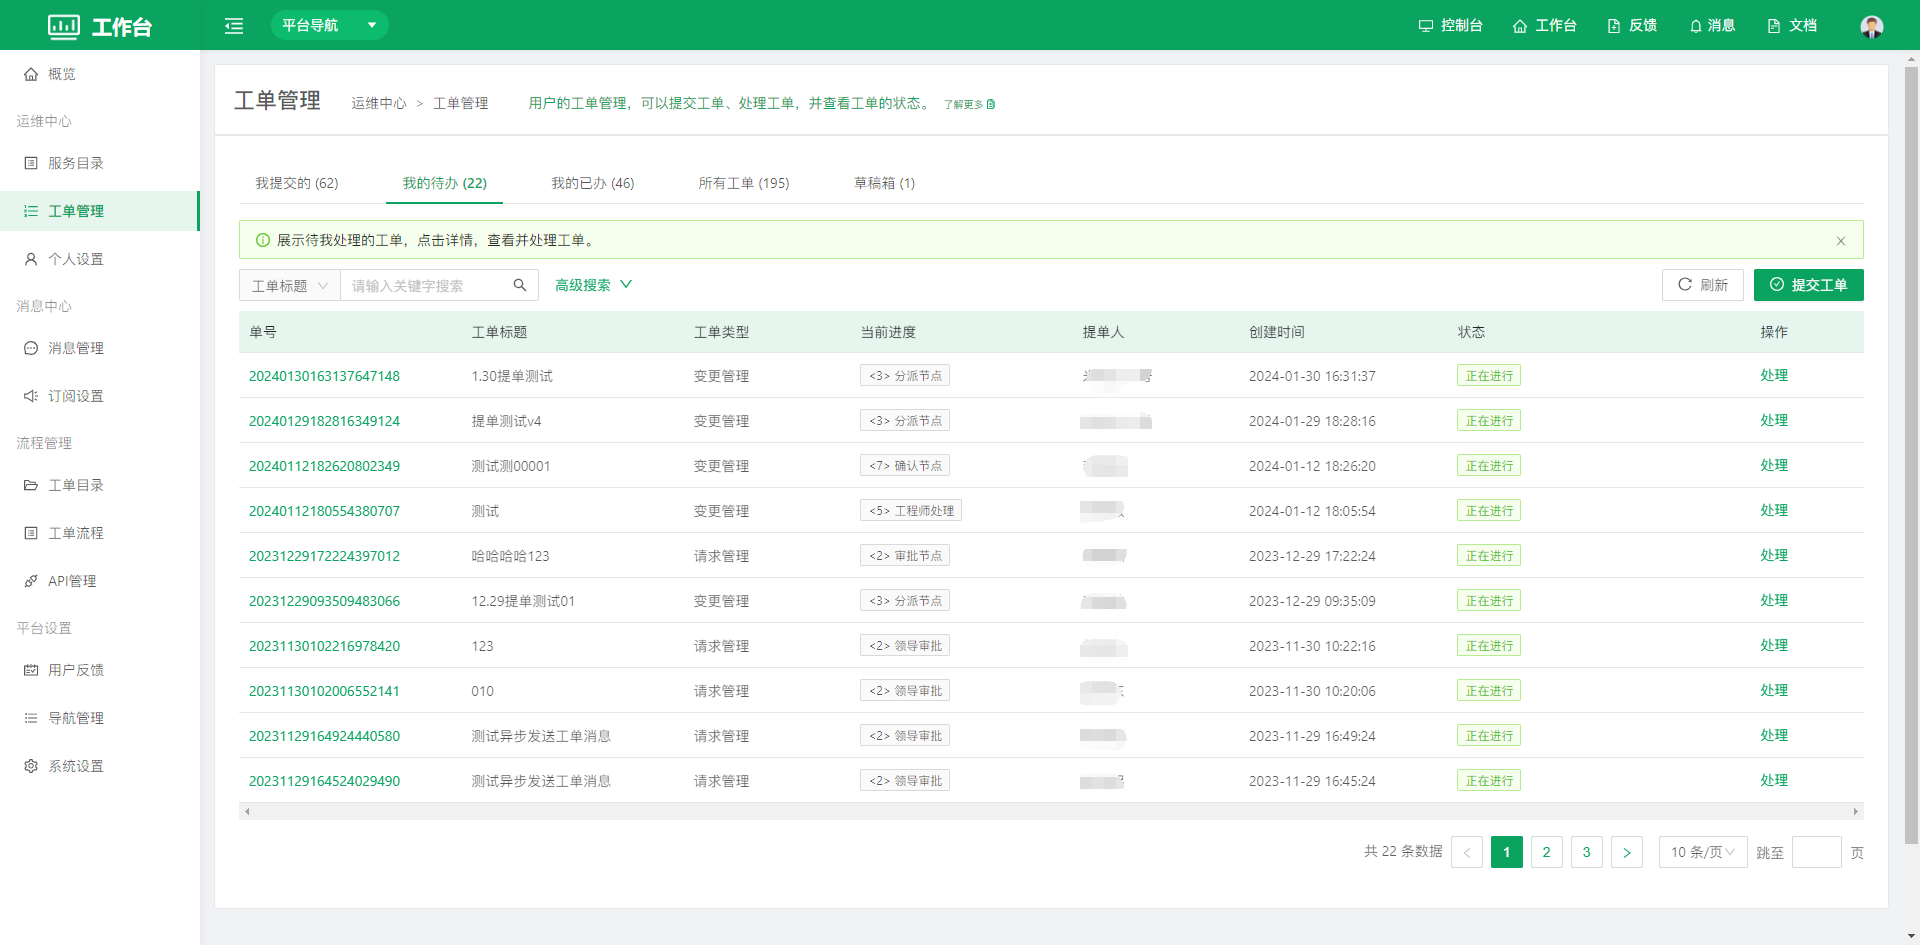
Process Tickets - Click Process in the list actions to open the ticket processing page.
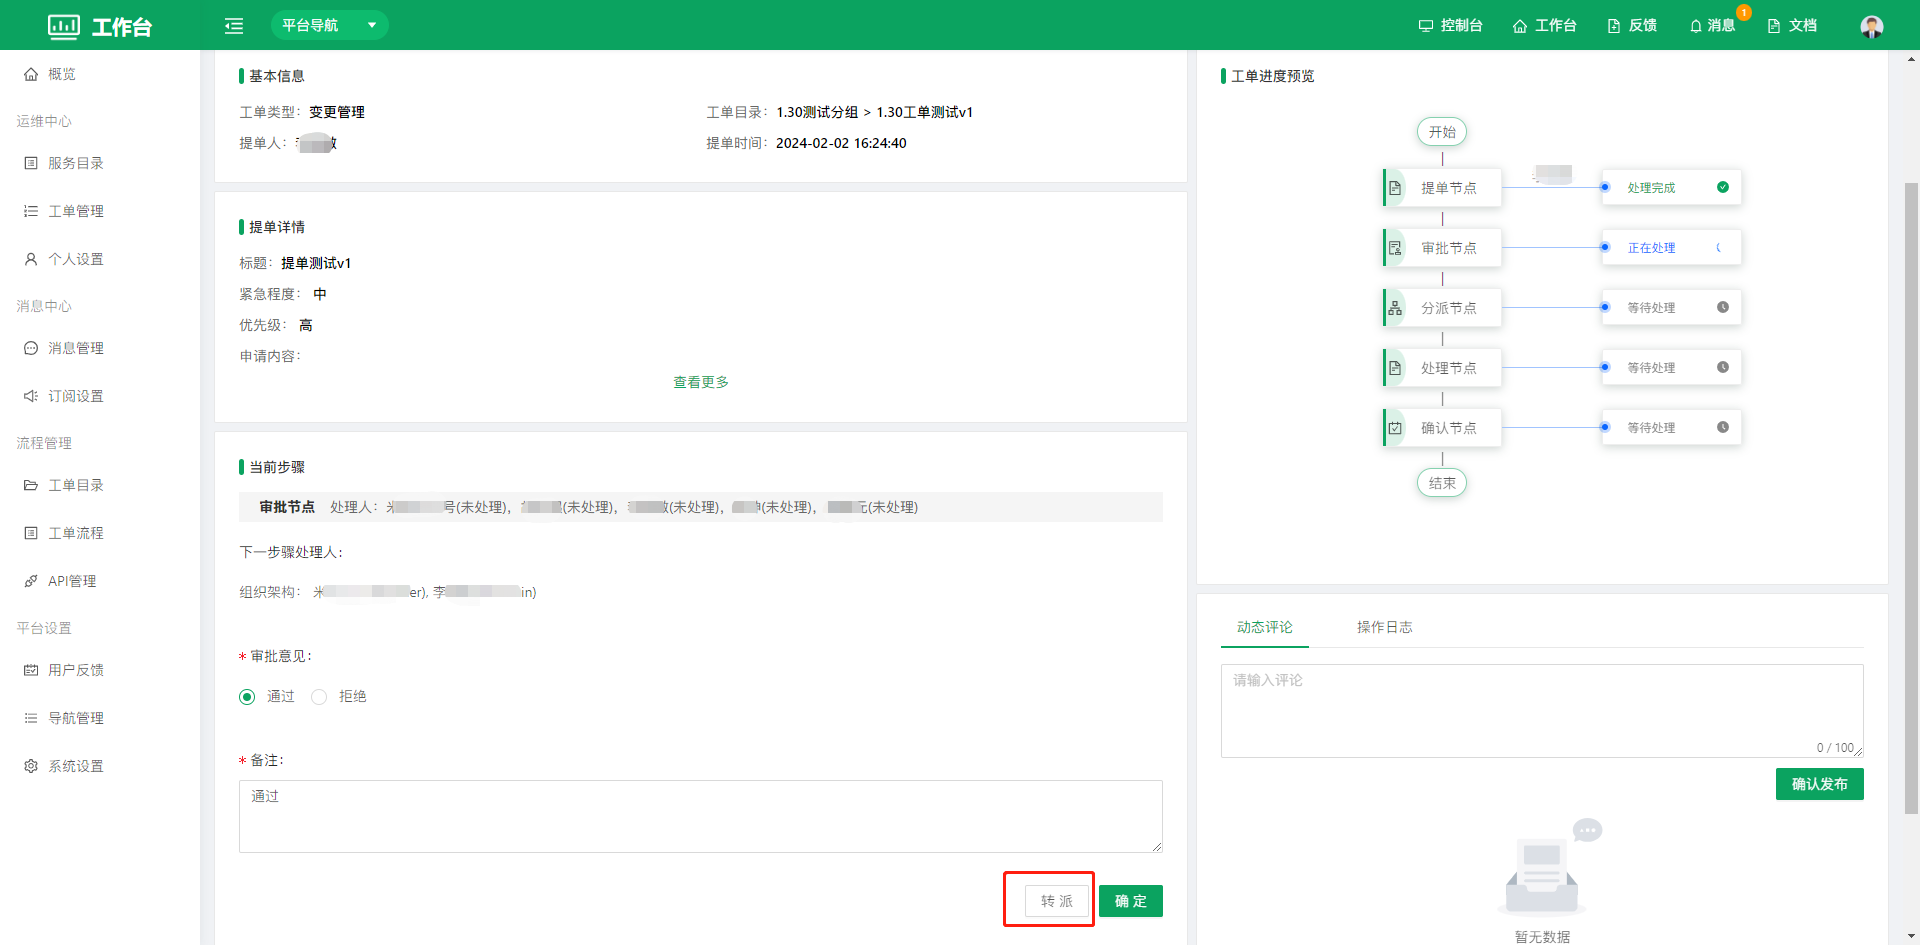 The ticket handler can fill in the required fields at the current step and process the ticket. After processing, the ticket appears in the Processed by Me list. You can also click Reassign to reassign the ticket,
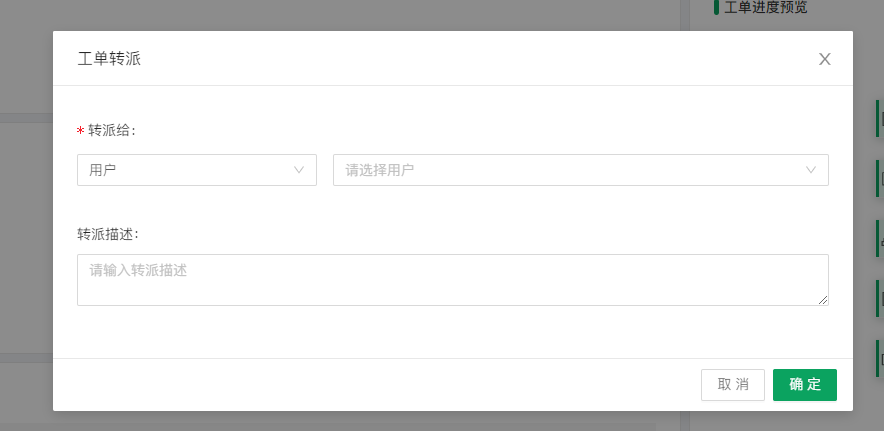 Select the user to reassign the ticket to and click OK to complete the reassignment.
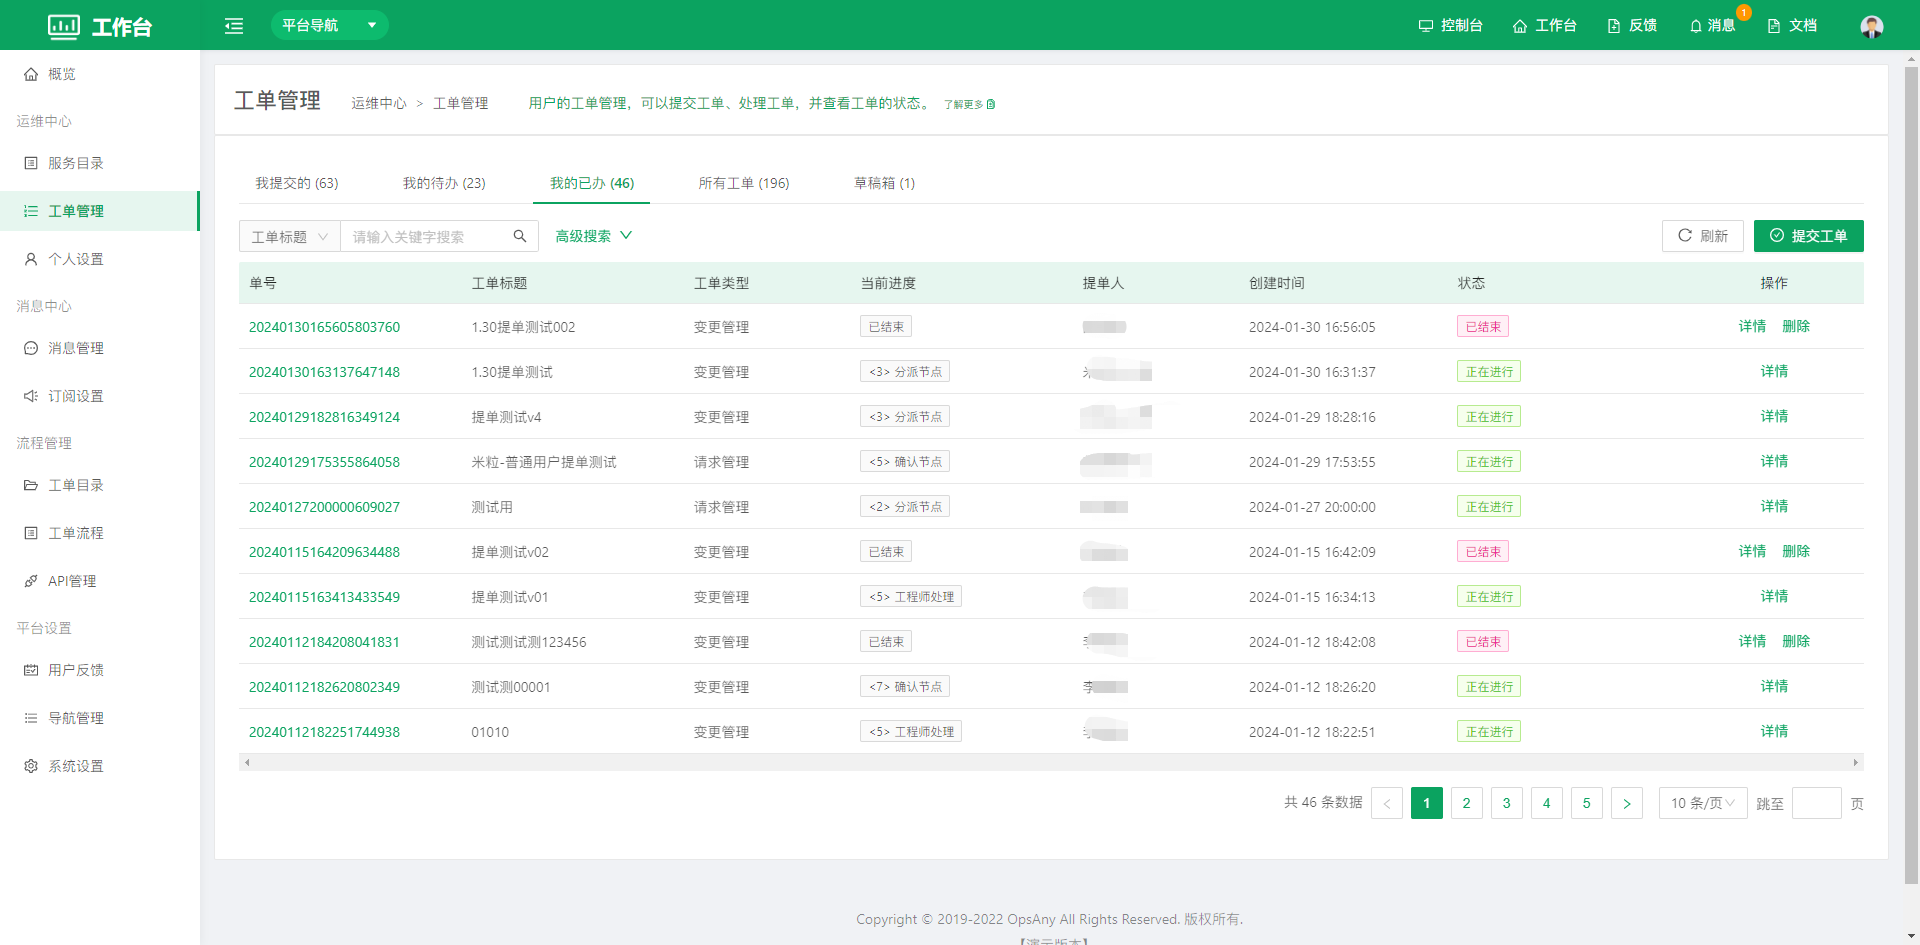
1.2.3 Processed by Me
Shows the tickets processed by the current user.
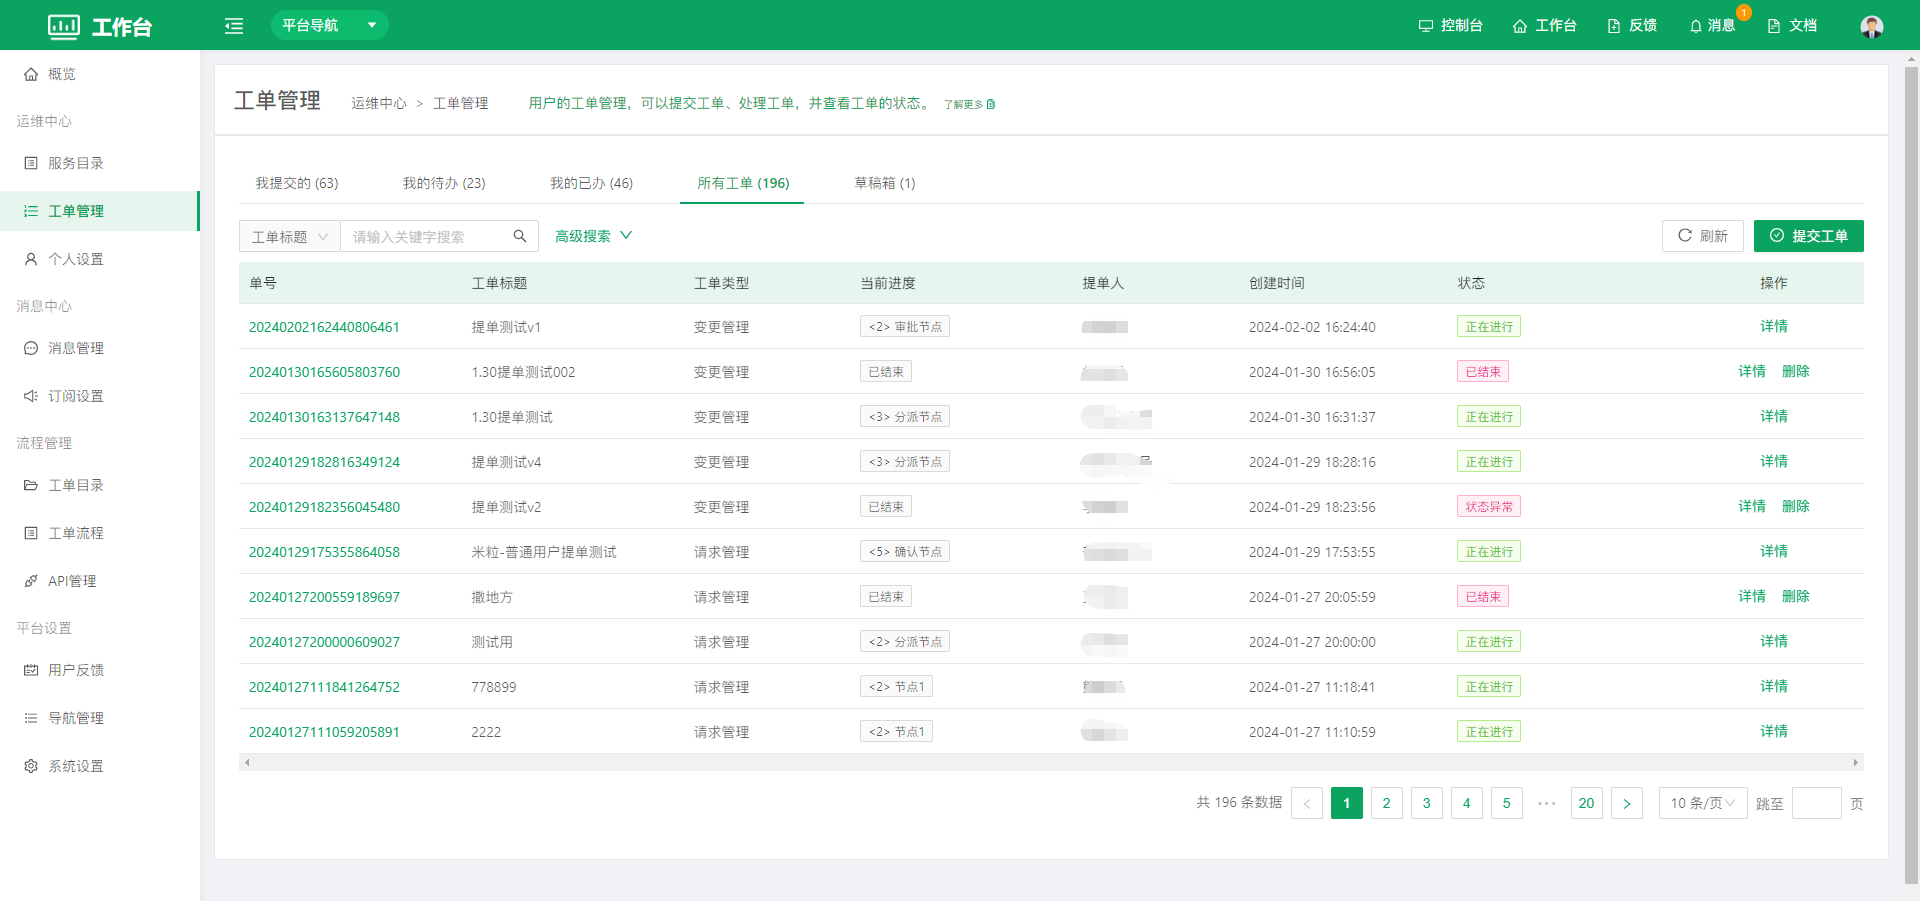
1.2.4 All Tickets
Shows all ticket data, including tickets submitted by the user, tickets processed by the user, and, for administrator roles, the tickets of all users.
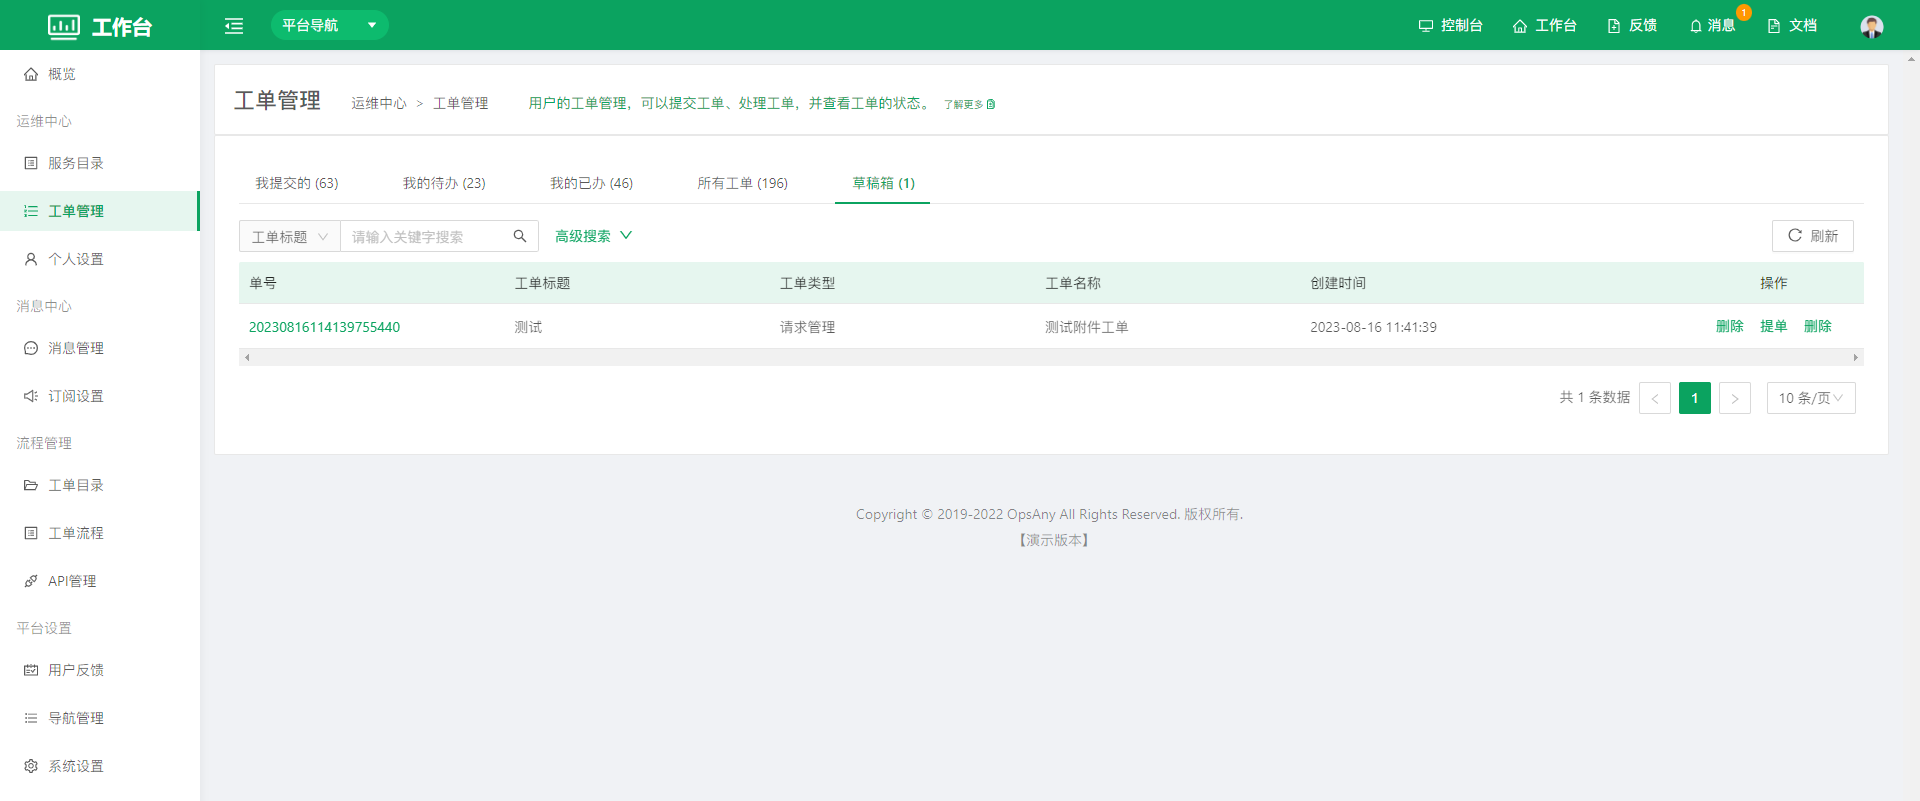
1.2.5 Drafts
Shows the tickets that the current user saved as drafts during ticket submission.
1.3 Task Management
Task management lets users create tasks, process tasks, check task status and create general task templates. It helps enterprises standardize internal management processes and improves communication and management efficiency among internal staff. General task templates can be quickly selected in ticket processes or ticket instances; administrators can create general task templates in advance according to the actual situation of the enterprise.
1.3.1 My To-dos
Shows the pending tasks of the current user. Click Start Processing in the actions column to process a pending task quickly.
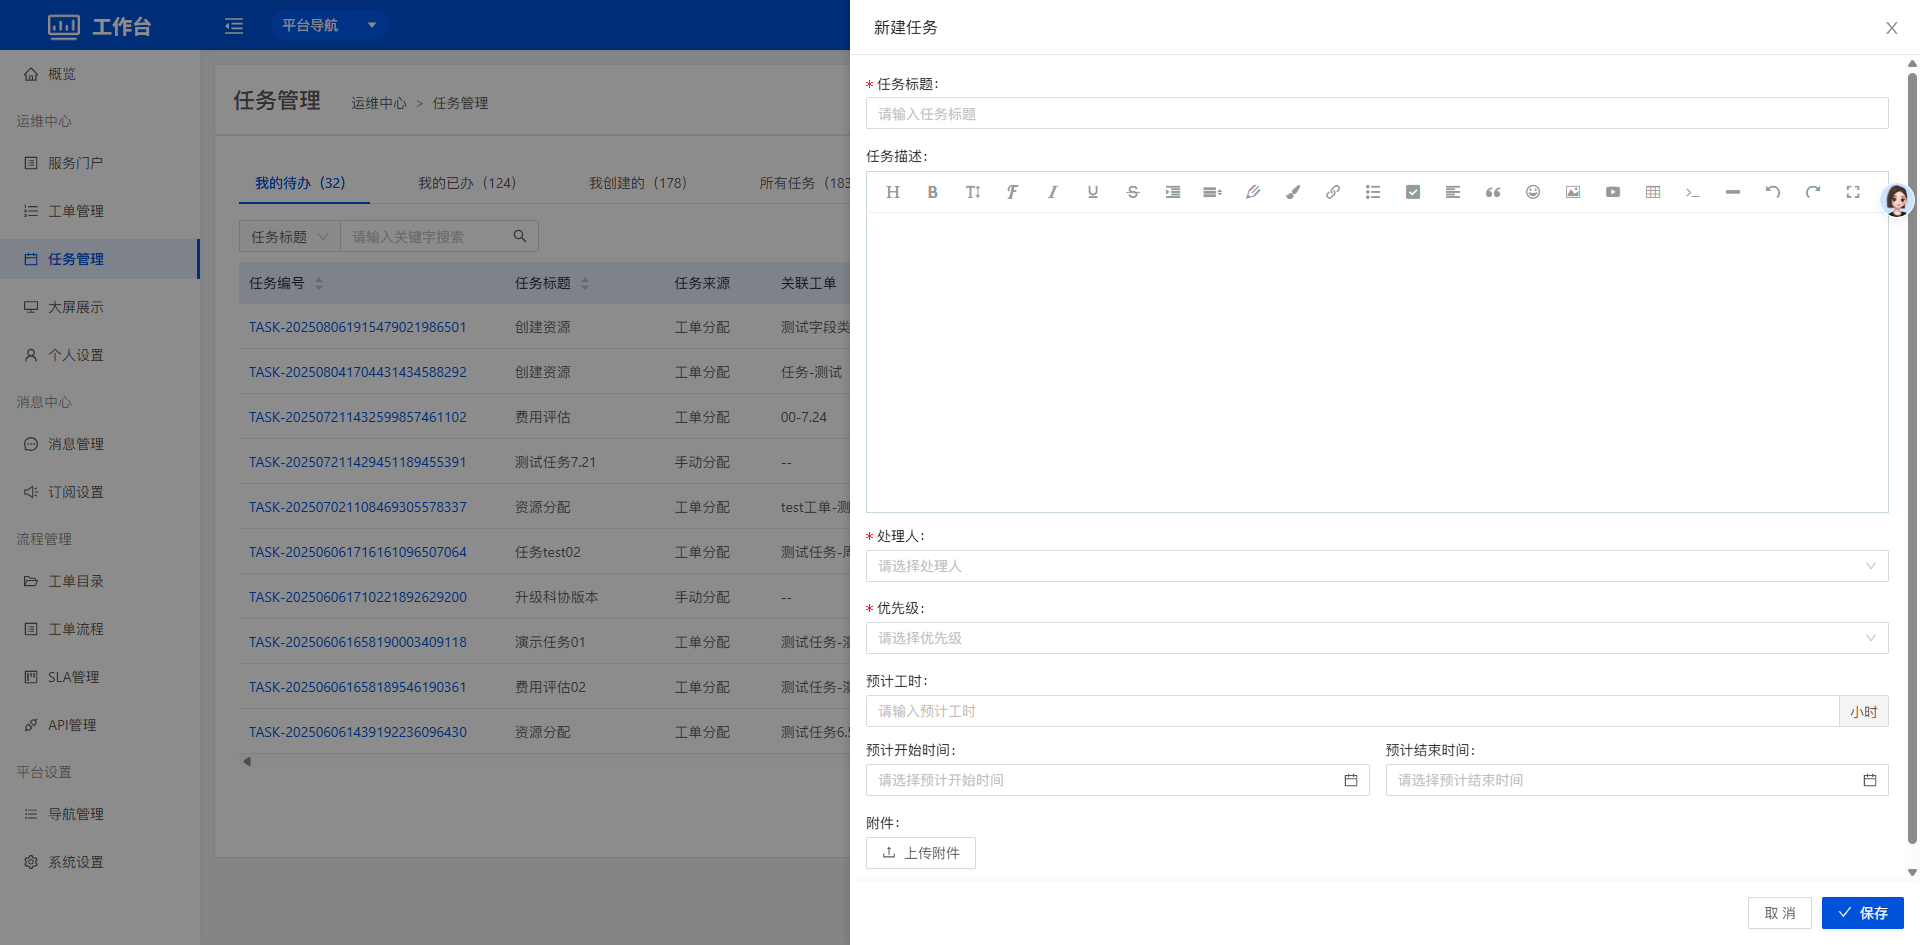
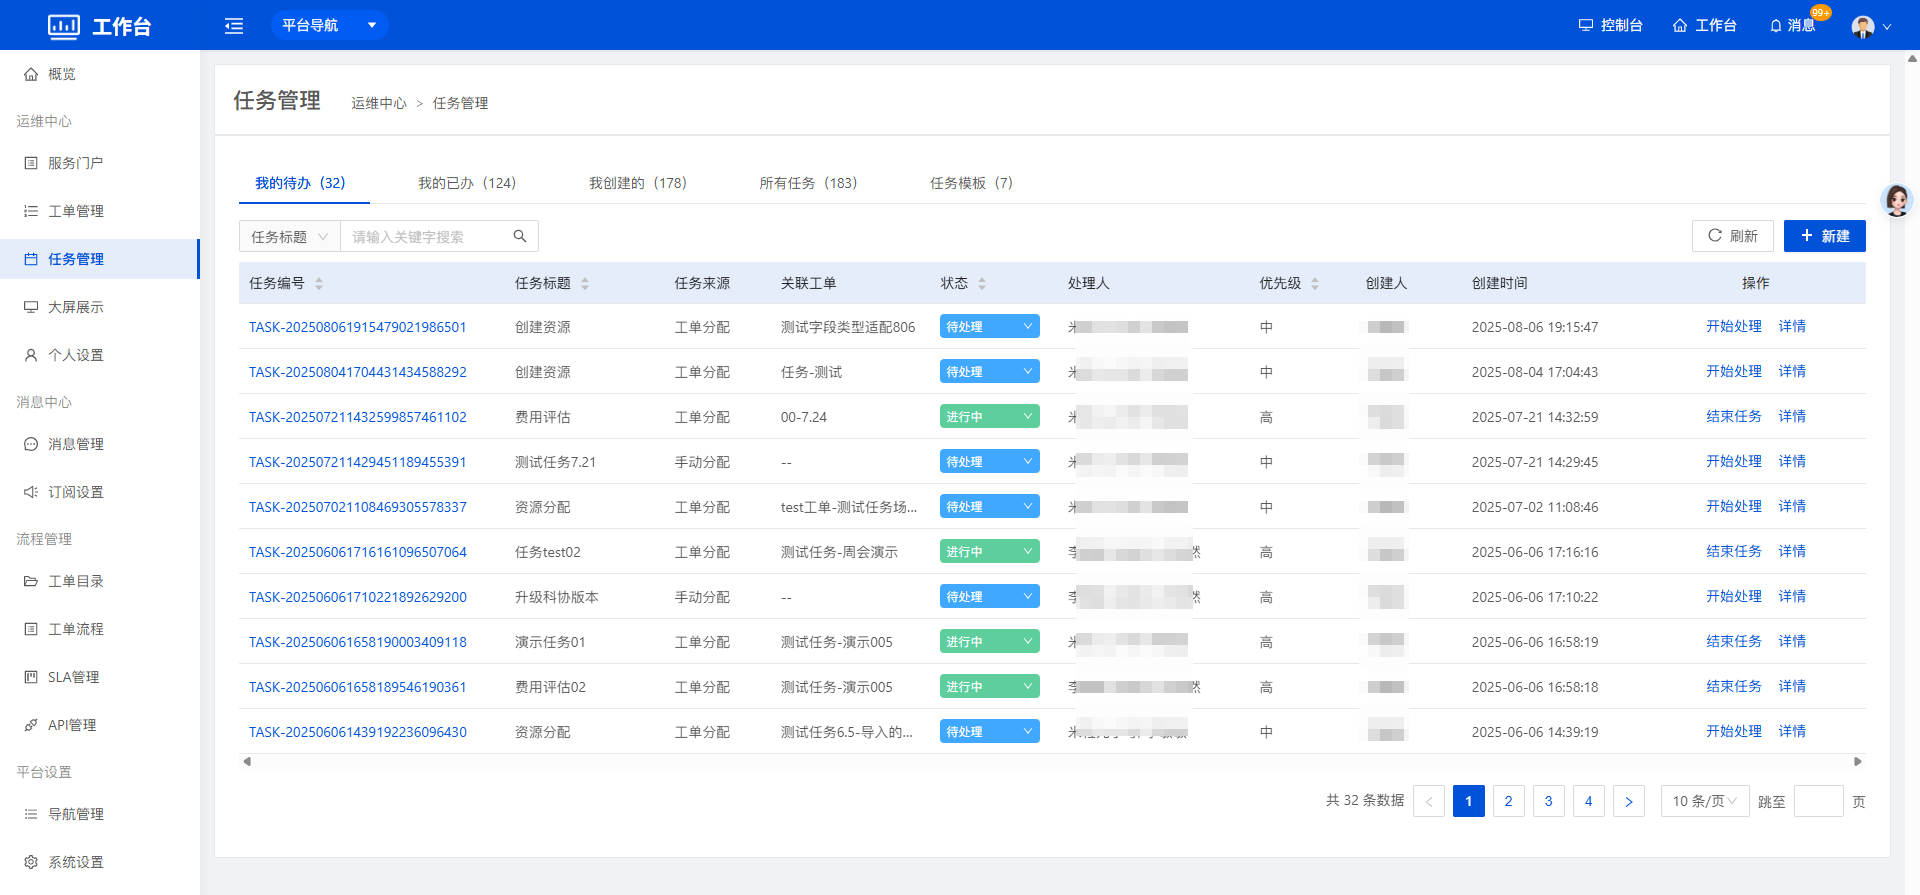 - Click Create to open the create task drawer and create a task by filling in the relevant fields.
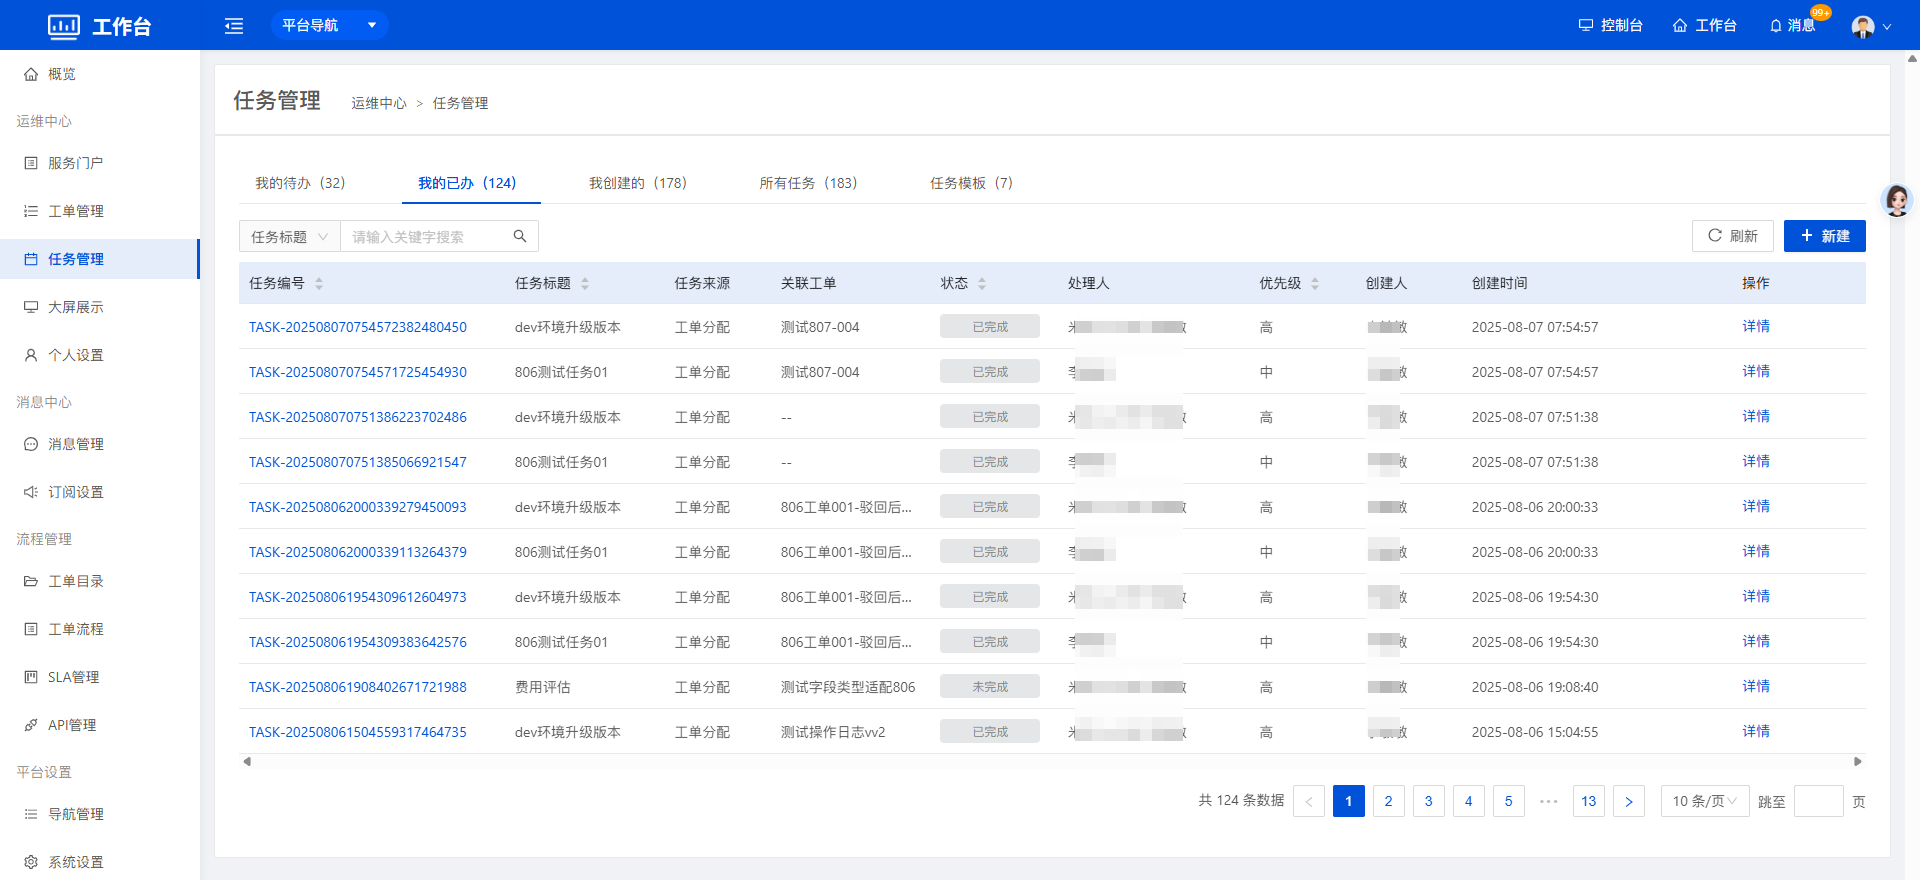
1.3.2 Processed by Me
Shows the tasks processed by the current user.
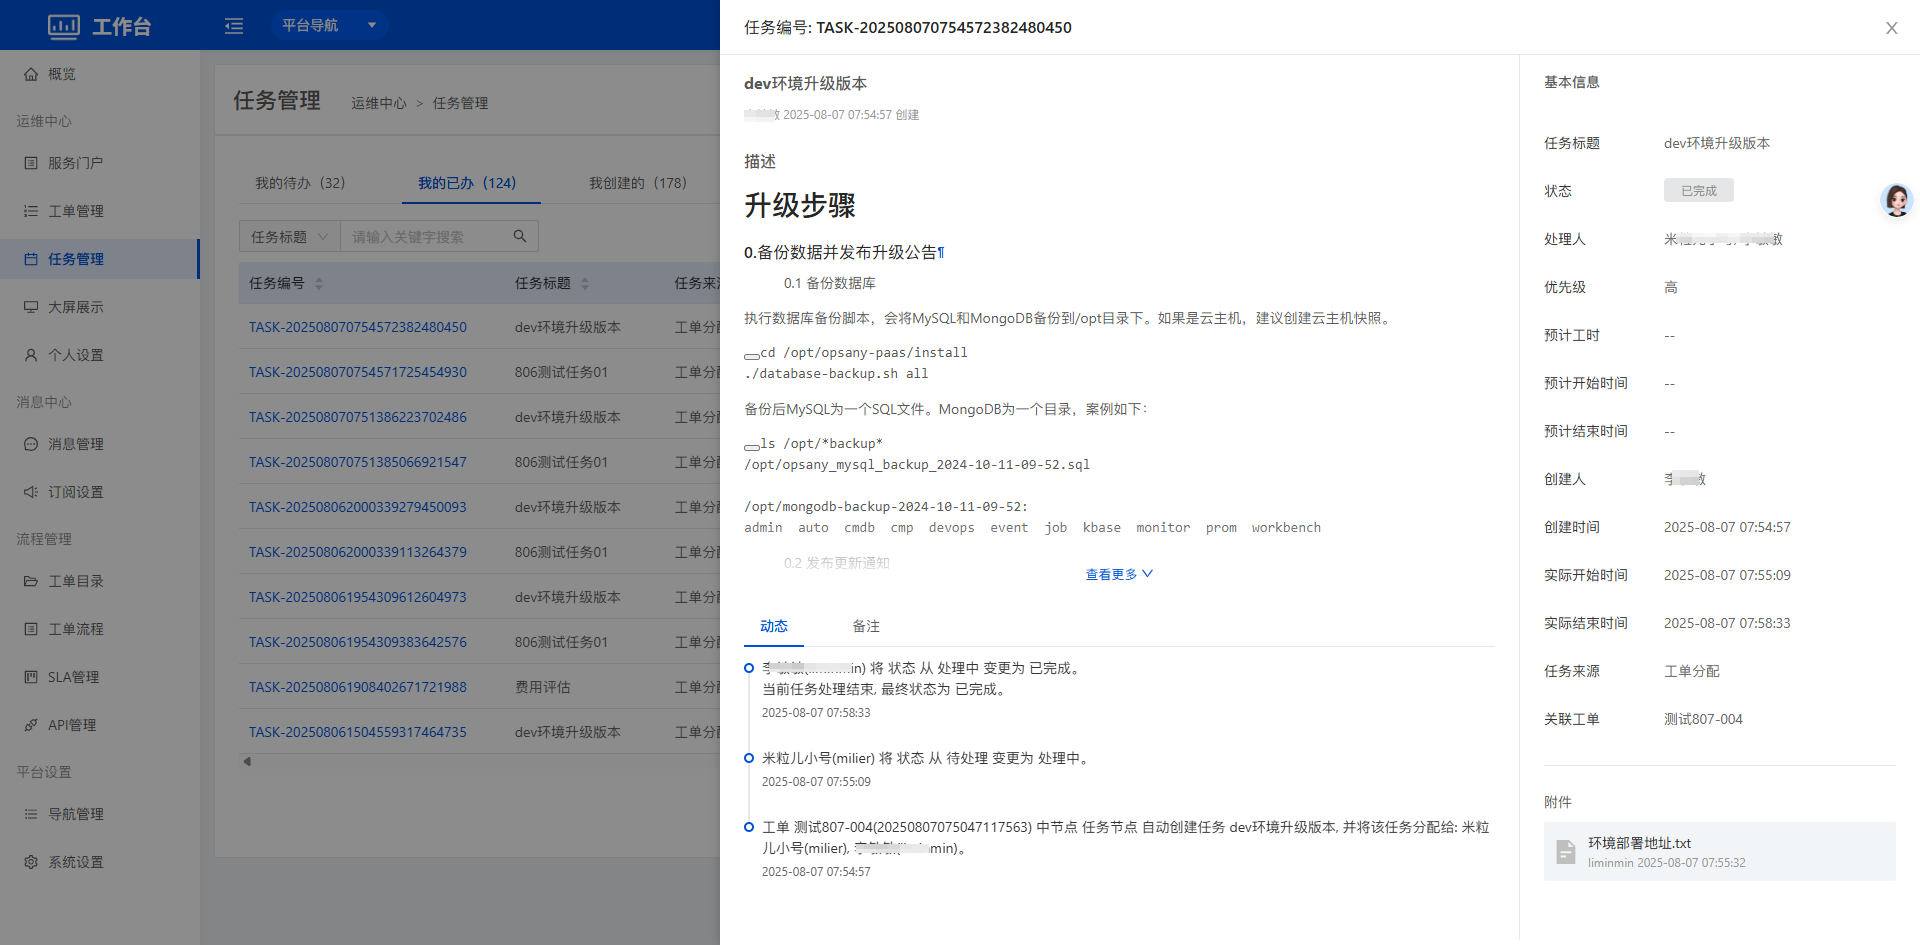
 - Click Details in the actions column to view information about the task.
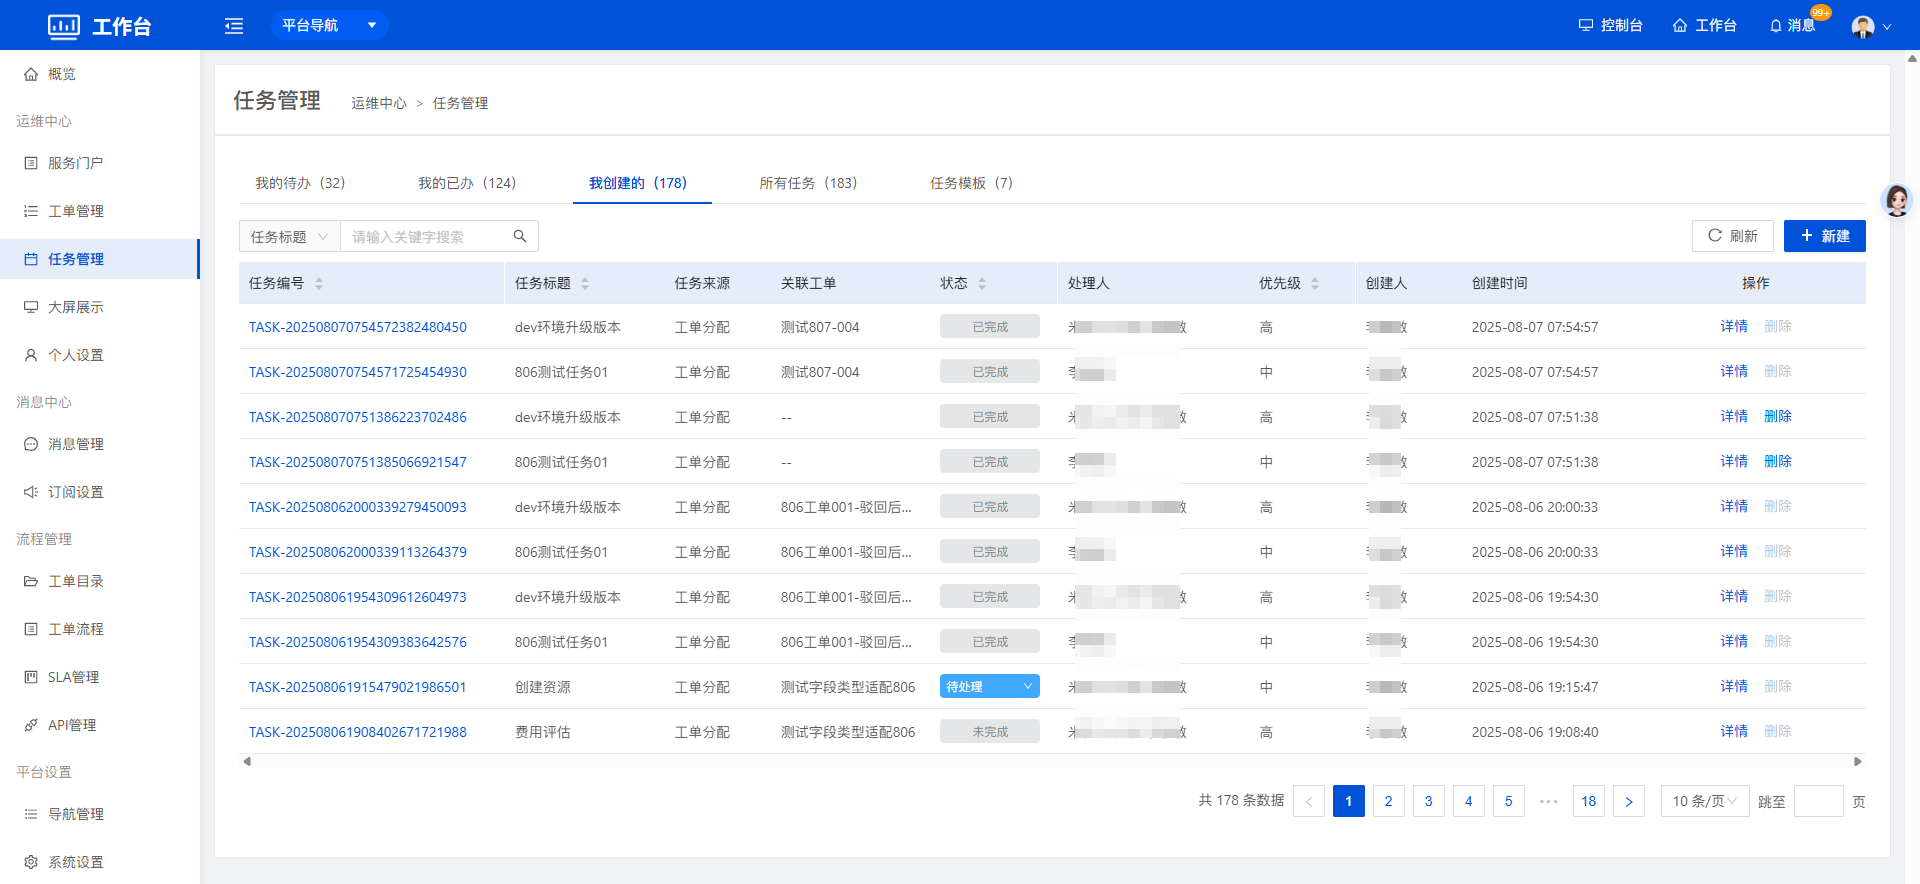
1.3.3 Created by Me
Shows the tasks created by the current user. Tasks that the user created and that are not associated with a ticket can be deleted.
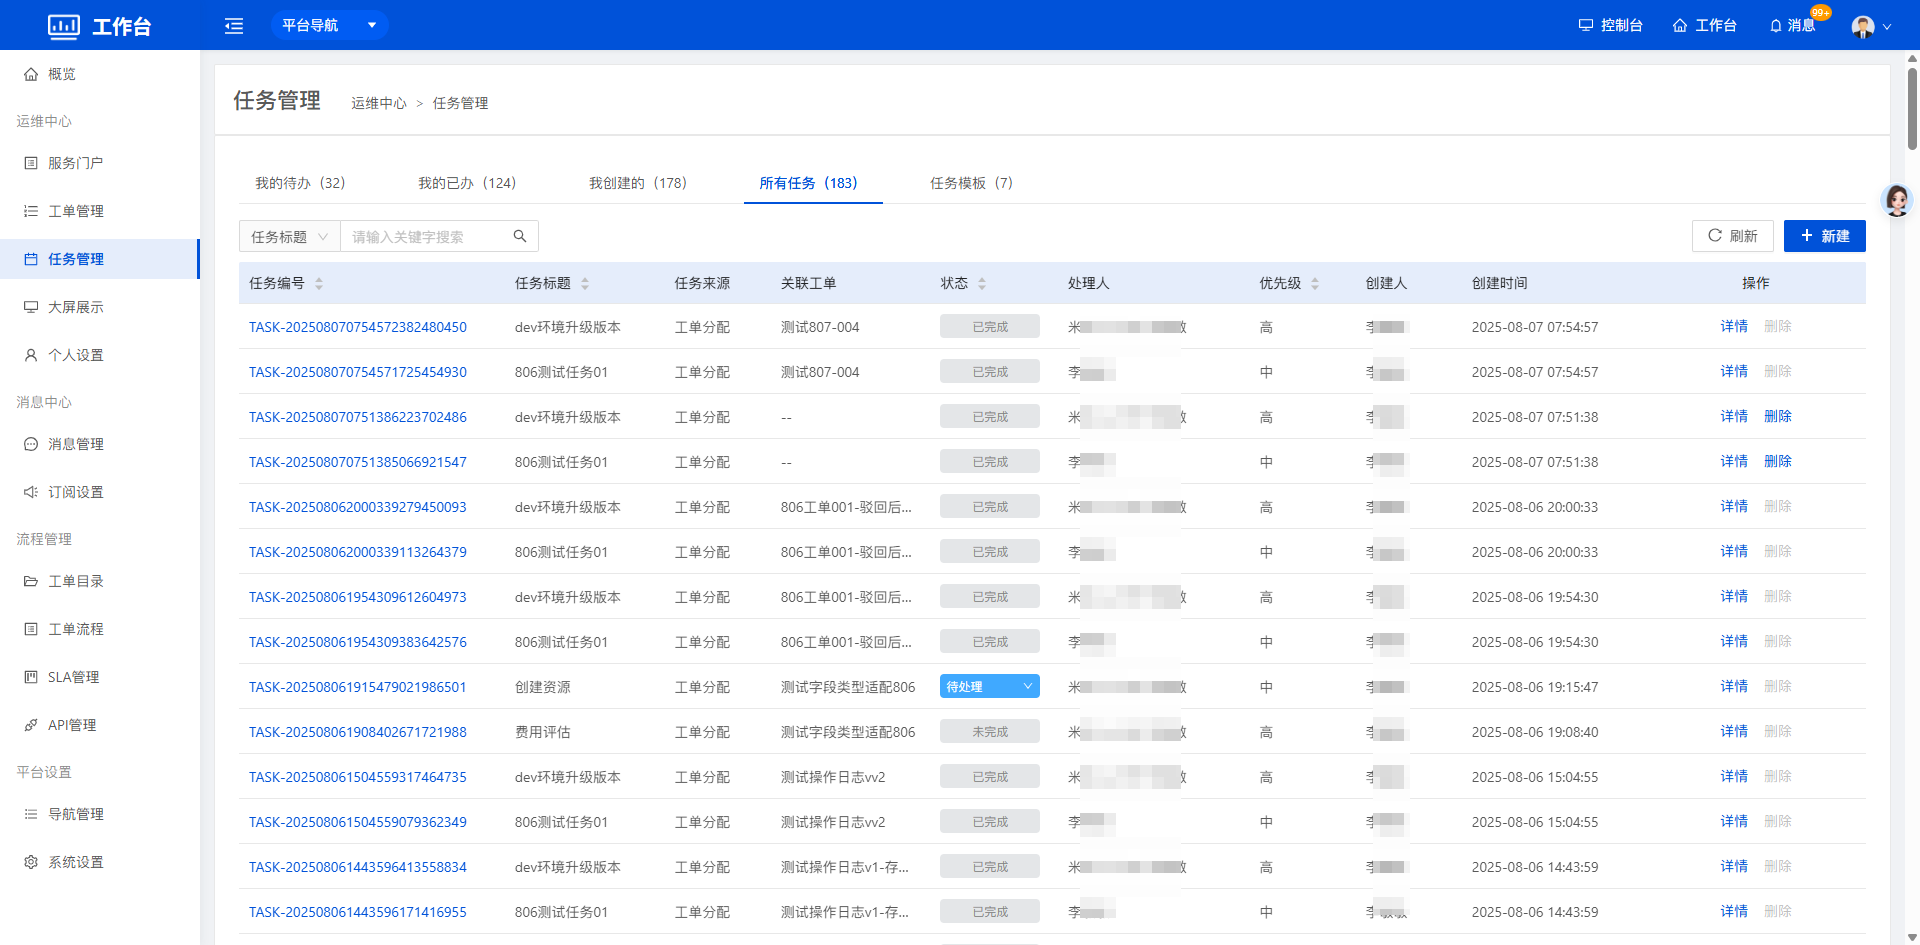
1.3.4 All Tasks
Shows all task records that the current user is authorized to view.
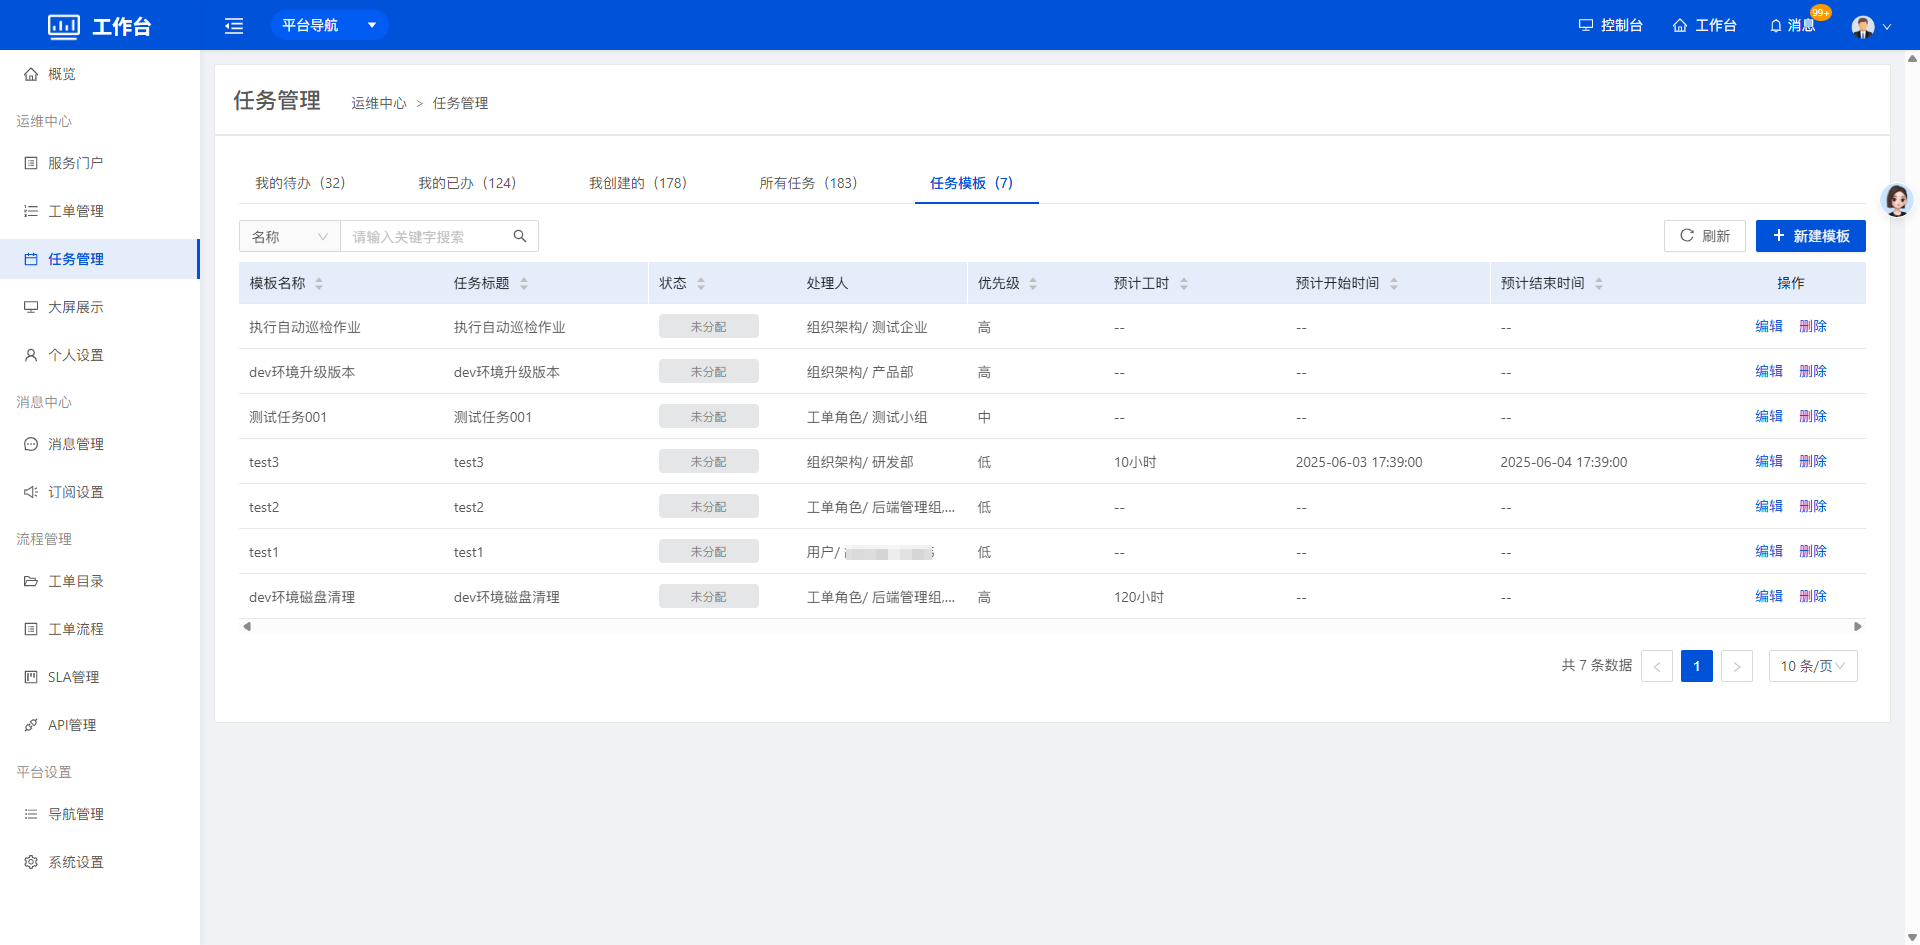
1.3.5 Task Templates
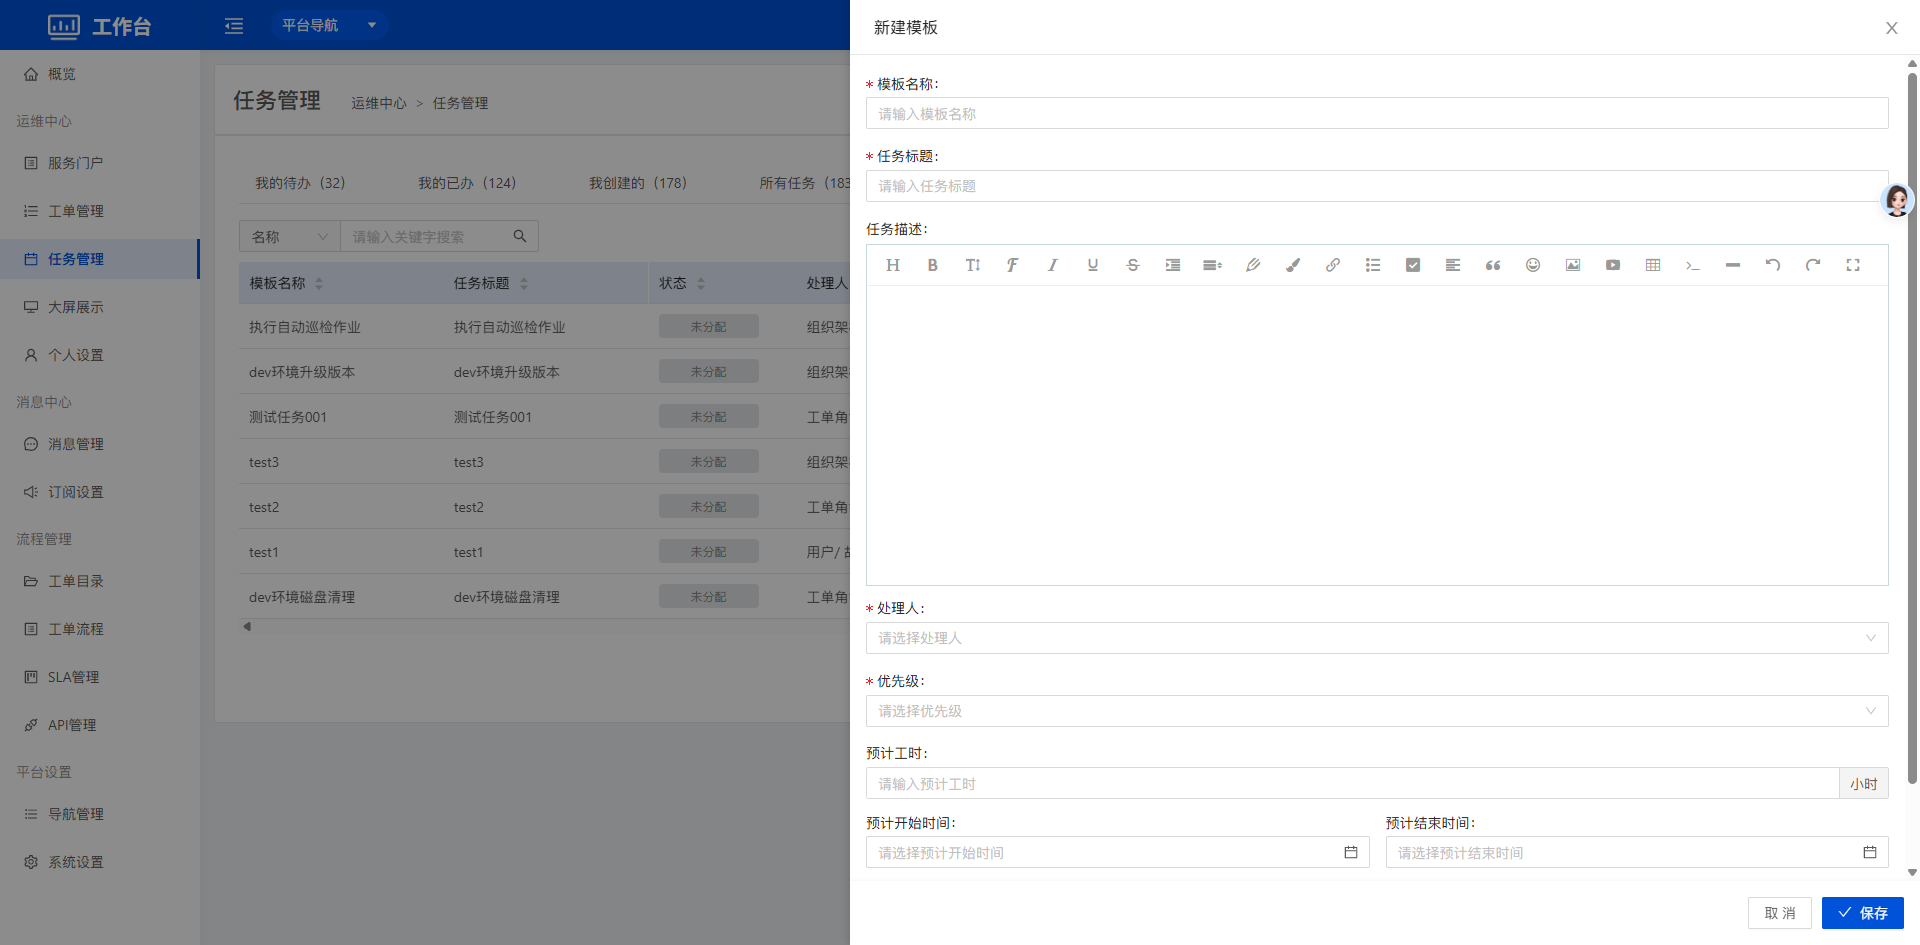
Shows the current general task templates. Administrators can create custom task templates. Templates created here can be quickly selected in ticket processes or ticket instances.
 - Click Create Template to open the create template drawer and create a template by filling in the fields on the page.
1.4 My On-call
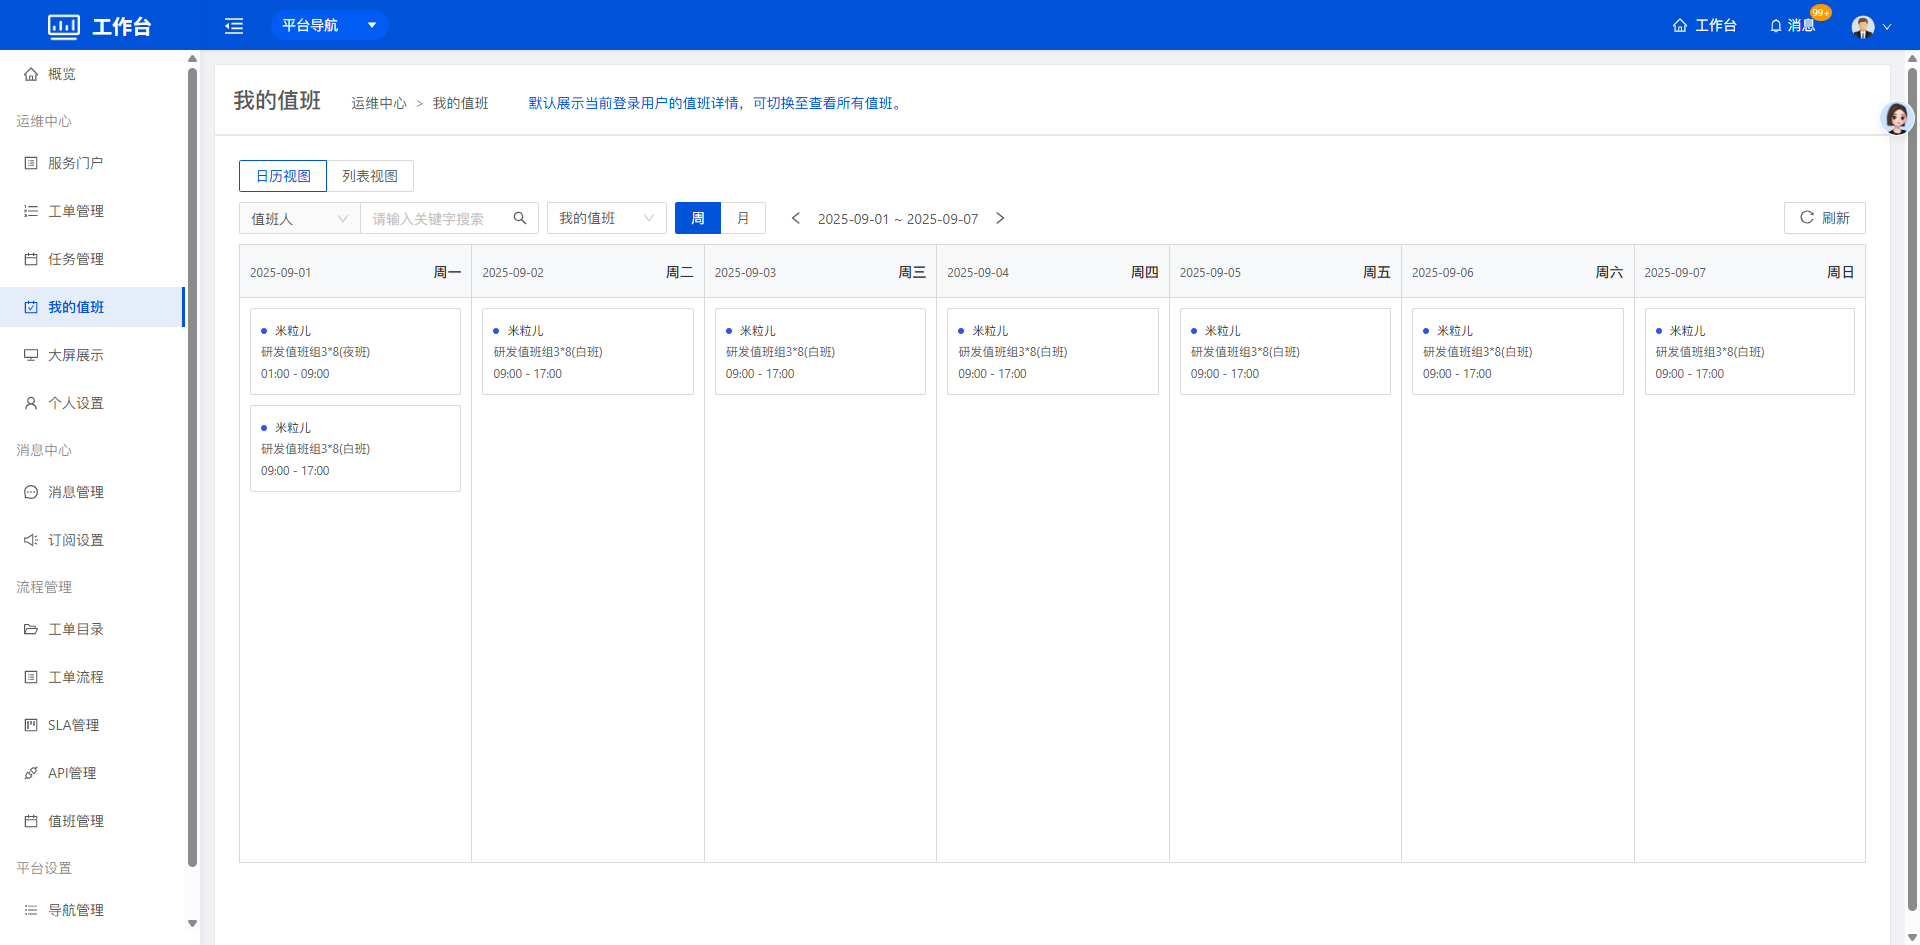
By default, shows the on-call details of the current logged-in user; you can switch to view all on-call schedules. On-call details are available in both calendar view and list view.
1.5 Dashboard
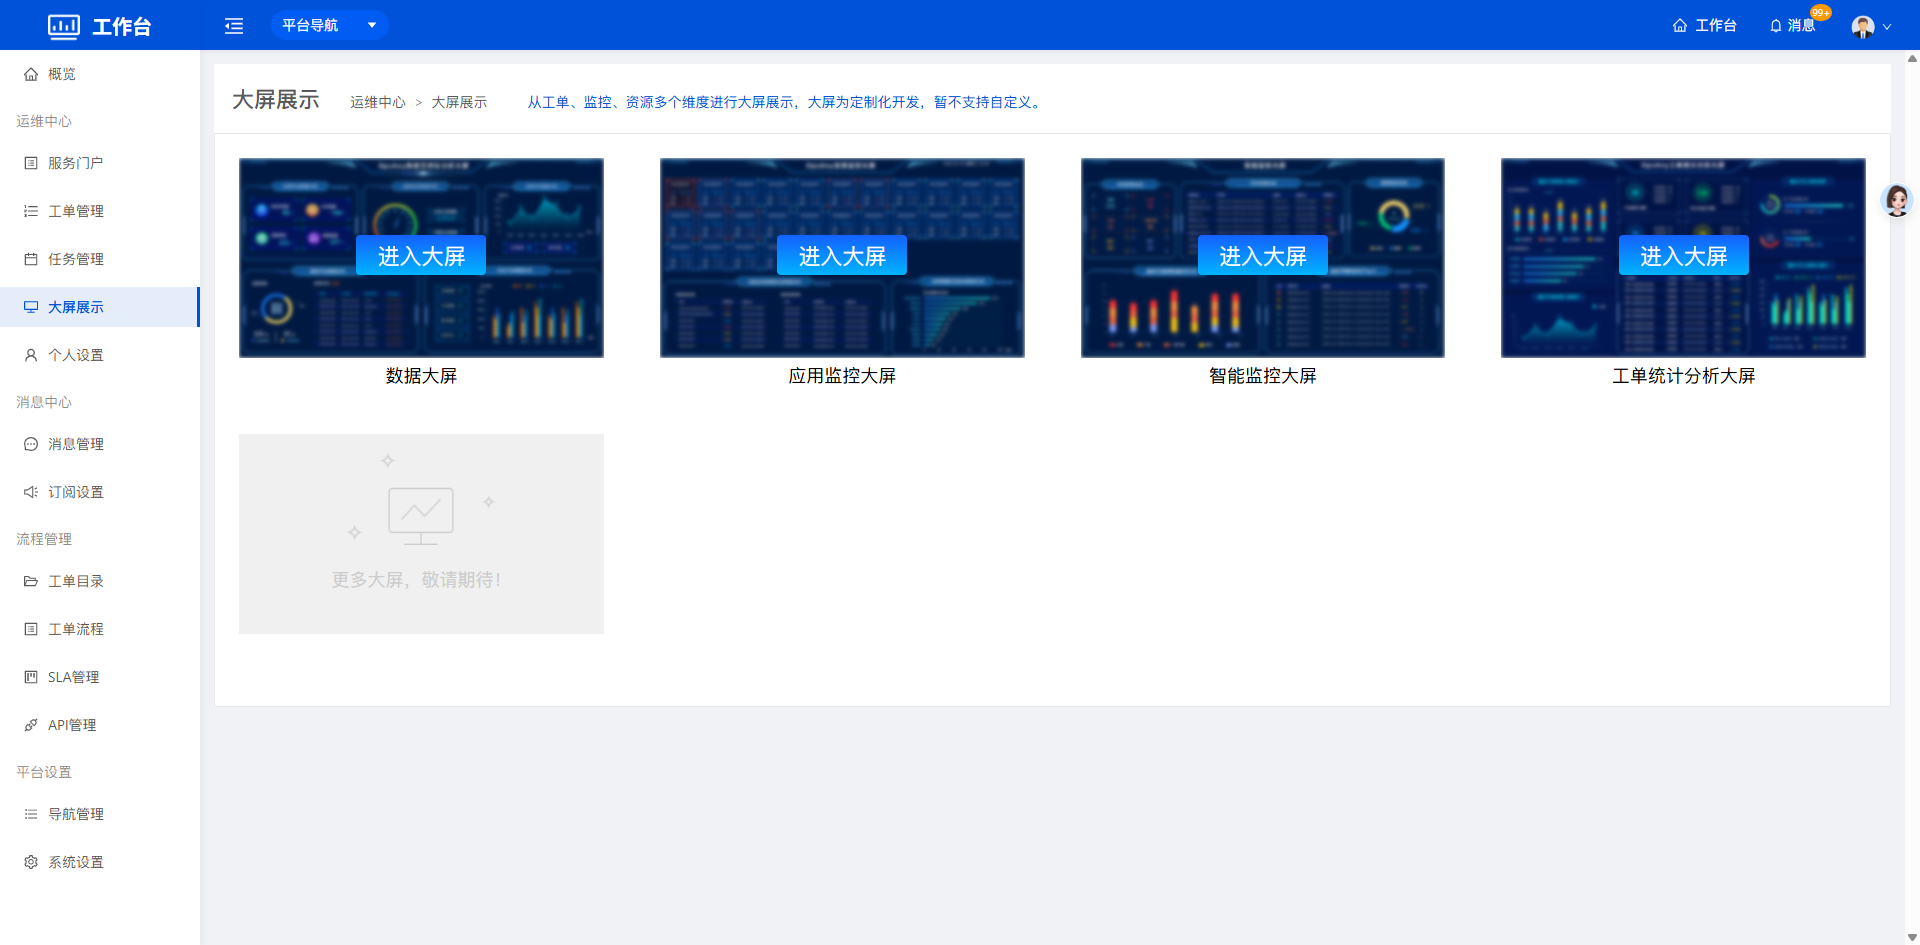
Displays a large-screen dashboard from multiple dimensions such as tickets, monitoring and resources. The dashboard is custom-developed and does not currently support customization.
1.6 Personal Settings
Personal settings include the user's platform profile, password change, MFA, notifications and other related settings. The user's profile and configuration are mainly used for sending mobile SMS, email, WeCom and DingTalk messages. The sources of such messages include alerts from the Monitor Platform, ticket progress messages and so on.
1.6.1 Basic Information
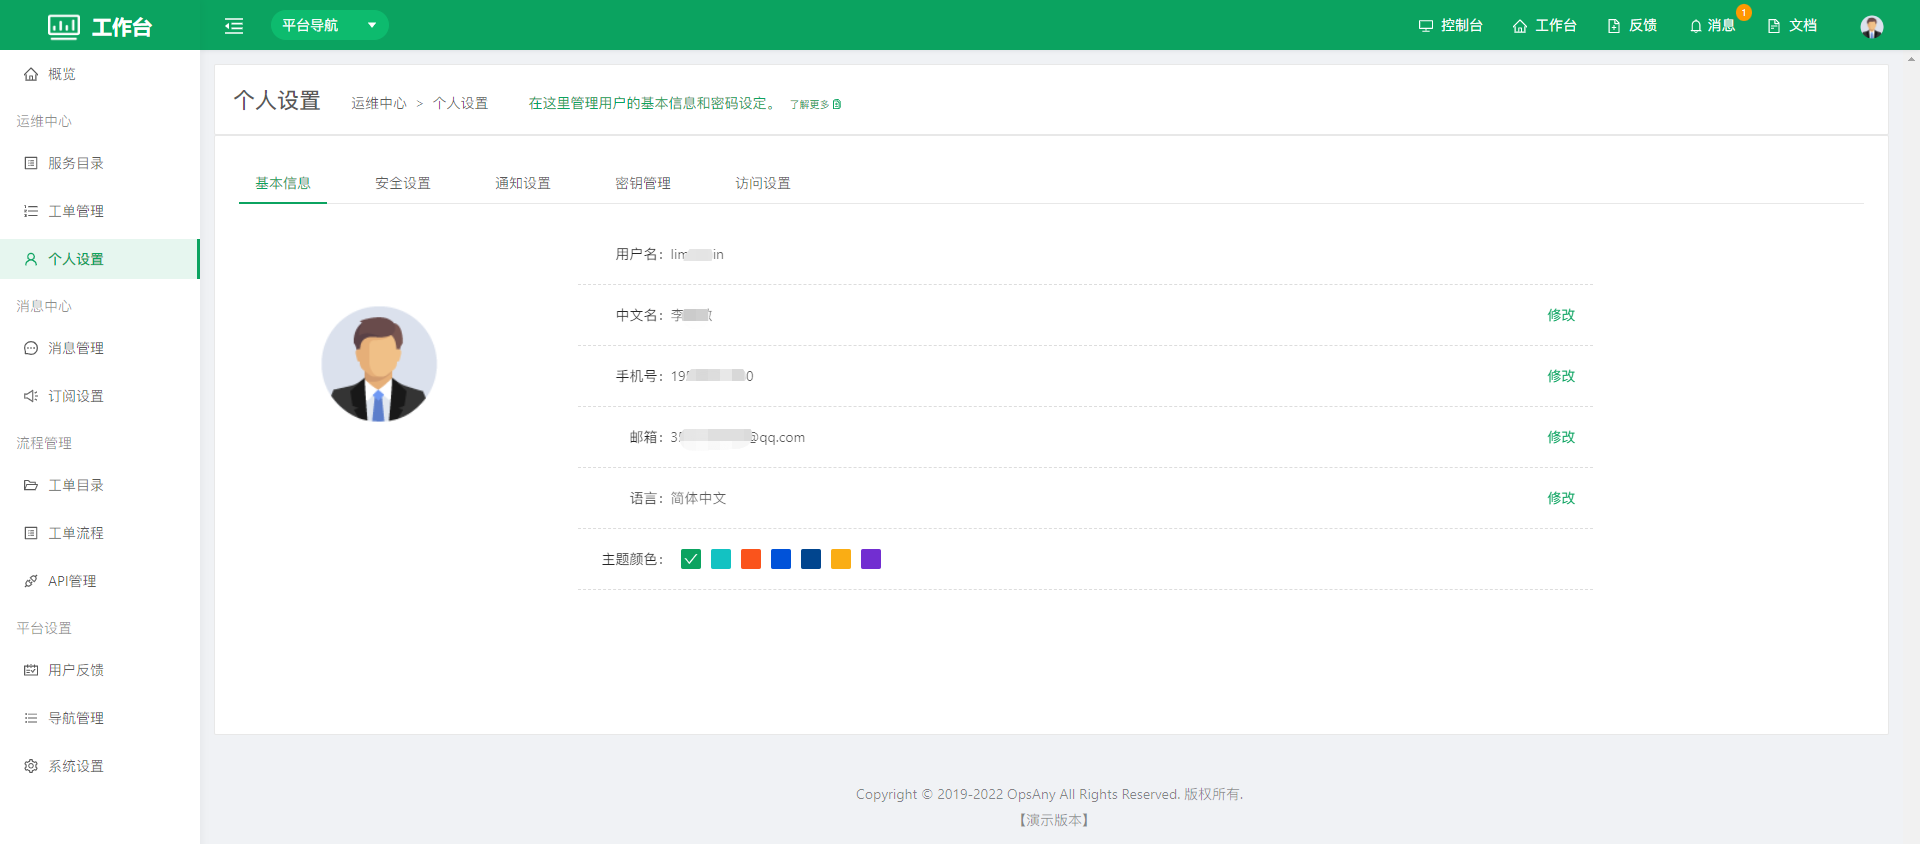
In the basic information section, users can change their display name, mobile number and email, switch the platform language and choose the platform theme color. The username cannot currently be changed.
1.6.2 Security Settings
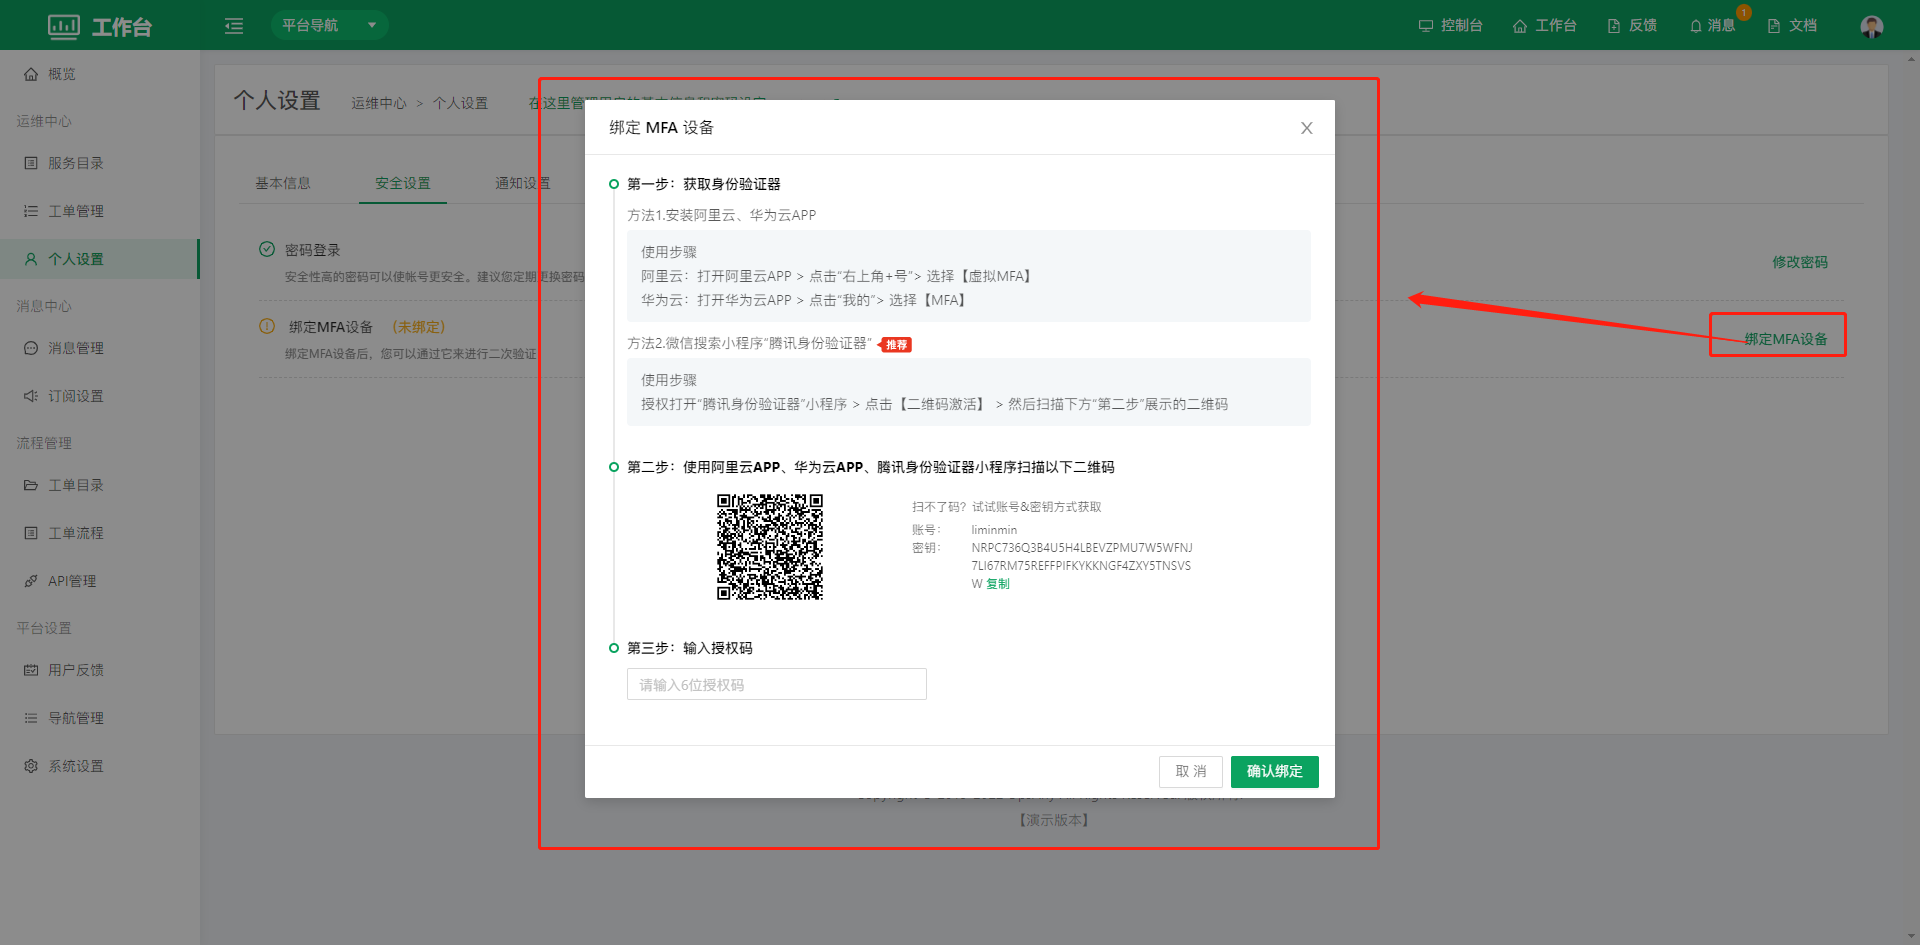
Users can change their platform login password and bind an MFA device for secondary security verification.
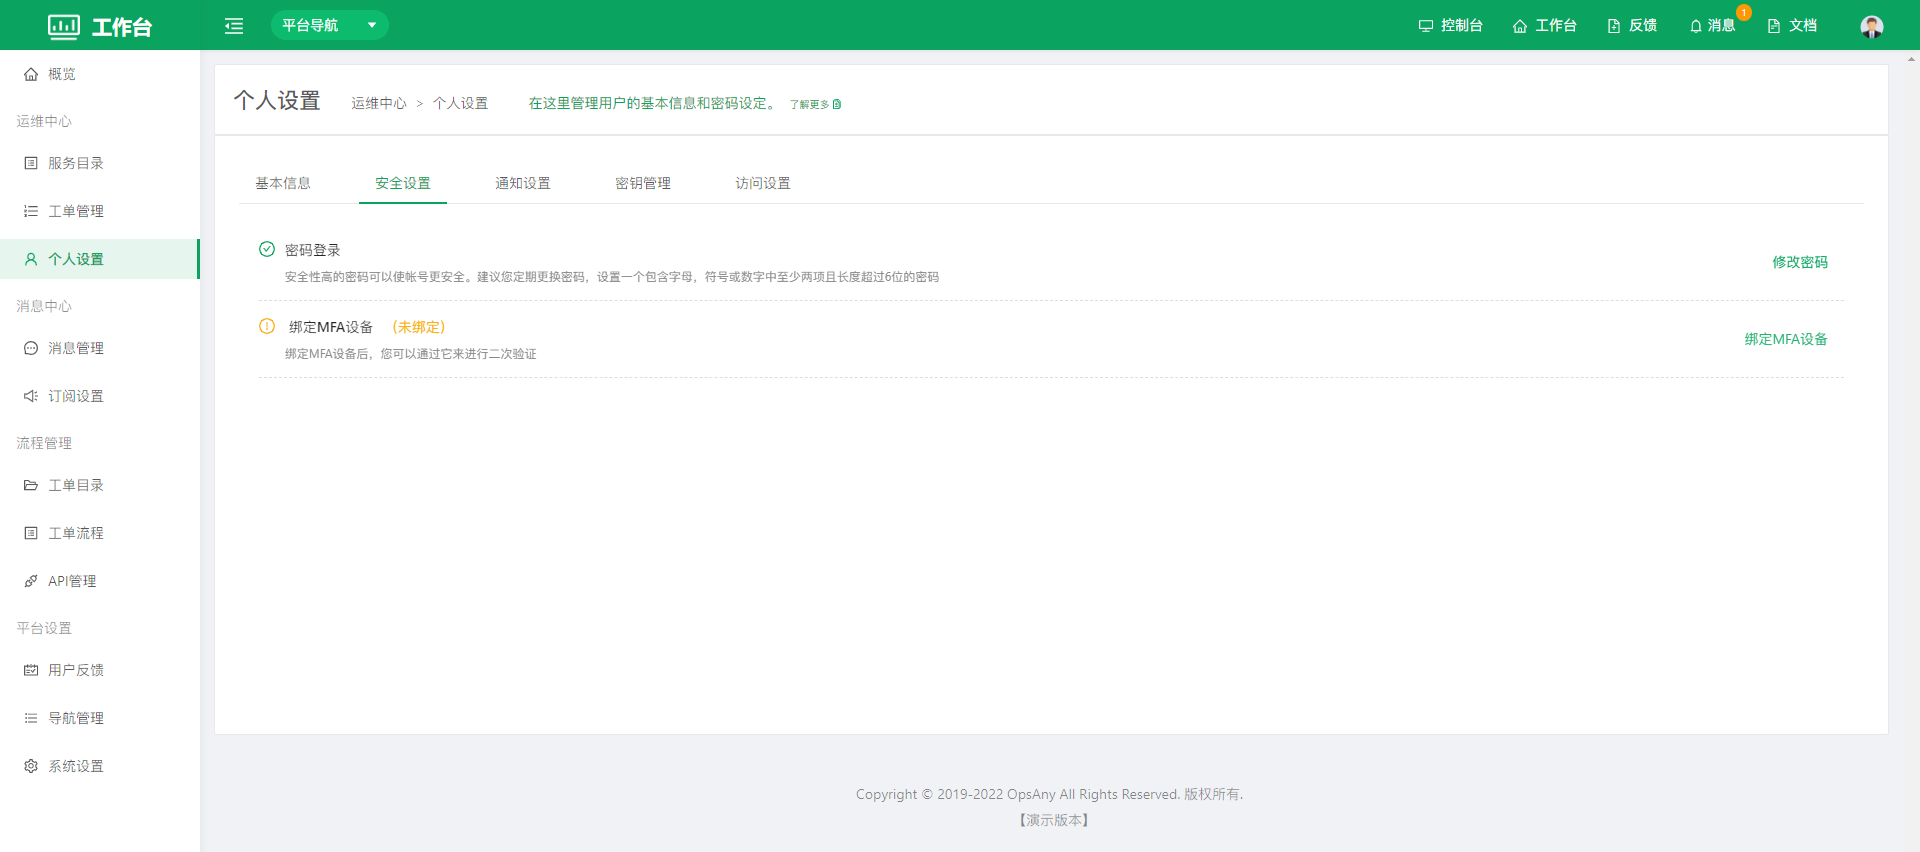
- Click Bind MFA Device and complete the binding according to the information in the dialog box.
1.6.3 Notification Settings
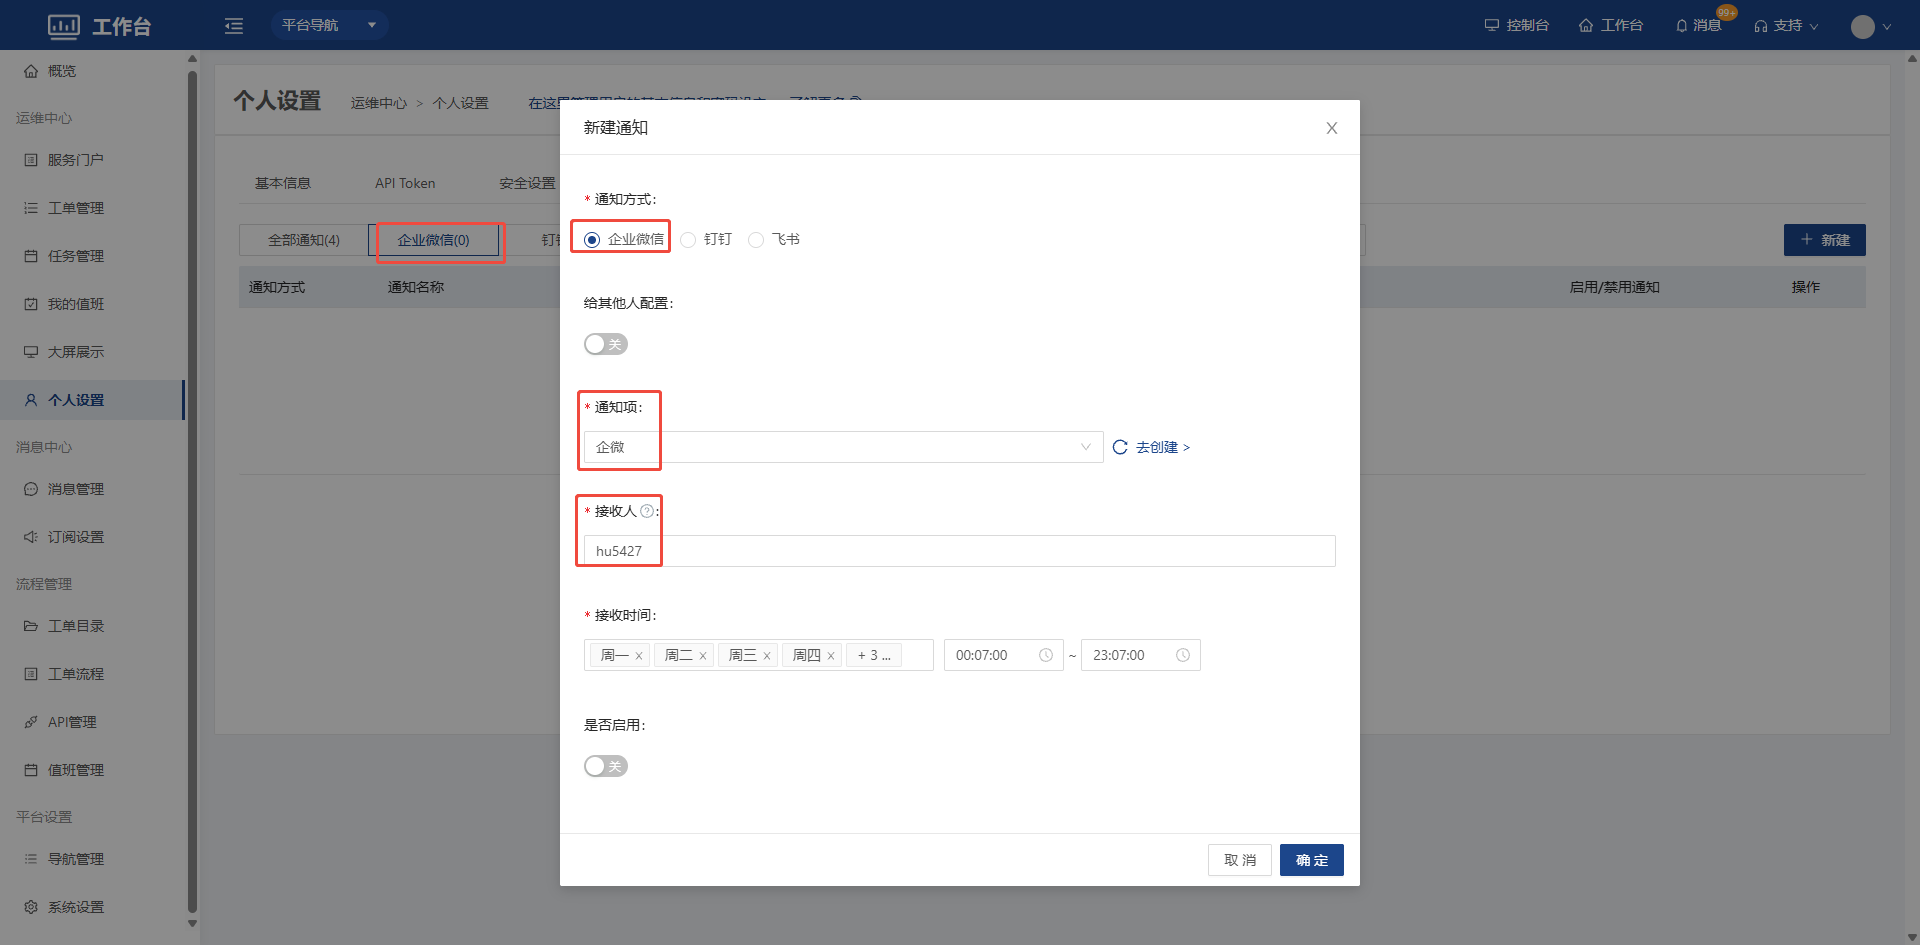
Configure WeCom and DingTalk notifications by selecting the WeCom or DingTalk application configured in System Settings and specifying the recipients. To obtain recipients (account or user UserID), go to System Settings to configure WeCom or DingTalk.
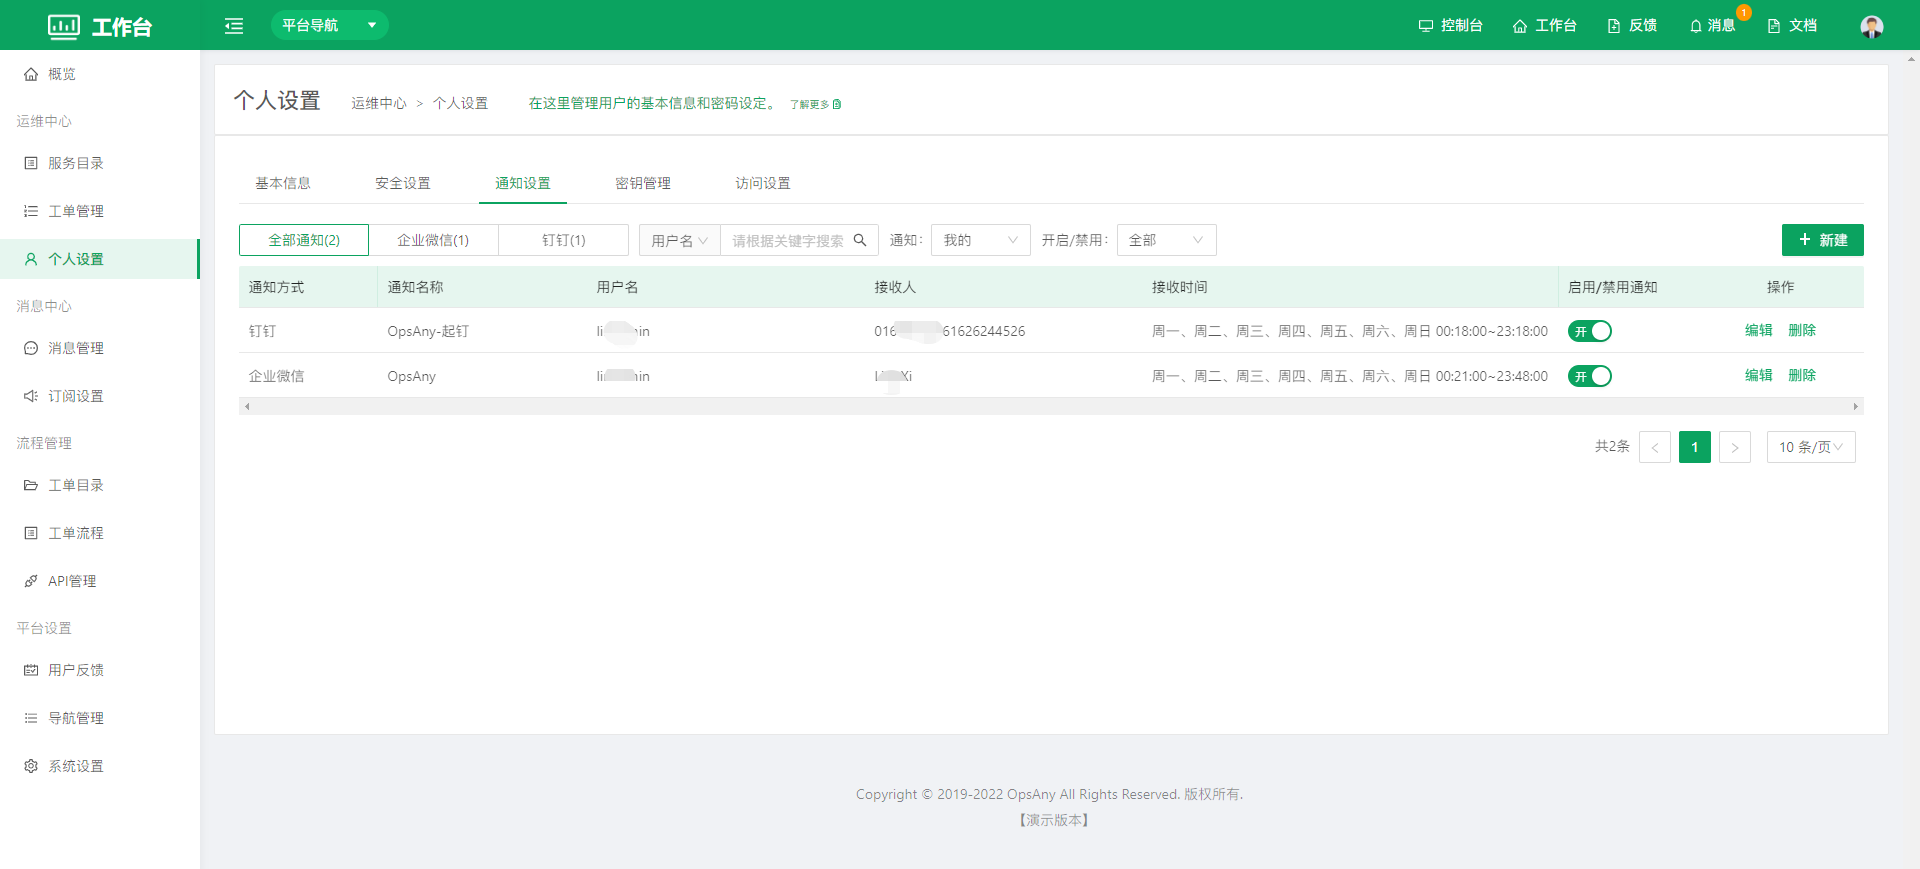
- Click Create to configure a notification method,
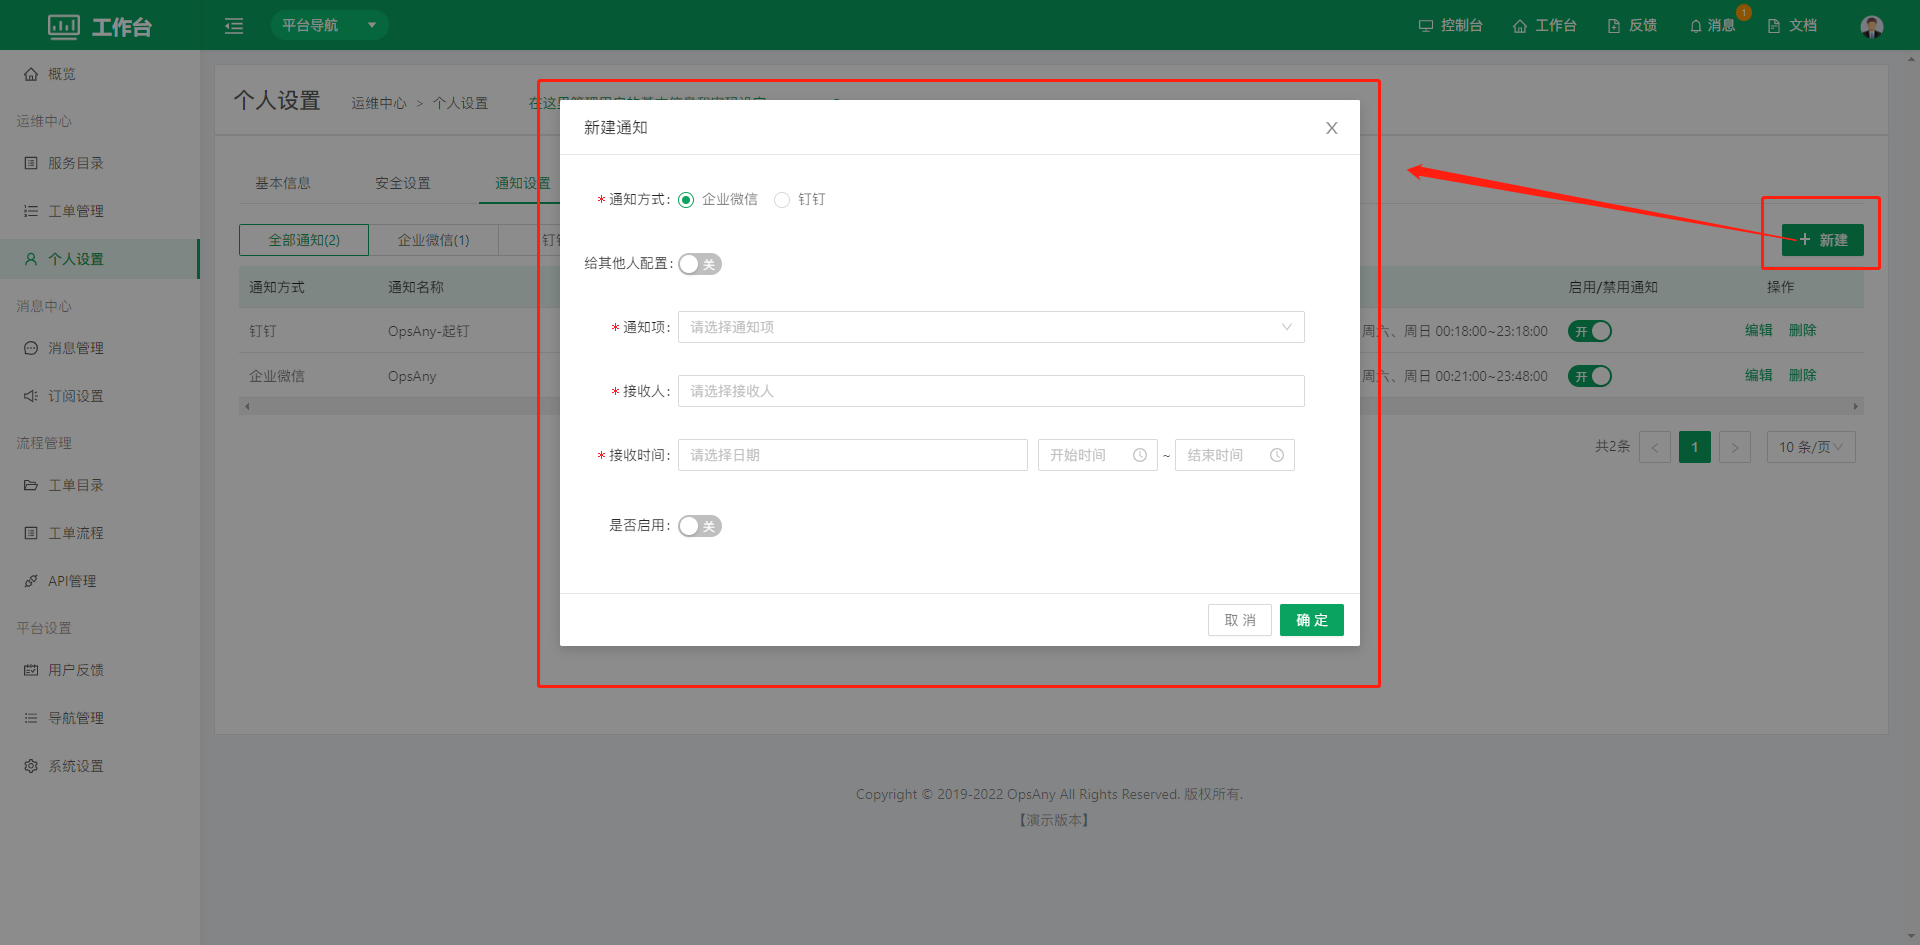 Select WeCom or DingTalk as the notification method and complete the notification configuration according to the fields in the dialog box.
1.6.4 Credential Management
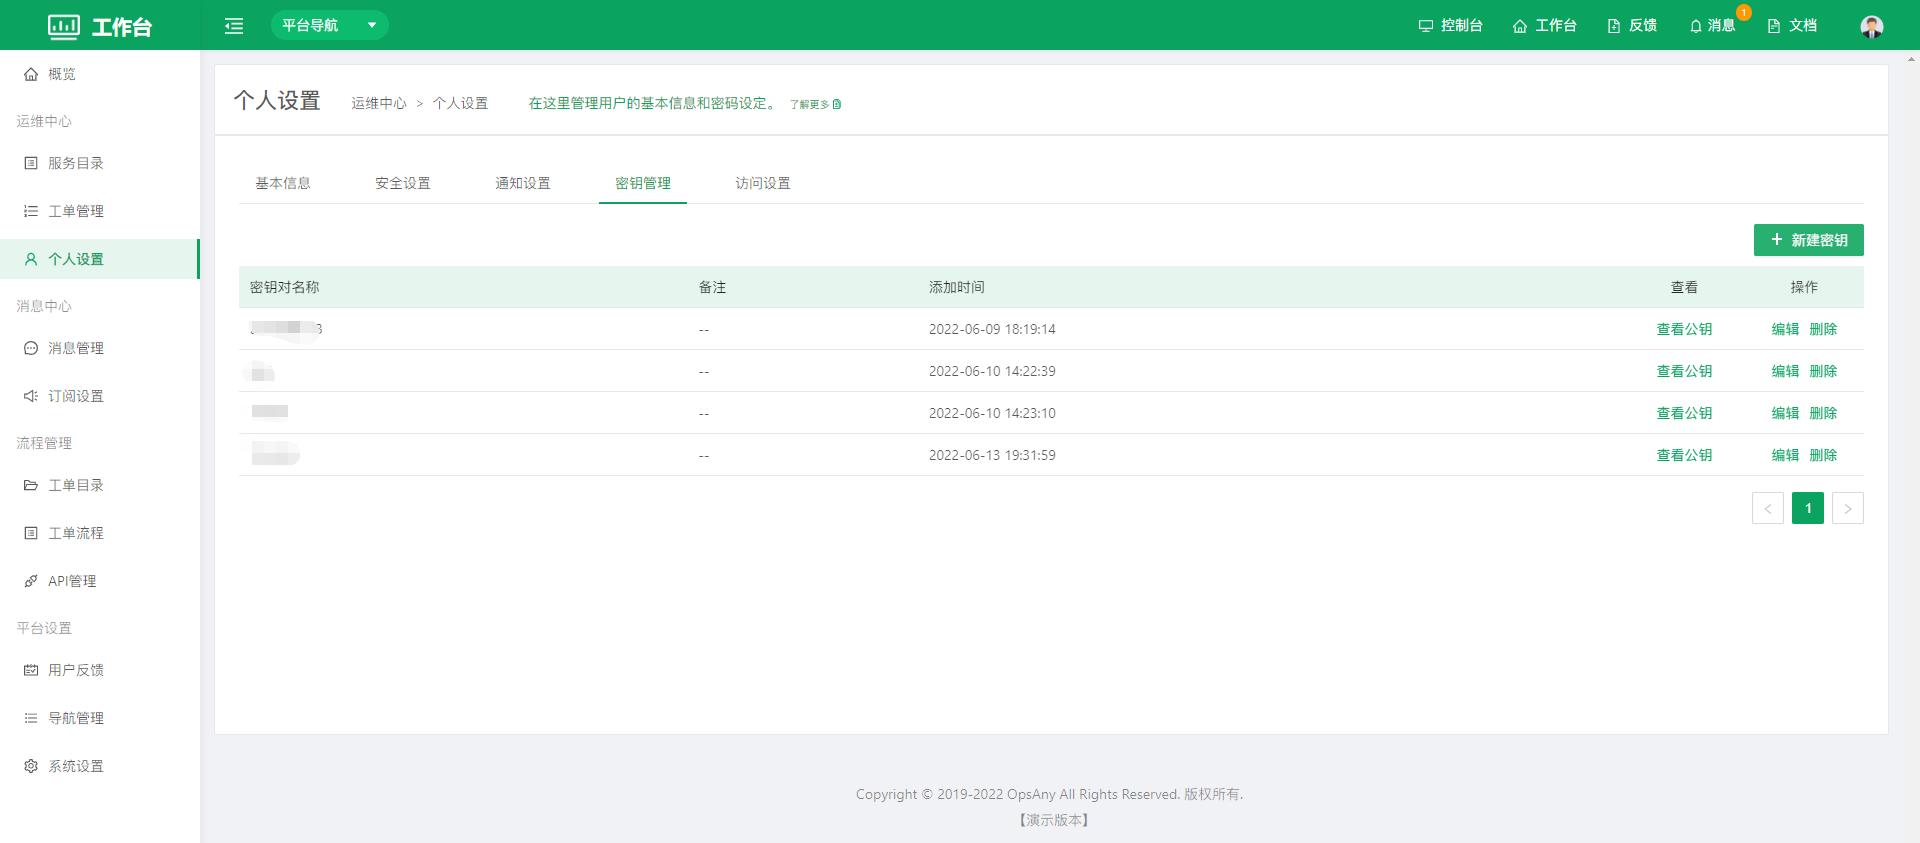
Credentials are mainly used when users manage cloud hosts, physical machines and virtual machines. You can upload the private key to the platform and save the public key in the corresponding system.
Use cases
When adding a host on the host management page of the Control Platform, select Credential as the authentication method and a credential selection box appears.
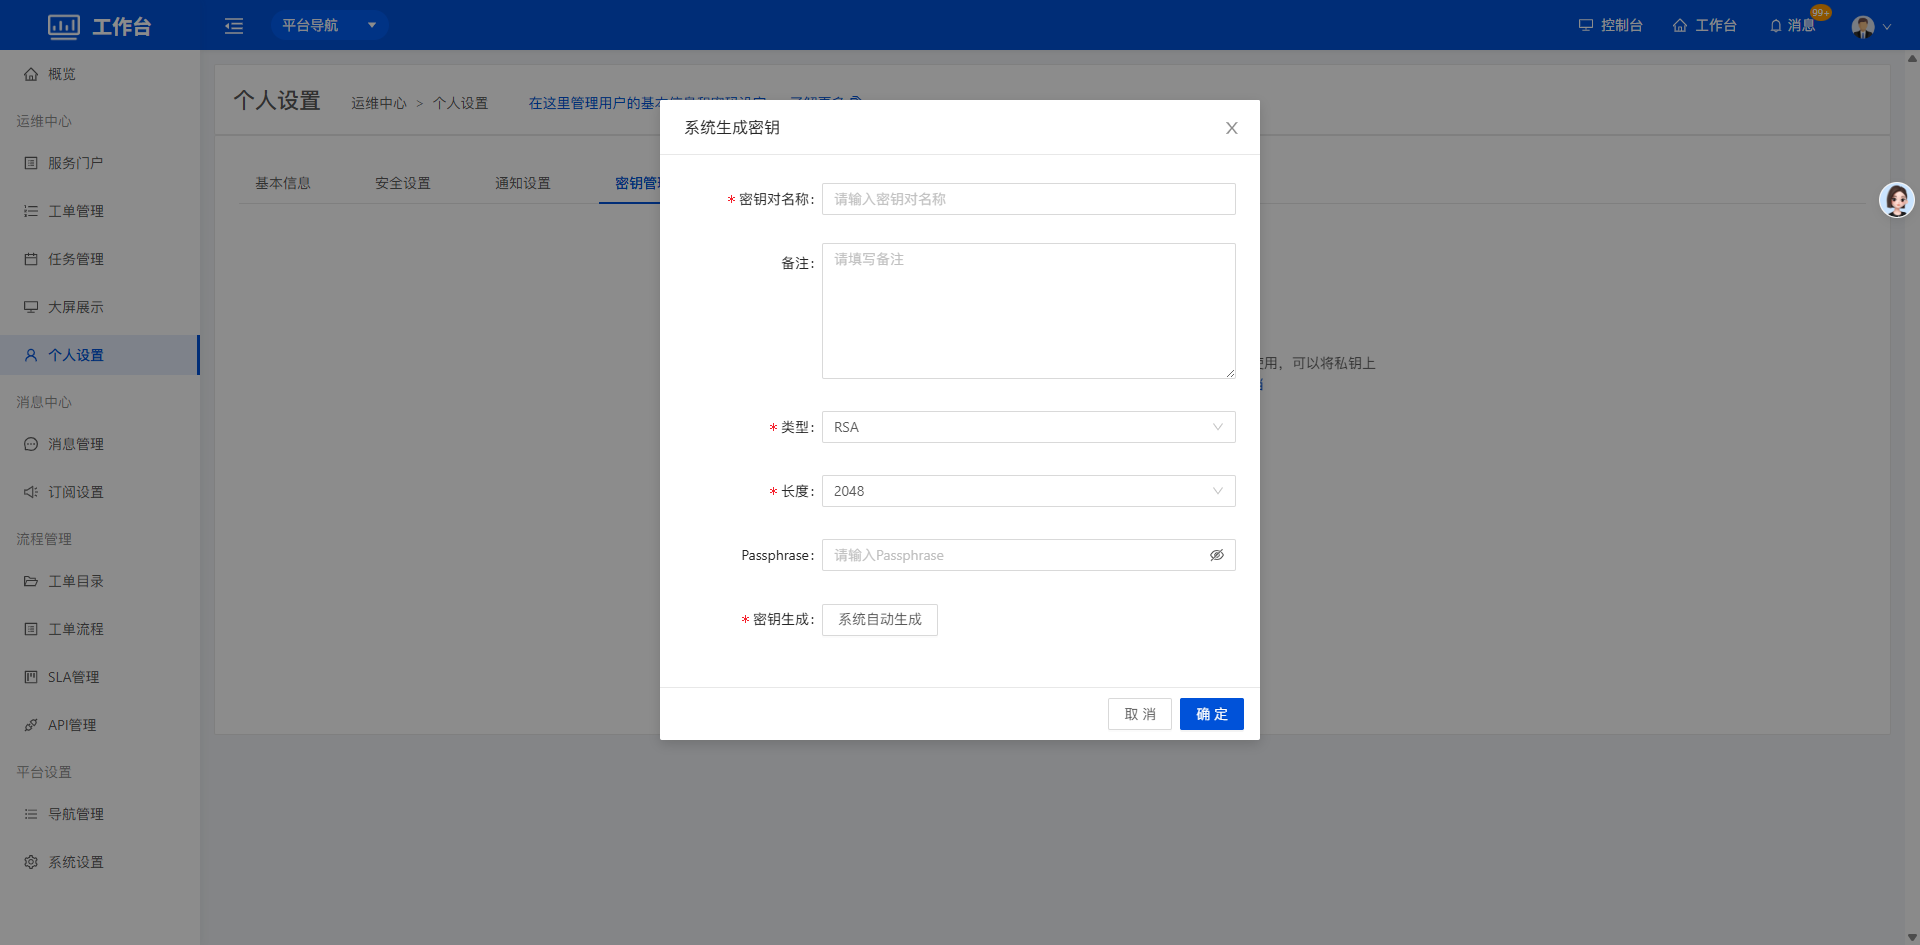
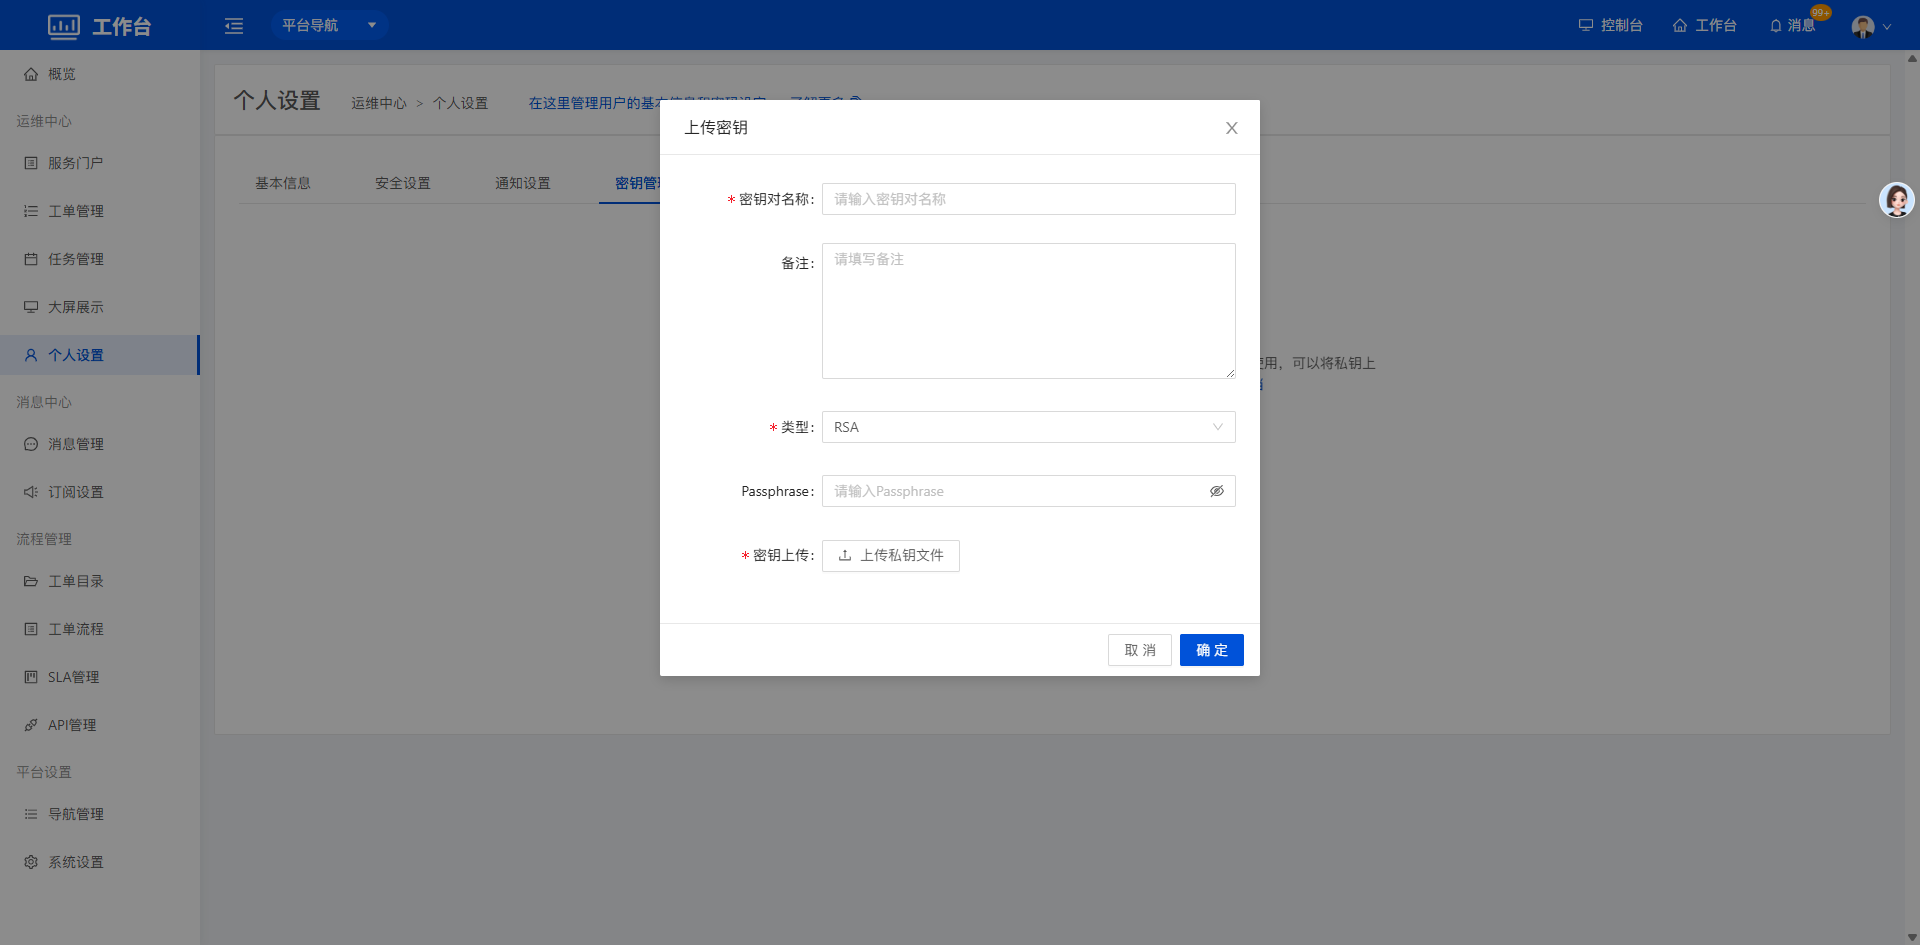
- There are two main ways to create a credential:
- The first is to generate the credential automatically in the system, after which you can download and view it.
- The second is to upload a local credential manually and let the system manage and use it.
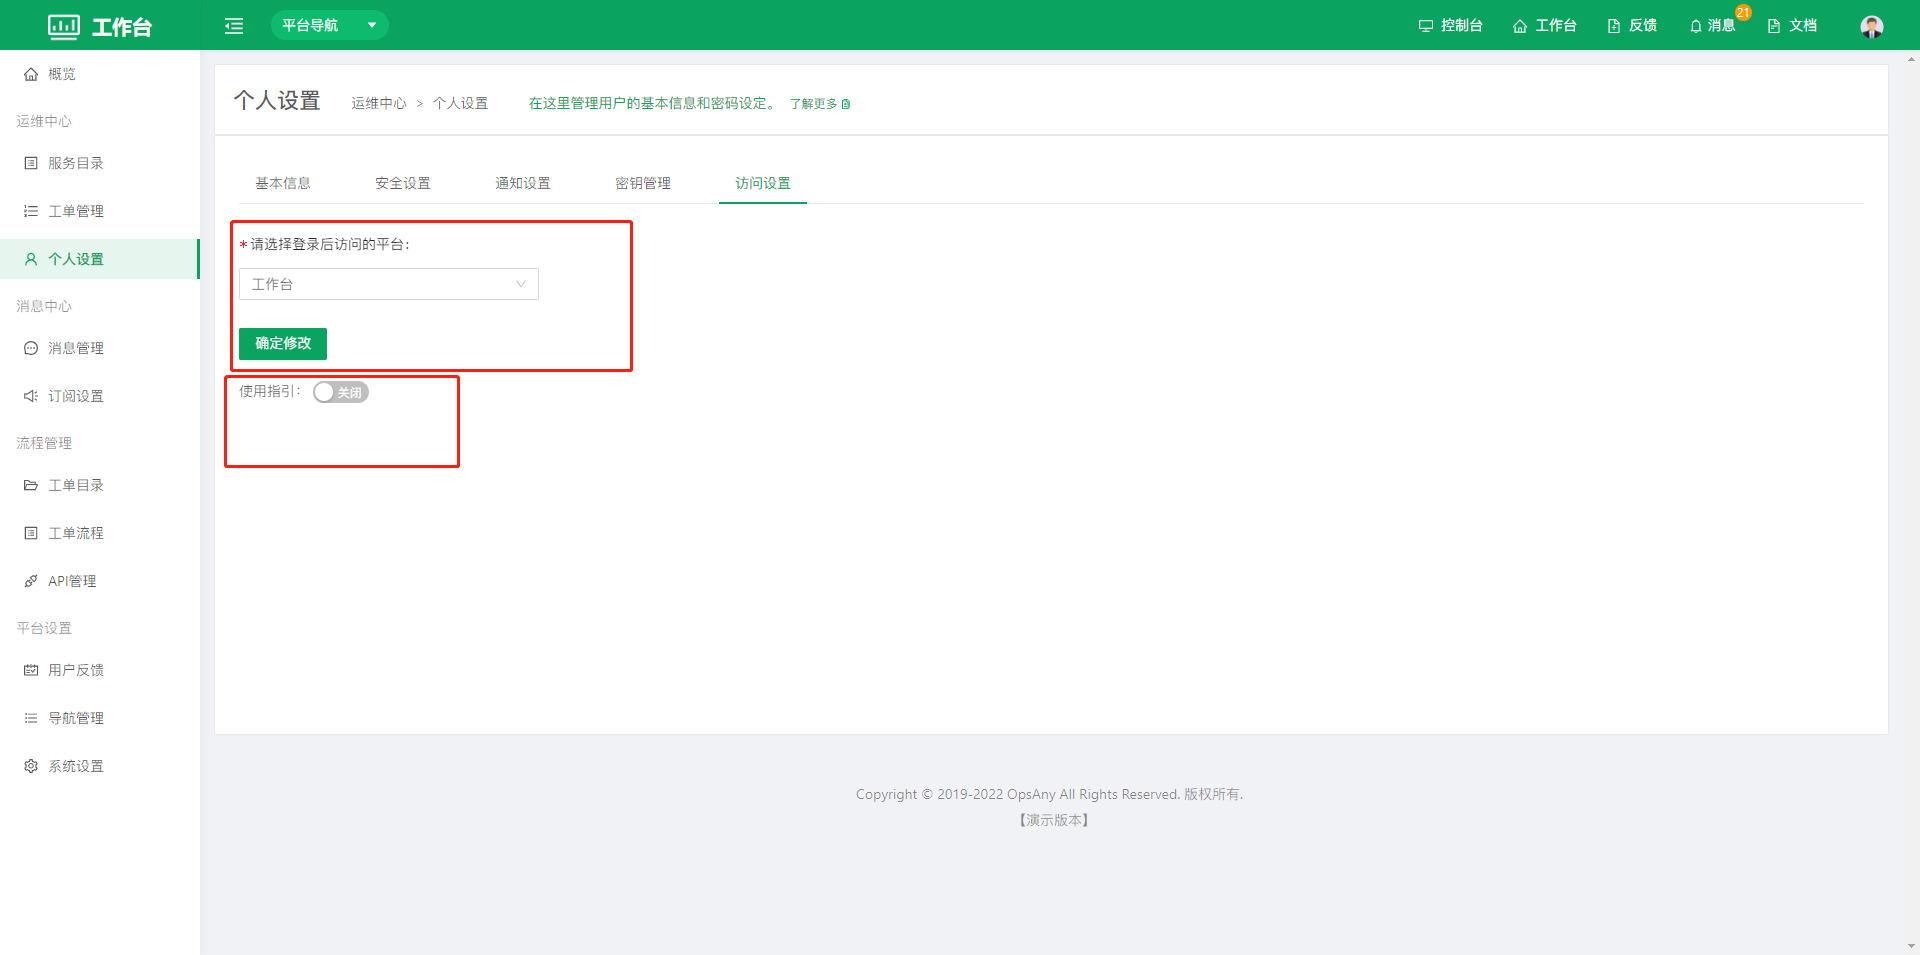
1.6.5 Access Settings
Users can choose which platform to open after login and whether to enable the platform usage guide.
2. Message Center
The Message Center covers message management for all platforms in OpsAny. The platform ships with common message types and message templates. For example, when a script job finishes, a message is sent to the users involved. The Message Center also makes it easier for users to collaborate and standardizes the working environment.
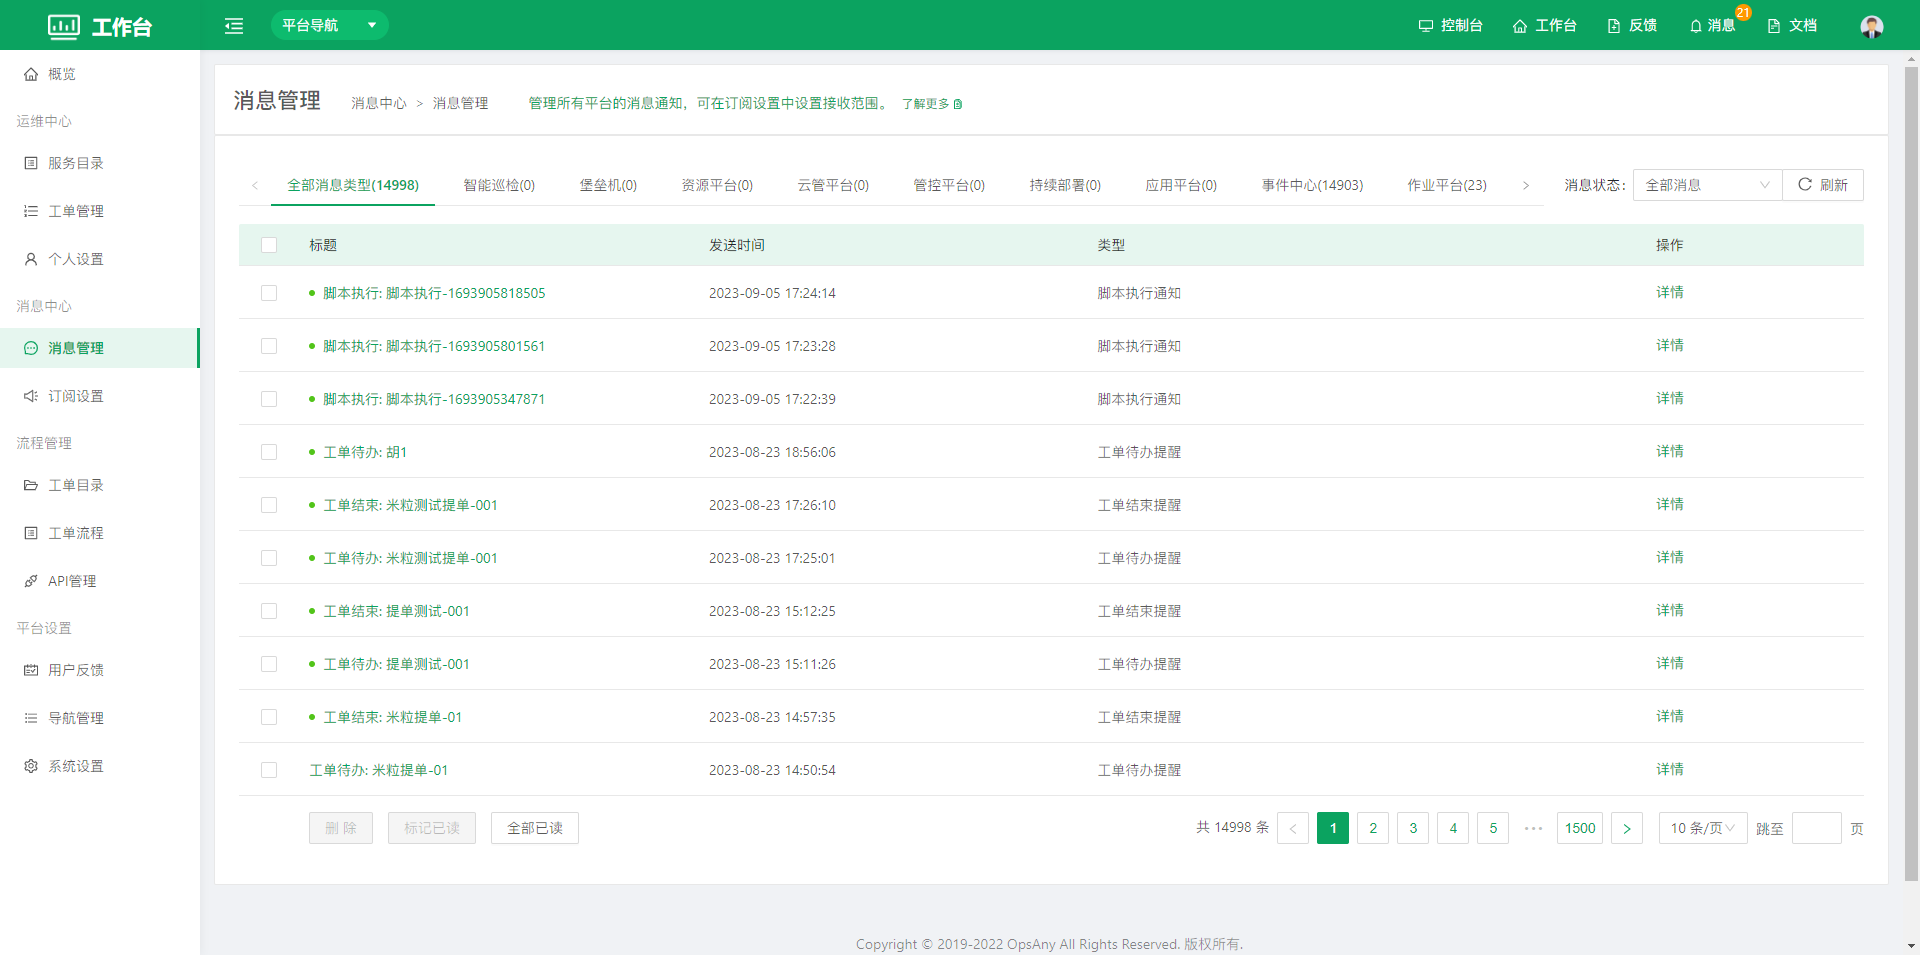
2.1 Message Management
Message management is mainly used to manage platform messages so that users can stay informed of platform execution status in a timely manner. It also supports viewing and managing messages by platform. Users can click a message name and details to view the specific message content.
2.2 Subscription Settings
Messages can be received in the following ways: in-site messages, mobile SMS, email, WeCom and DingTalk. Use the toggle switches to control whether messages are sent. The mobile number and email address come from the information the user entered in personal settings.
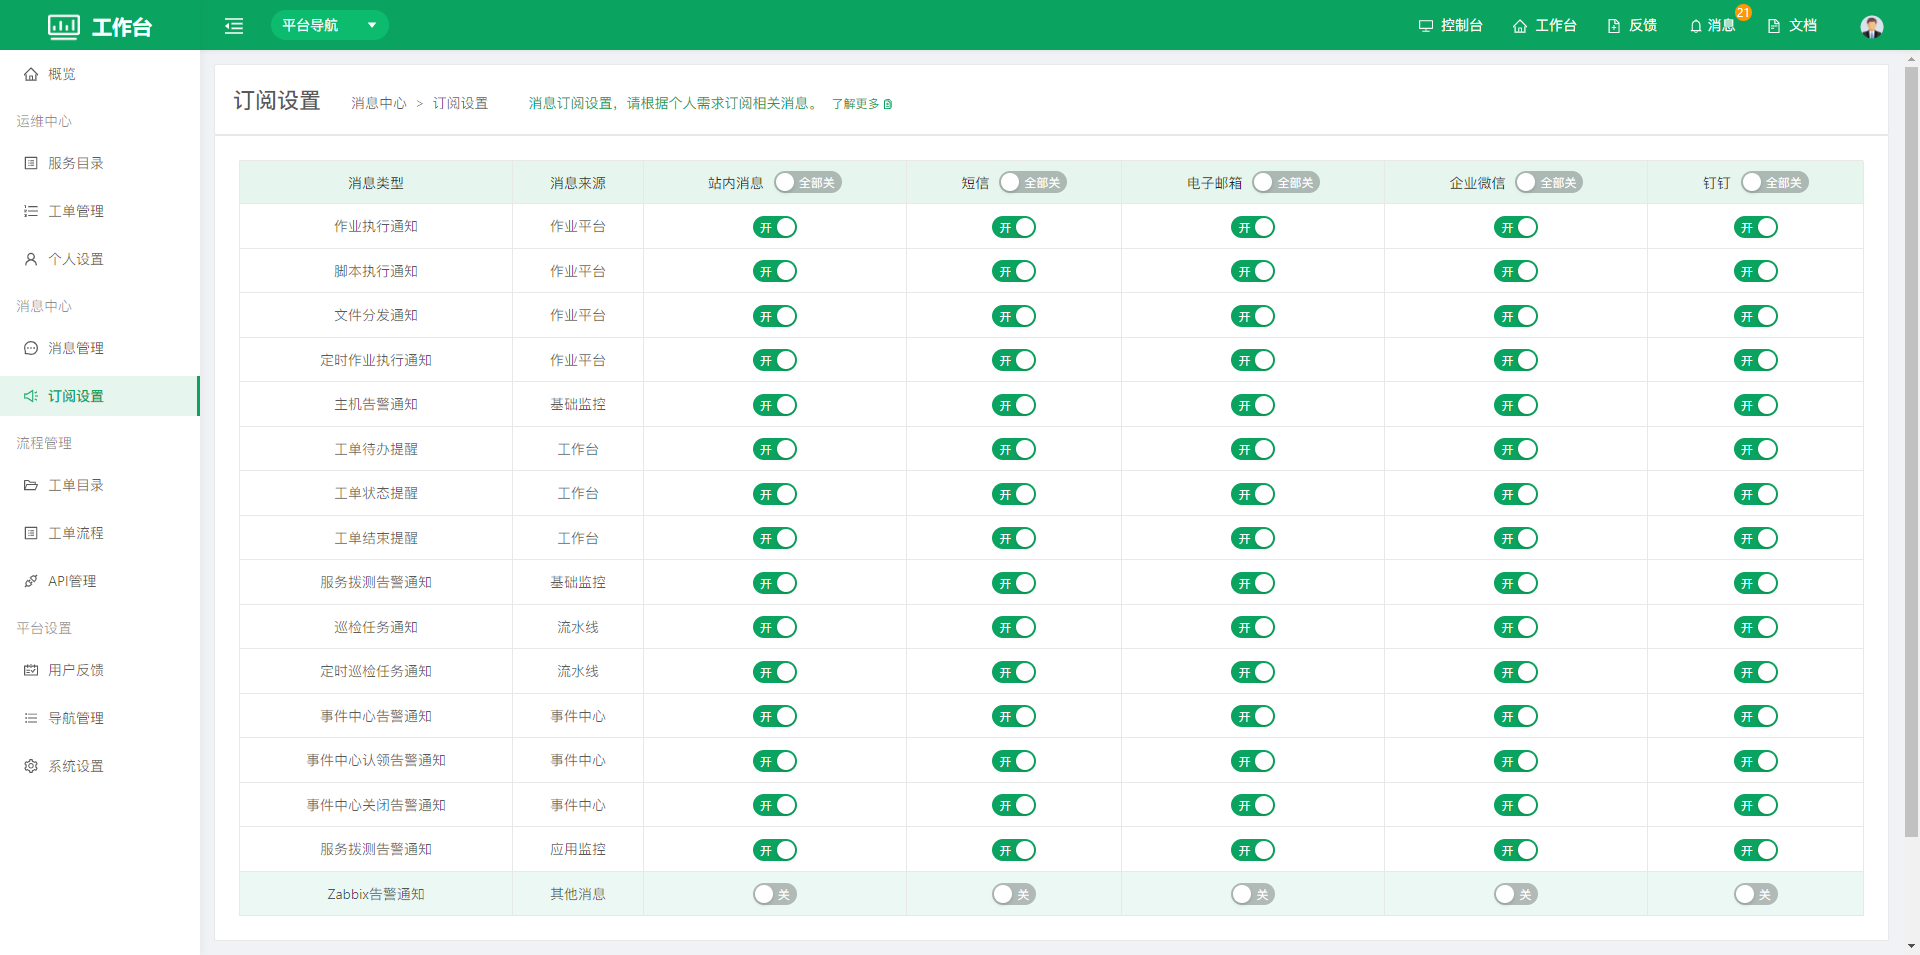
Users can turn off all messages of a given type, and can also customize message delivery according to their scenario.
3. Process Management
3.1 Ticket Catalog
Ticket and catalog management. Catalogs classify tickets, helping users submit and manage tickets more efficiently.
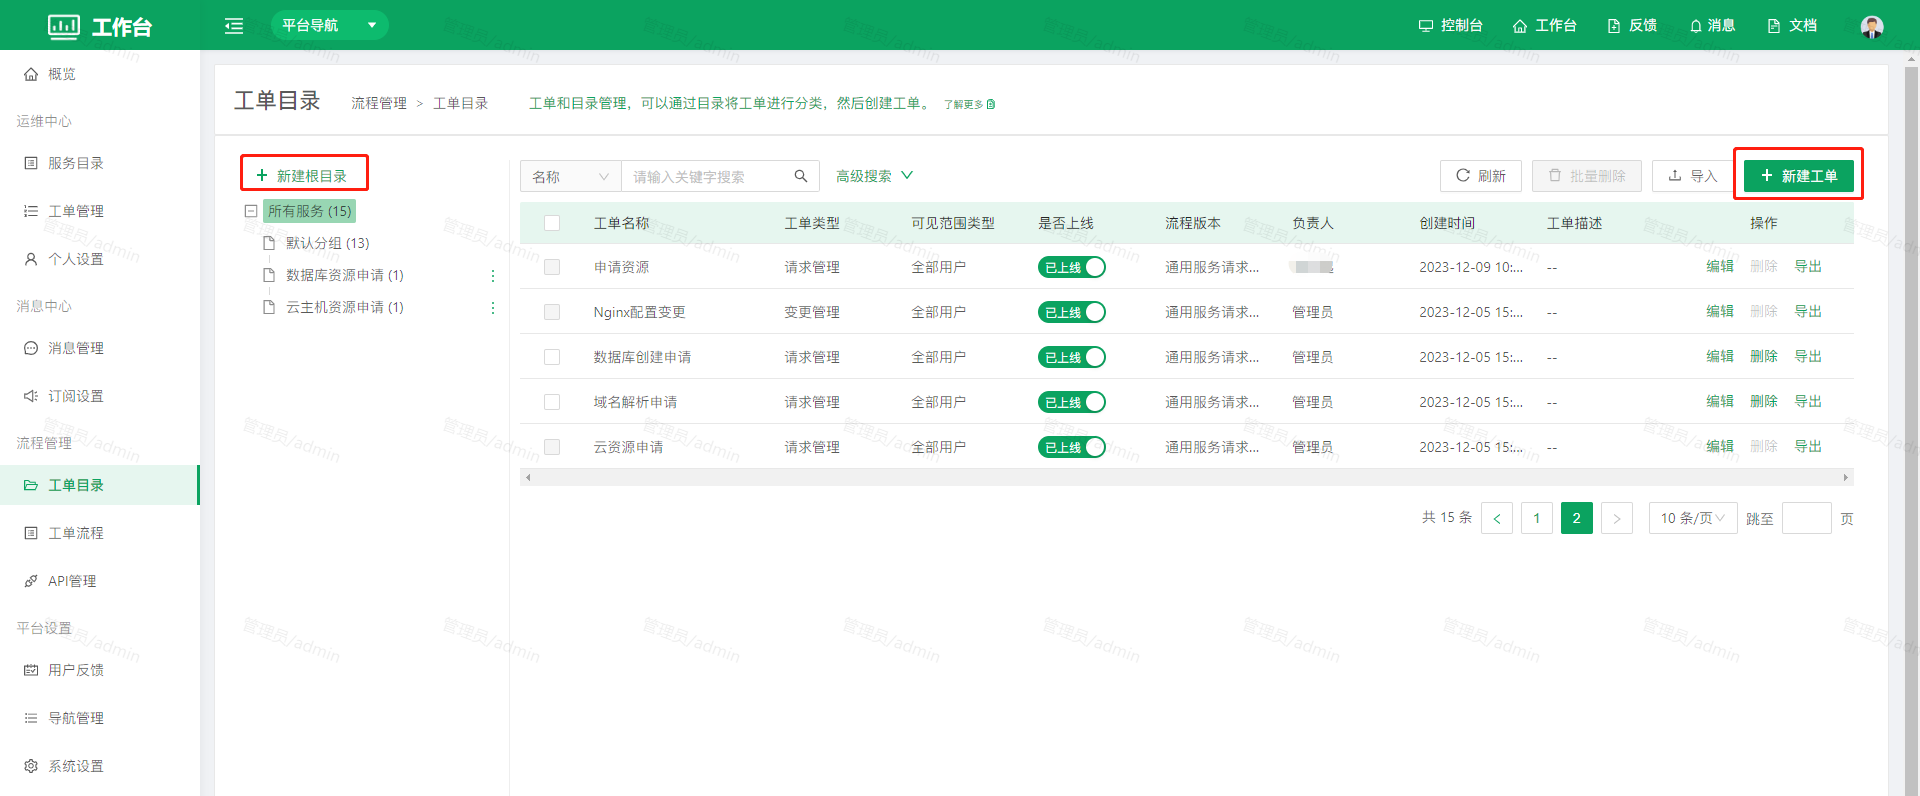 Tickets support batch deletion, import, export, online/offline switching and more.
Note: A ticket that is in use cannot be deleted.
Create a Ticket Catalog
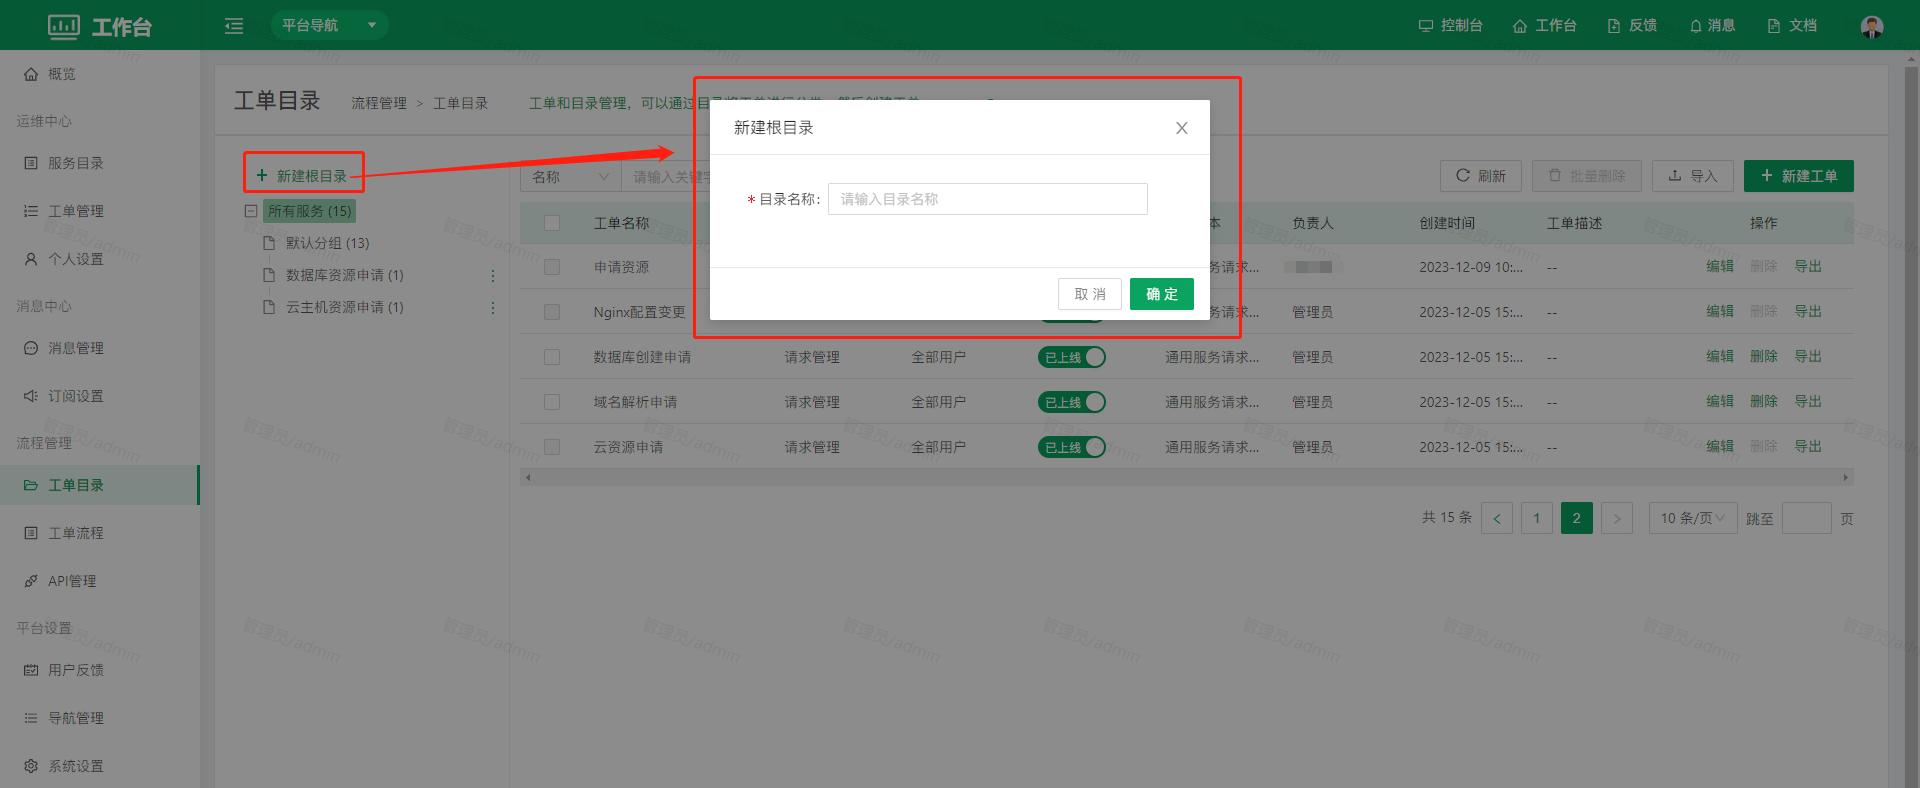
Click Create Root Directory to create a ticket catalog.
Create a Ticket
Click Create Ticket to open the create ticket dialog and complete the operation according to the fields on the page.
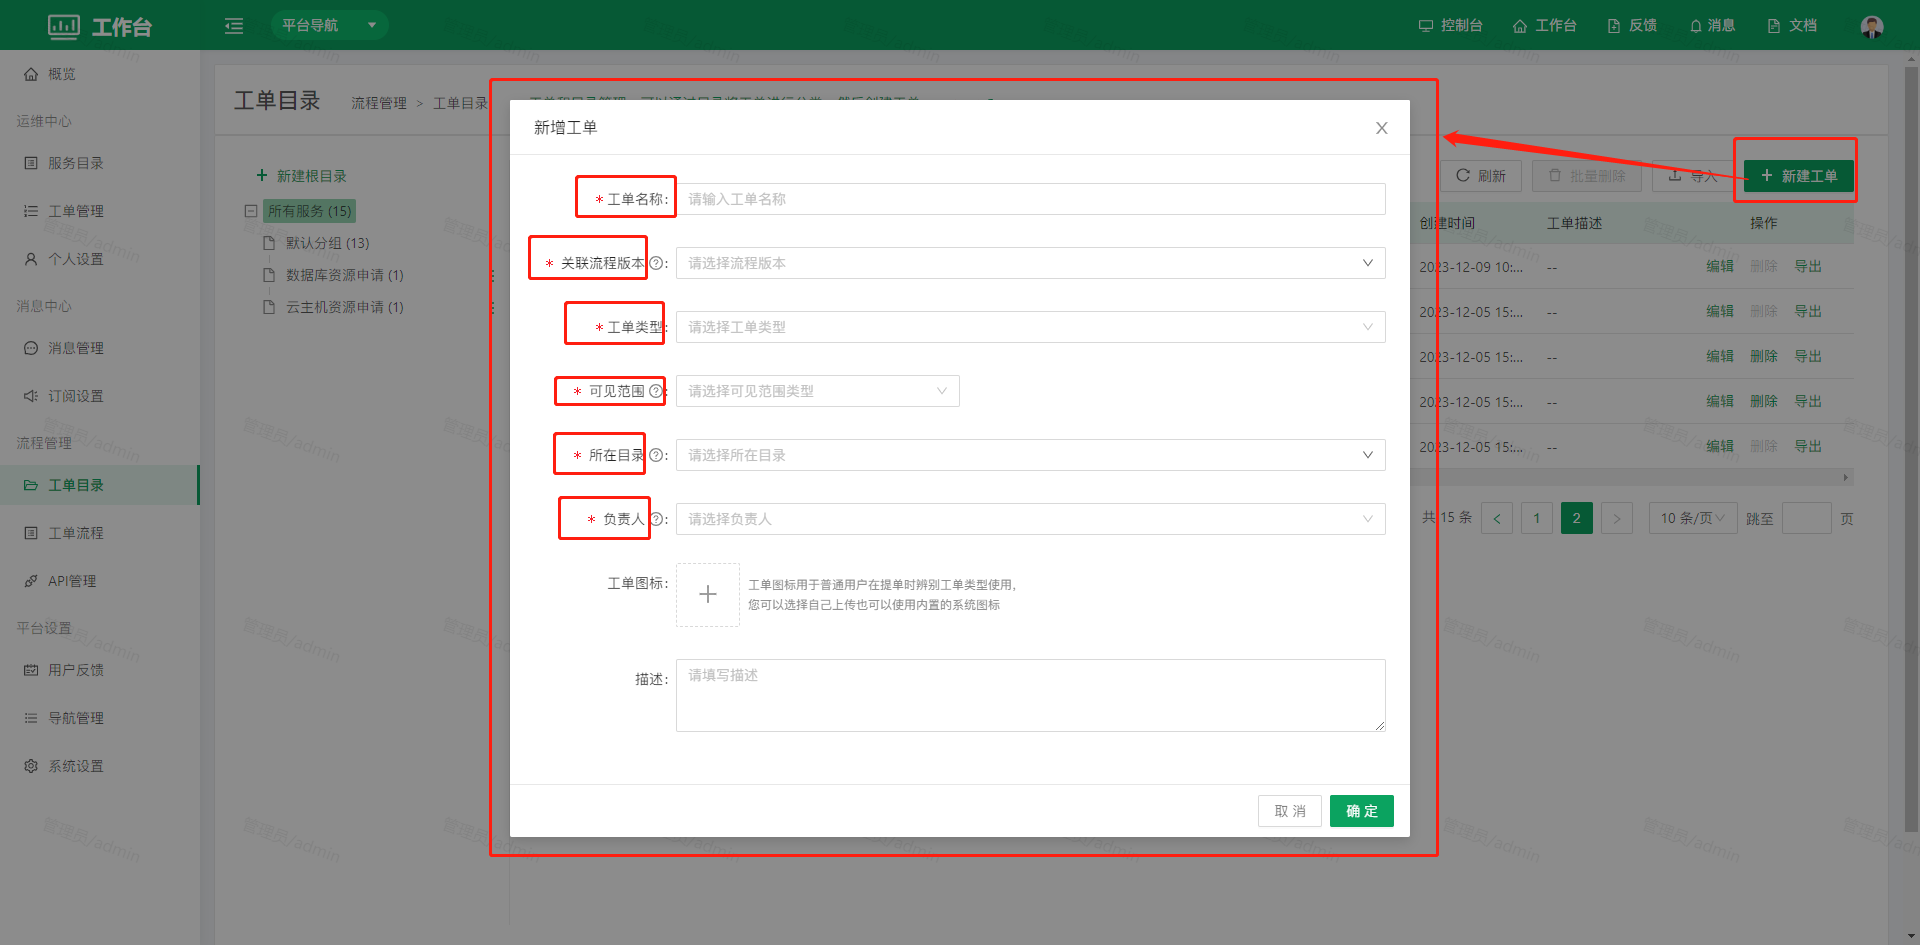
Ticket name: users can name the ticket according to its usage scenario.
Associated process version: users can choose the ticket process according to the approval or operation process of the ticket.
Ticket type: the system provides four built-in common types: Request Management, Change Management, Incident Management and Problem Management.
Visibility: users select which users can use the ticket.
Catalog: users select which ticket catalog the ticket is placed in.
Owner: users select the owner of the ticket.
3.2 Ticket Process
Ticket process management. Users can customize ticket processes and define the nodes, forms, fields and other information in a process.
3.2.1 Process Design
The entry point for configuring and managing all kinds of process models: the process model library of the system. Use the process engine to configure nodes of service processes and perform routine maintenance. The process design list can be regarded as a process template library. It includes creating, editing, deleting, cloning, publishing, exporting and other functions for processes.
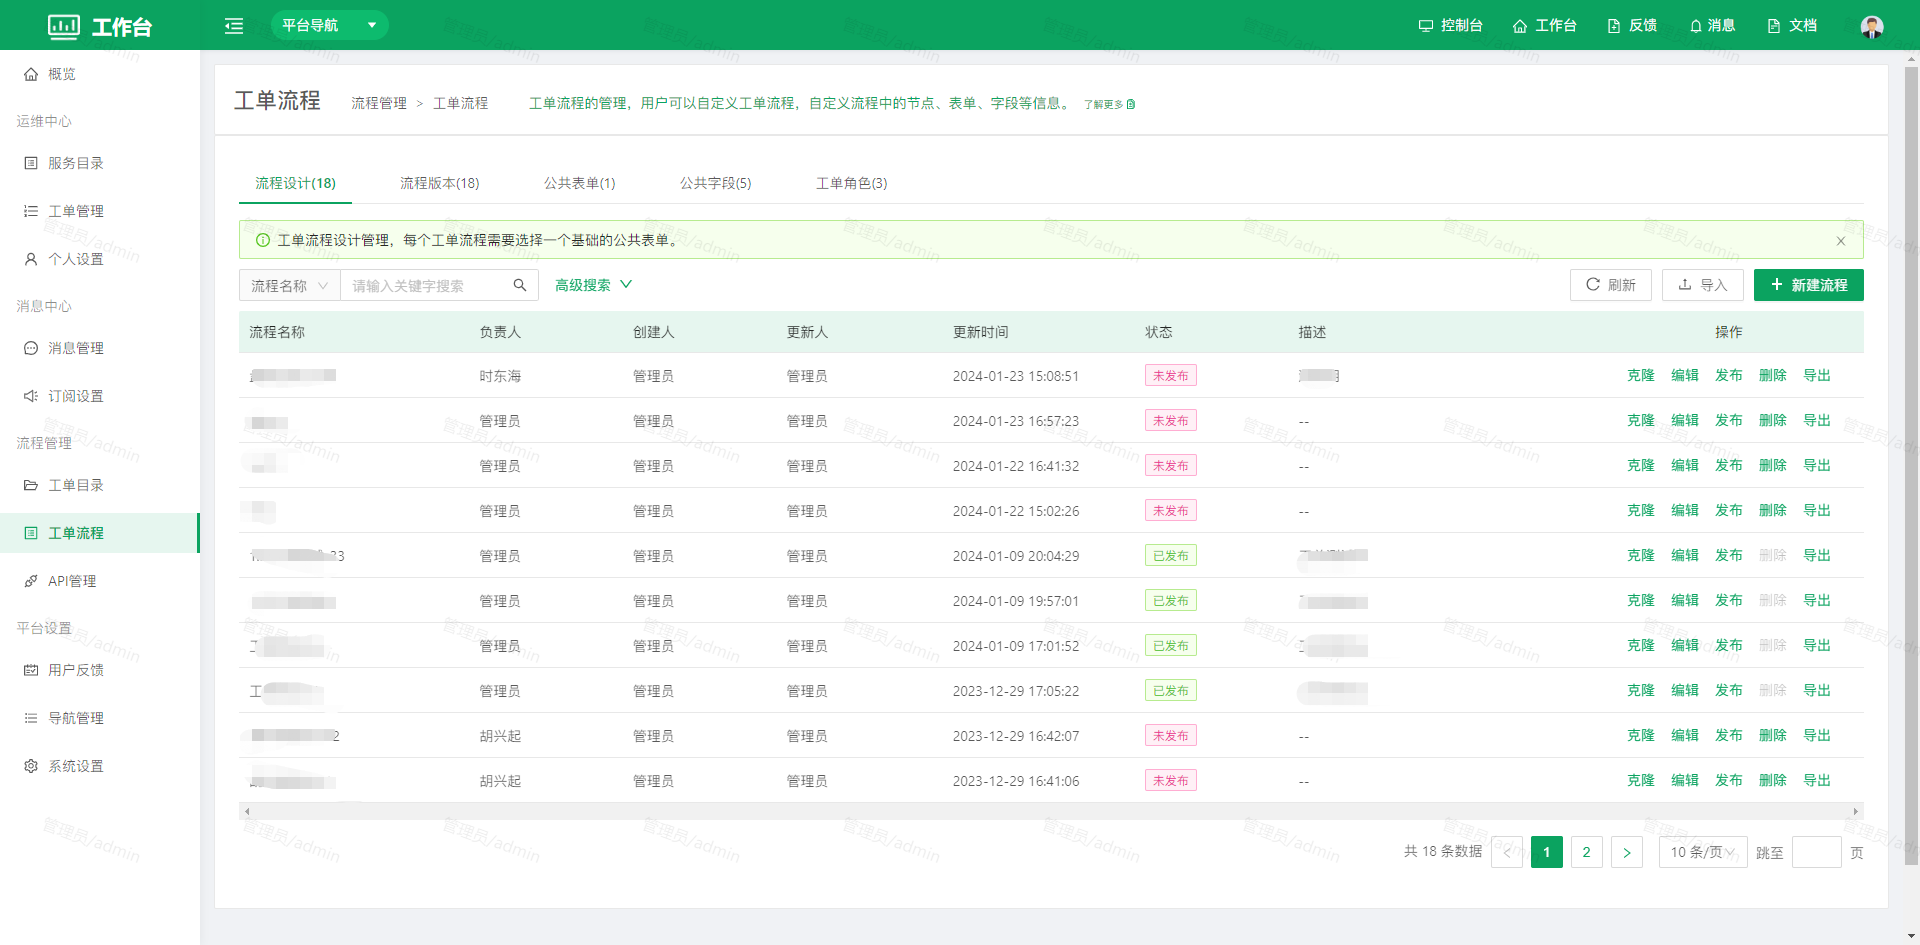 Create: the entry point for creating a ticket process.
Status: Published, Unpublished.
Publish: a process design must be published before the ticket process can be used officially. After publishing, a corresponding process version record is added on the Process Versions tab.
Delete: delete the process template. Deleting a process from the template library does not affect online process instances and tickets that are already in use.
Create a Process
- Step 1 of creating a process: enter the process information
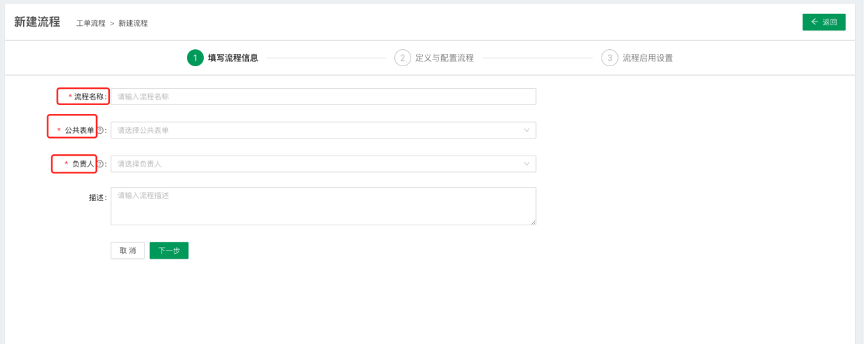
Process name: enter the name of the process.
Public form: the list comes from the forms configured in Public Forms. Select an appropriate public form to reference the corresponding public fields.
Owner: the owner of the process.
Description: a description of the process.
- Step 2 of creating a process: define and configure the process
Currently, node types include: Normal node, Approval node, API node, Dispatch node and Confirmation node.
Normal node: the node is processed and fed back manually.
Approval node: an approval action node with built-in approval content and approval method.
API node: select a platform API on this node and call it to perform the operation automatically.
Dispatch node: on a dispatch node, tasks can be dispatched to specific users, ticket roles, organizational structures and so on.
Confirmation node: the confirmation node is where the submitter confirms the ticket after the entire ticket process has been completed.
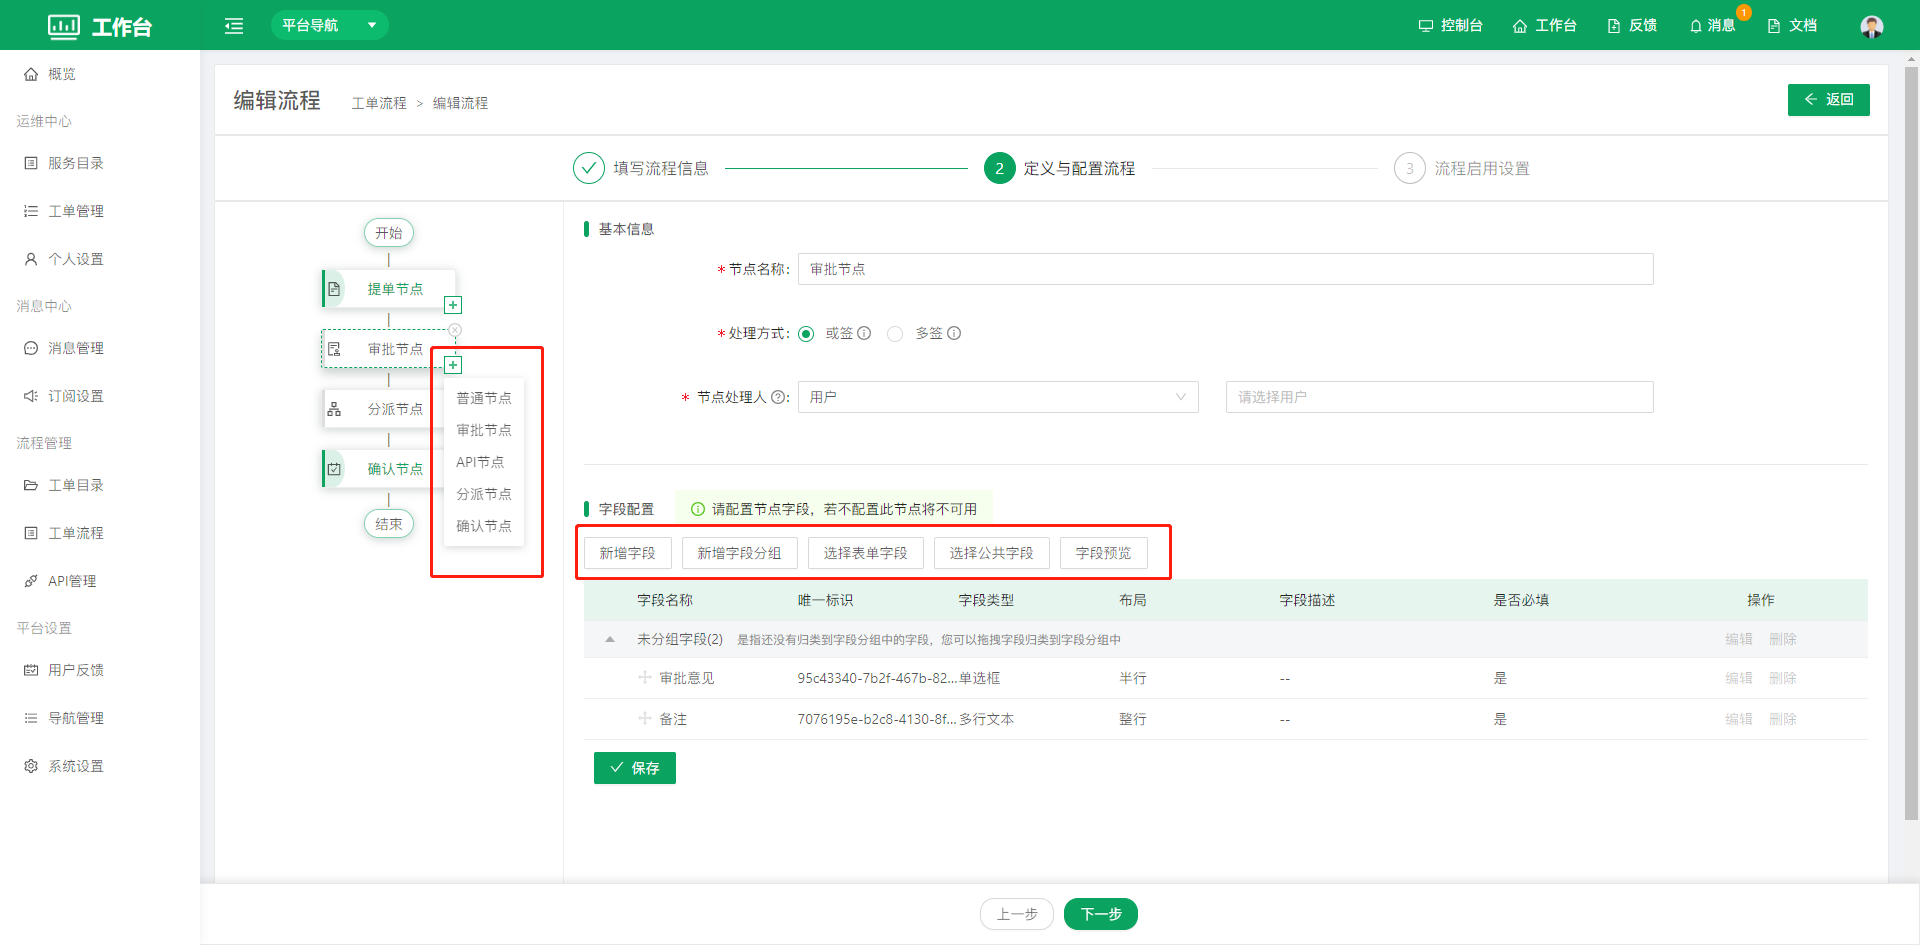
Click the plus sign next to a node on the left to add a node; the new node is added directly below the current node.
Add field: click Add Field to customize fields.
Add field group: create custom field groups; drag fields to group them.
Select form field: based on the public form selected in the previous step, you can quickly select public fields.
Field preview: shows how the form of the current node is displayed.
Click OK in the lower right corner to save the input of the current node and avoid misoperations.
Click Next in the lower left corner to save all current operations and proceed to the next step.
Step 3 of process design
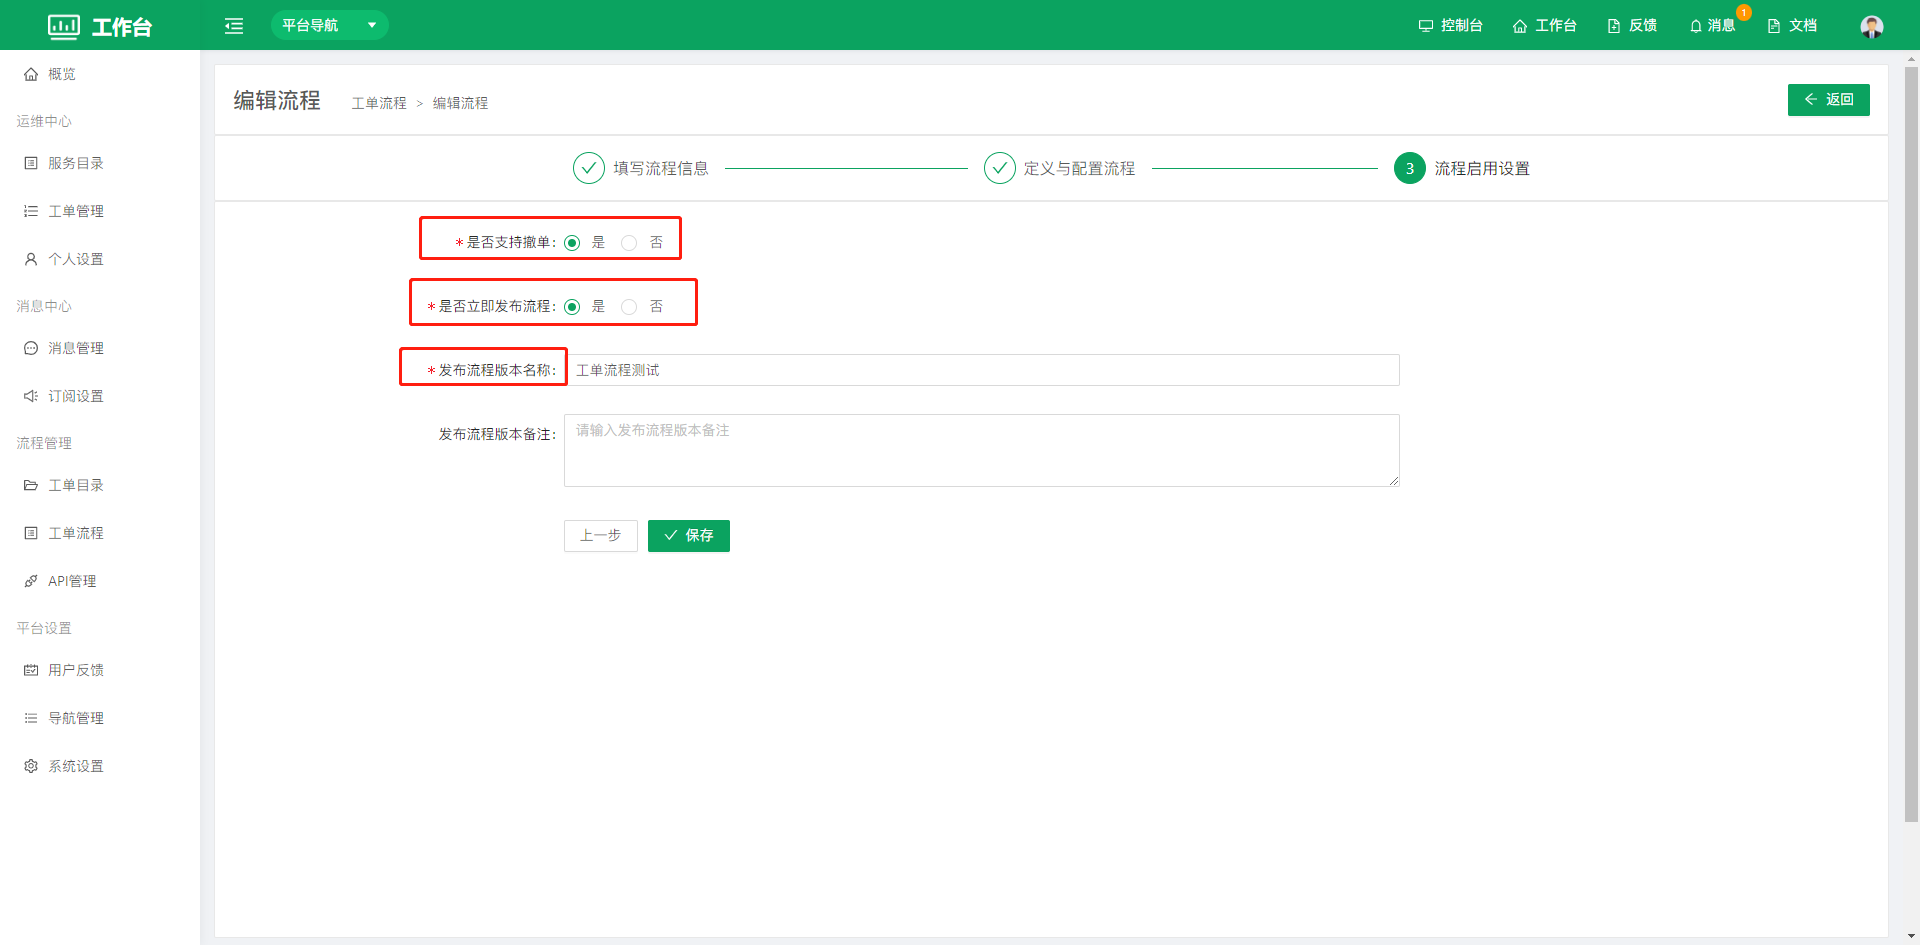
Support cancellation: once a handler has processed the ticket process, the ticket can no longer be cancelled; otherwise it can be cancelled, and after cancellation the ticket is not saved.
Deploy the process immediately: after deployment, the process generates a new process version.
Deployed process version name: users can define the name of the process version.
3.2.2 Process Versions
A process version is generated after the process design is deployed.
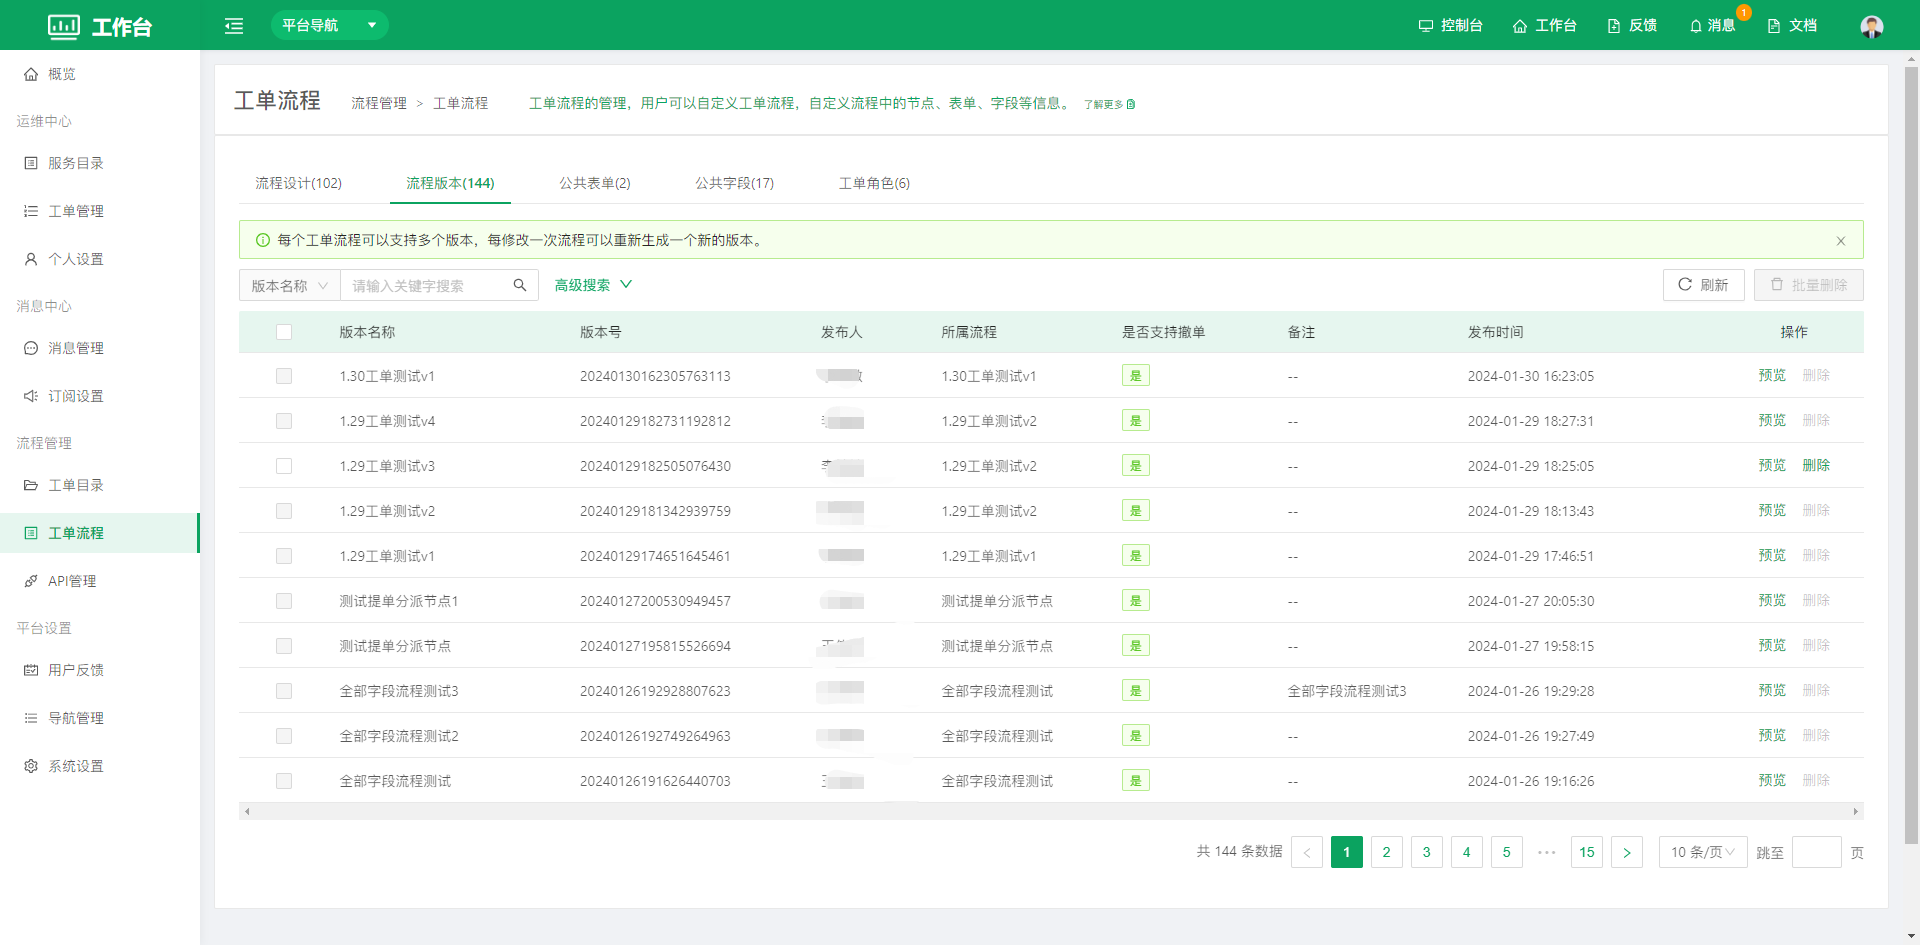
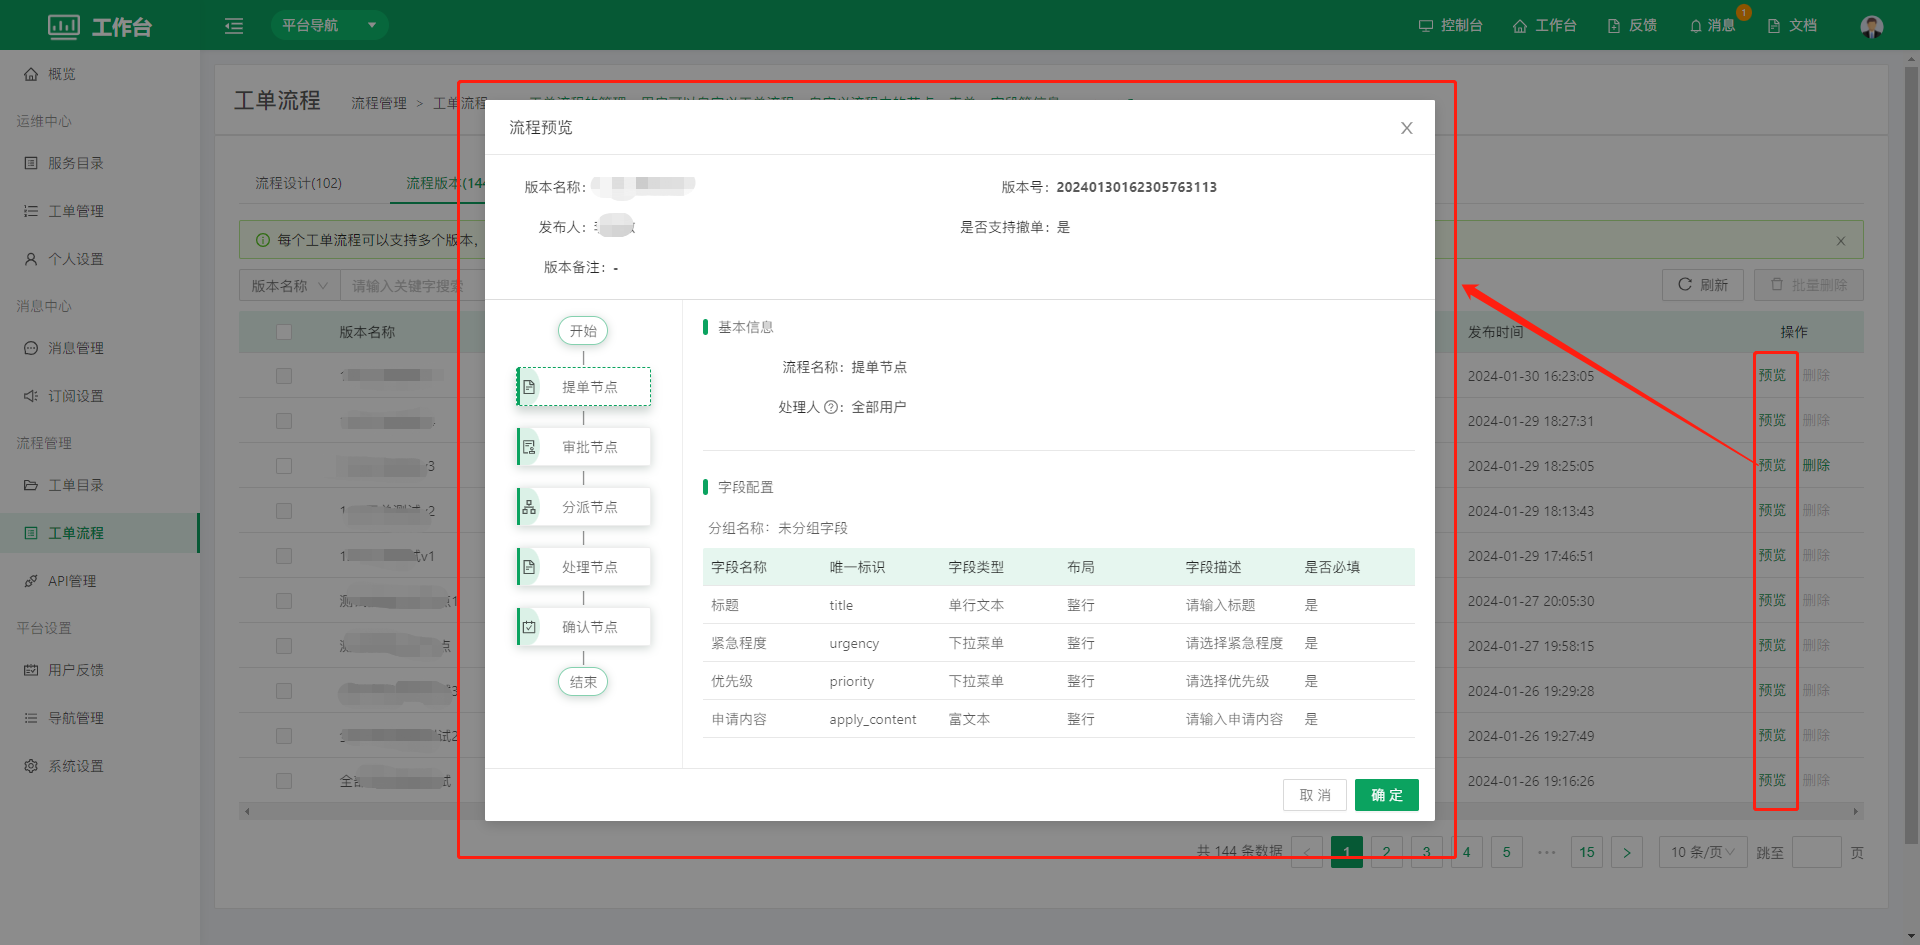
- Click Preview in the list page actions to preview the nodes of the current process version.
3.2.3 Public Forms
Select applicable fields from the public fields to compose different forms and apply them in process design. When creating a process, if a public form is selected, the fields in the model can be directly referenced as fields in the process nodes and stay up to date when the form is updated.
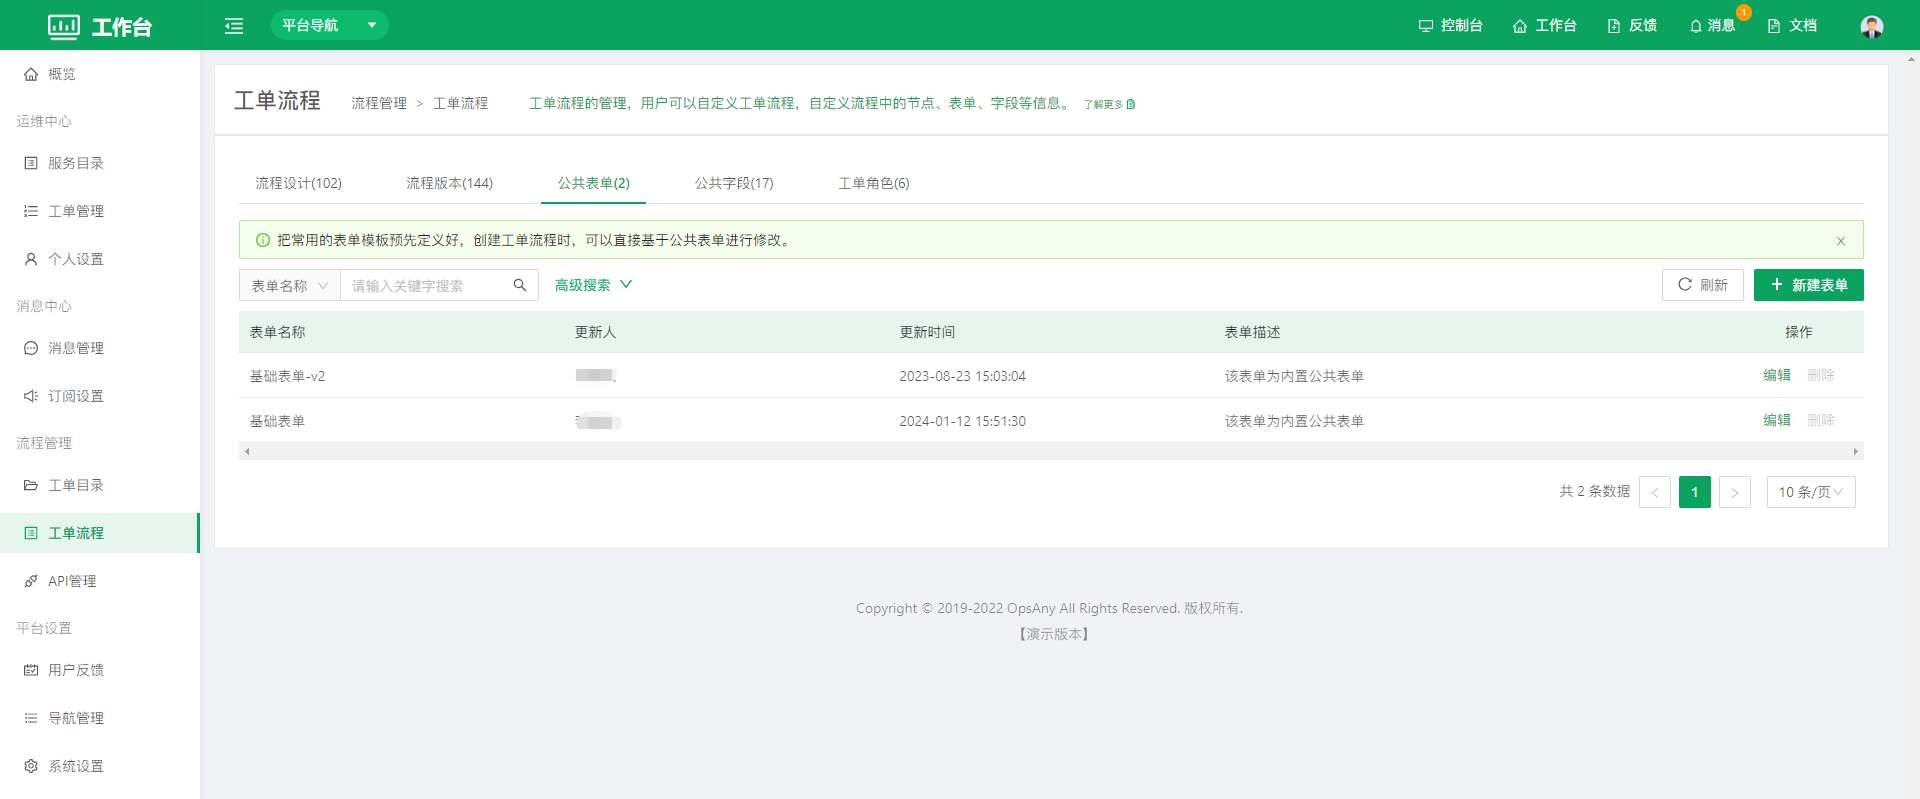
- Click to create a form.
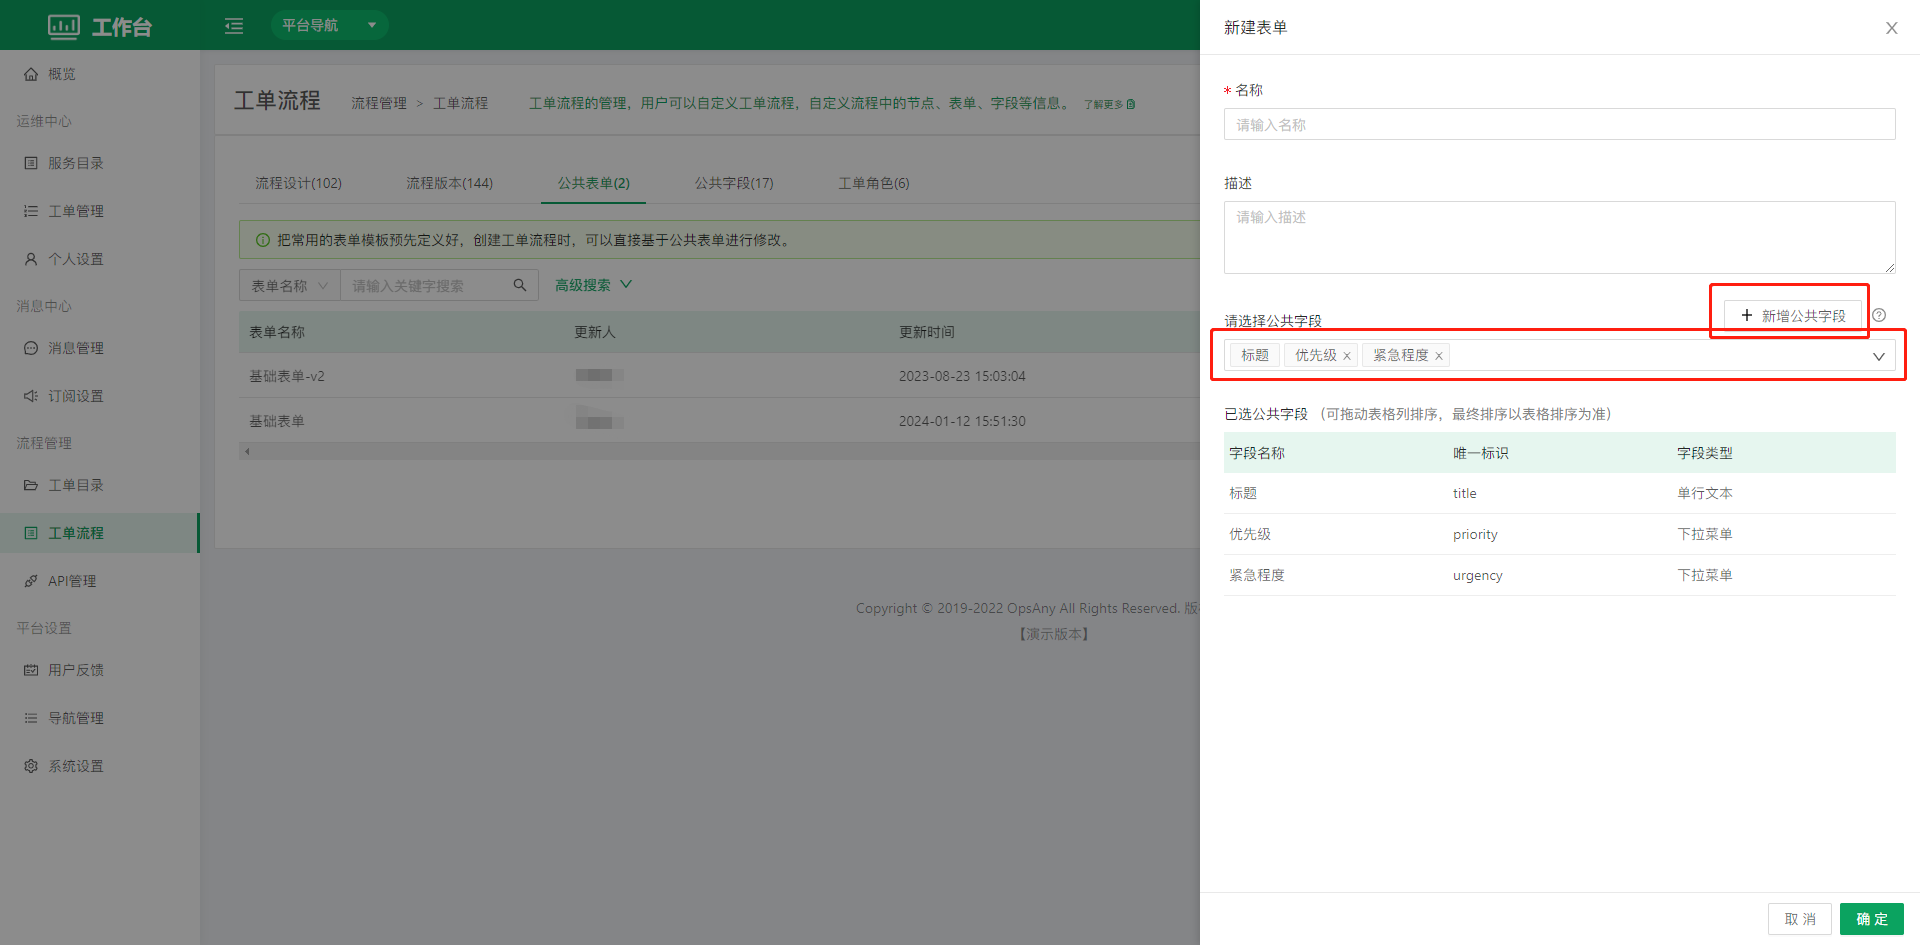
Select public field: select an existing field from the public fields to add it.
Add field: if the required field is not available in the public fields, click Add Field to create a field directly and add it for use.
3.2.4 Public Fields
The system provides some commonly used built-in fields. Built-in fields can be edited but not deleted. Users with permissions can add public fields as needed for management.
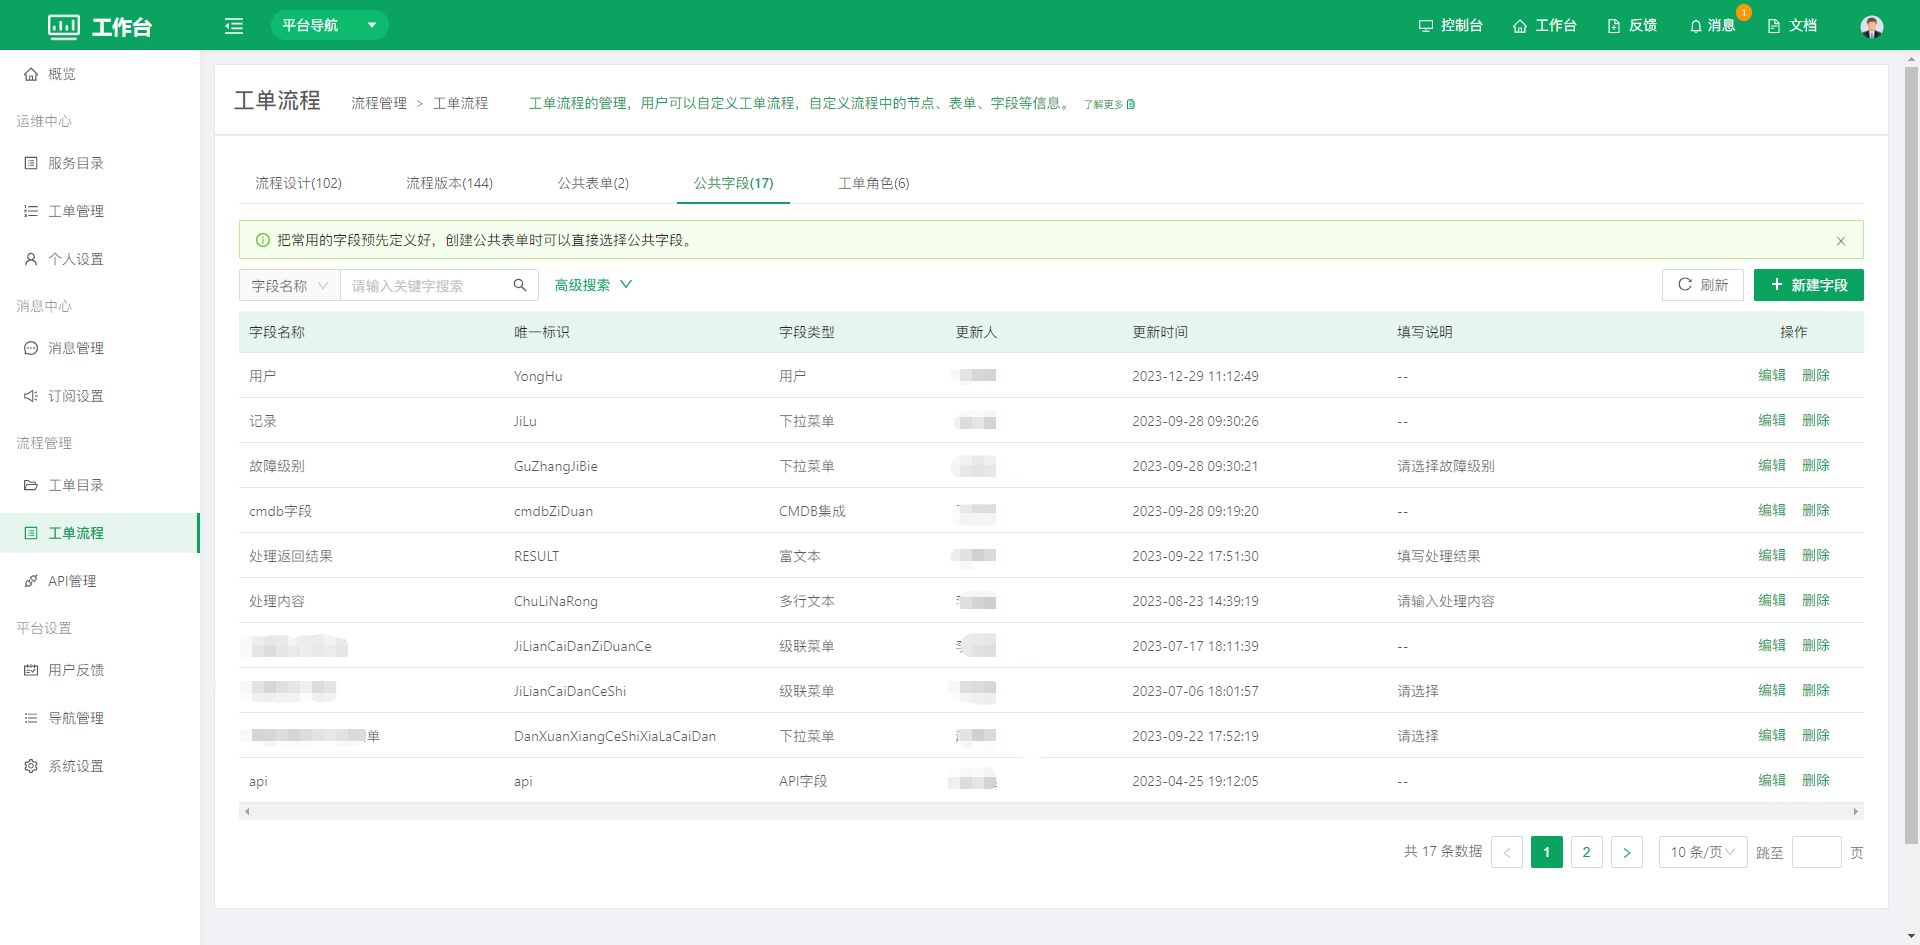
- Click Add Field to create a custom public field.
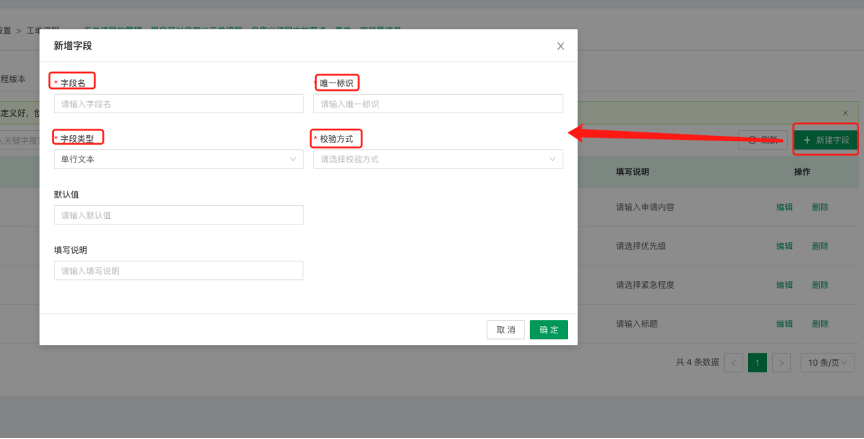
Field type: the system provides built-in types such as single-line text, multi-line text, number, dropdown, radio button, checkbox, date, time, link, attachment, rich text, API field, CMDB integration and user.
Validation method: select the validation method for the field.
Ticket role: mainly refers to the roles that handle different services, for example, the owner who approves account provisioning or the implementer who provisions remote access for the account. Add, modify and delete roles and members in daily management according to the actual production environment.
3.2.5 Ticket Roles
Users can create custom ticket roles and grant permissions on tickets and processes by role.
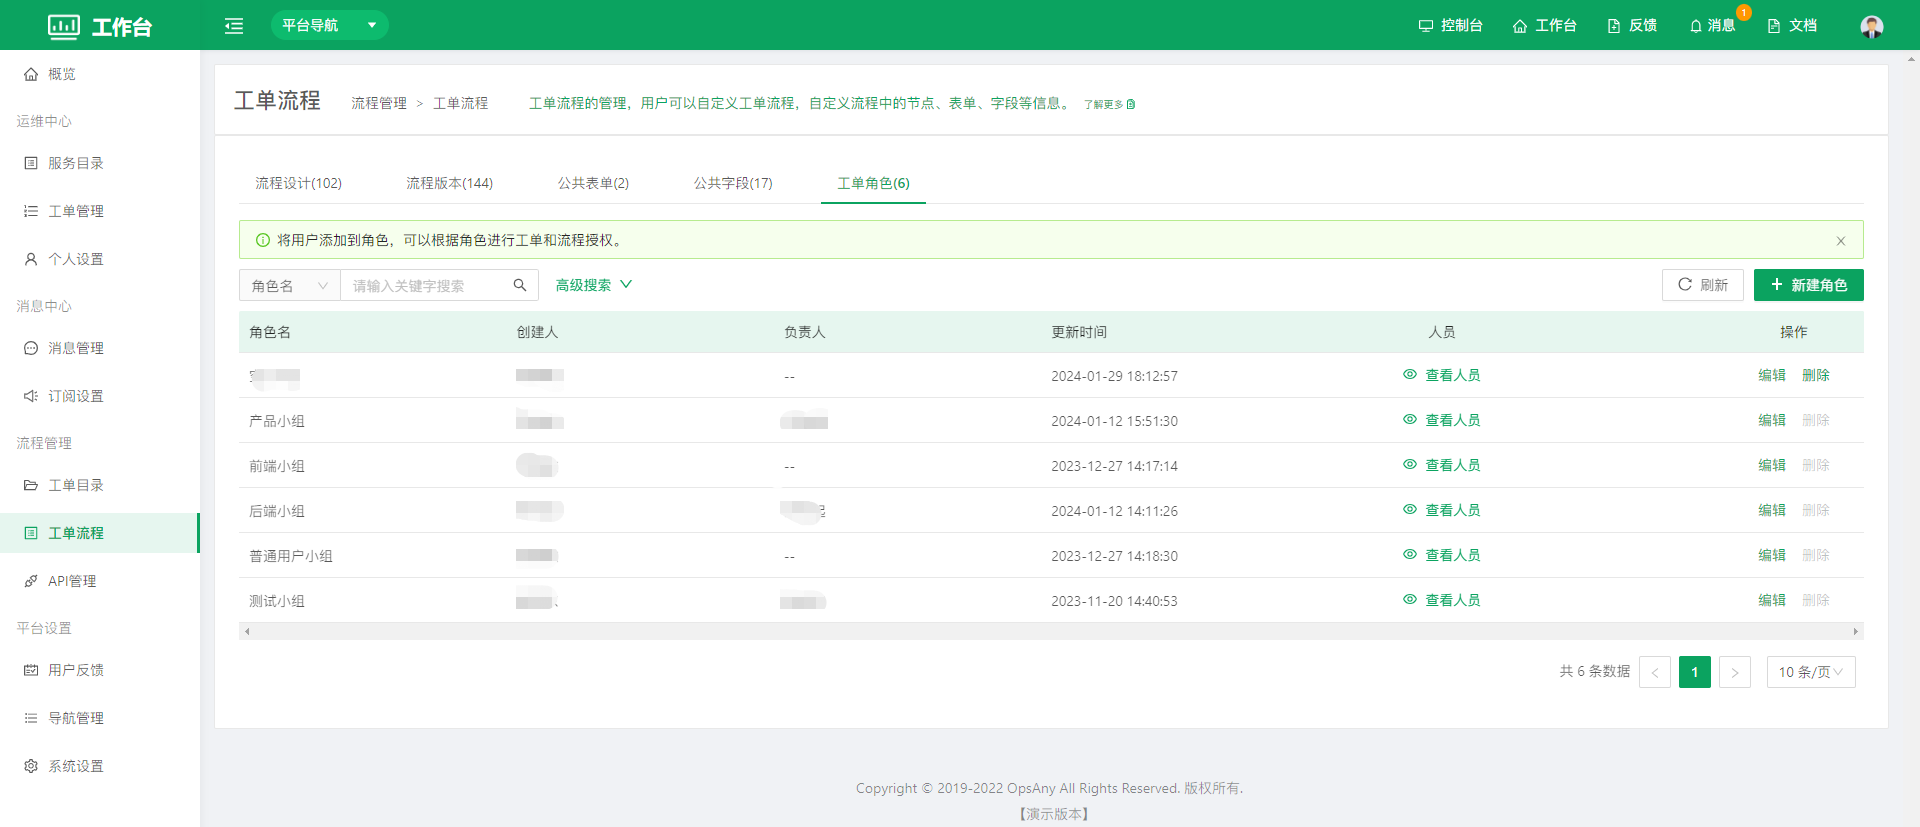
Click the create role button in the upper right corner of the page to create a ticket role.
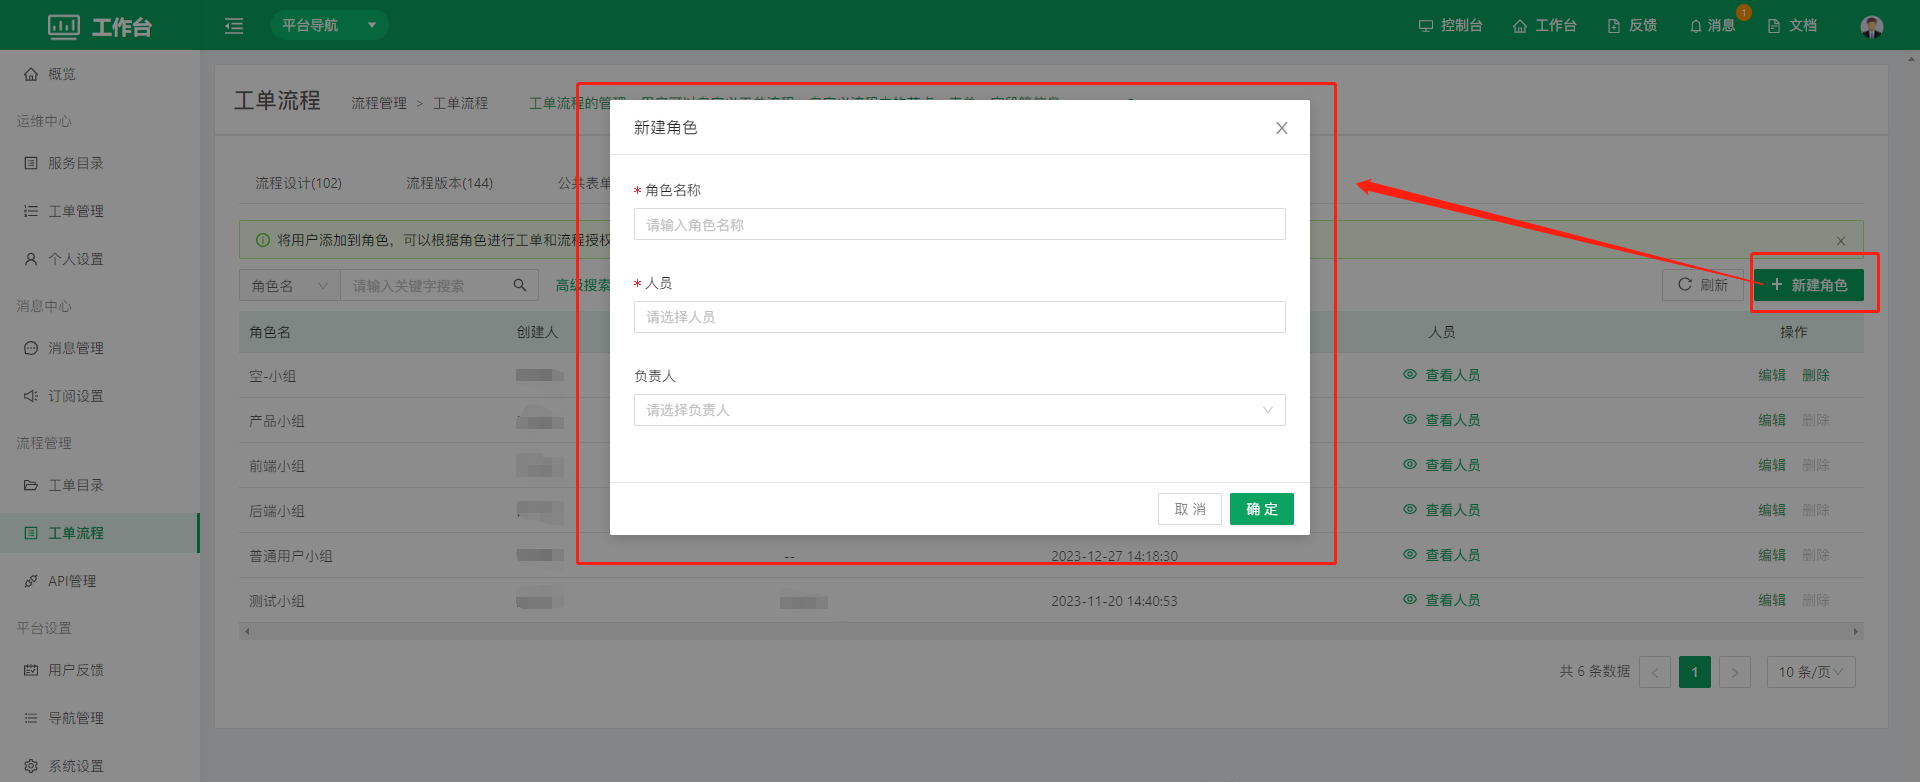 Role name: give the ticket role an easily recognizable name.
Members: select which users are included in the ticket role.
Owner: select an owner responsible for this ticket role
3.3 SLA Management
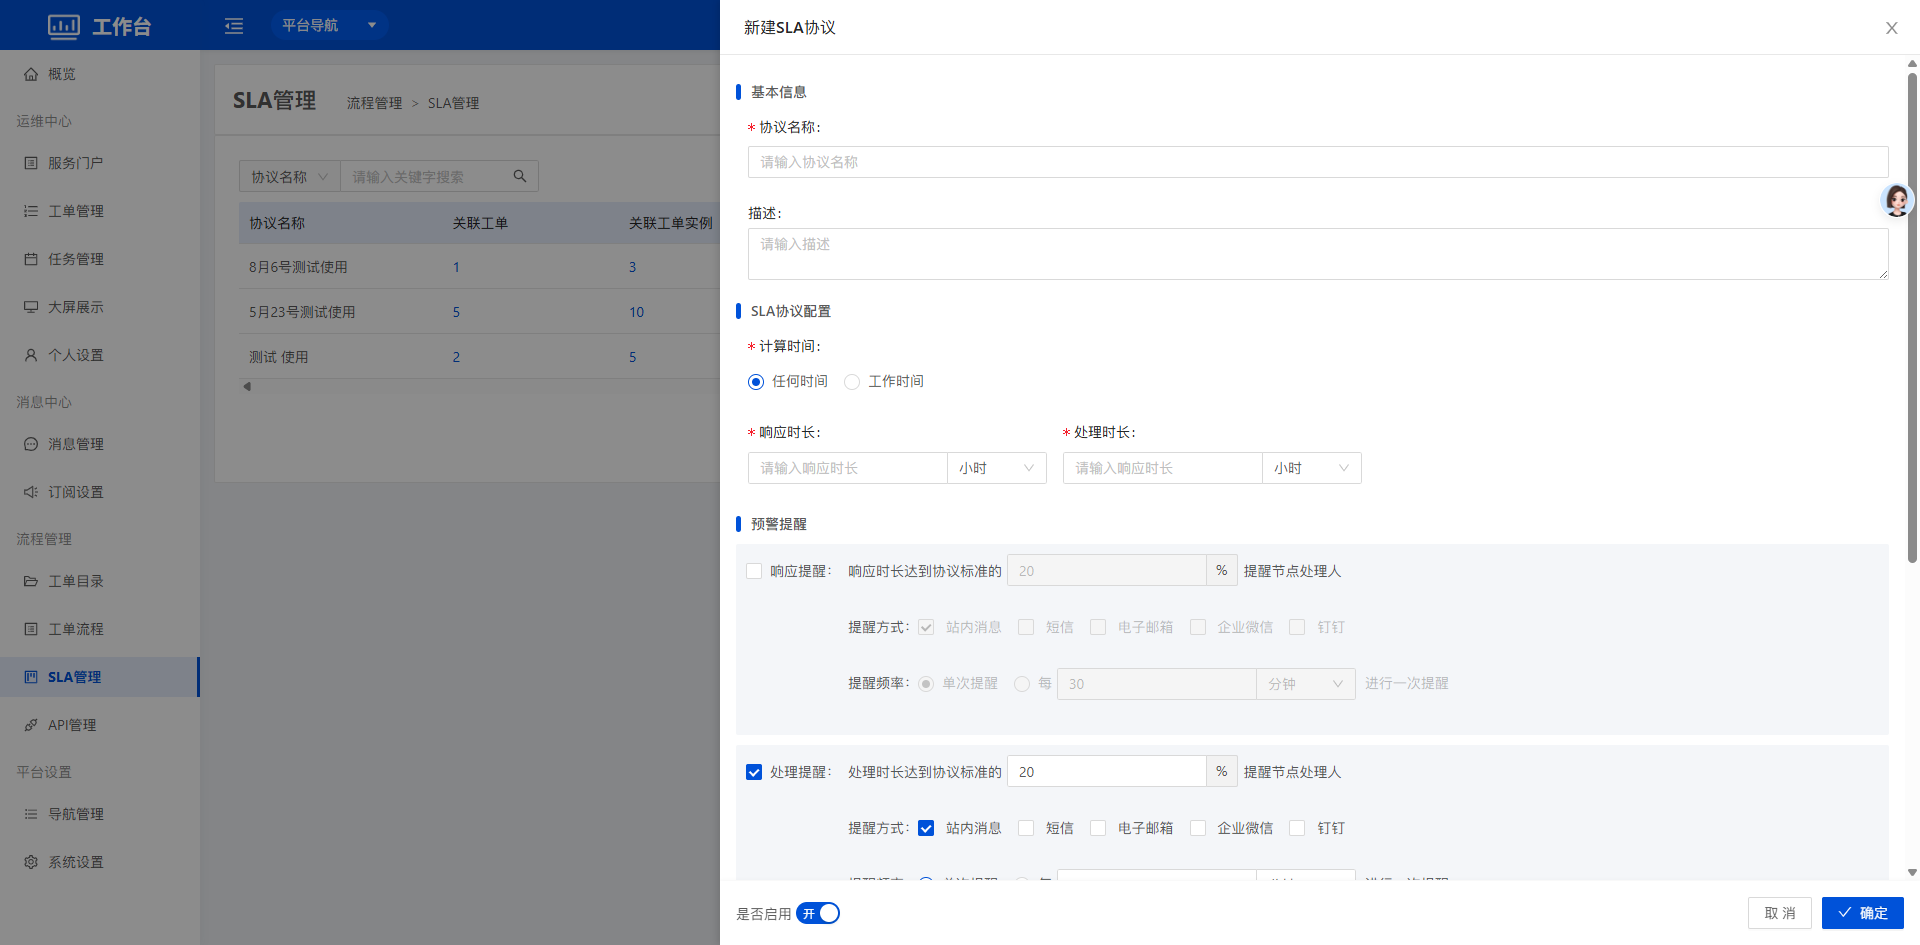
Customize SLA agreements, including response time, handling time, response reminders, handling reminders, response timeout reminders, handling timeout reminders, reminder methods, reminder frequency and other information. Ticket SLA management is a closed loop: create rules → enable the SLA agreement for tickets → response and handling reminders → response timeout and handling timeout reminders → ticket statistics and analysis. It turns service commitments into an executable, measurable operating system, ultimately balancing efficiency, customer satisfaction and business risk control.
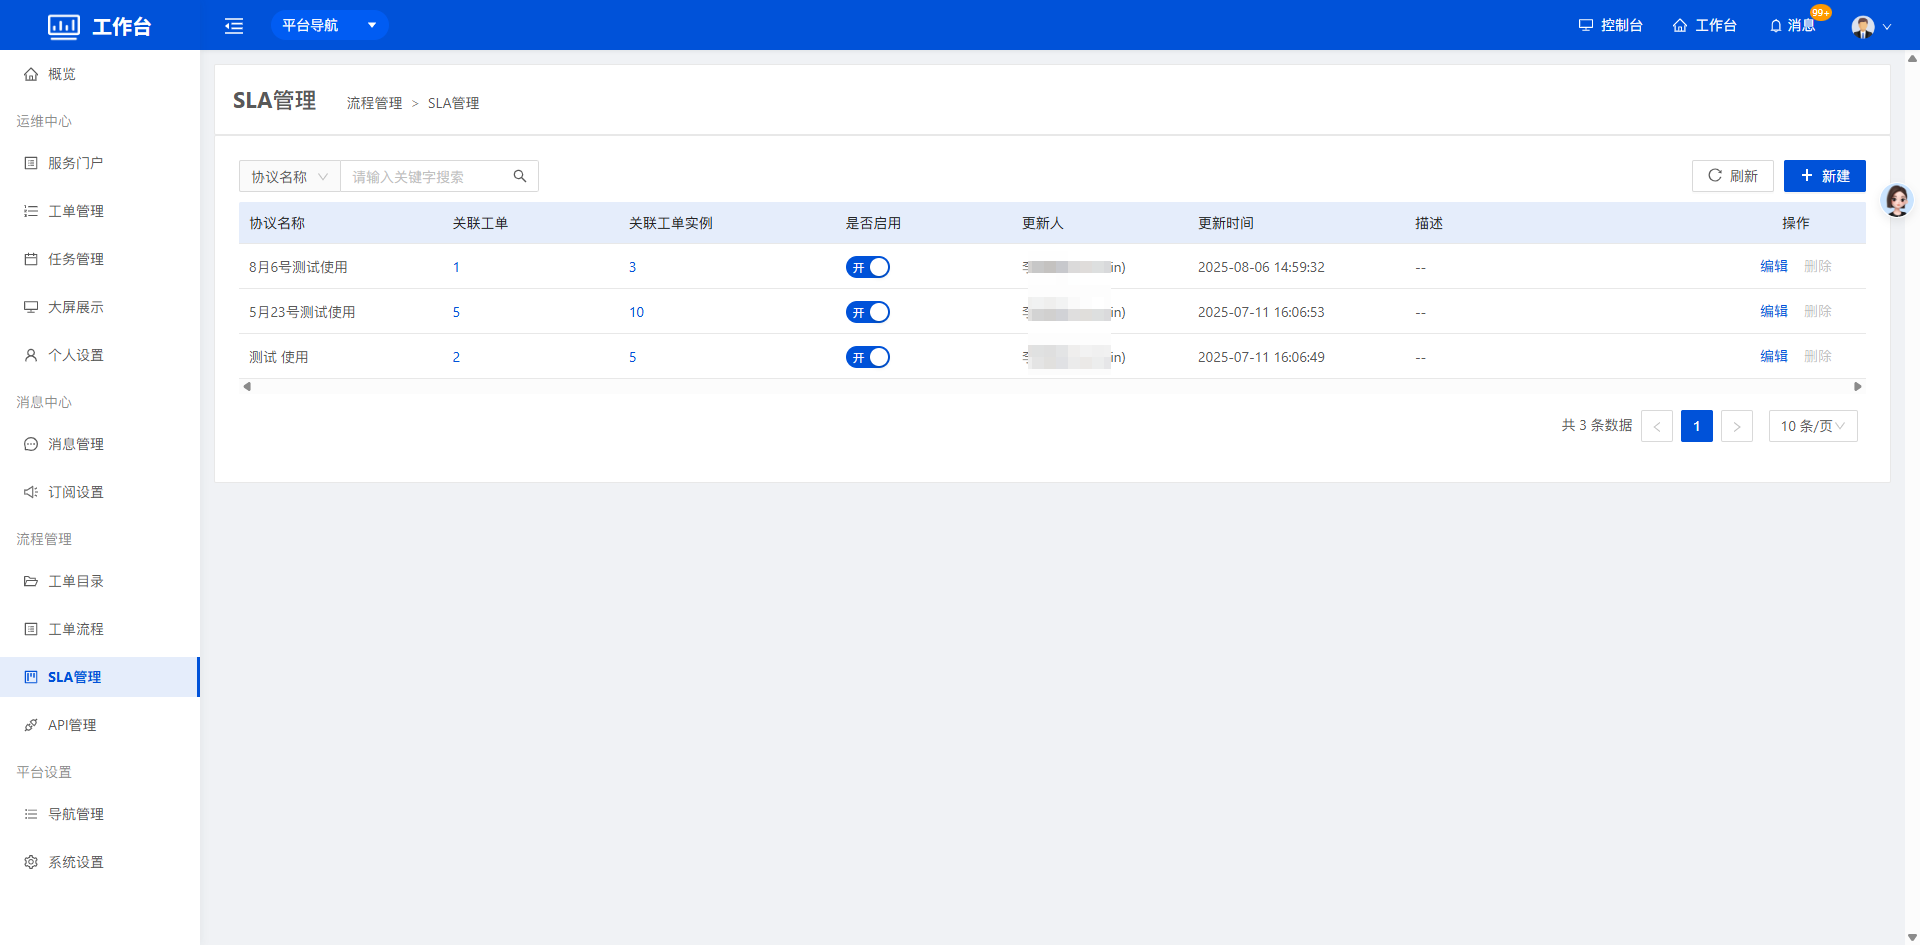 - Click Create to open the create SLA agreement drawer and create an SLA agreement according to the fields on the page.
3.4 API Management
API management mainly supports the use of tickets and the service catalog. For example, when applying for a cloud host through vCenter, users can use the relevant APIs provided by vCenter, create an API, test it, use the API in ticket process design, and complete the cloud host request.
Create an API
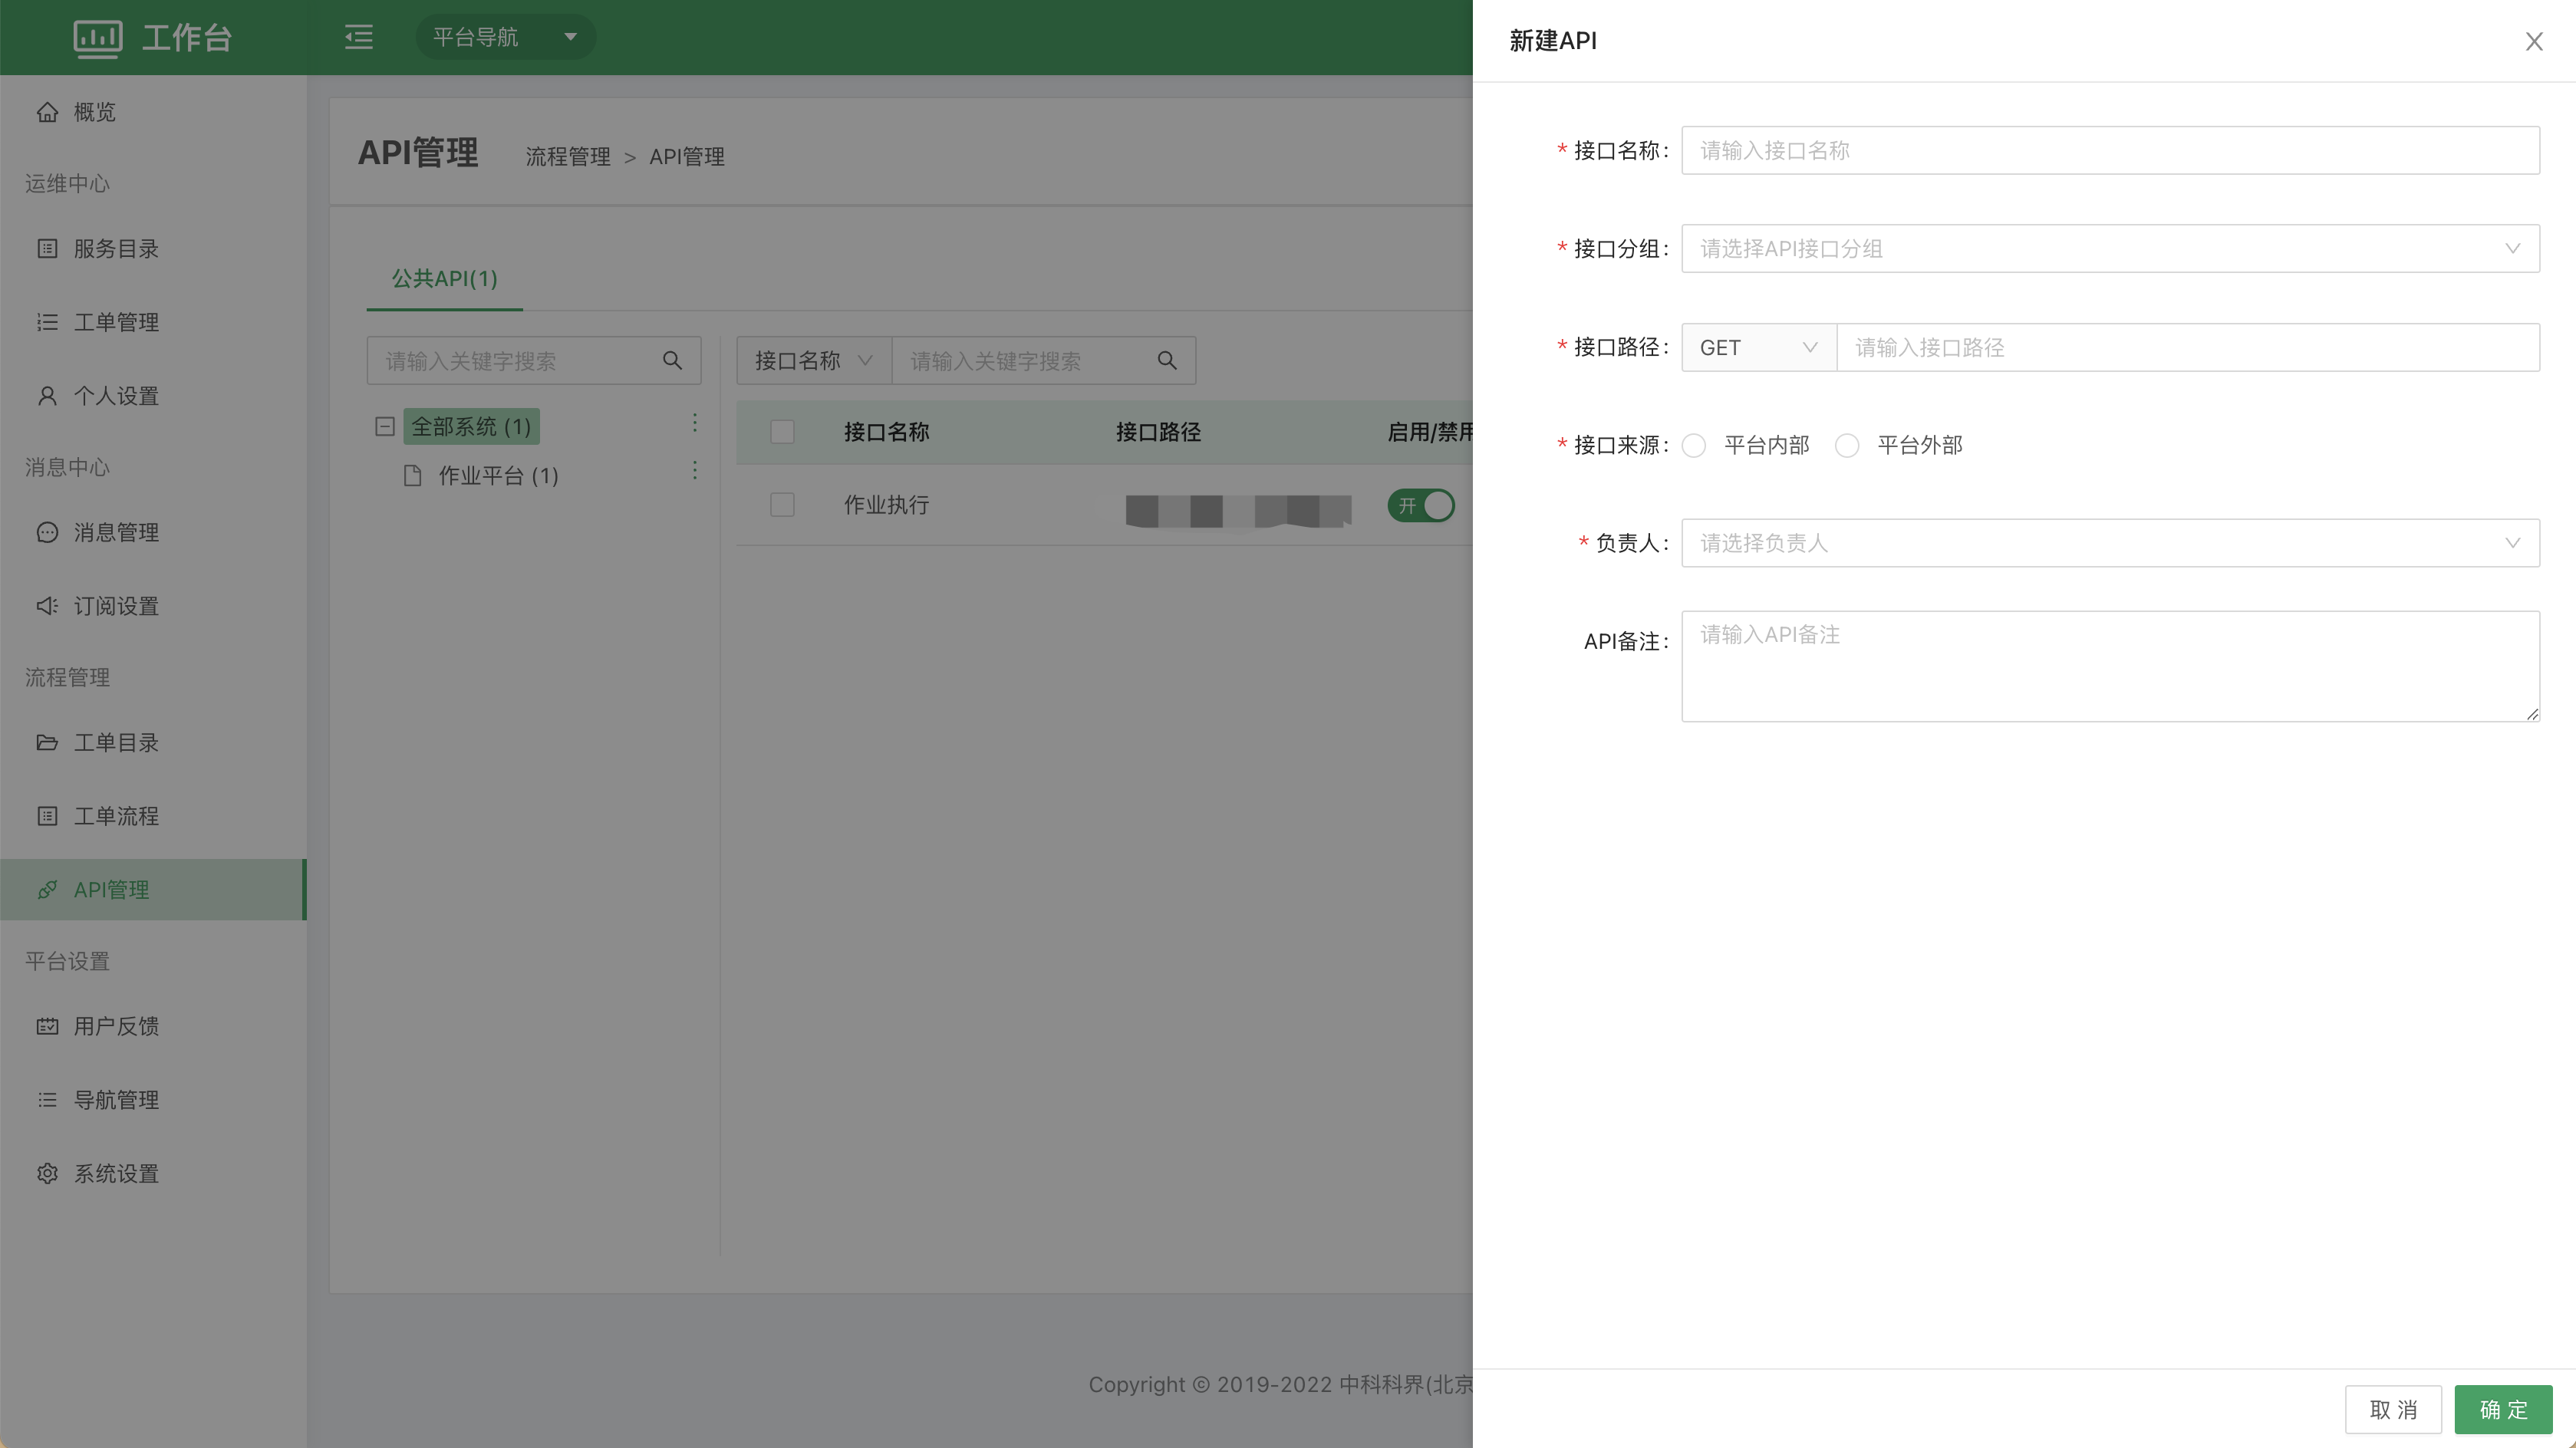
Interface source: internal platform interfaces and external interfaces. Platform-internal APIs are provided through secondary development of the platform; contact the platform according to your actual requirements. External interfaces can be customized and edited by users according to the actual situation and must pass the connection test.
Edit an API
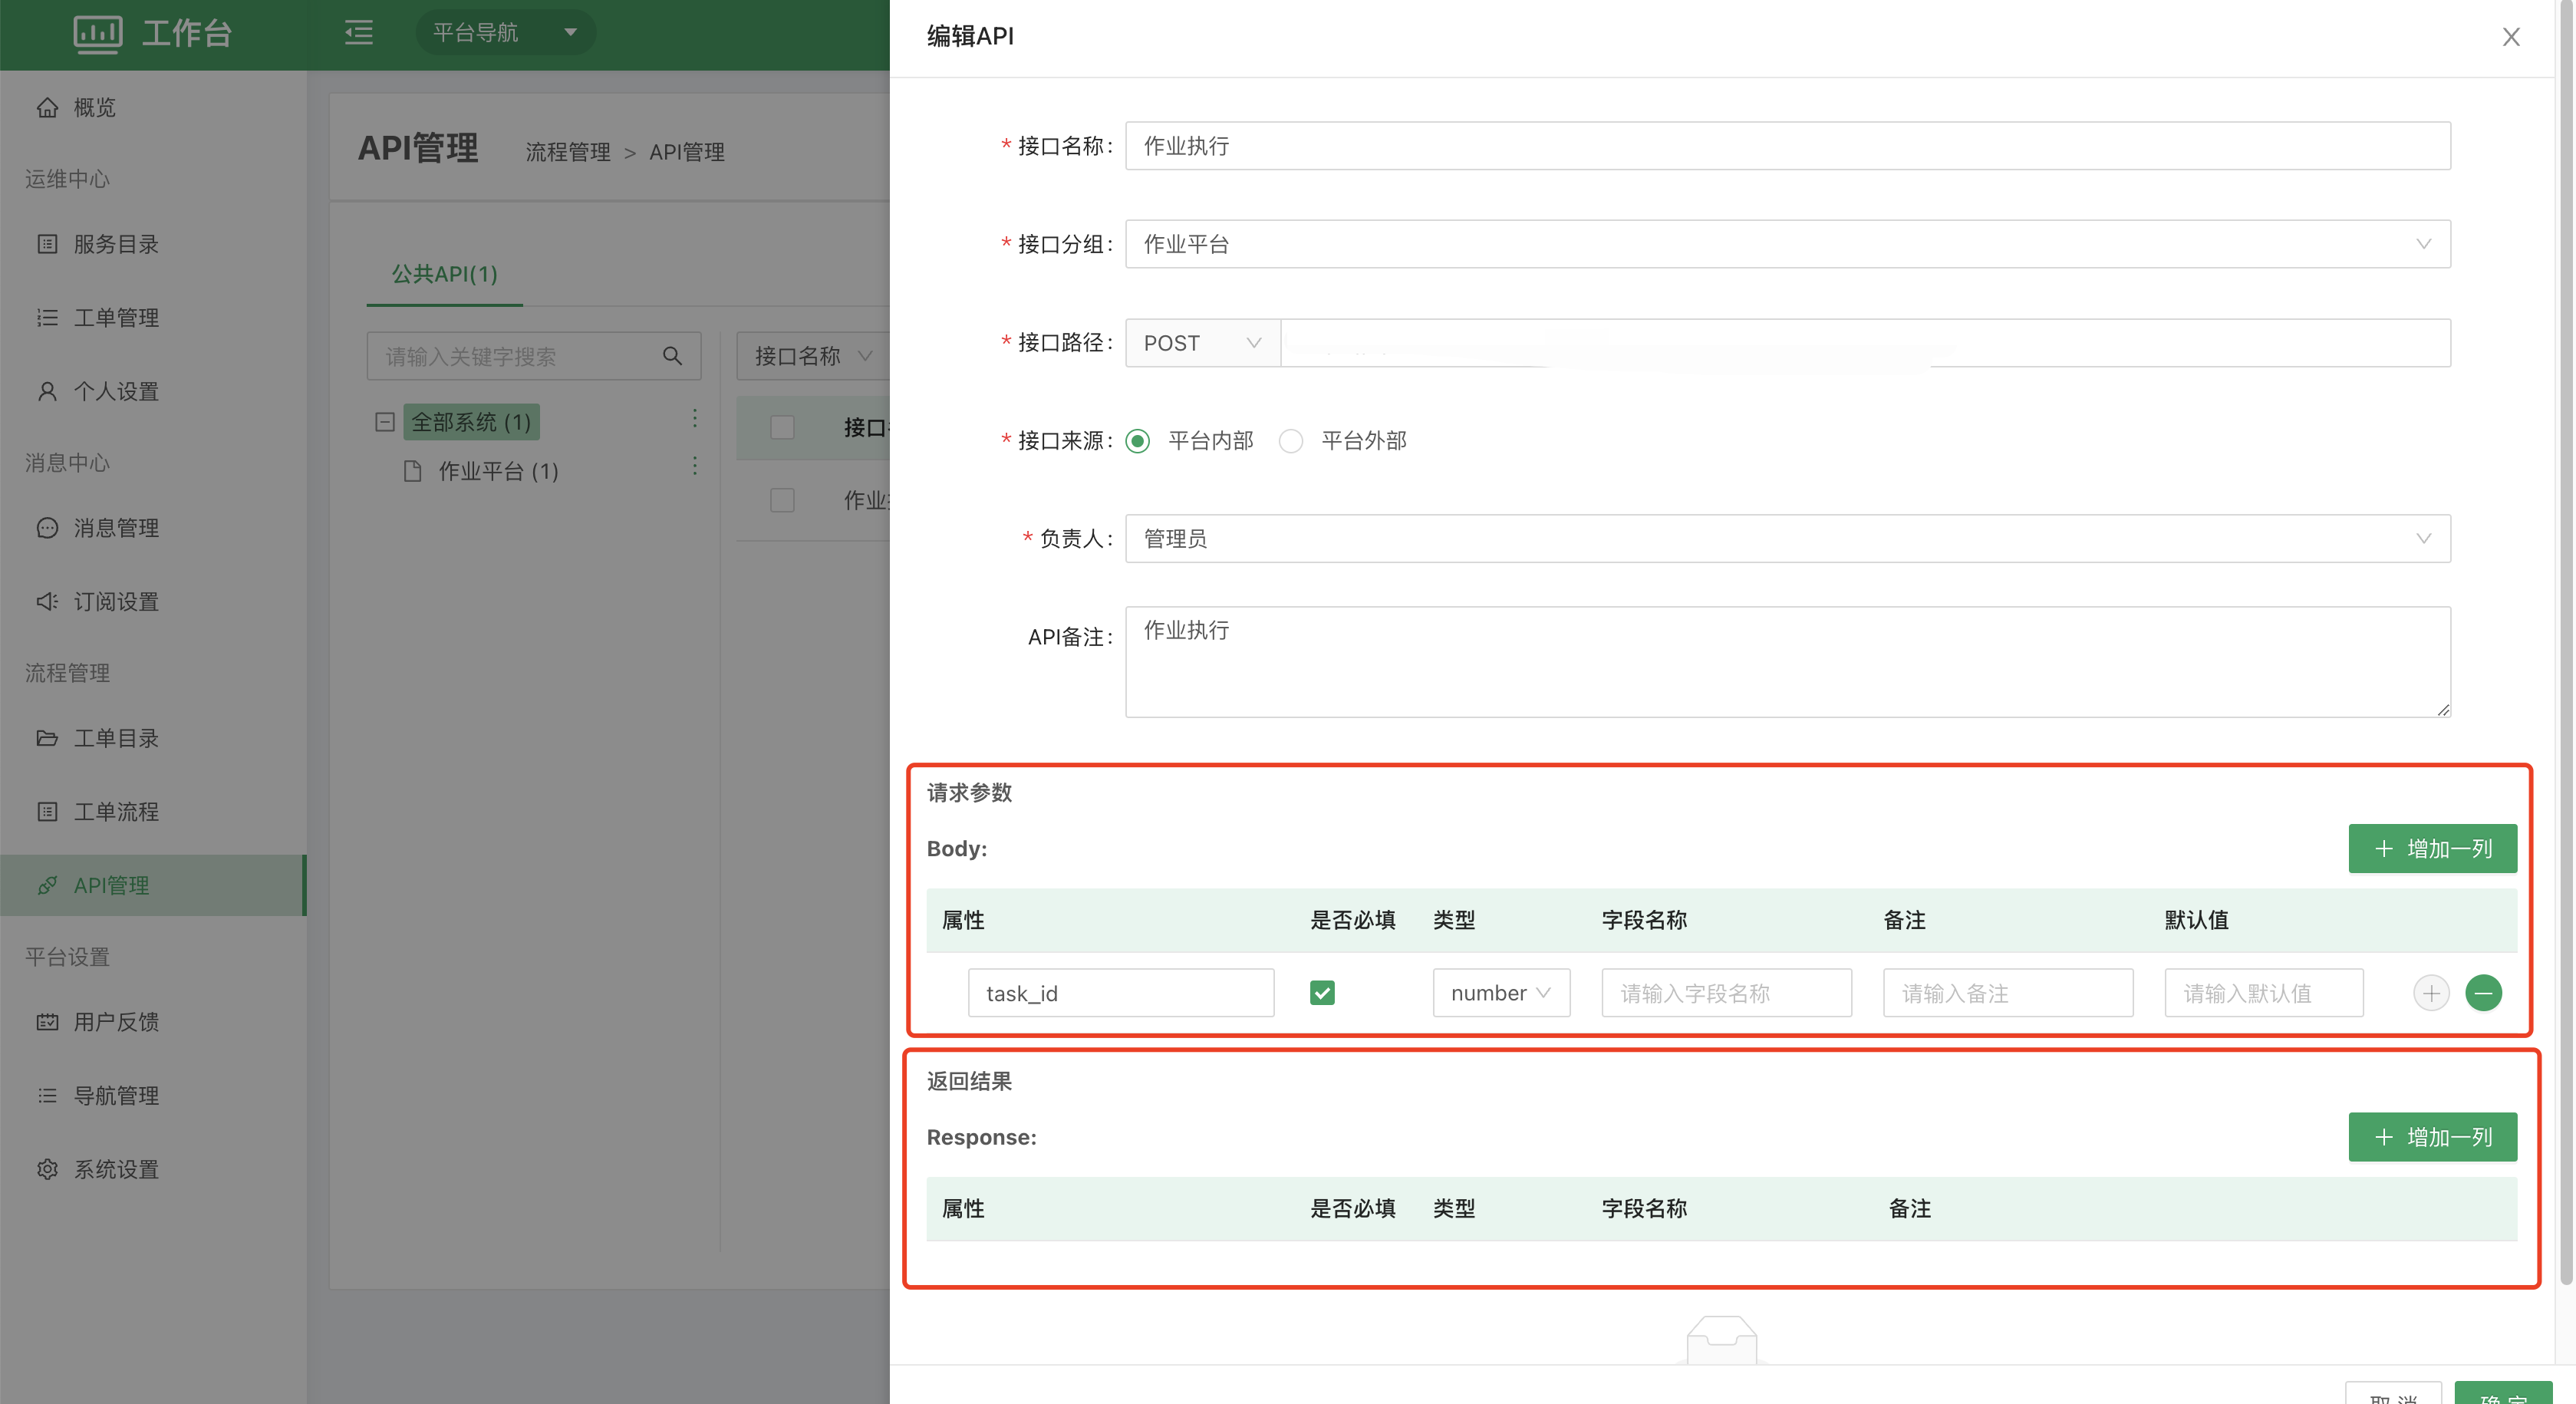
Users can customize request parameters and return parameters. Currently only the type of request parameters is validated; for the response, only the status_code is evaluated: 200 means success and any other value means failure. Therefore, test the API's return values and status in advance during use to avoid invalid ticket execution.
3.5 On-call Management
Supports custom scheduling for multiple on-call groups, and scheduling templates help you schedule quickly.
Note: For the newly added on-call management features, go to Unified Permission - Permission Policy to grant authorization before use.
3.5.1 On-call Calendar
View on-call details by week and month in calendar view, or in list view. Users can add on-call shifts, swap shifts, cover shifts, cancel on-call shifts and more.
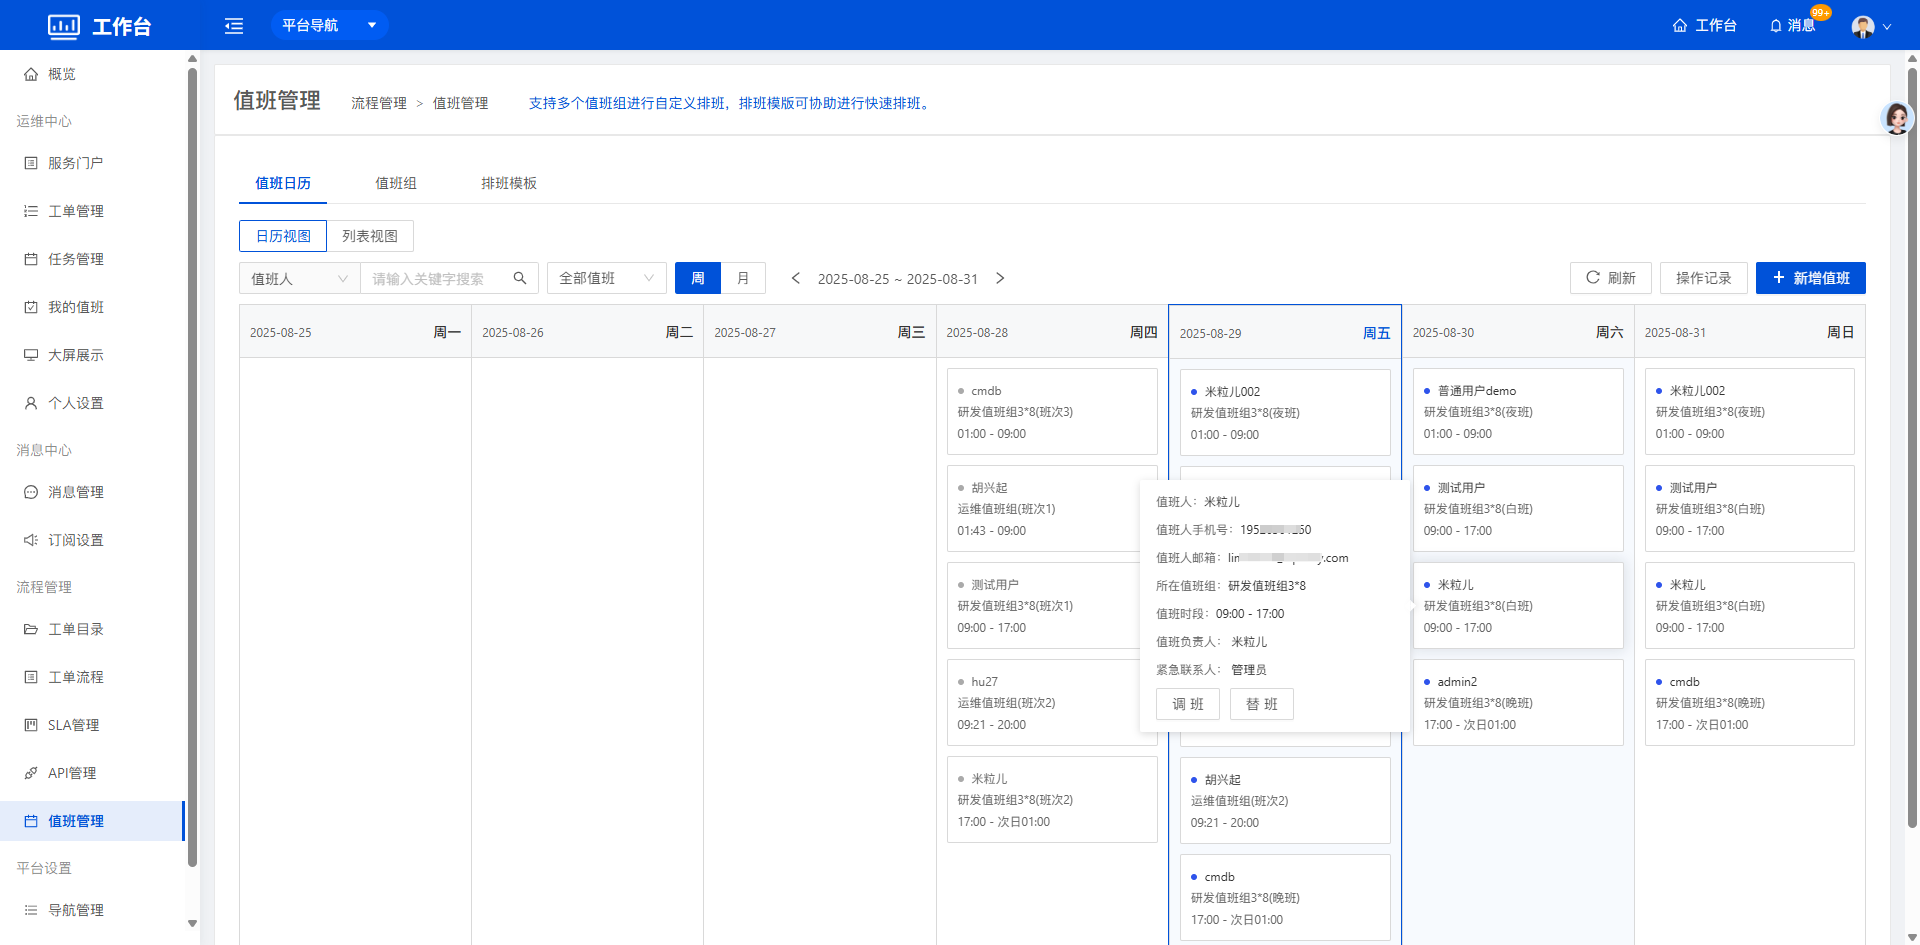
- Calendar view
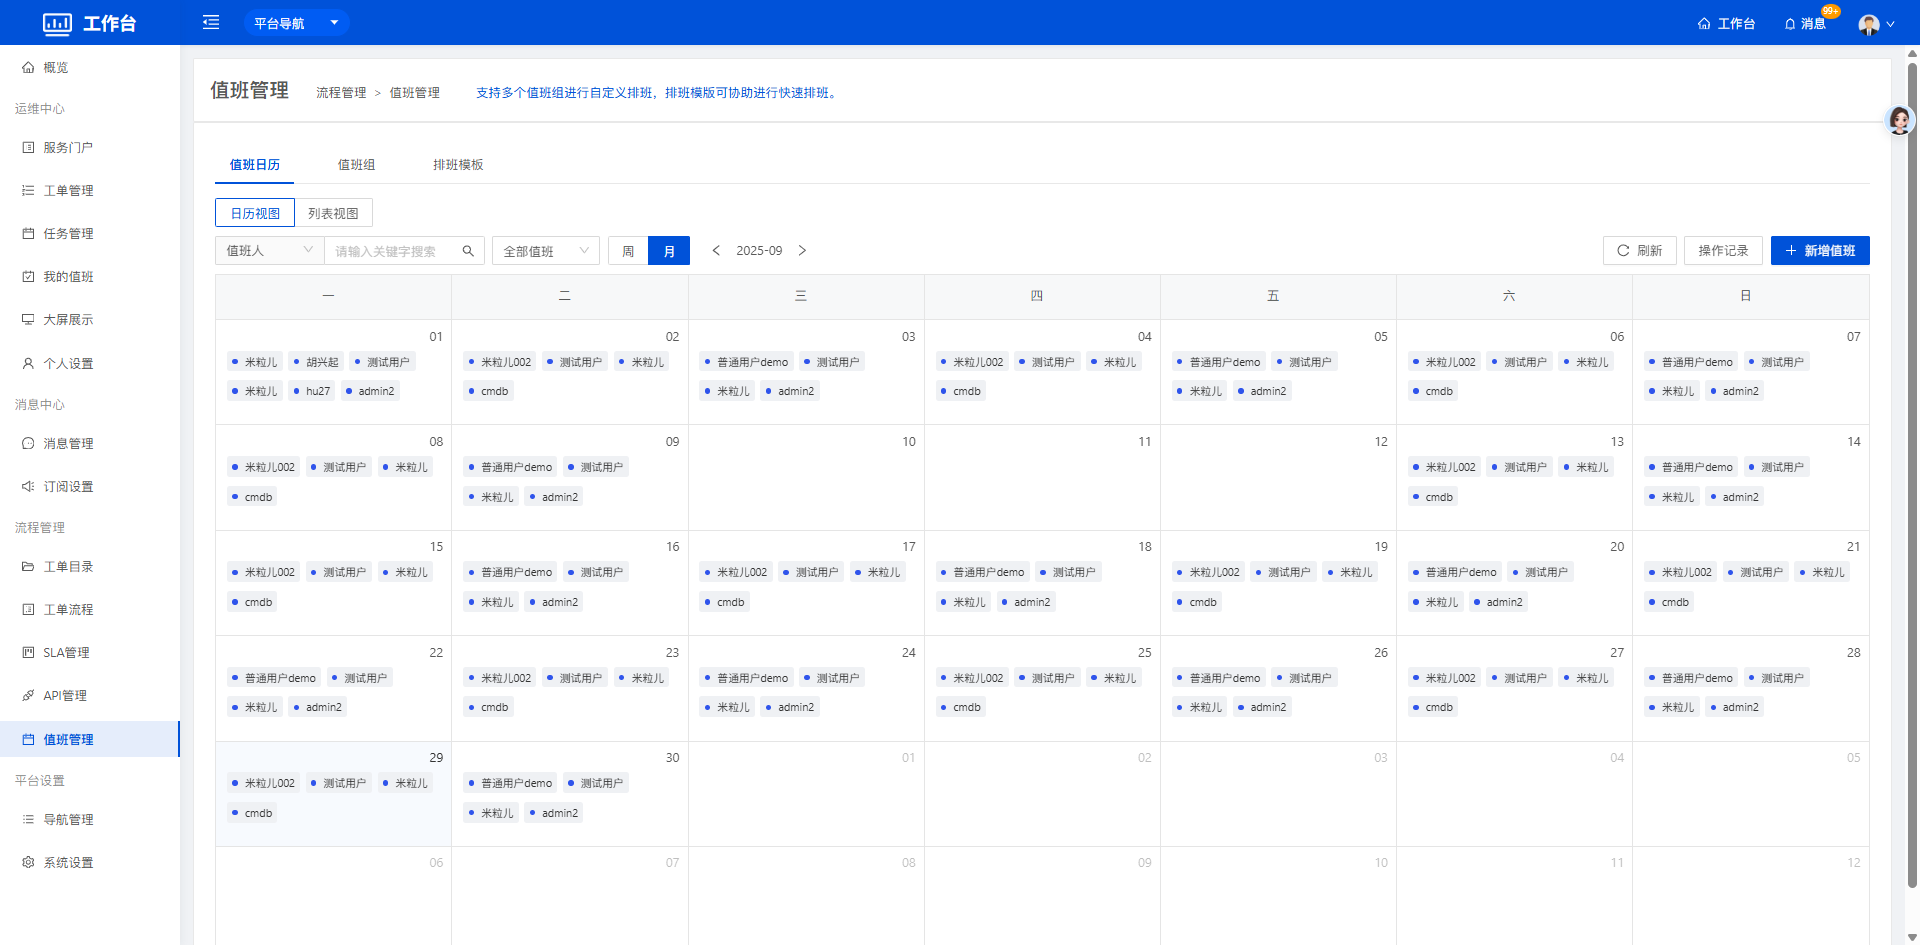
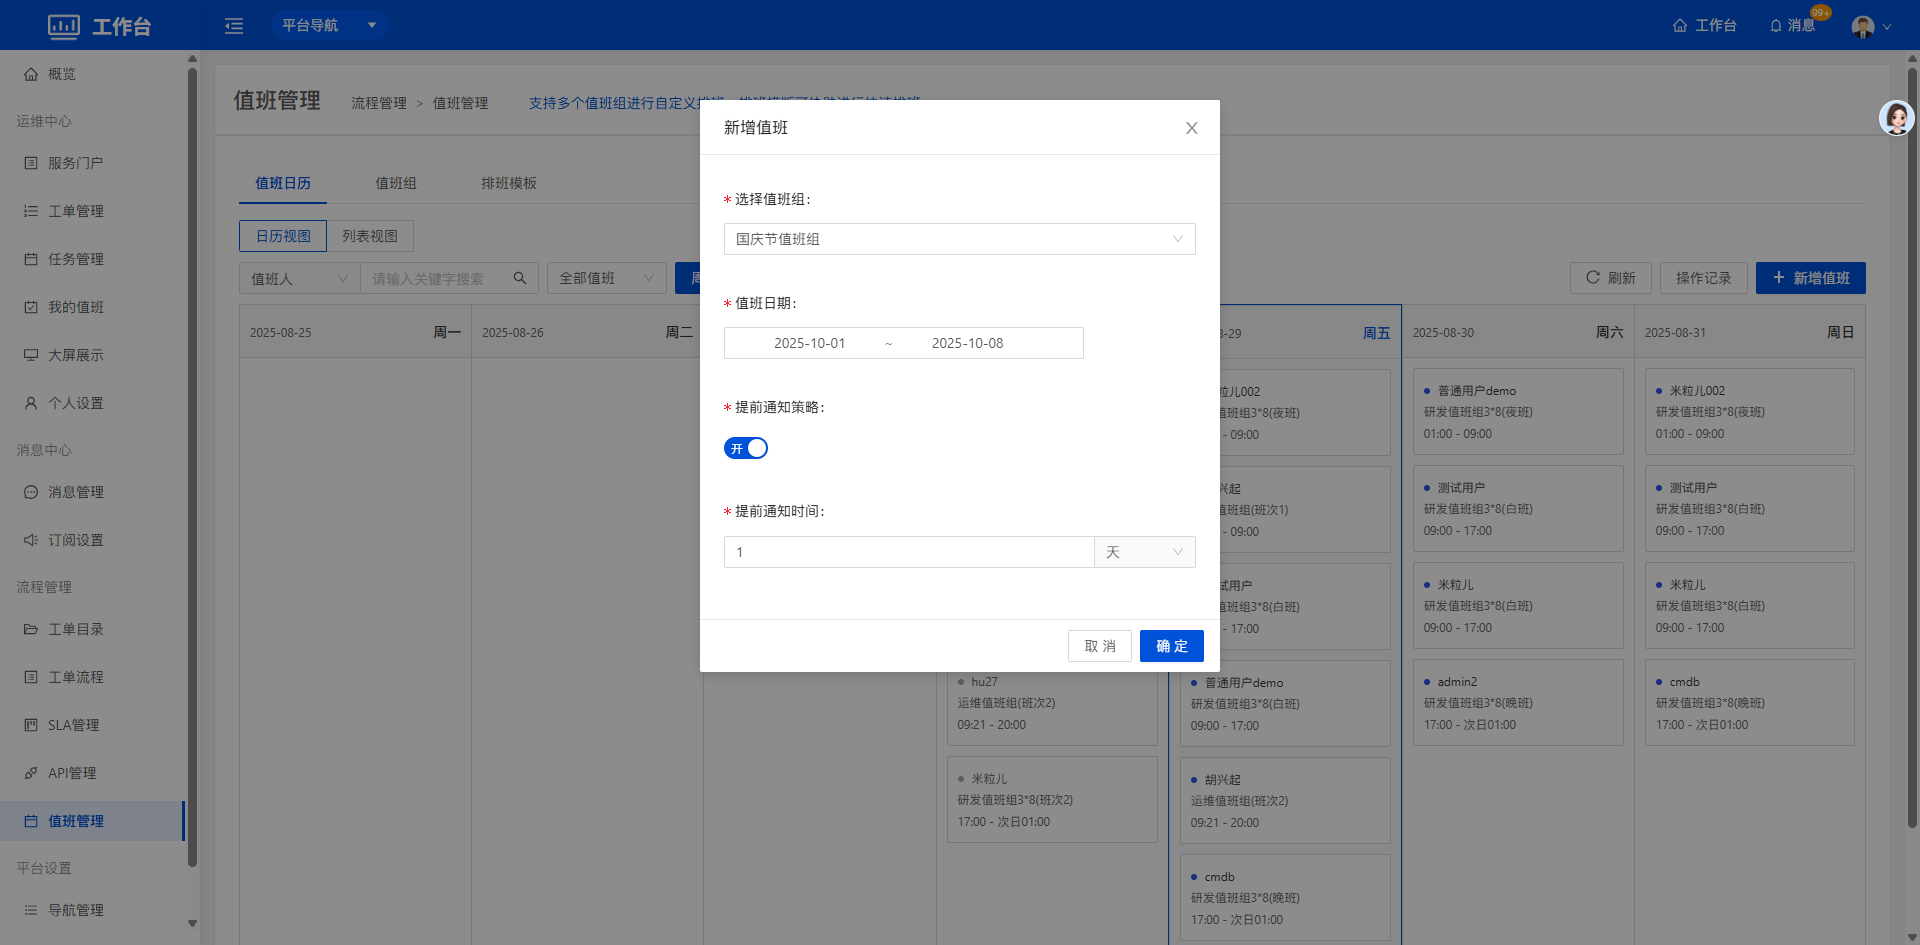
Click the add on-call shift button to select the on-call group, on-call date and on-call notification policy, and complete the new on-call shift.
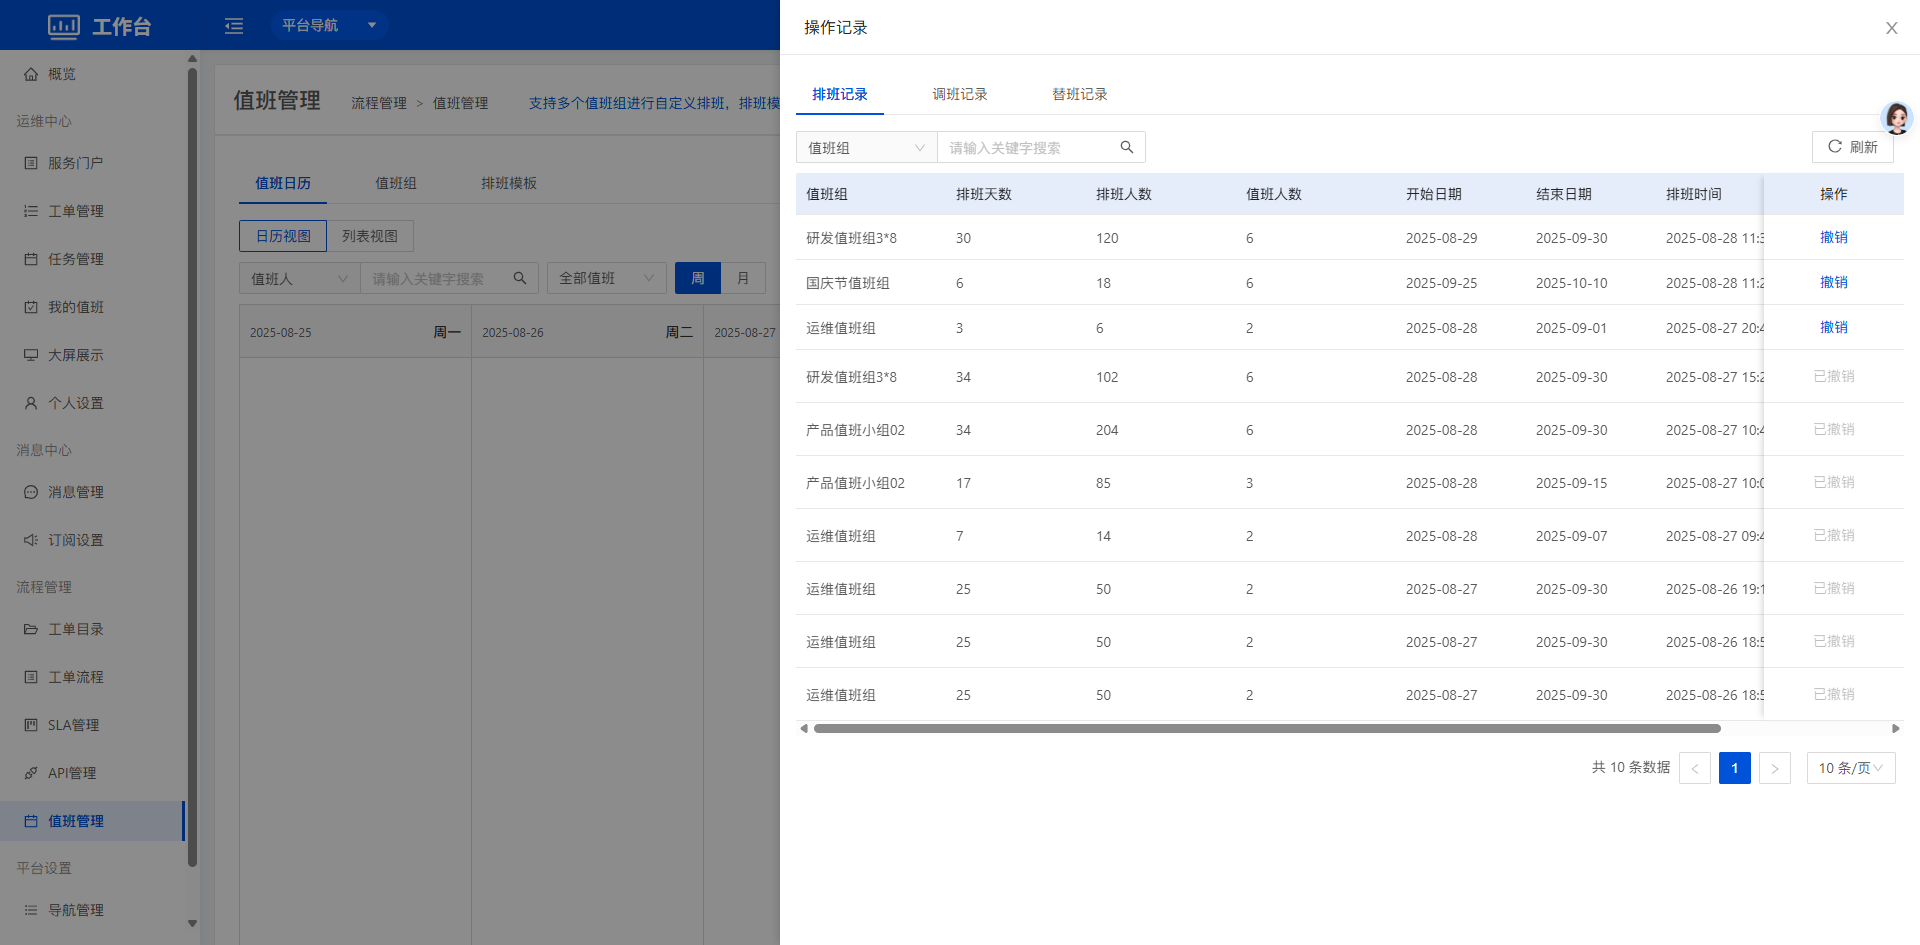
Click the operation records button to view scheduling records, shift swap records, shift coverage records and other operation log information.
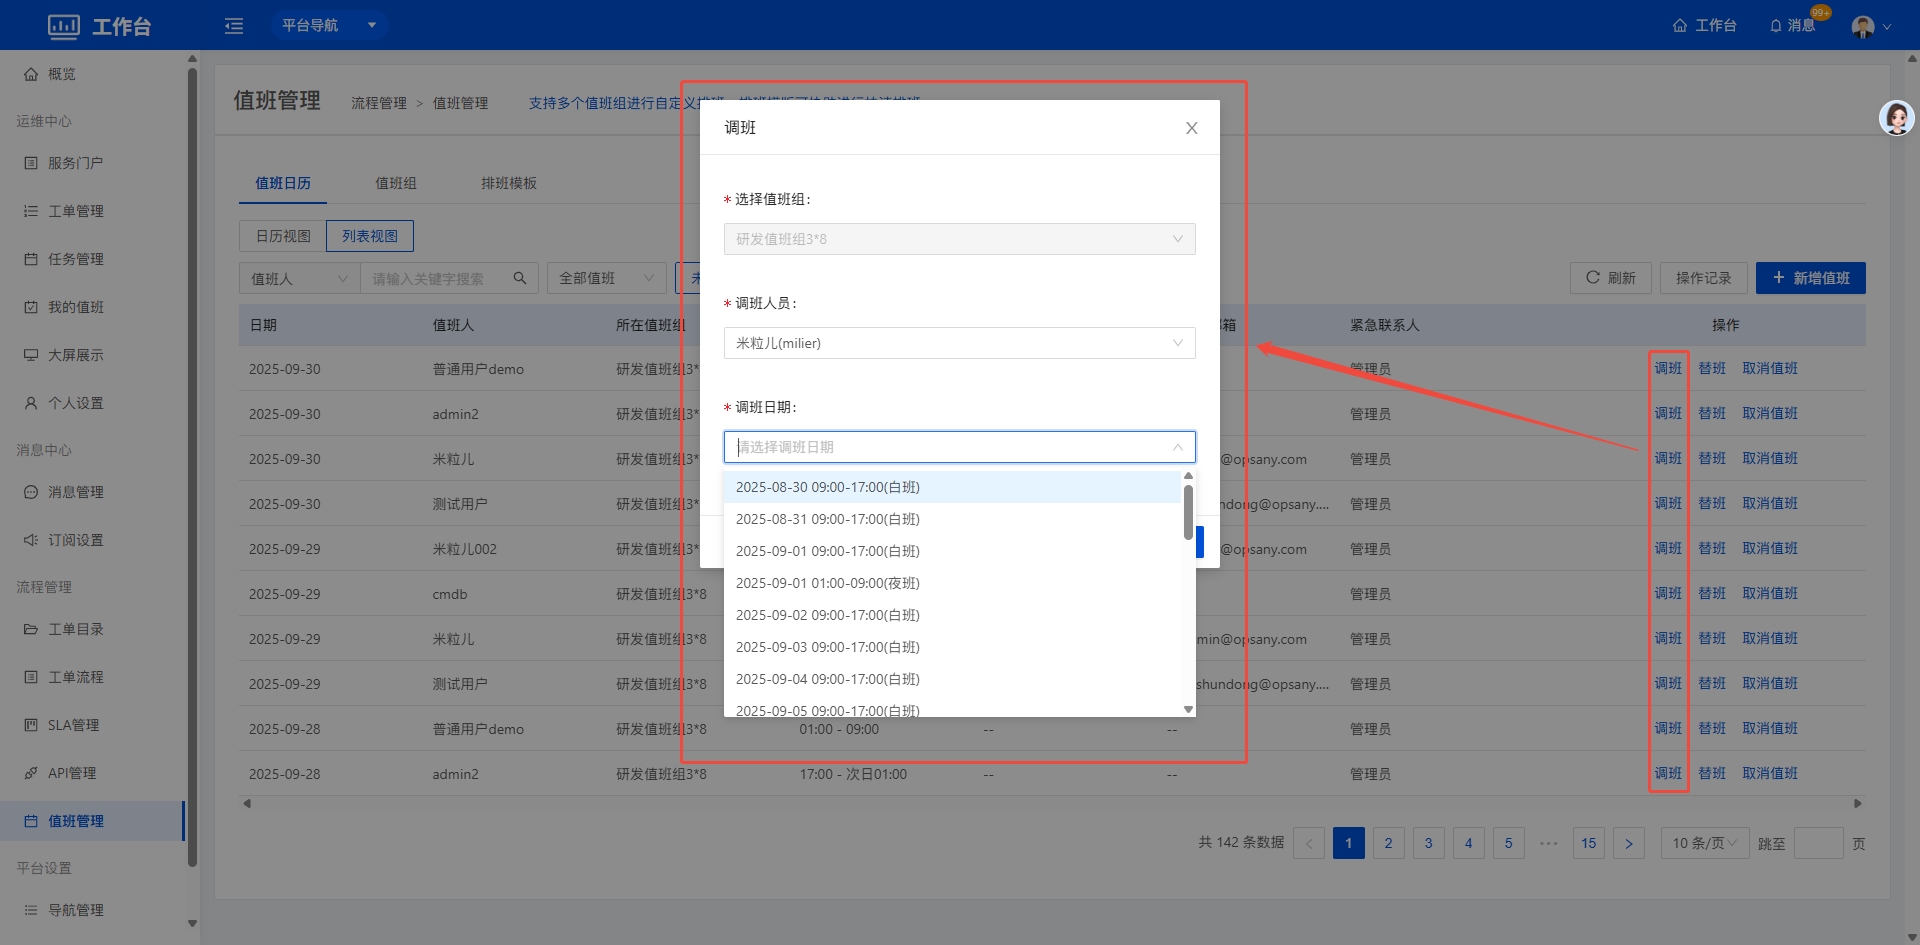
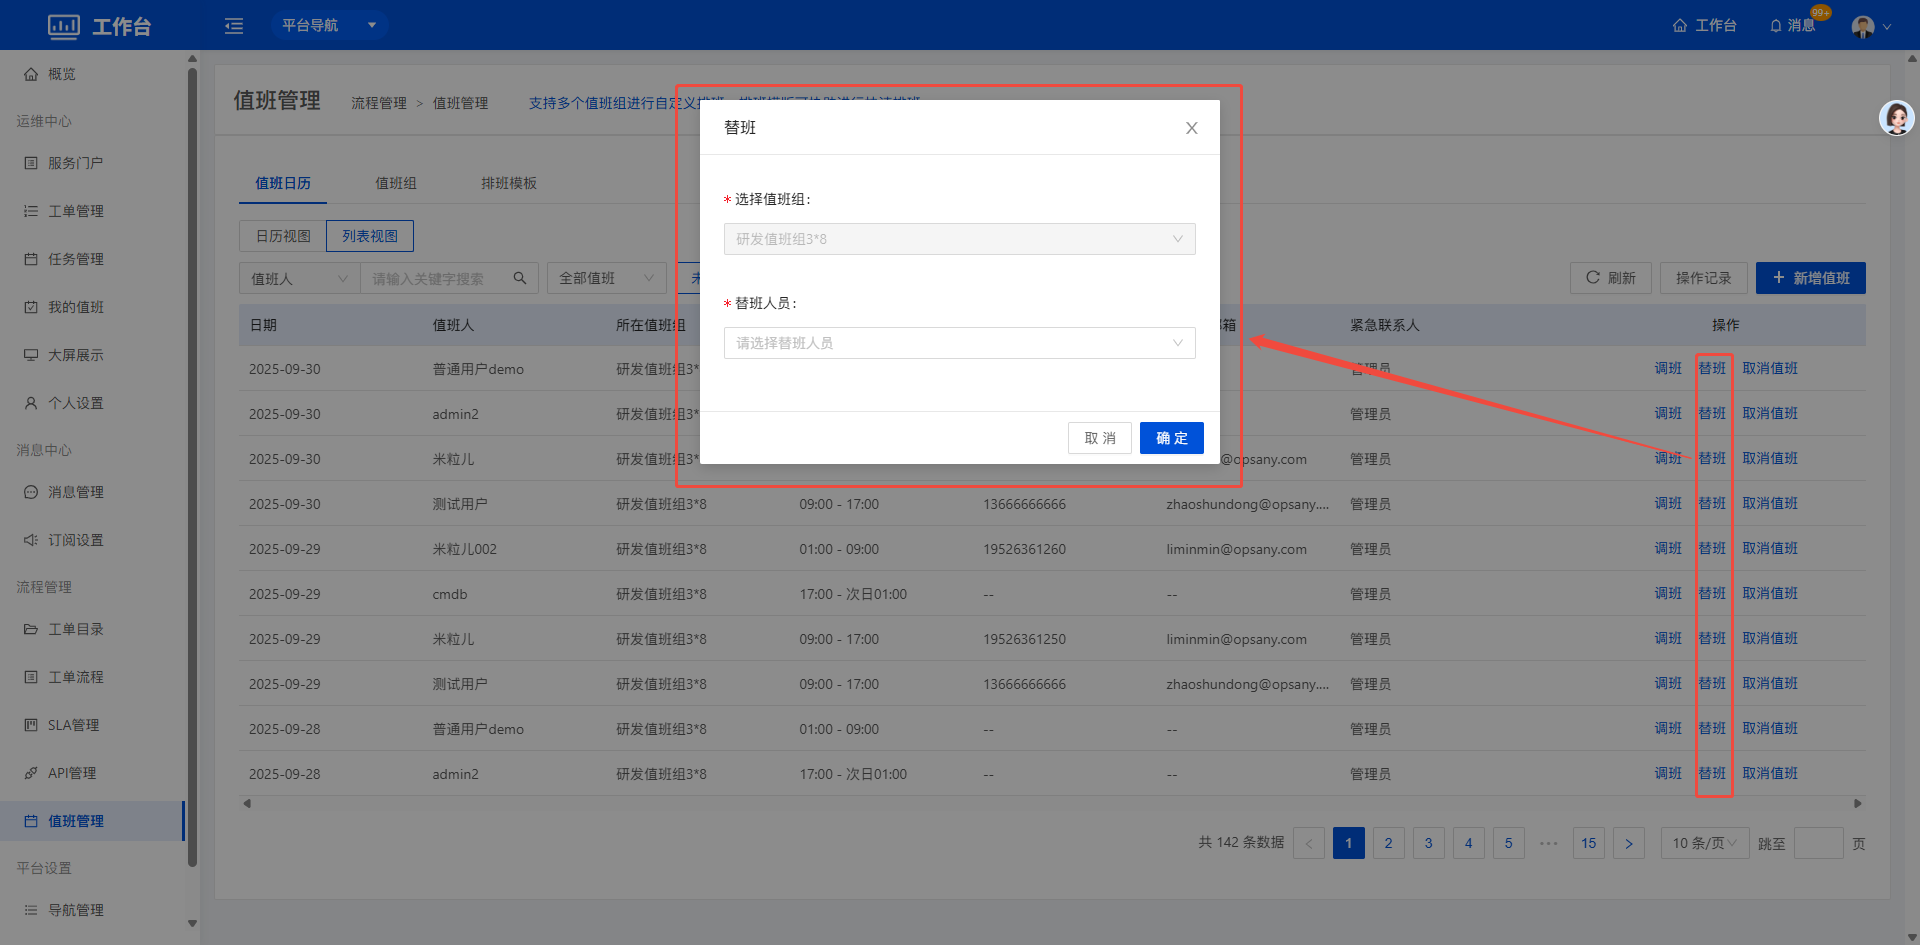
- List view: switch between future and past on-call shifts. For future shifts you can swap shifts, cover shifts and cancel on-call shifts.
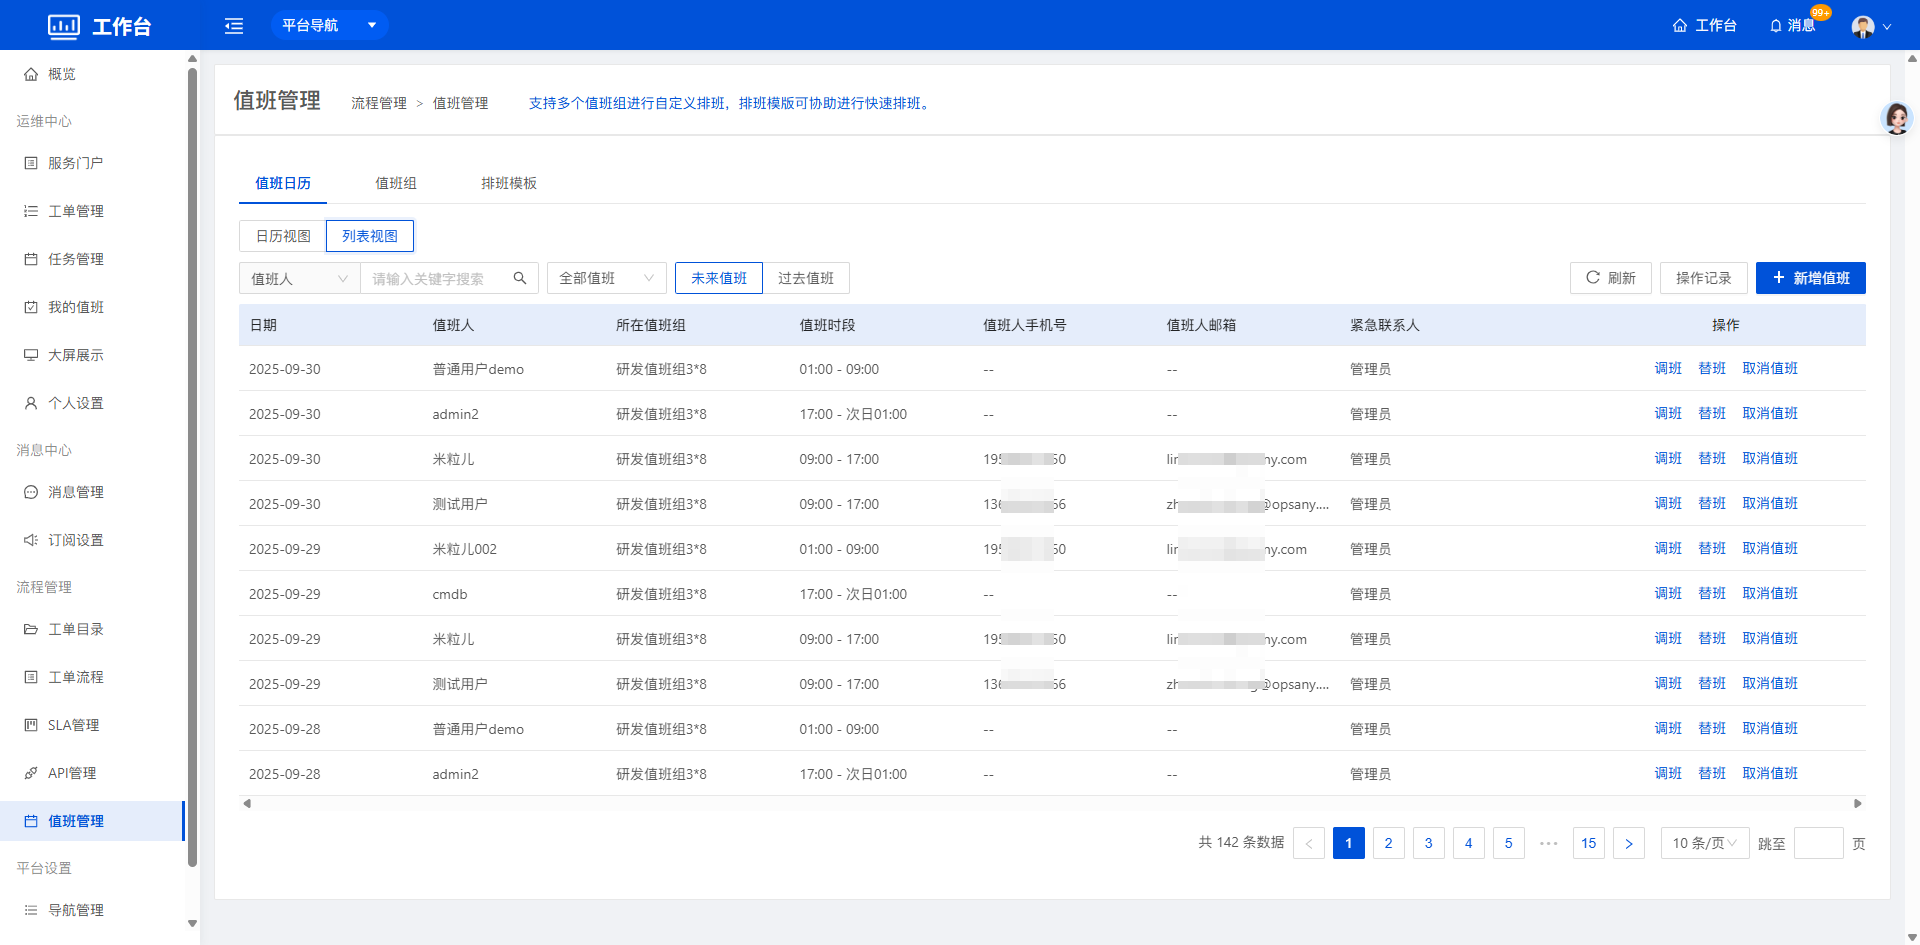
Click the swap shift button to select the person and date for the shift swap and complete the operation.
 Click the cover shift button to select the person who will cover the shift and complete the operation.
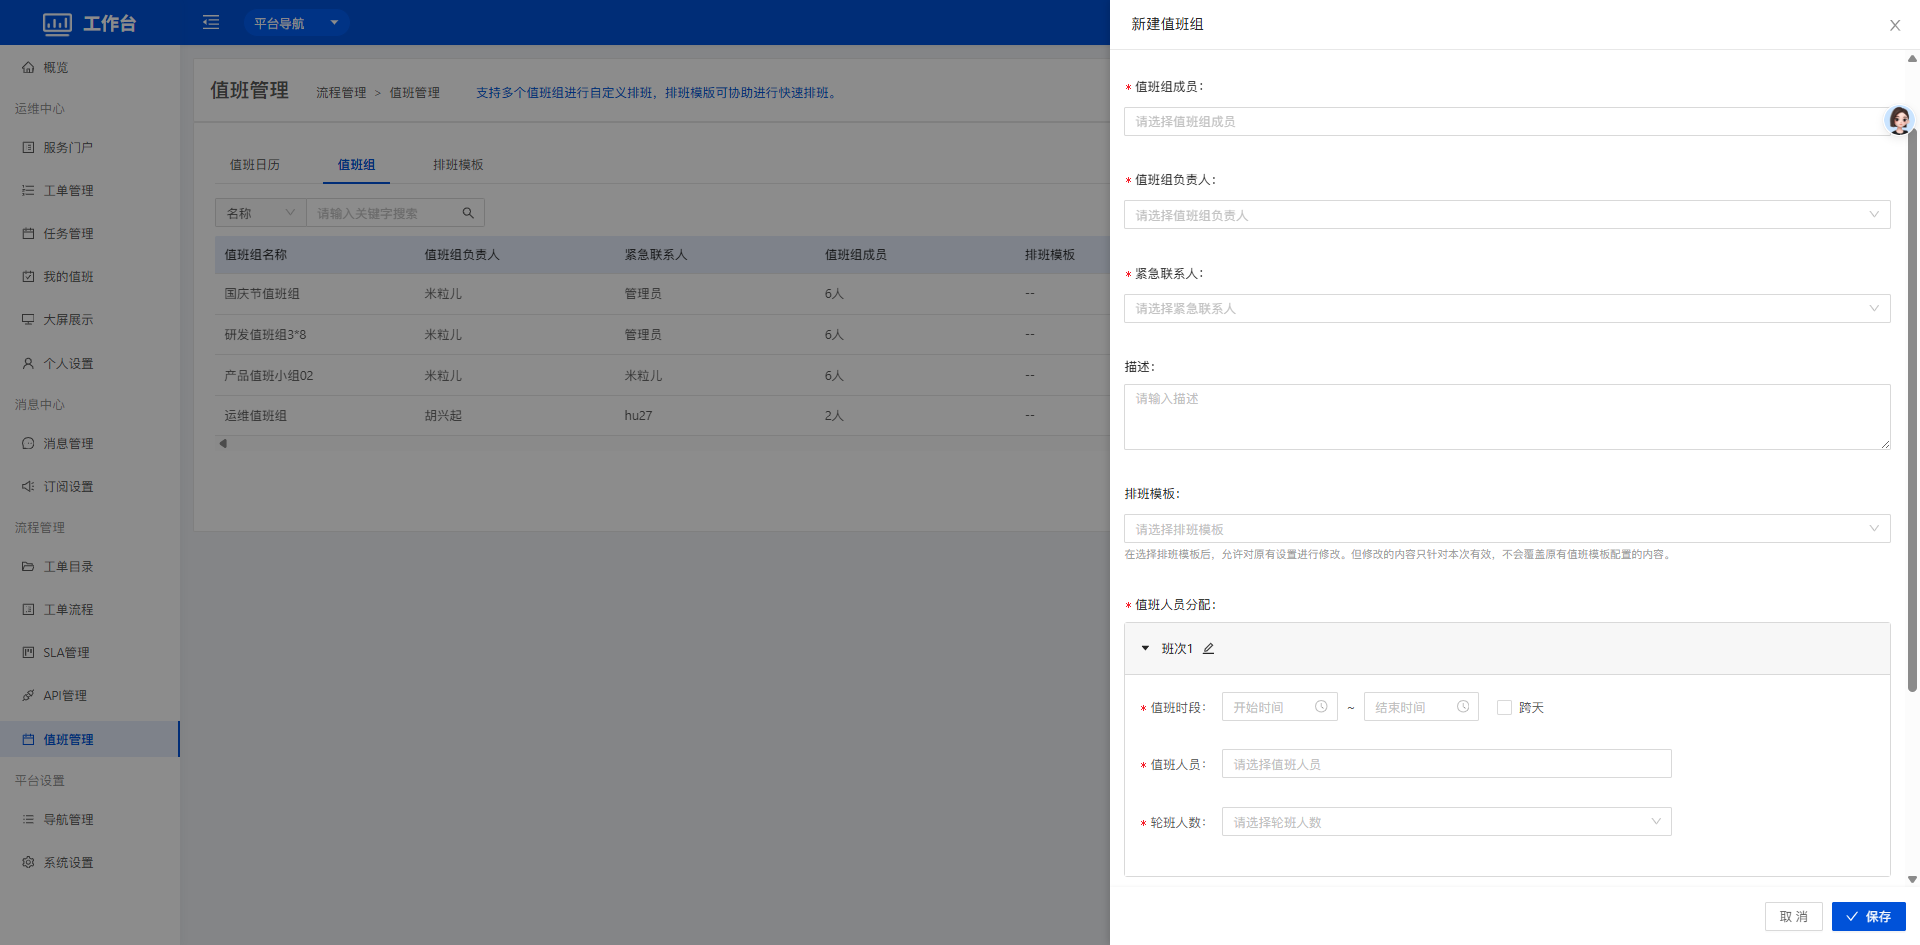
3.5.2 On-call Groups
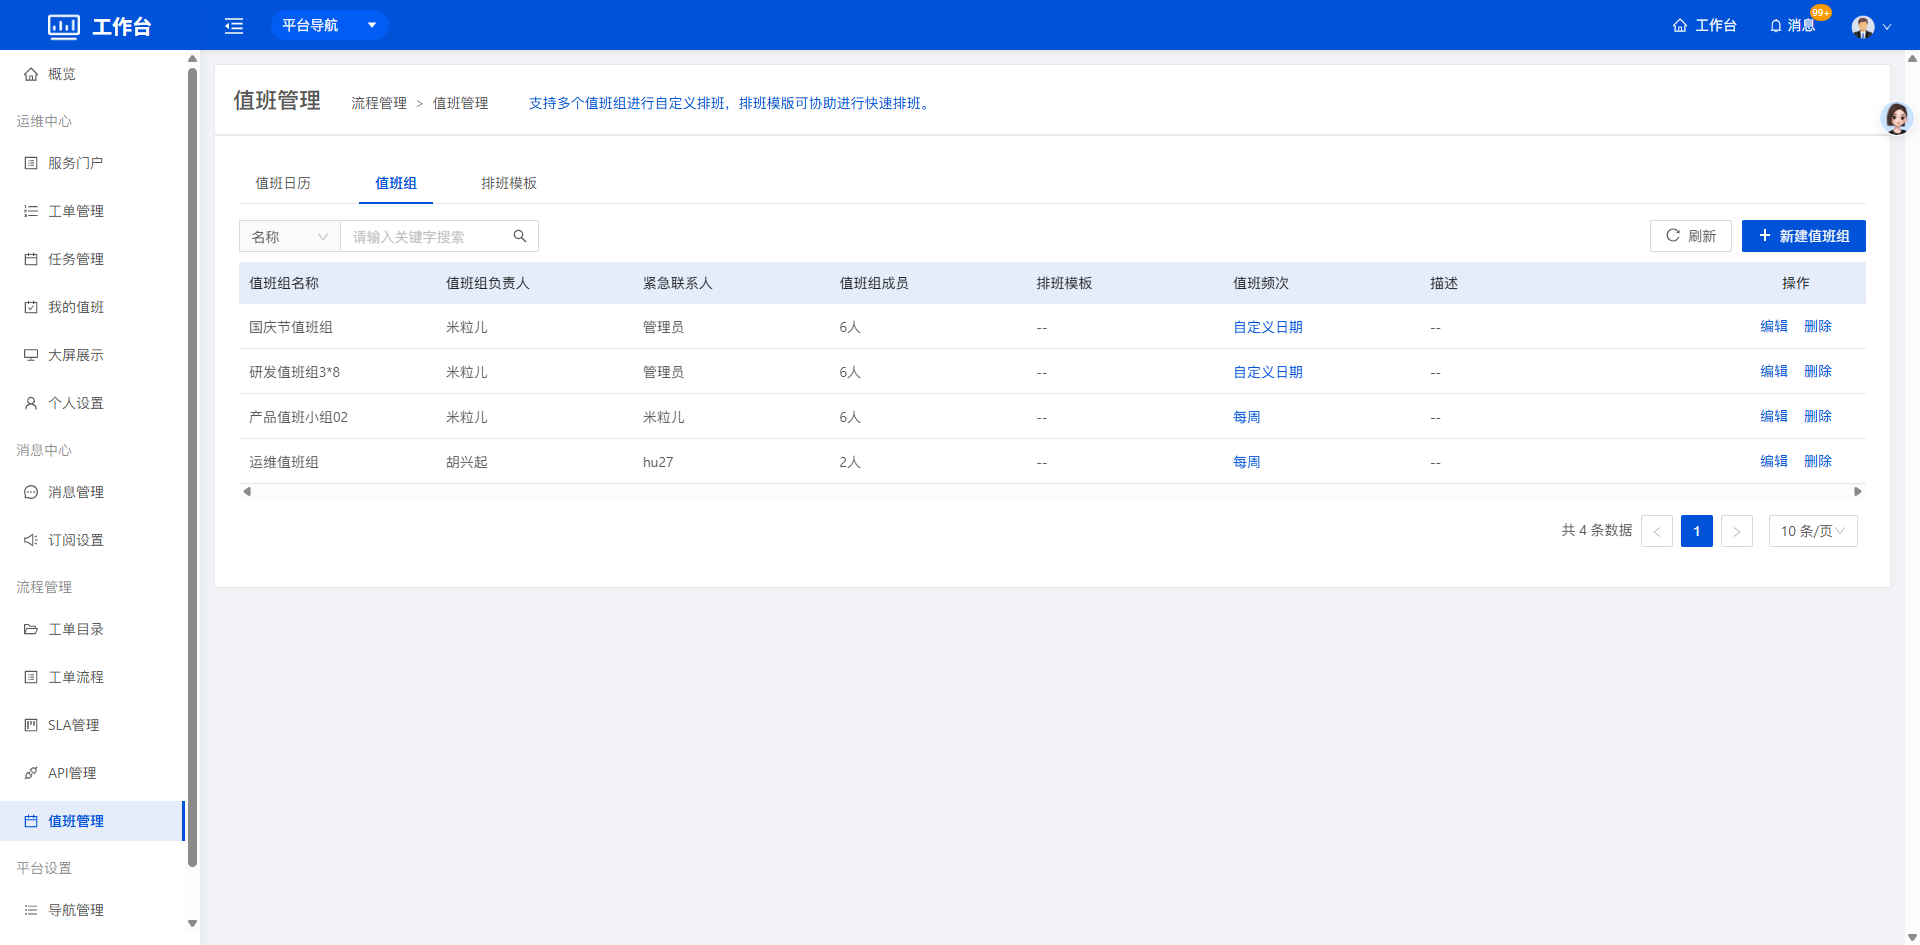 Supports creating custom on-call groups. Click the create on-call group button to define the parameters of the on-call group. After selecting the group members, configure the on-call assignment rules based on the existing members (you can also select a scheduling template for quick configuration), and select the on-call period, on-call personnel and the number of people per rotation; finally select the on-call frequency to complete the creation.
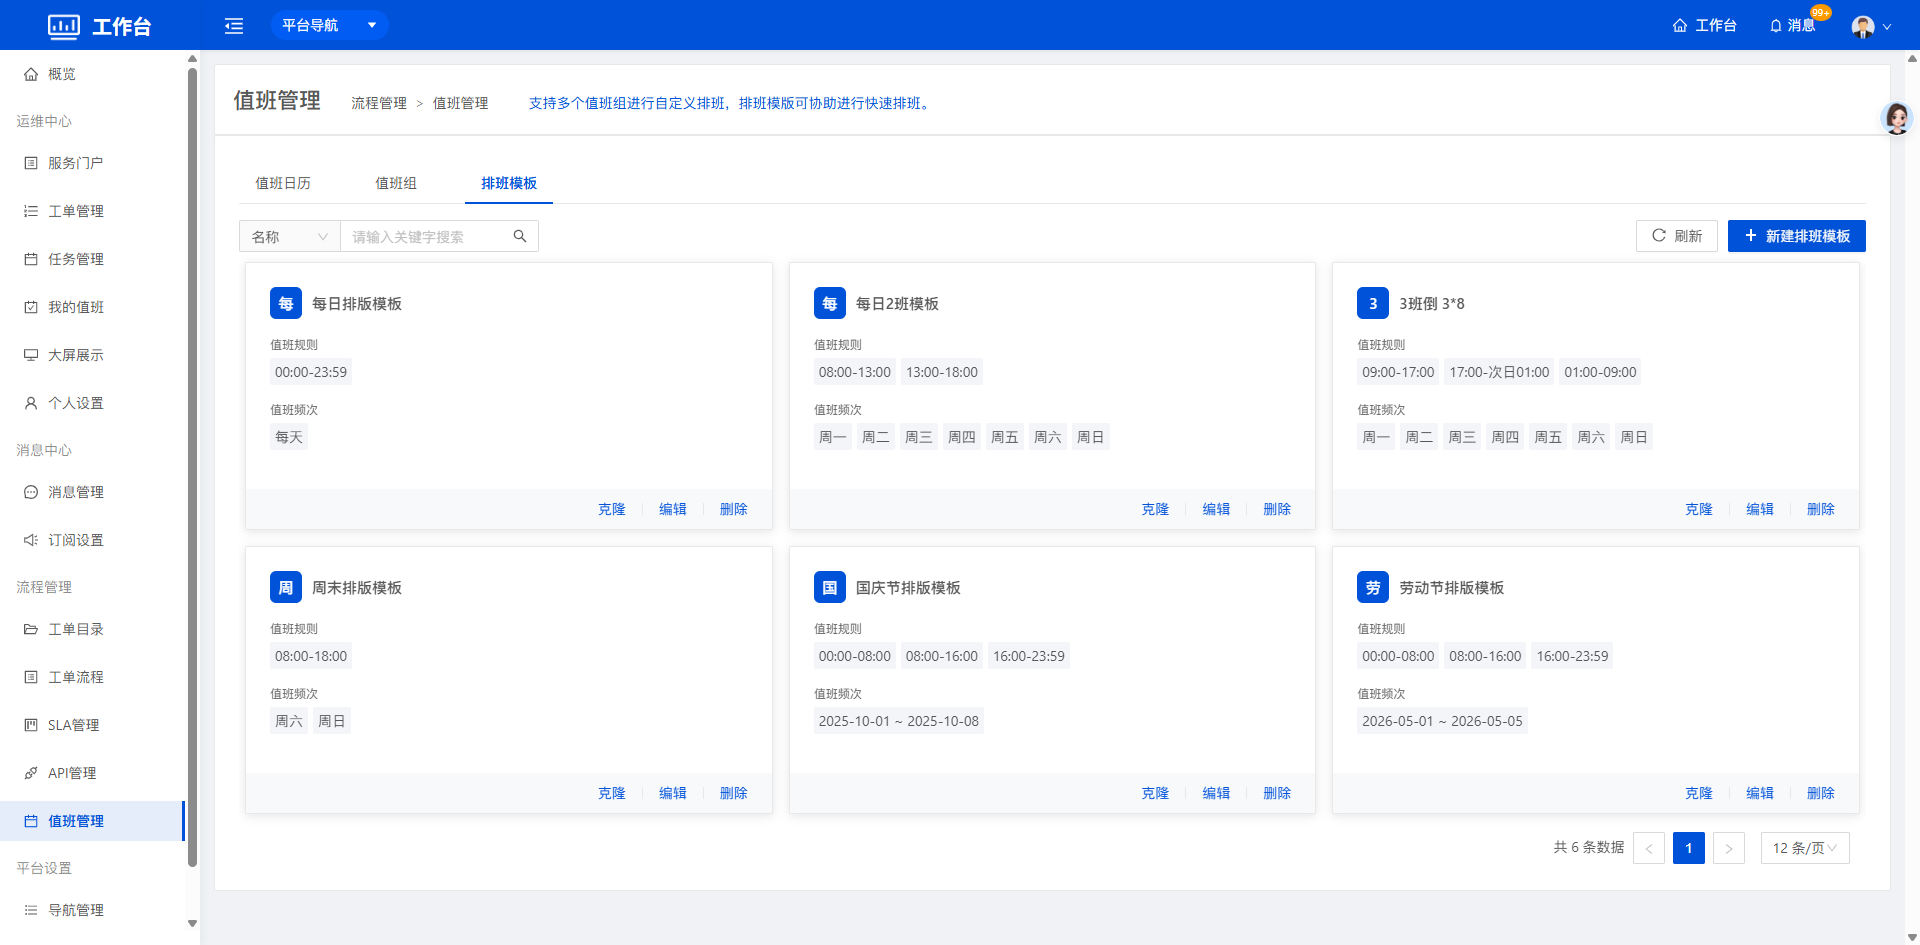
3.5.3 Scheduling Templates
Common scheduling templates are built in, and you can also create your own. Select one when creating an on-call group to fill in the configuration quickly.
Click create scheduling template to configure on-call shifts, on-call frequency and so on.
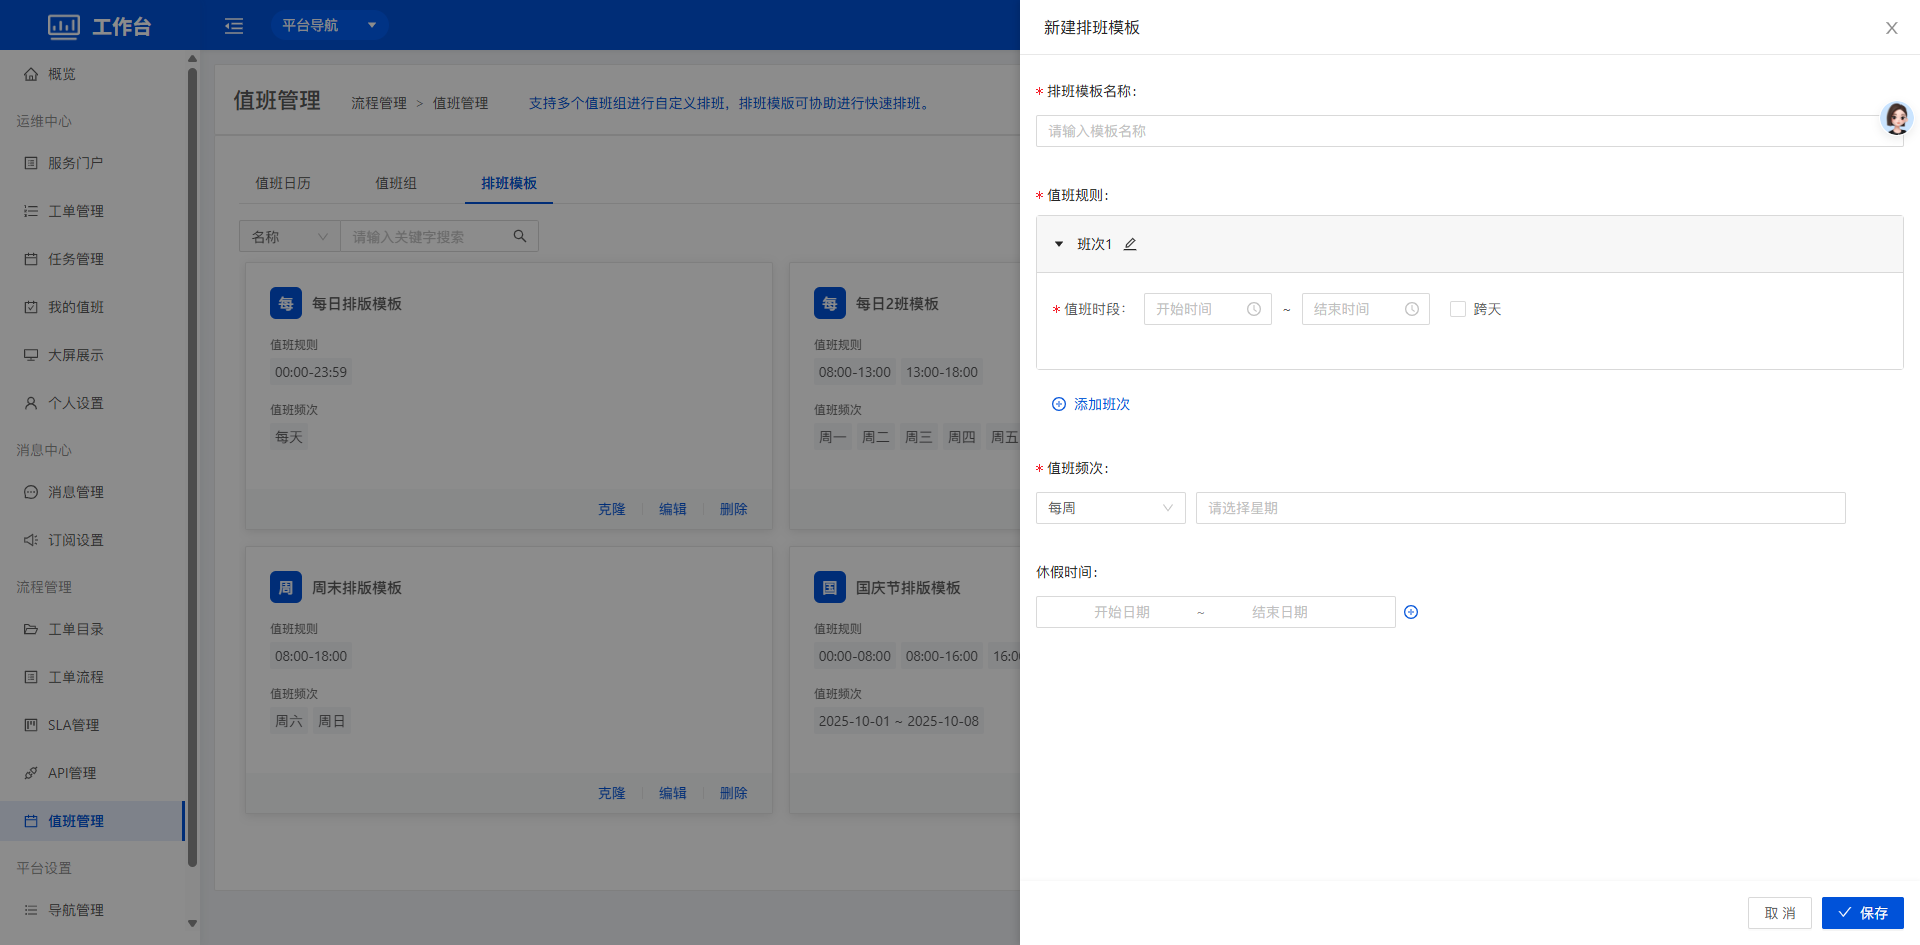
Note: When the cross-day option is selected for a shift, the cross-day period is identified automatically.
4. Platform Settings
4.1 User Feedback
User feedback helps users provide effective feedback to platform administrators, so the platform can be optimized and improved more quickly. Platform administrators can mark each feedback as Resolved or Unresolved.
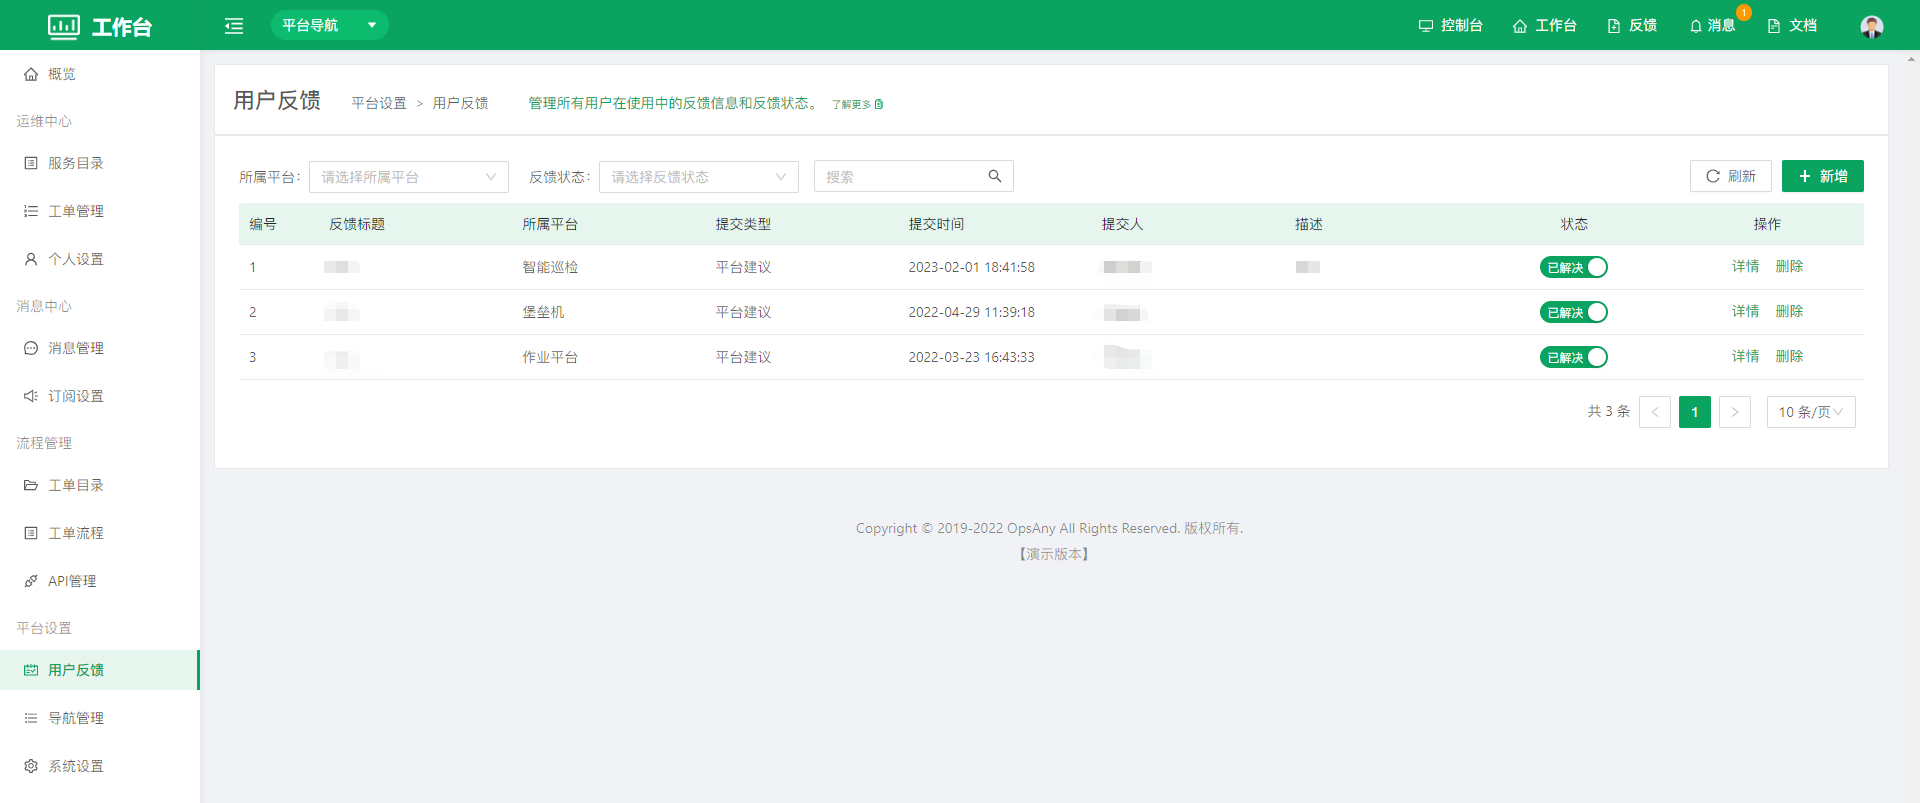
- Click Create to open the feedback page and complete the operation according to the fields on the page.
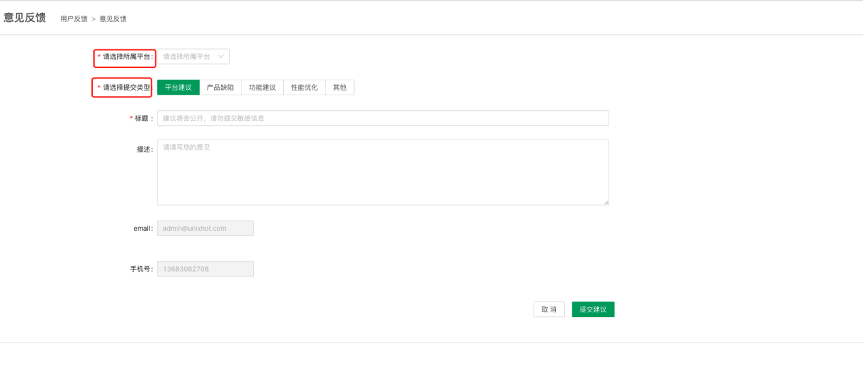
Users can submit feedback for different platforms and different feedback types, helping platform administrators optimize the platform more effectively.
4.2 Navigation Management
Navigation management helps users quickly access each platform. It supports custom configuration and lets you add URLs of third-party services so that users can easily open related components from within the platform.
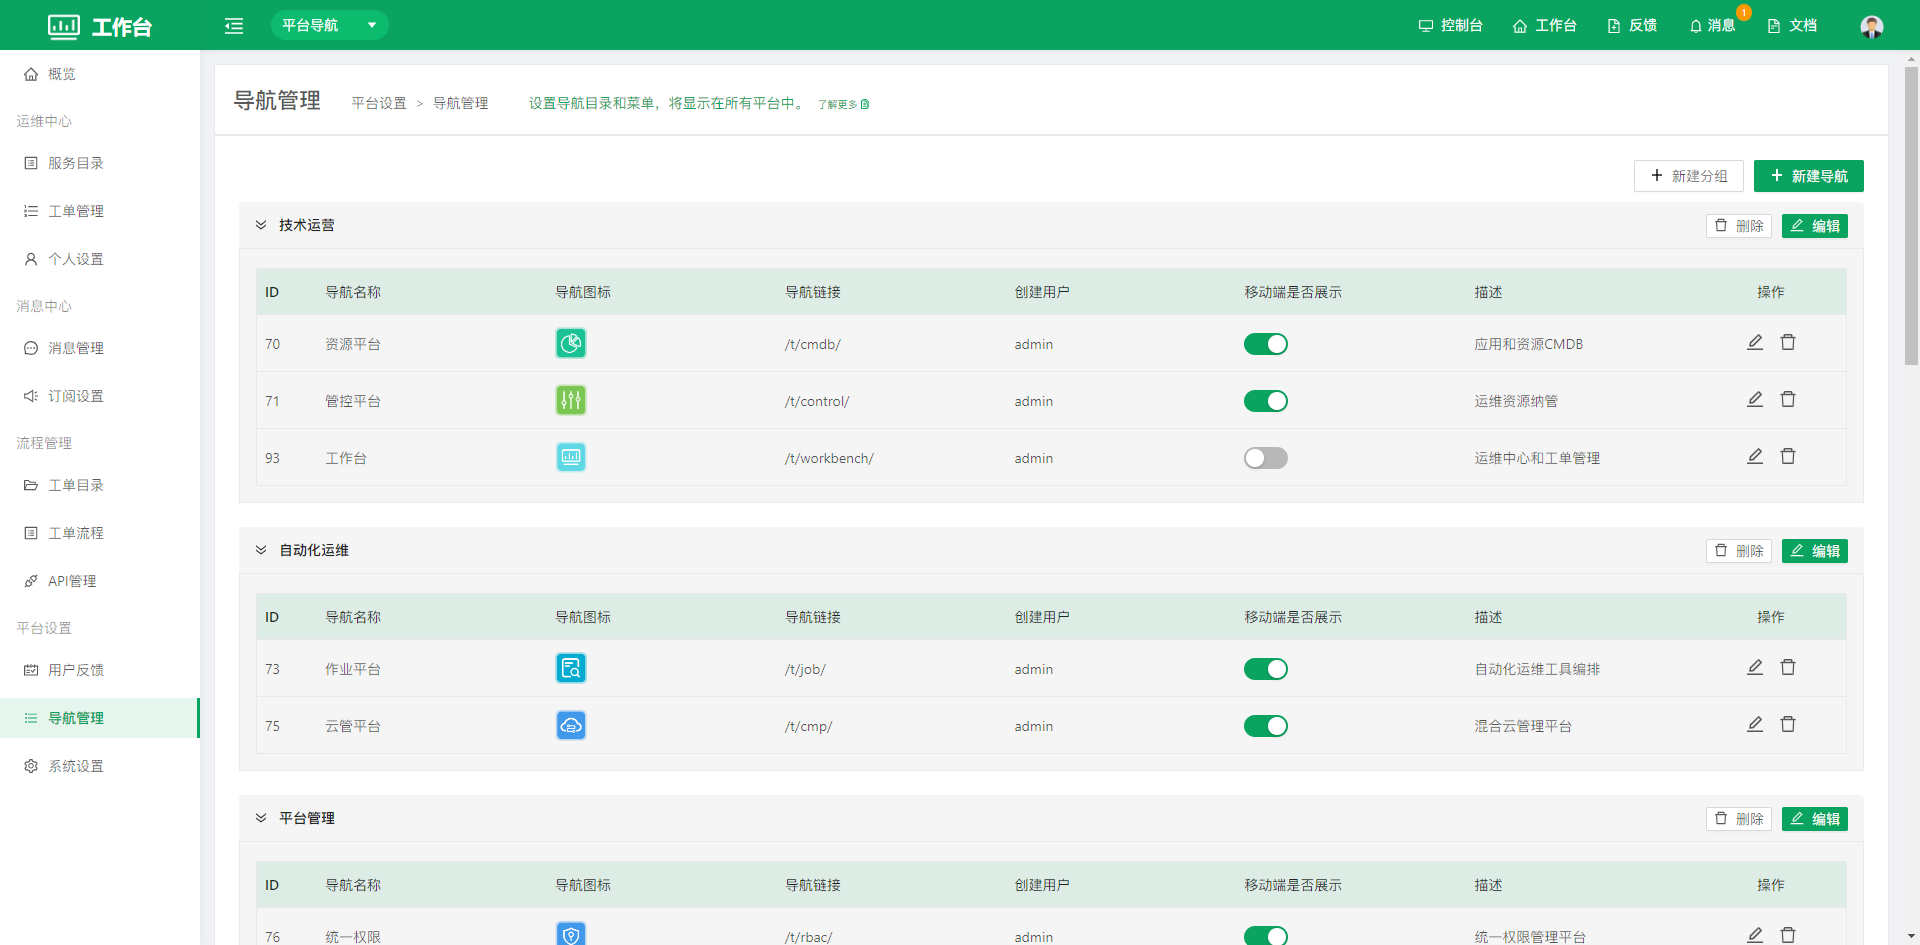
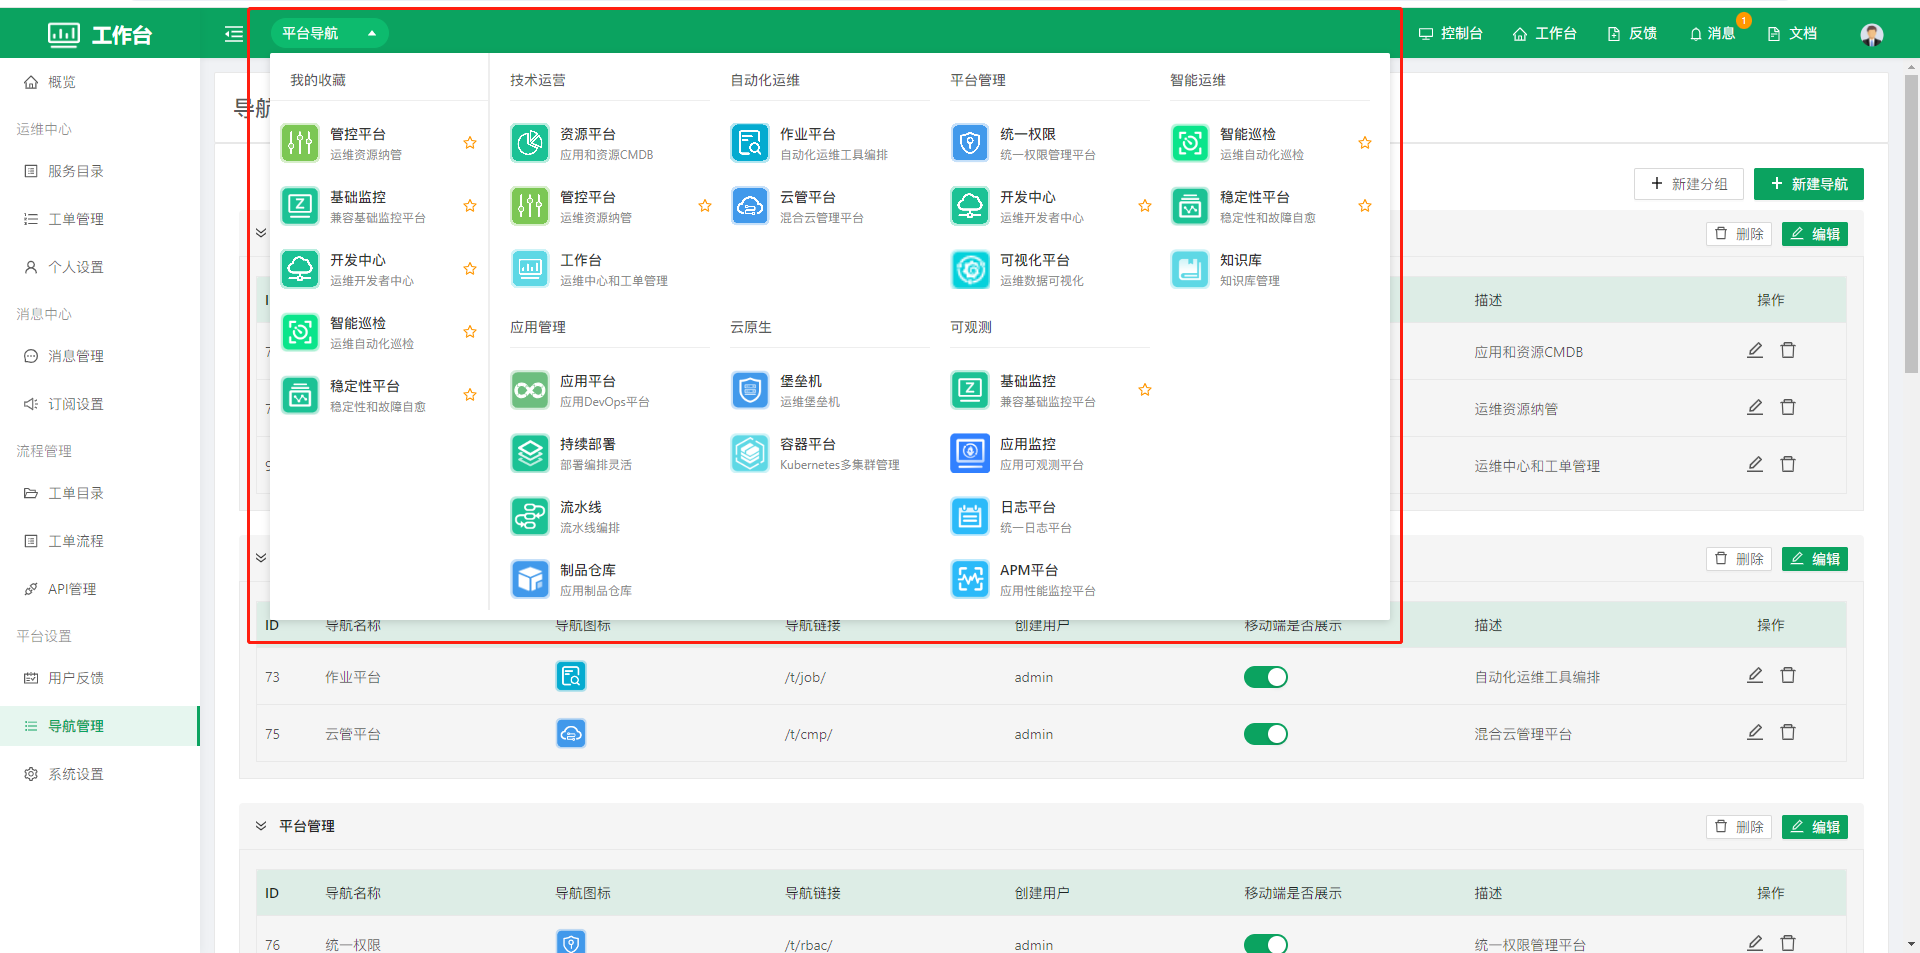
Where Navigation Appears
View it in the platform navigation in the top menu.
Create a Navigation Item
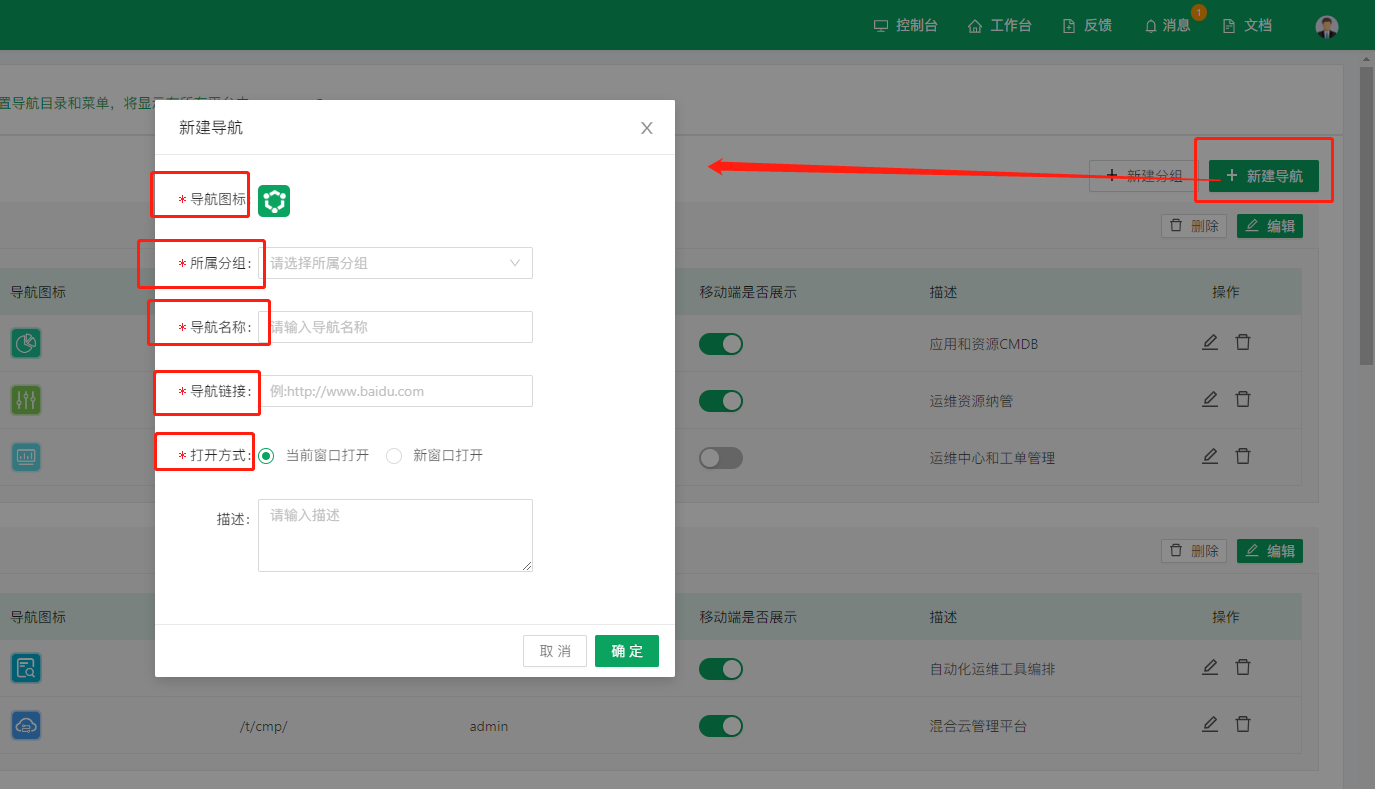
Navigation icon: users can upload a custom navigation icon.
Group: select the appropriate group to classify the navigation item.
Navigation name: users can define the navigation name.
Navigation link: users can enter a custom URL; the full path is required (for example, https://www.opsany.com)
Open method: choose whether the navigation opens in the current window or in a new window.
4.3 System Settings
System settings configure the notification-related items of Workbench, such as the mail server, WeCom, DingTalk, SMS and platform personalization. After configuration, they can be used to send ticket notifications or alert notifications.
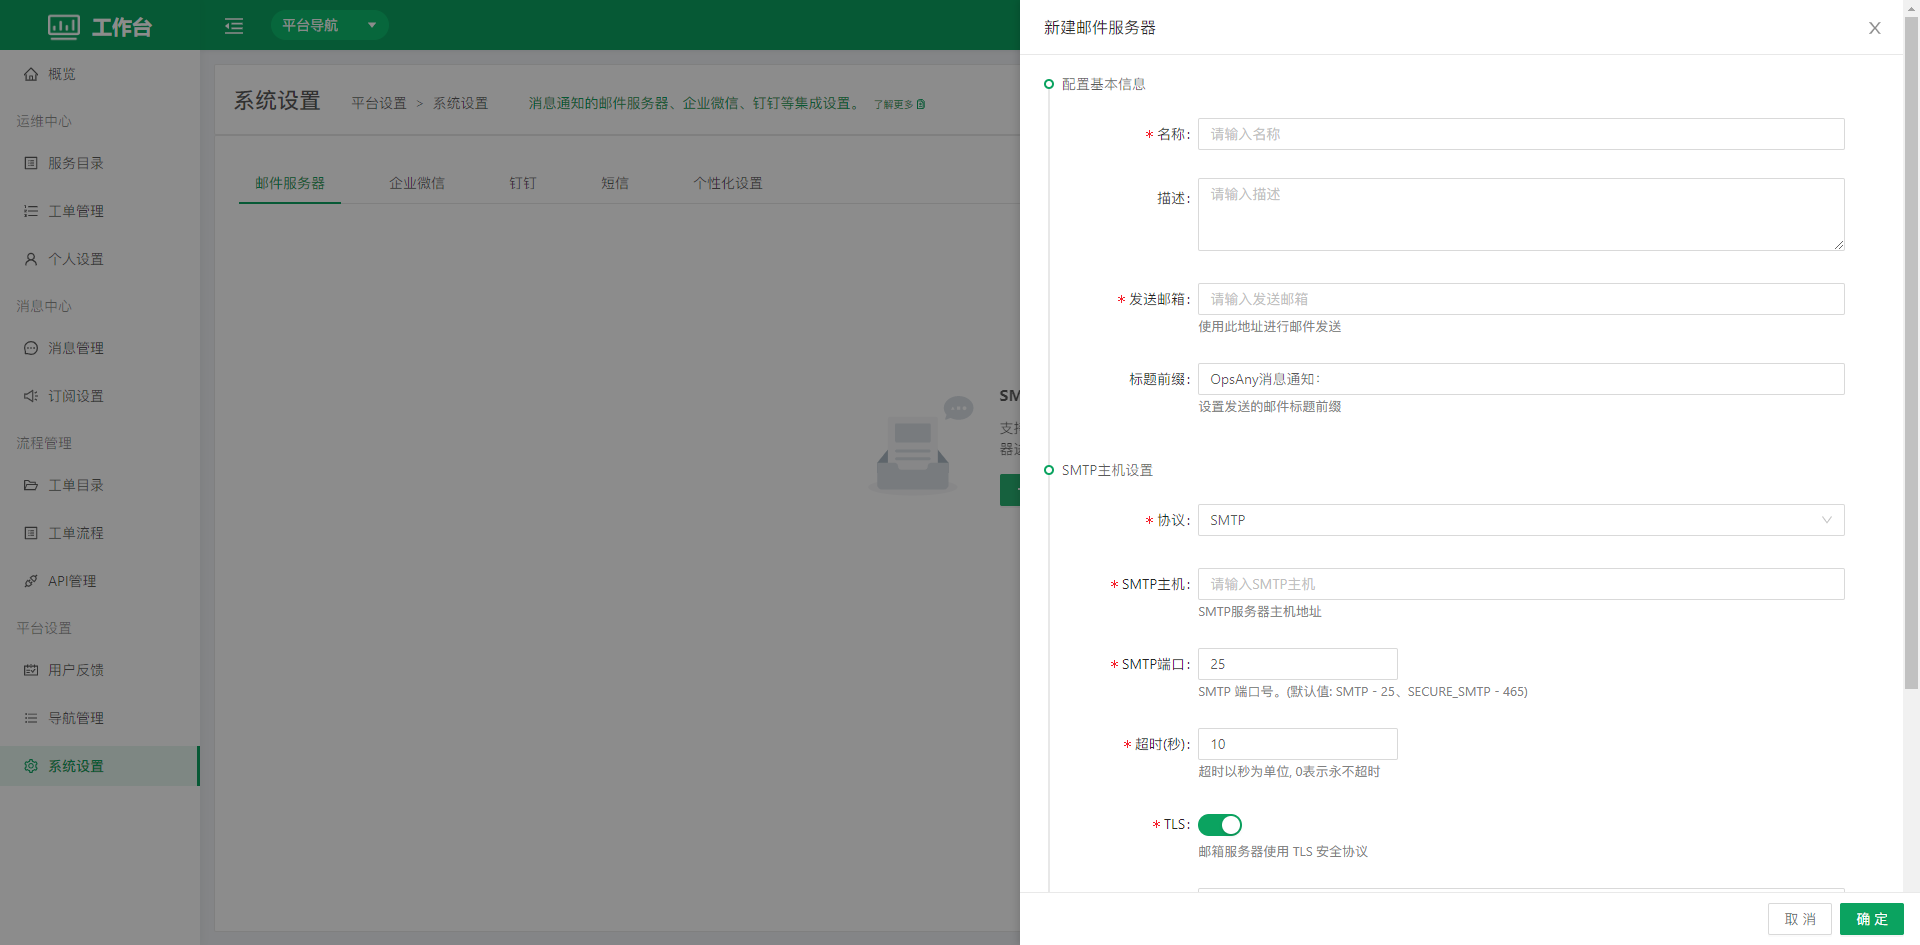
4.3.1 Mail Server
Configure the mail server: complete the email configuration according to the fields on the new mail server page.
4.3.2 WeCom
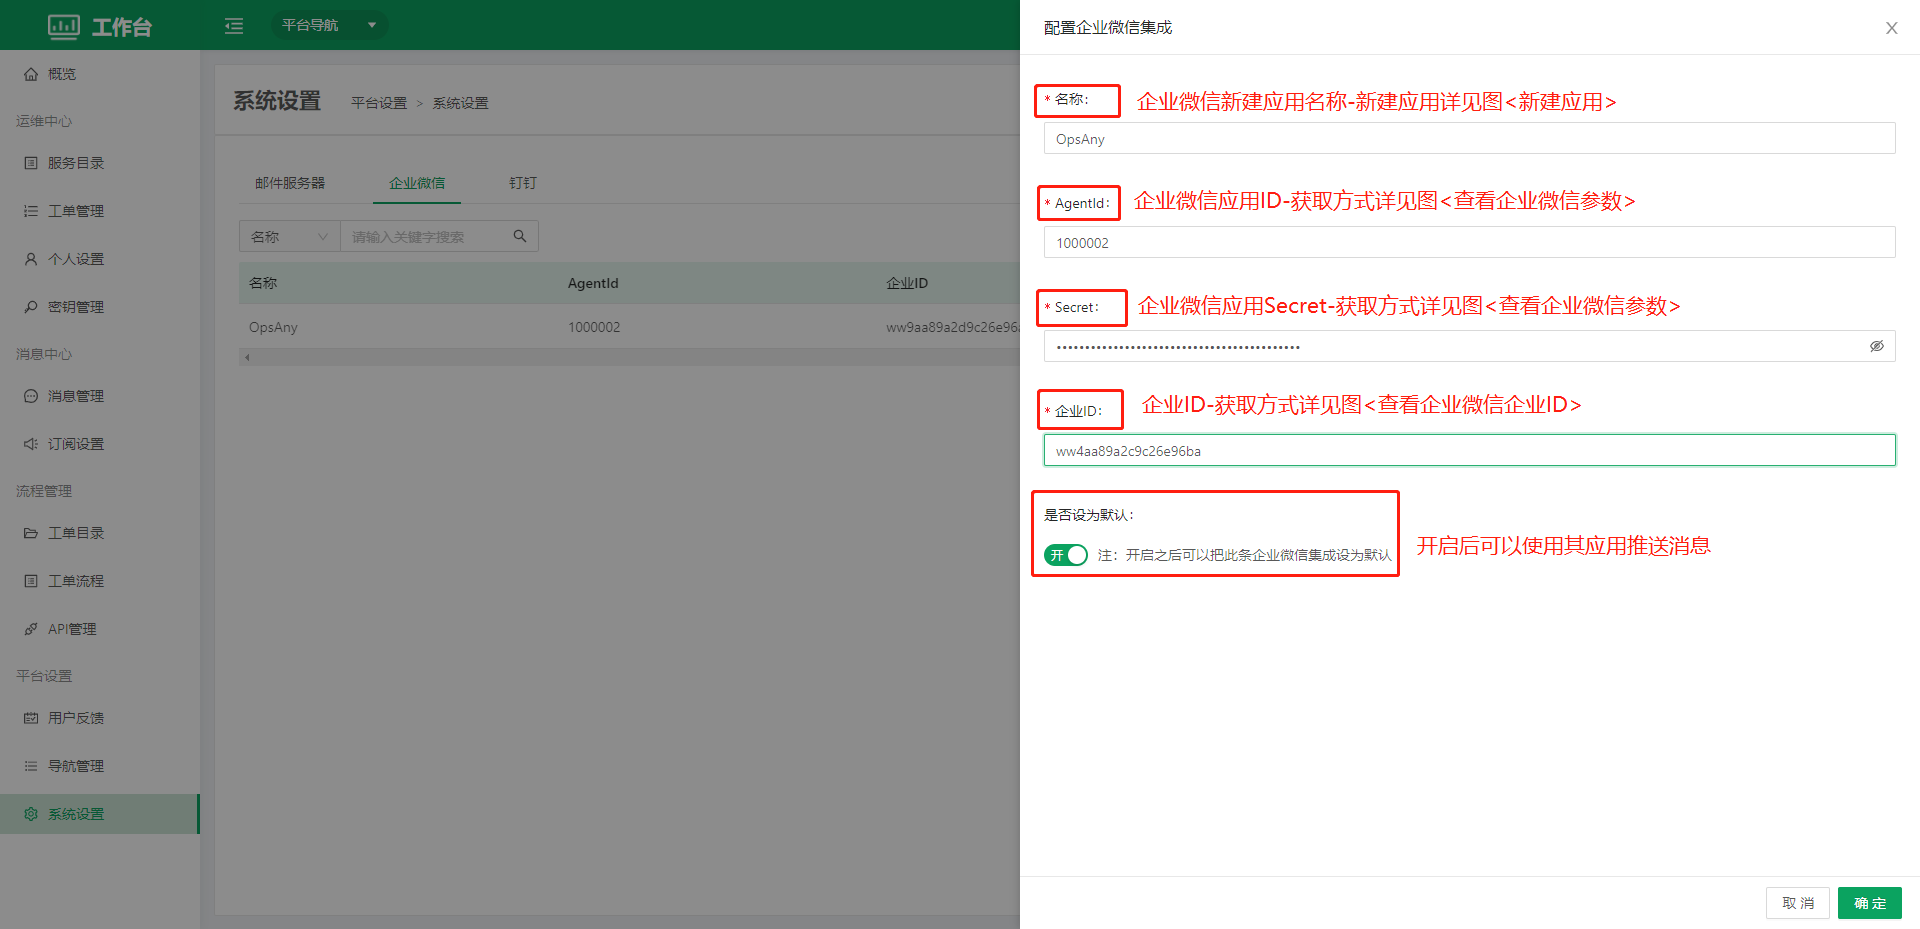
After configuring WeCom, users need to go to Personal Settings - Notification Settings to create a notification, configure the recipient (account) and associate the notification application.
-
Configure the WeCom integration: fill in the content according to the fields on the page
-
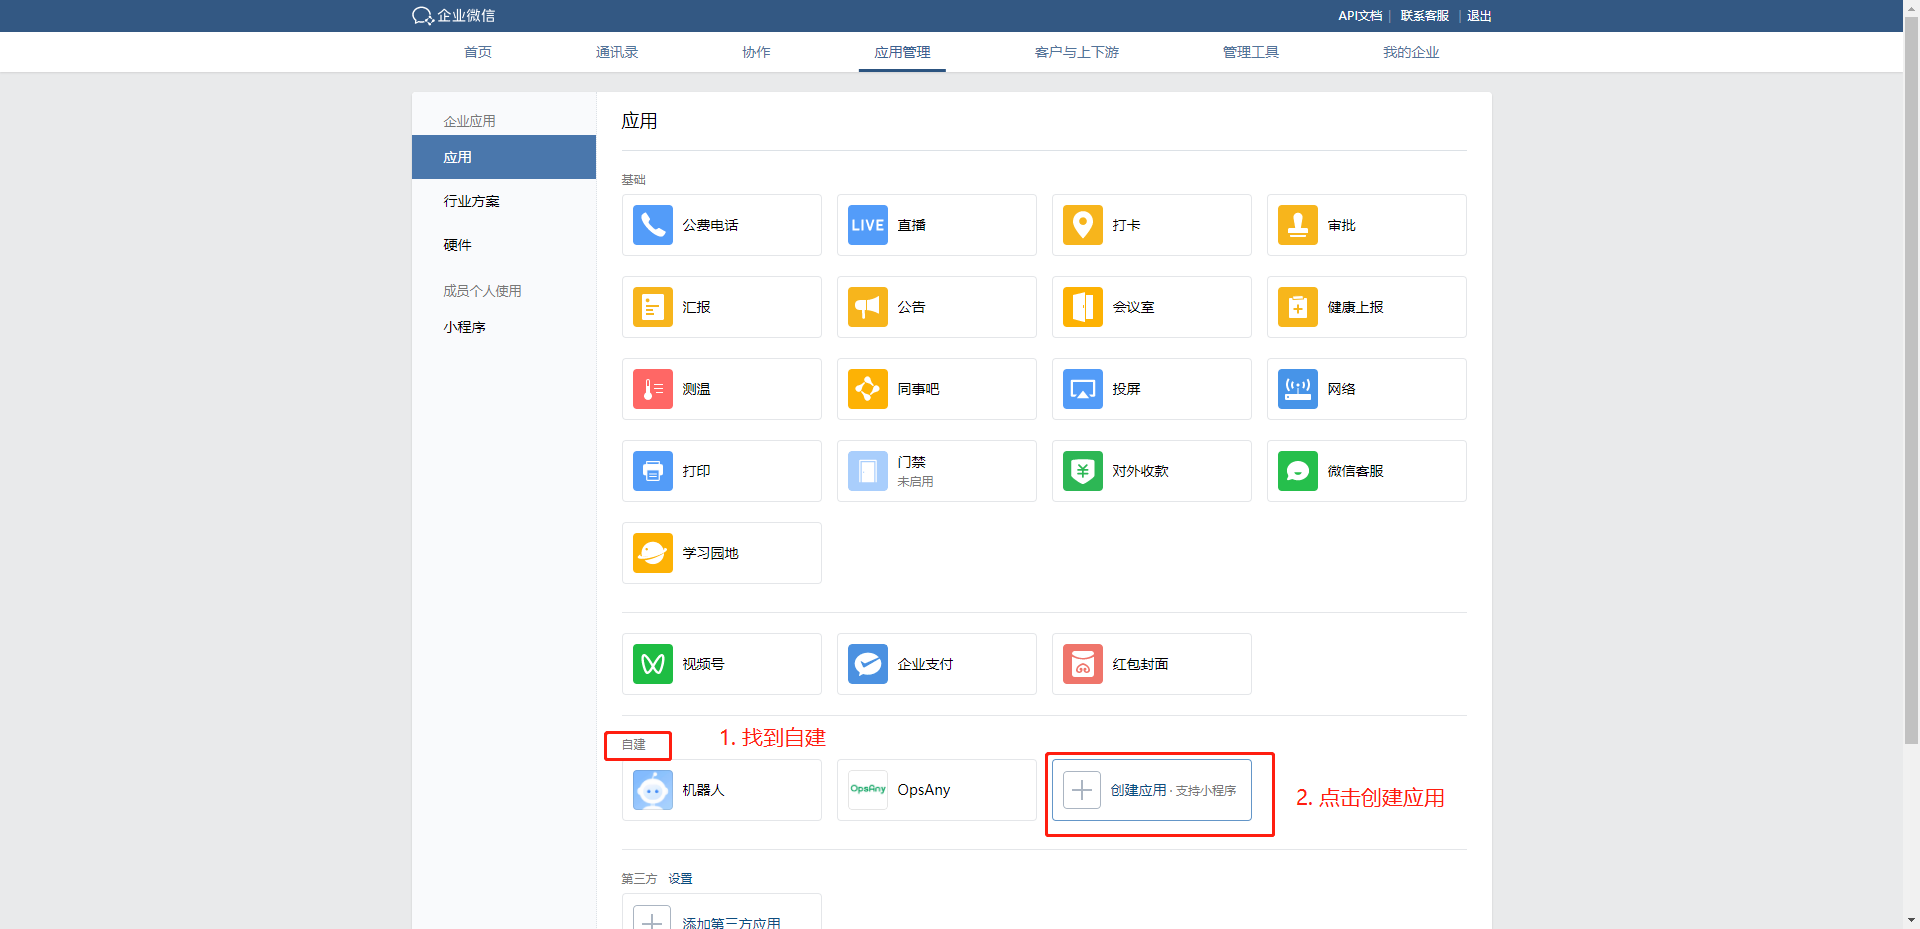
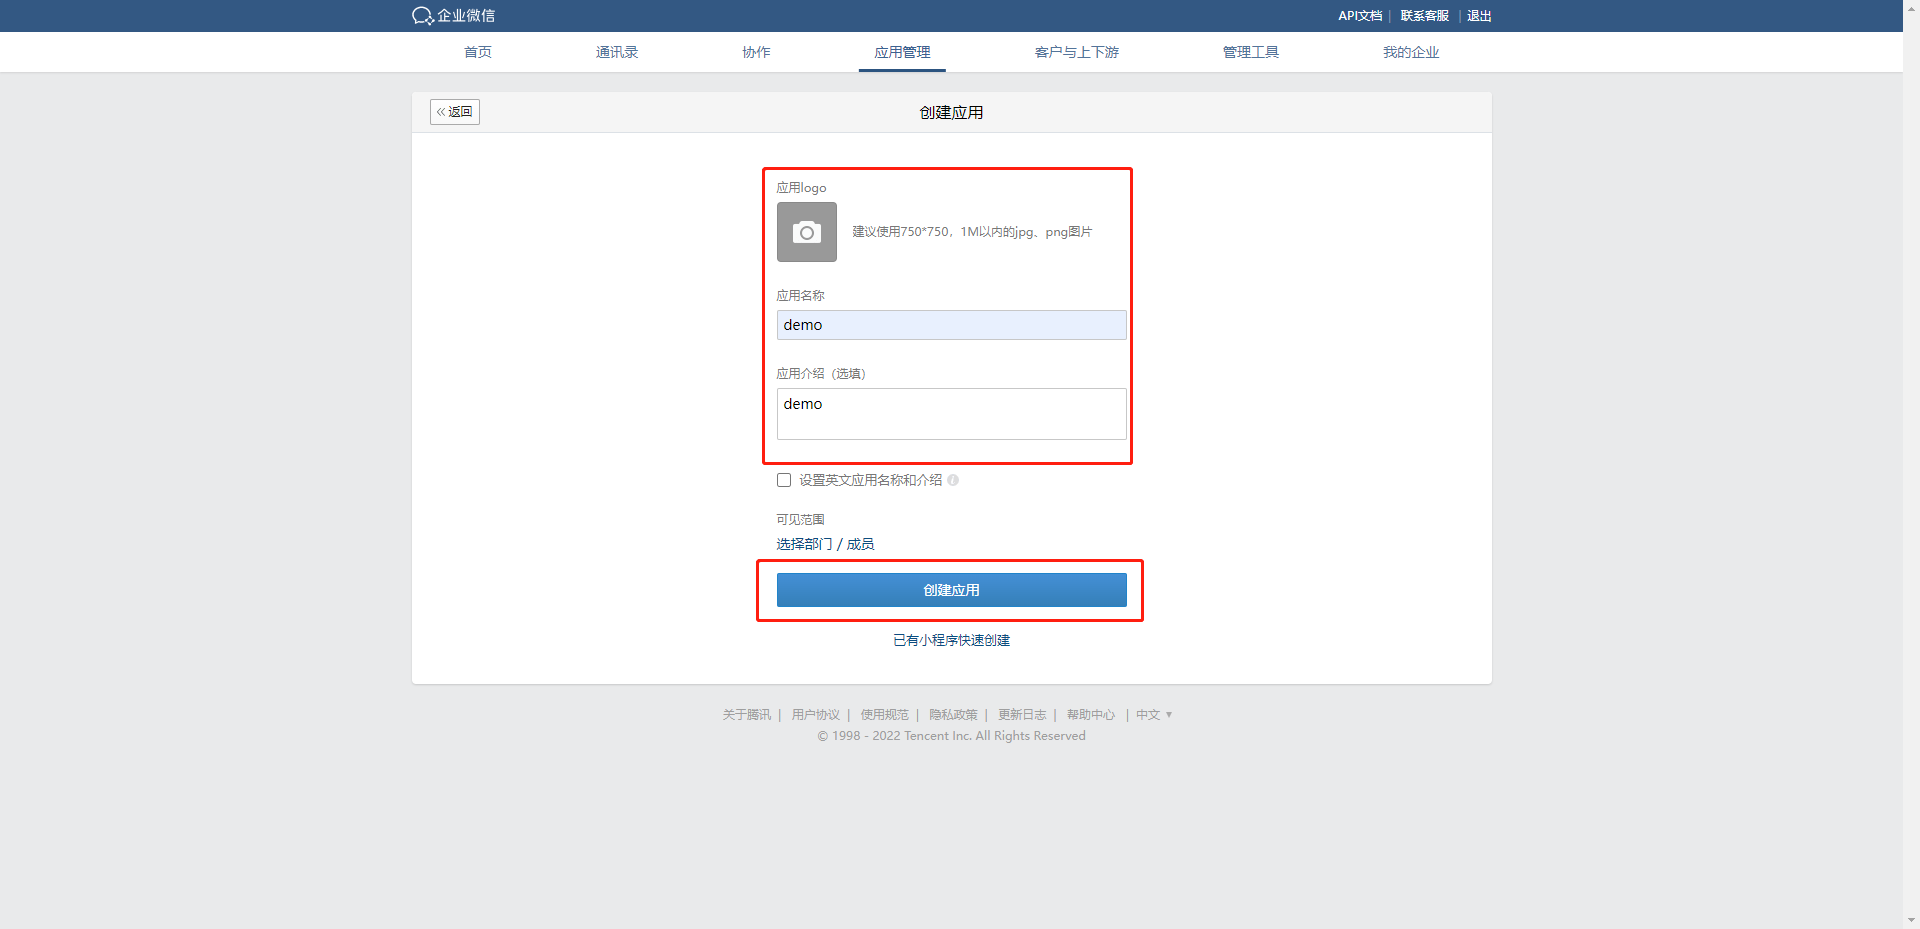
Create an application: open the WeCom admin console and create an application
Address: https://work.weixin.qq.com/wework_admin/frame#apps
-
View WeCom parameters: enter the corresponding AgentId and Secret values on the Configure WeCom Integration page
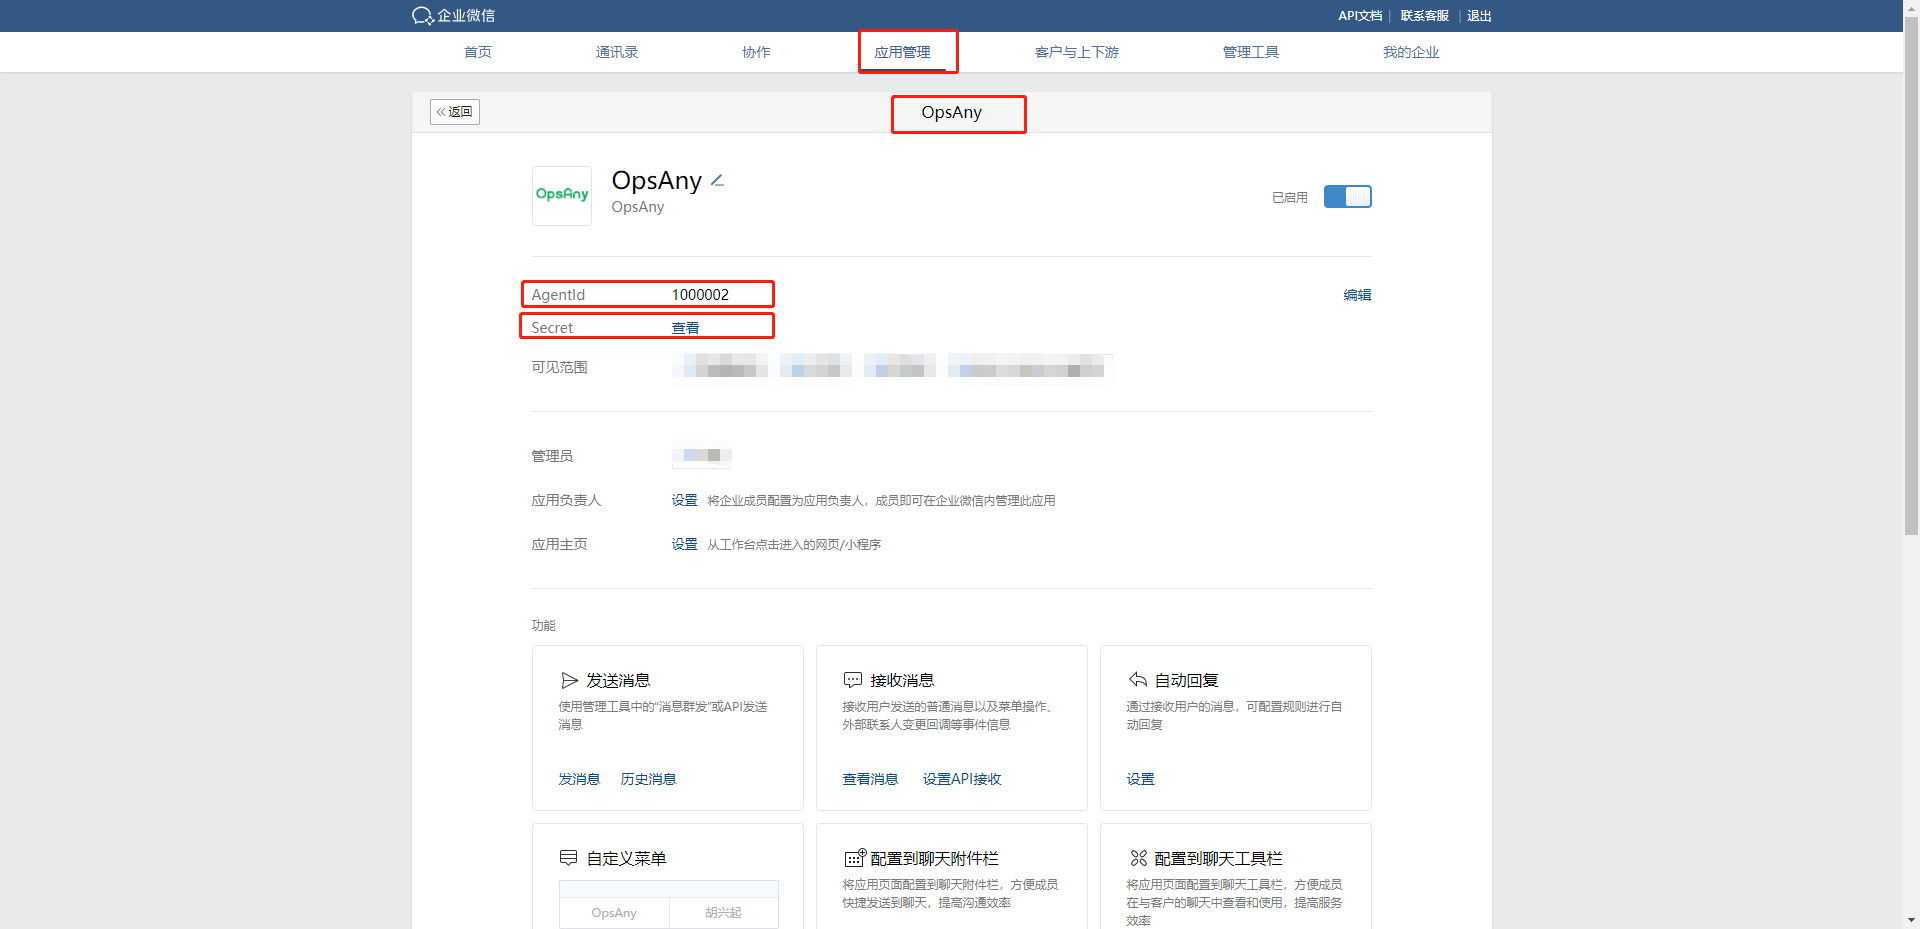
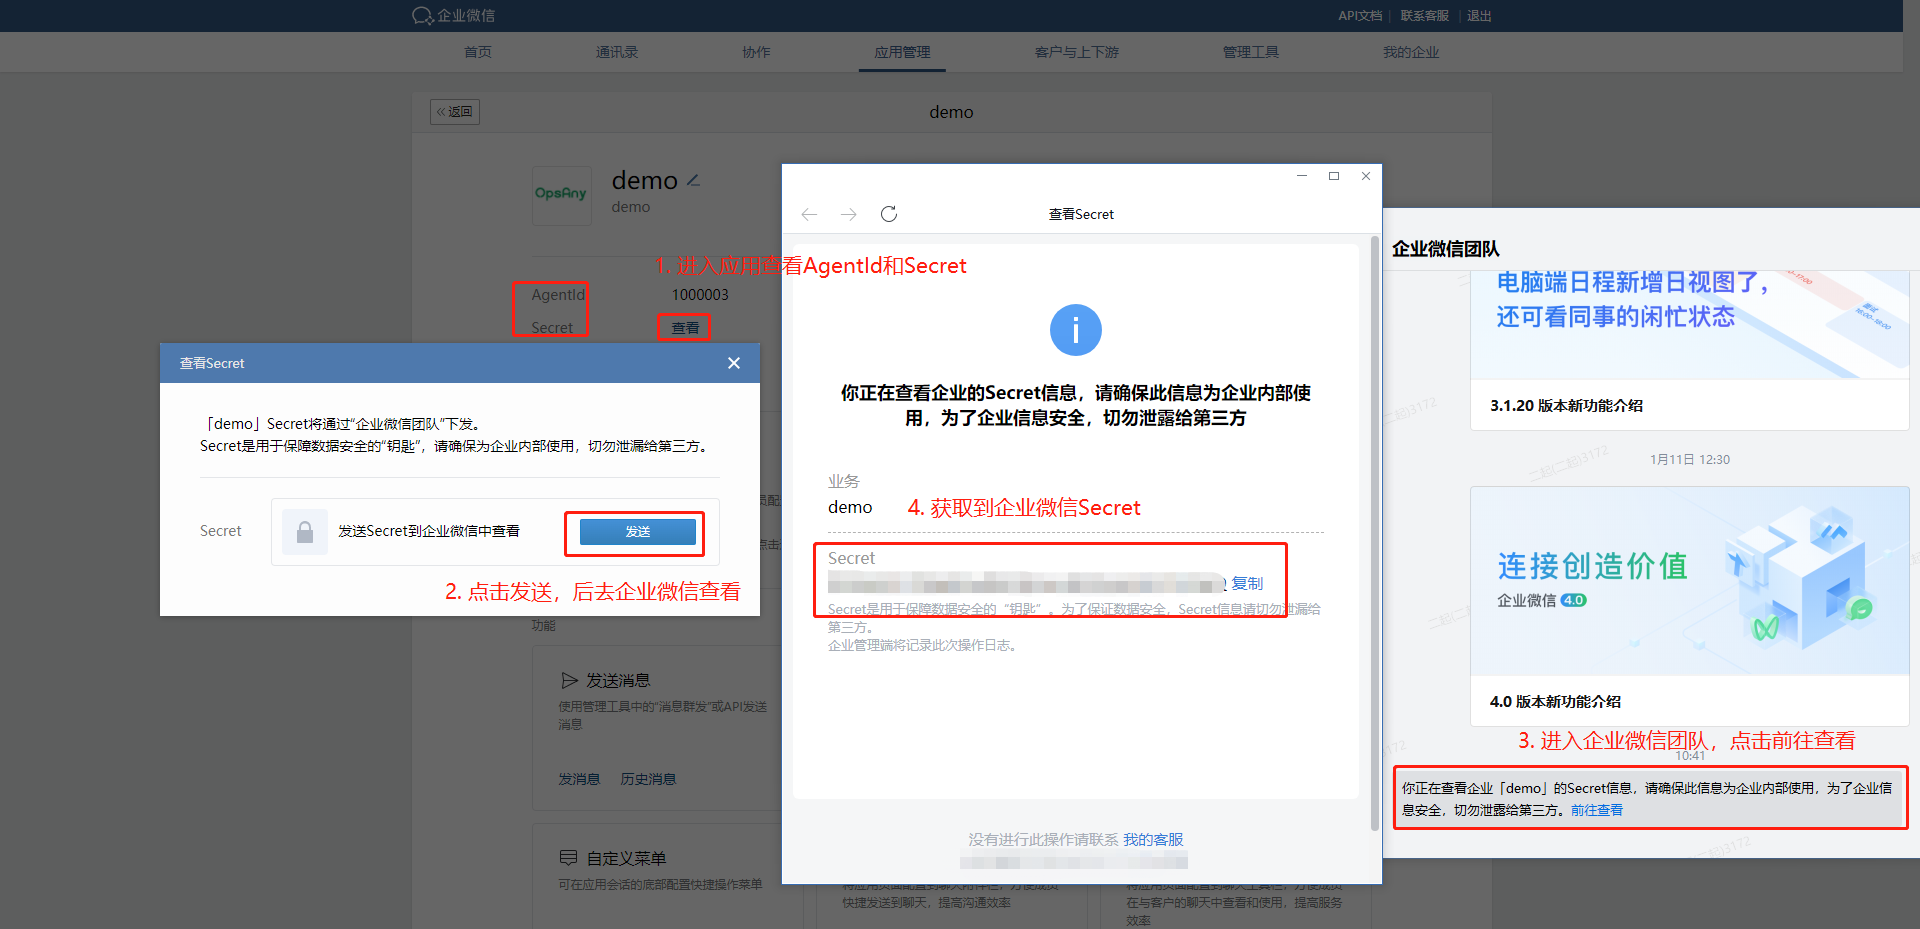
-
View the WeCom CorpID: enter the corresponding CorpID value on the Configure WeCom Integration page
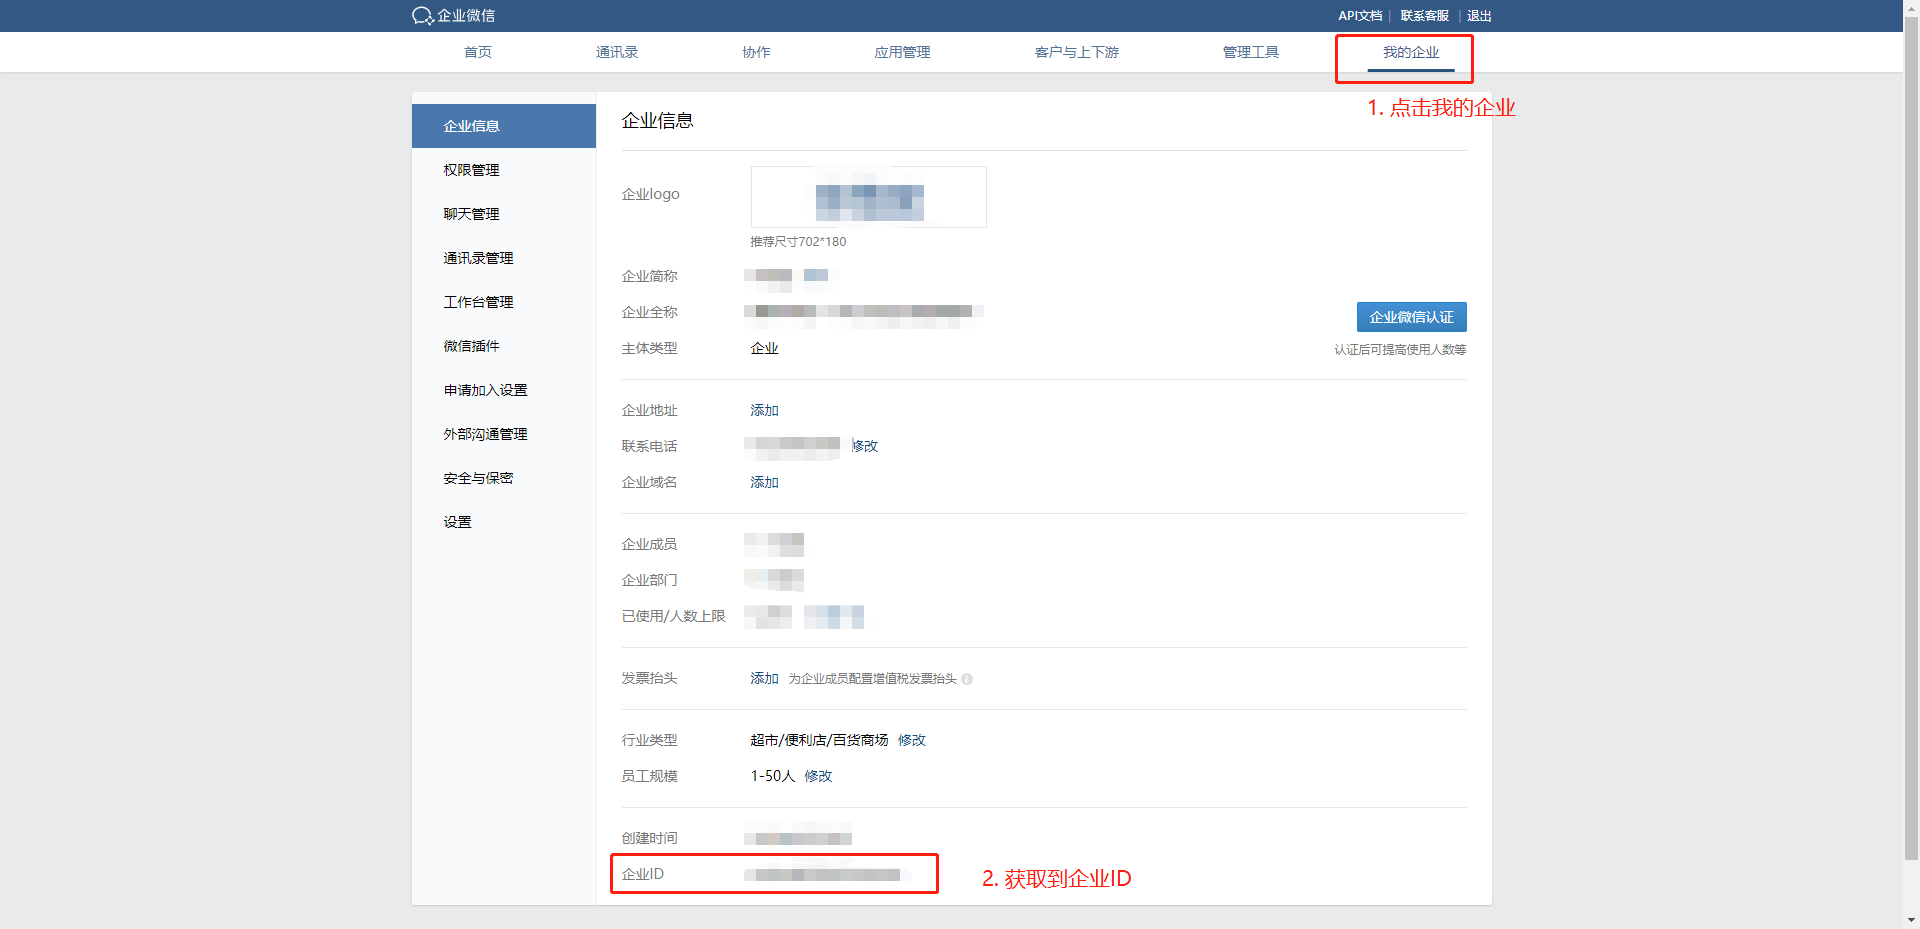
-
Obtain WeCom user recipients and configure them
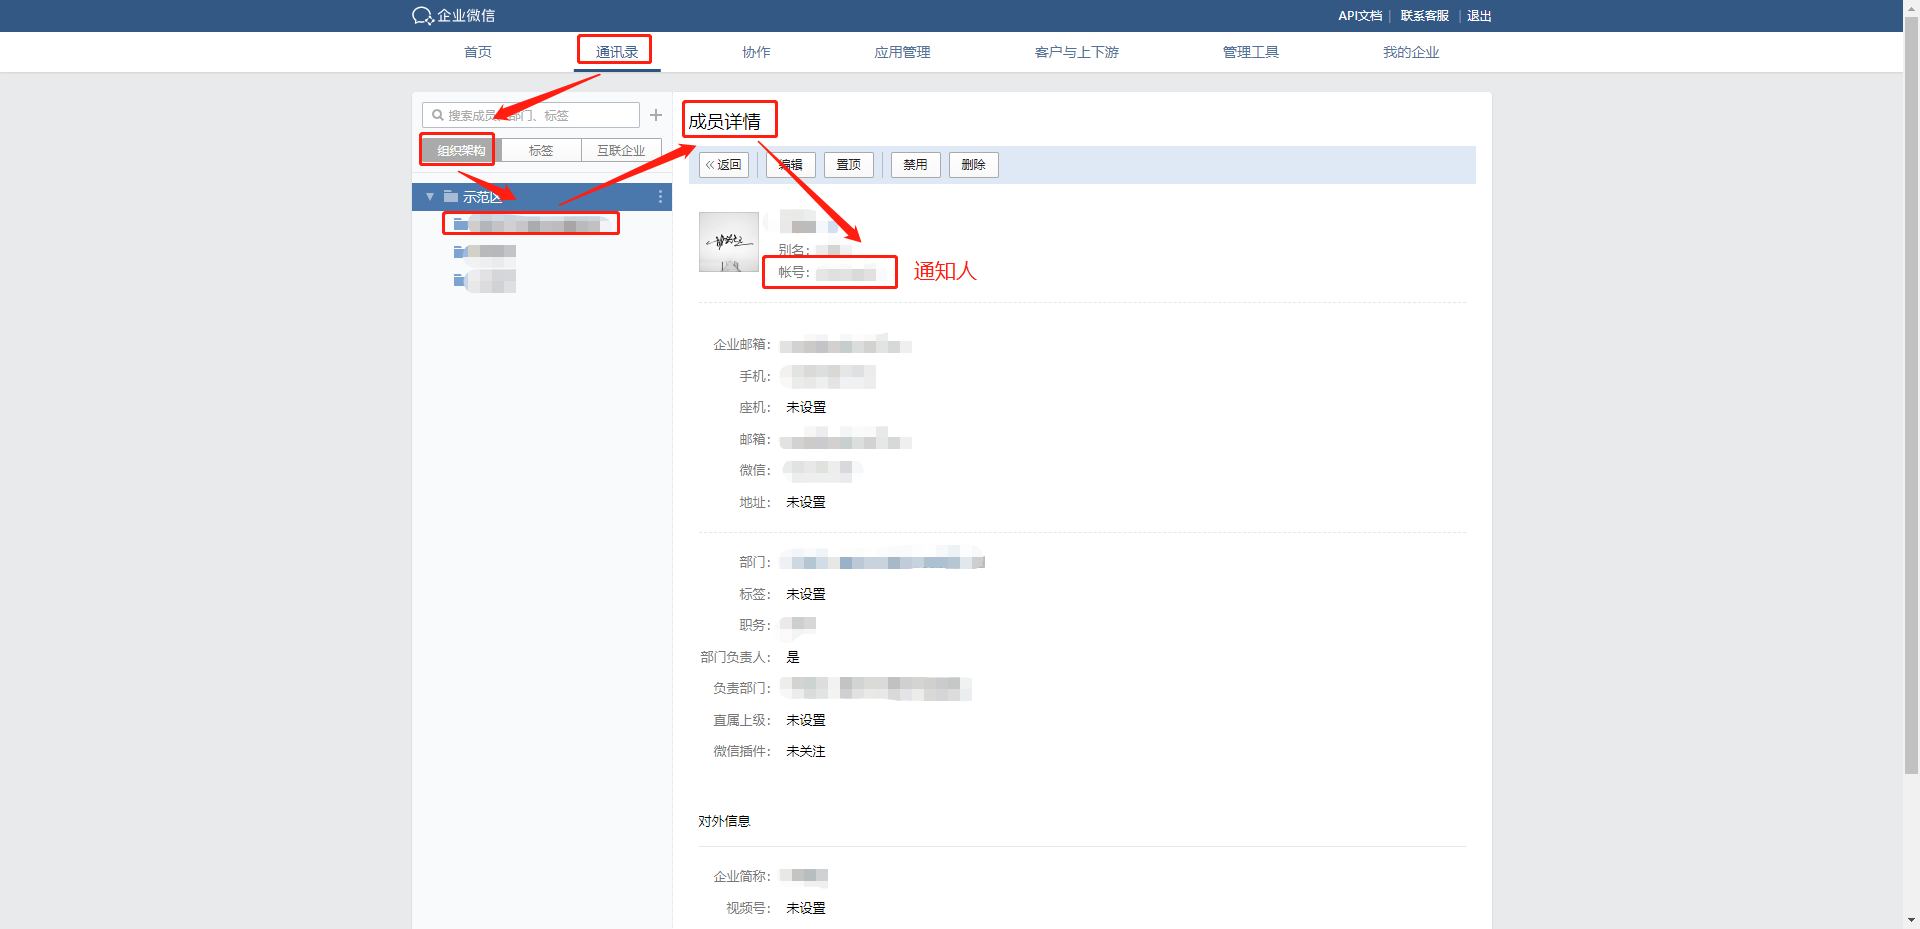
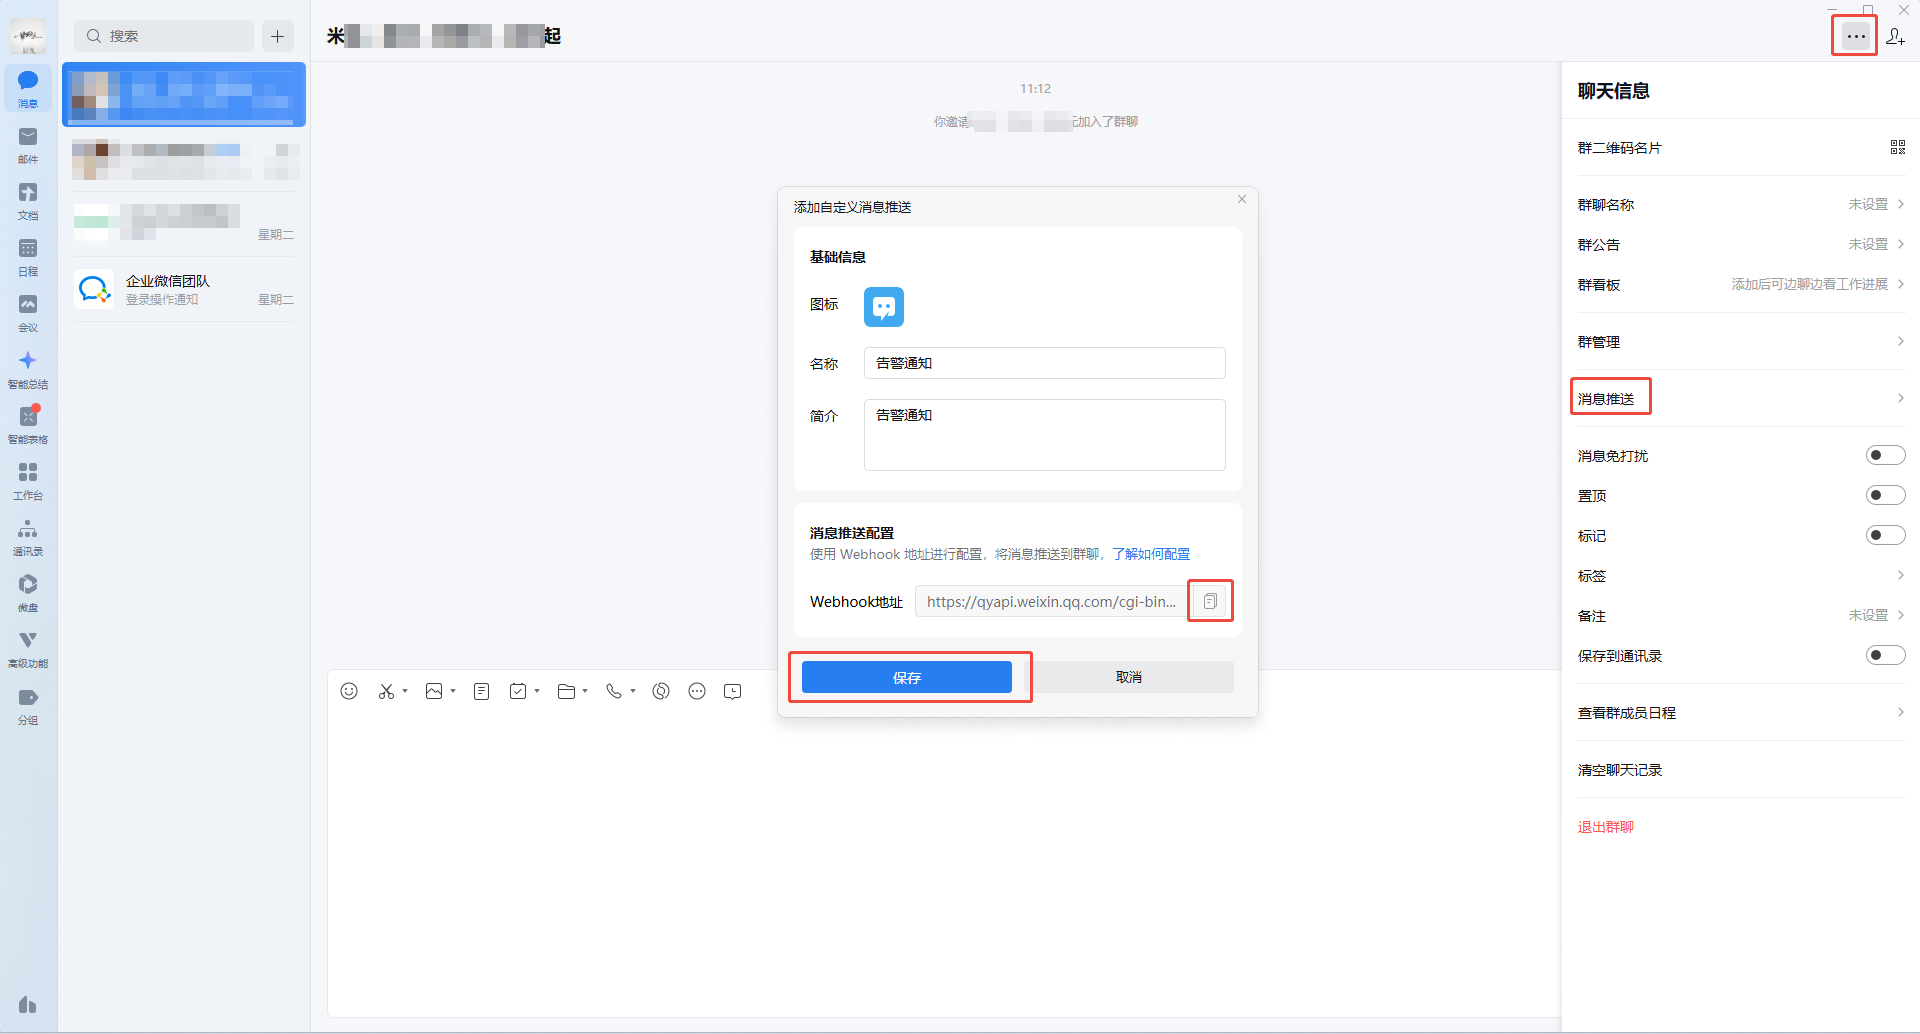
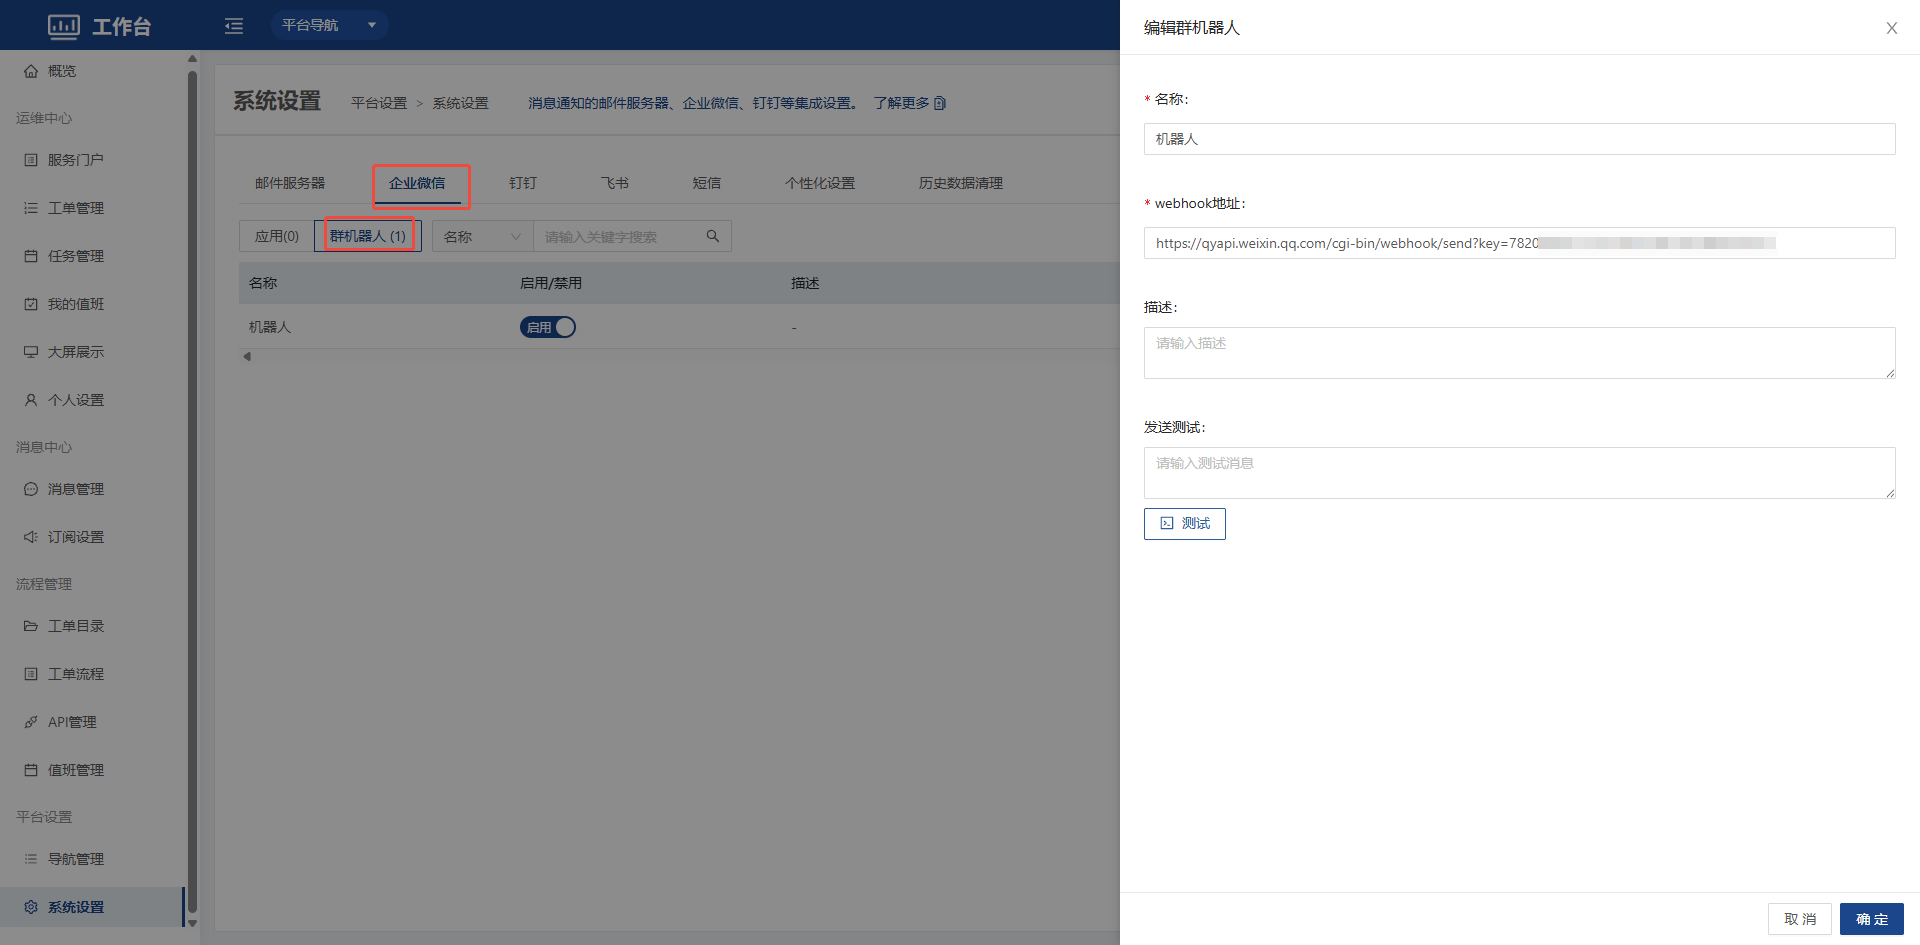
- Configure the WeCom robot
4.3.3 DingTalk
After configuring DingTalk, users need to go to Personal Settings - Notification Settings to create a notification, configure the recipient (employee UserID) and associate the notification application.
-
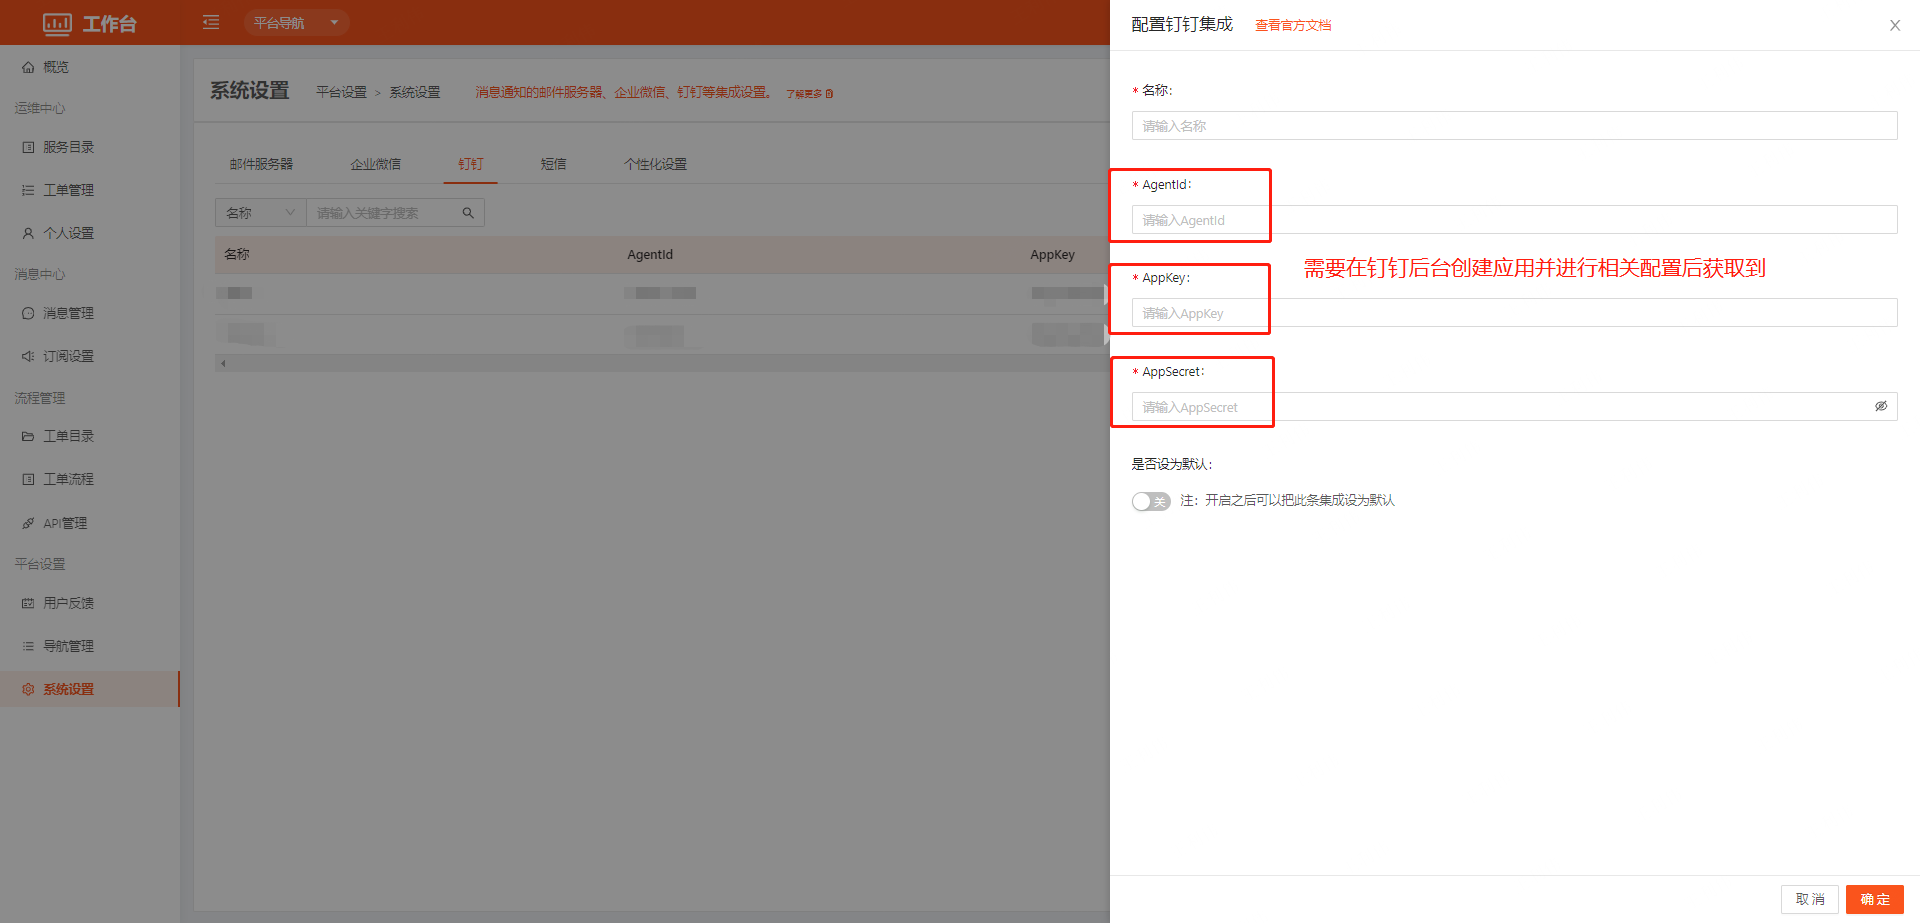
Configure the DingTalk integration: fill in the content according to the fields on the page
-
Create a robot application
Address: https://open-dev.dingtalk.com/fe/app#/corp/app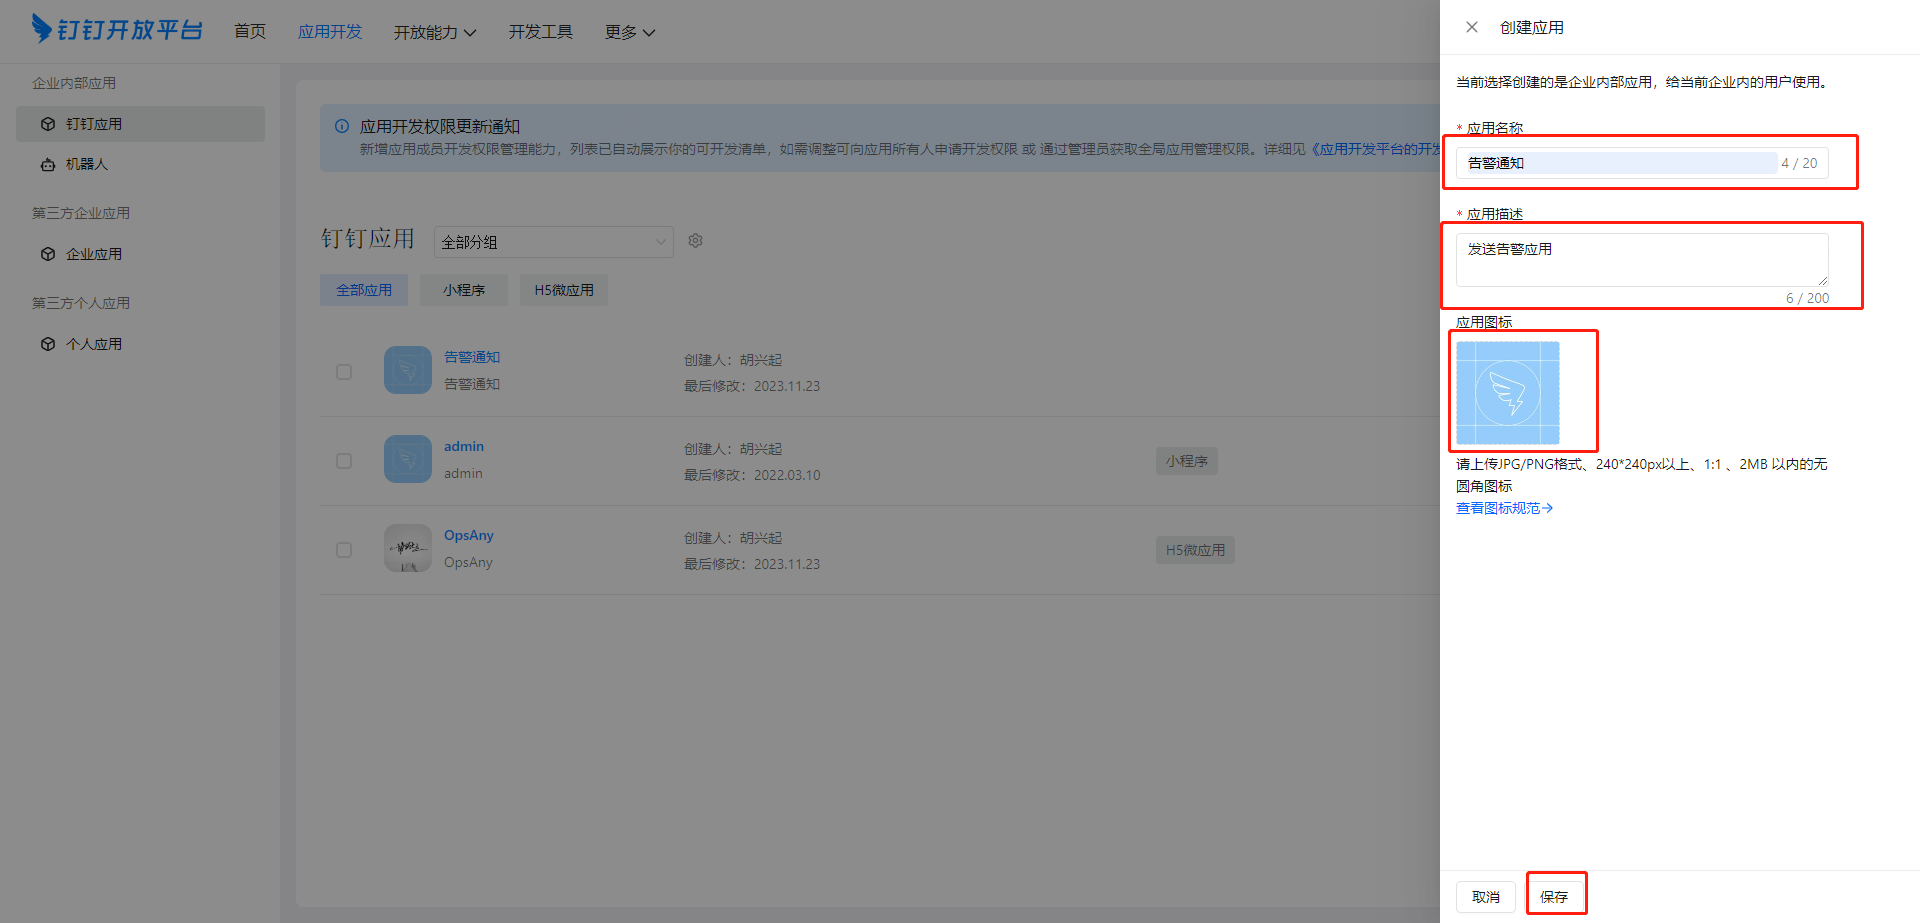
-
Configure and publish the robot application
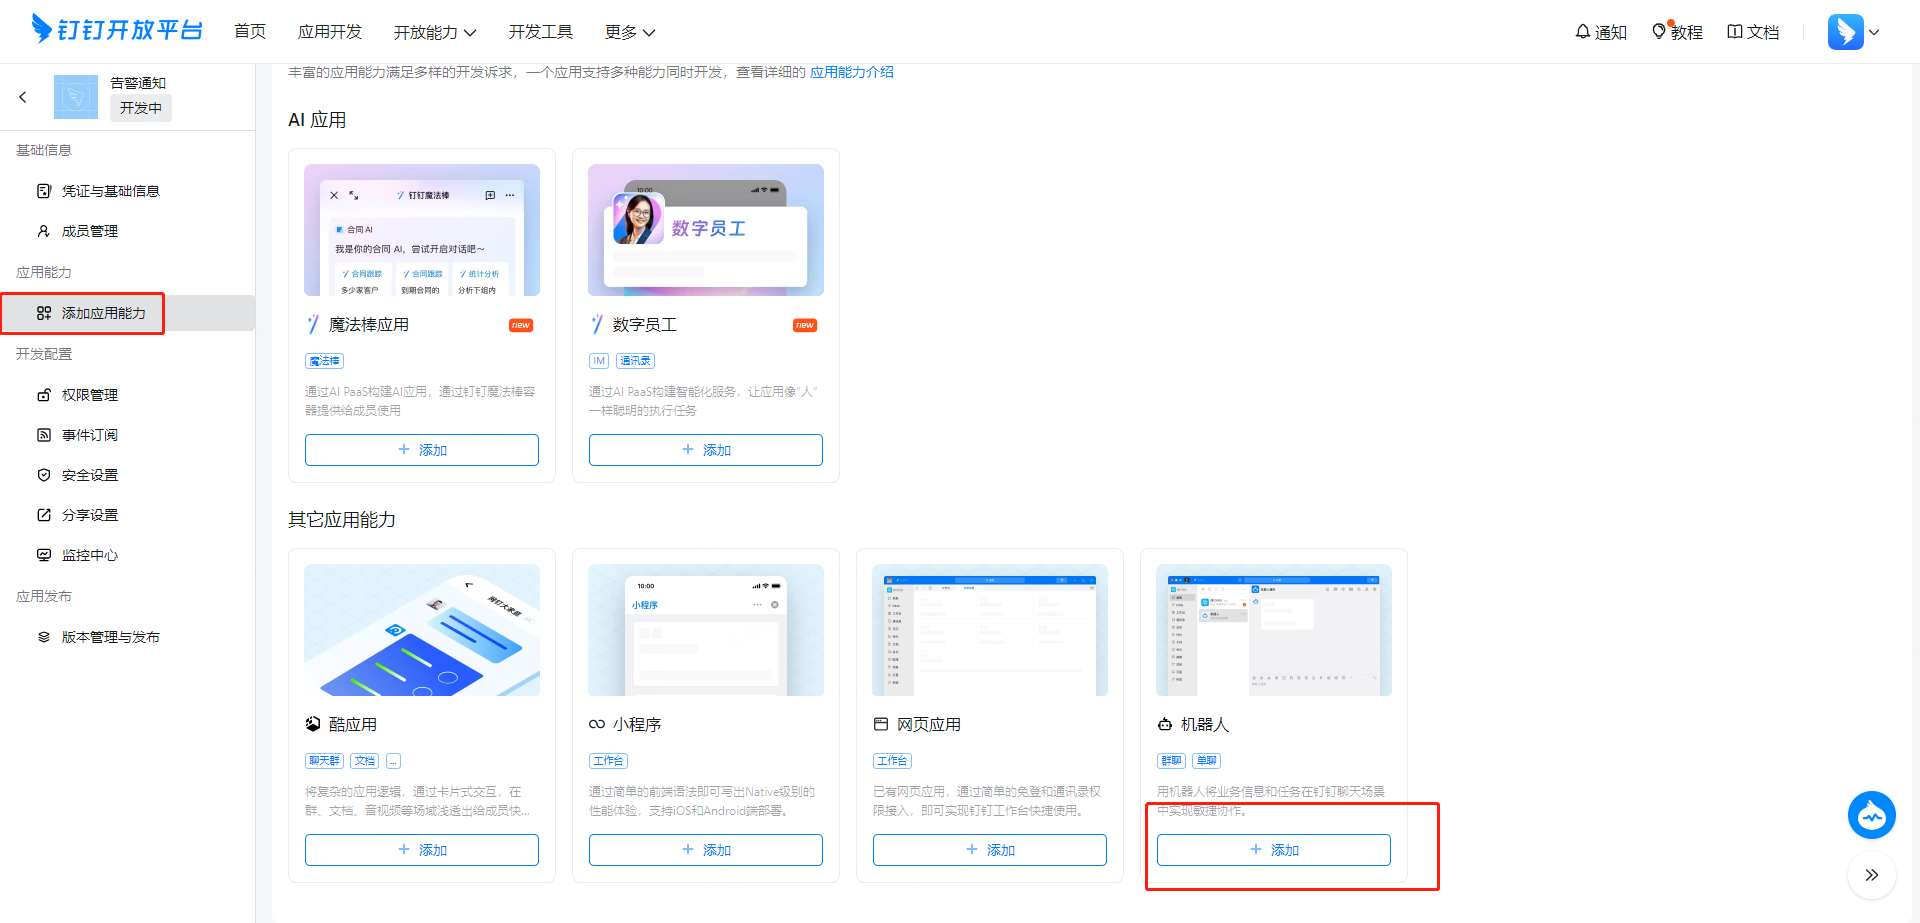
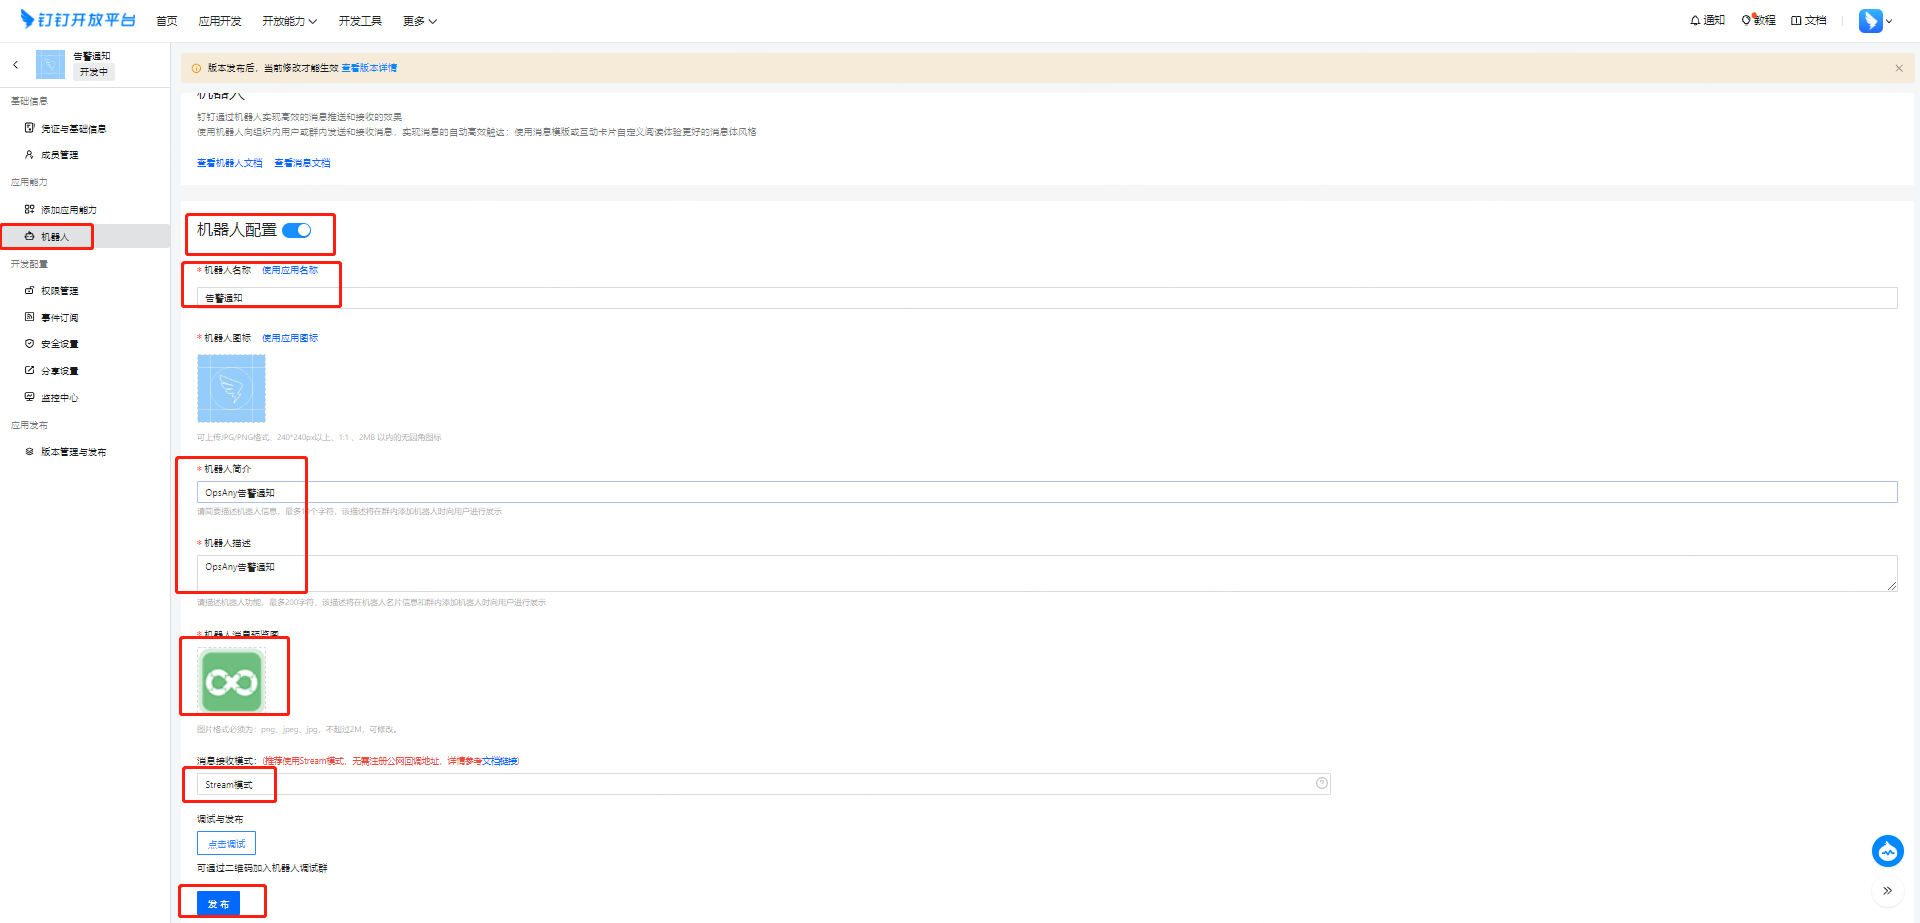
-
Authorize the robot to send messages
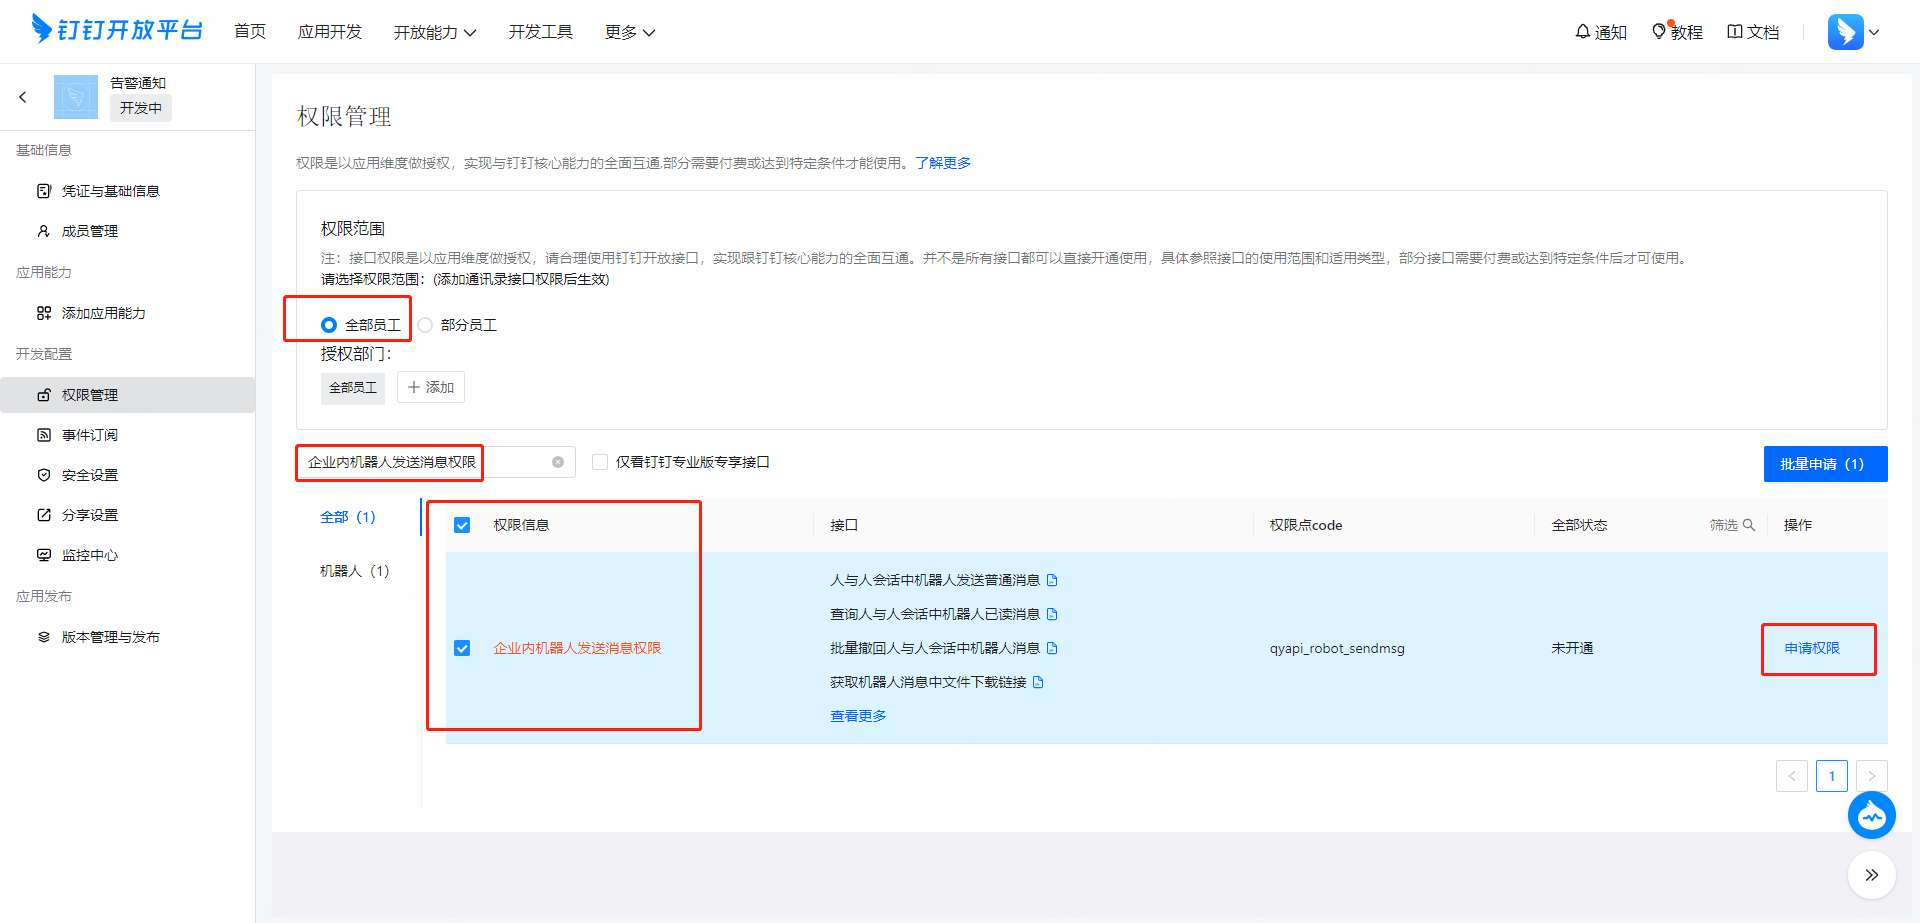
If you need to push ticket approval to-dos to DingTalk To-Do, enable the following API permissions and make sure the subscription is enabled (read member information, write to-dos in the to-do application).
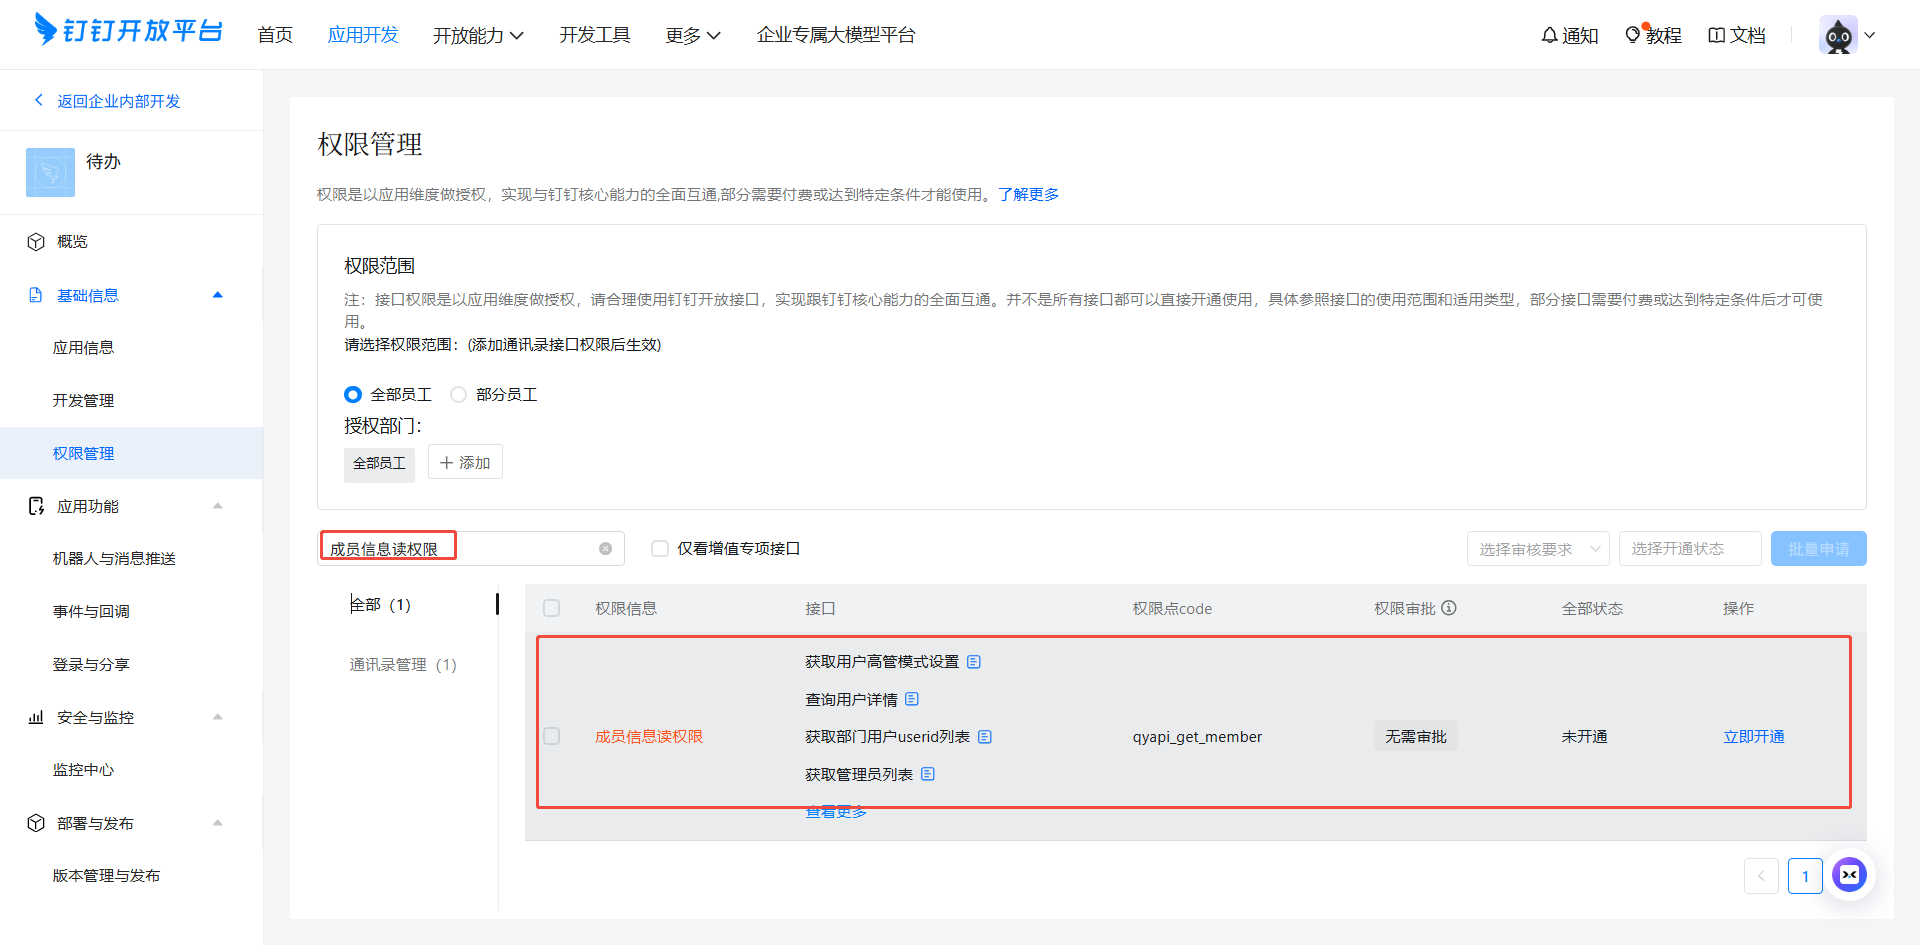
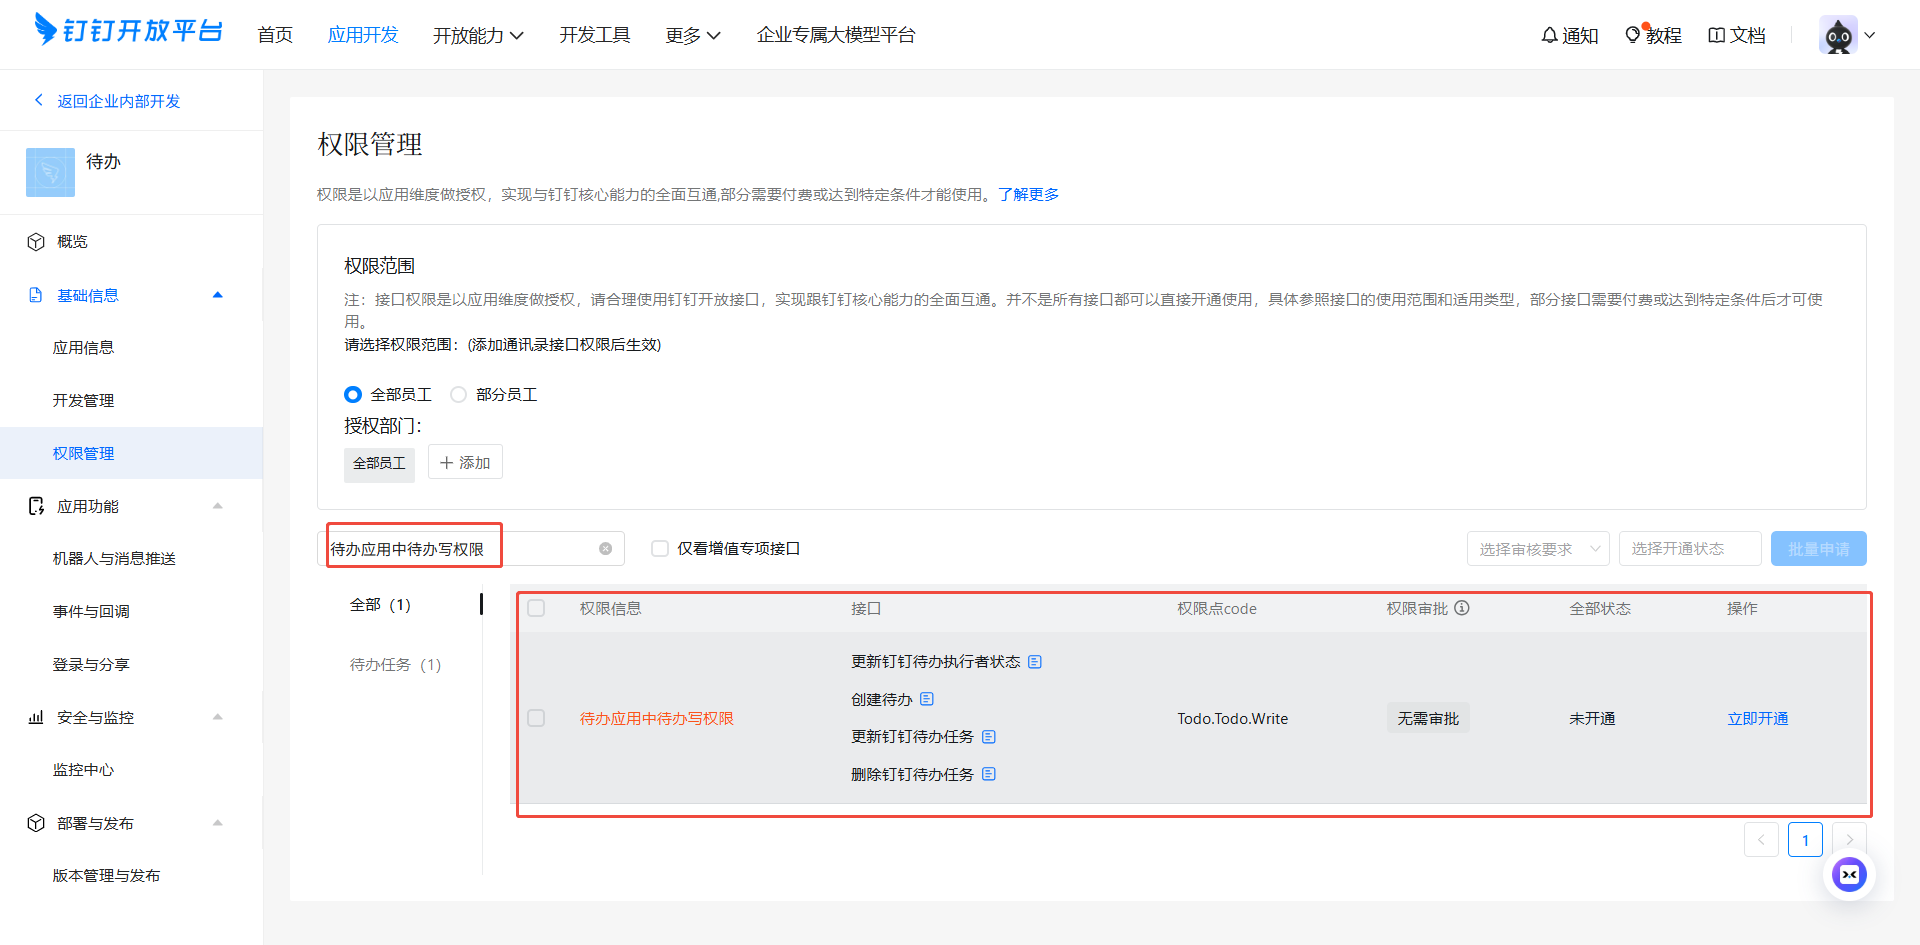
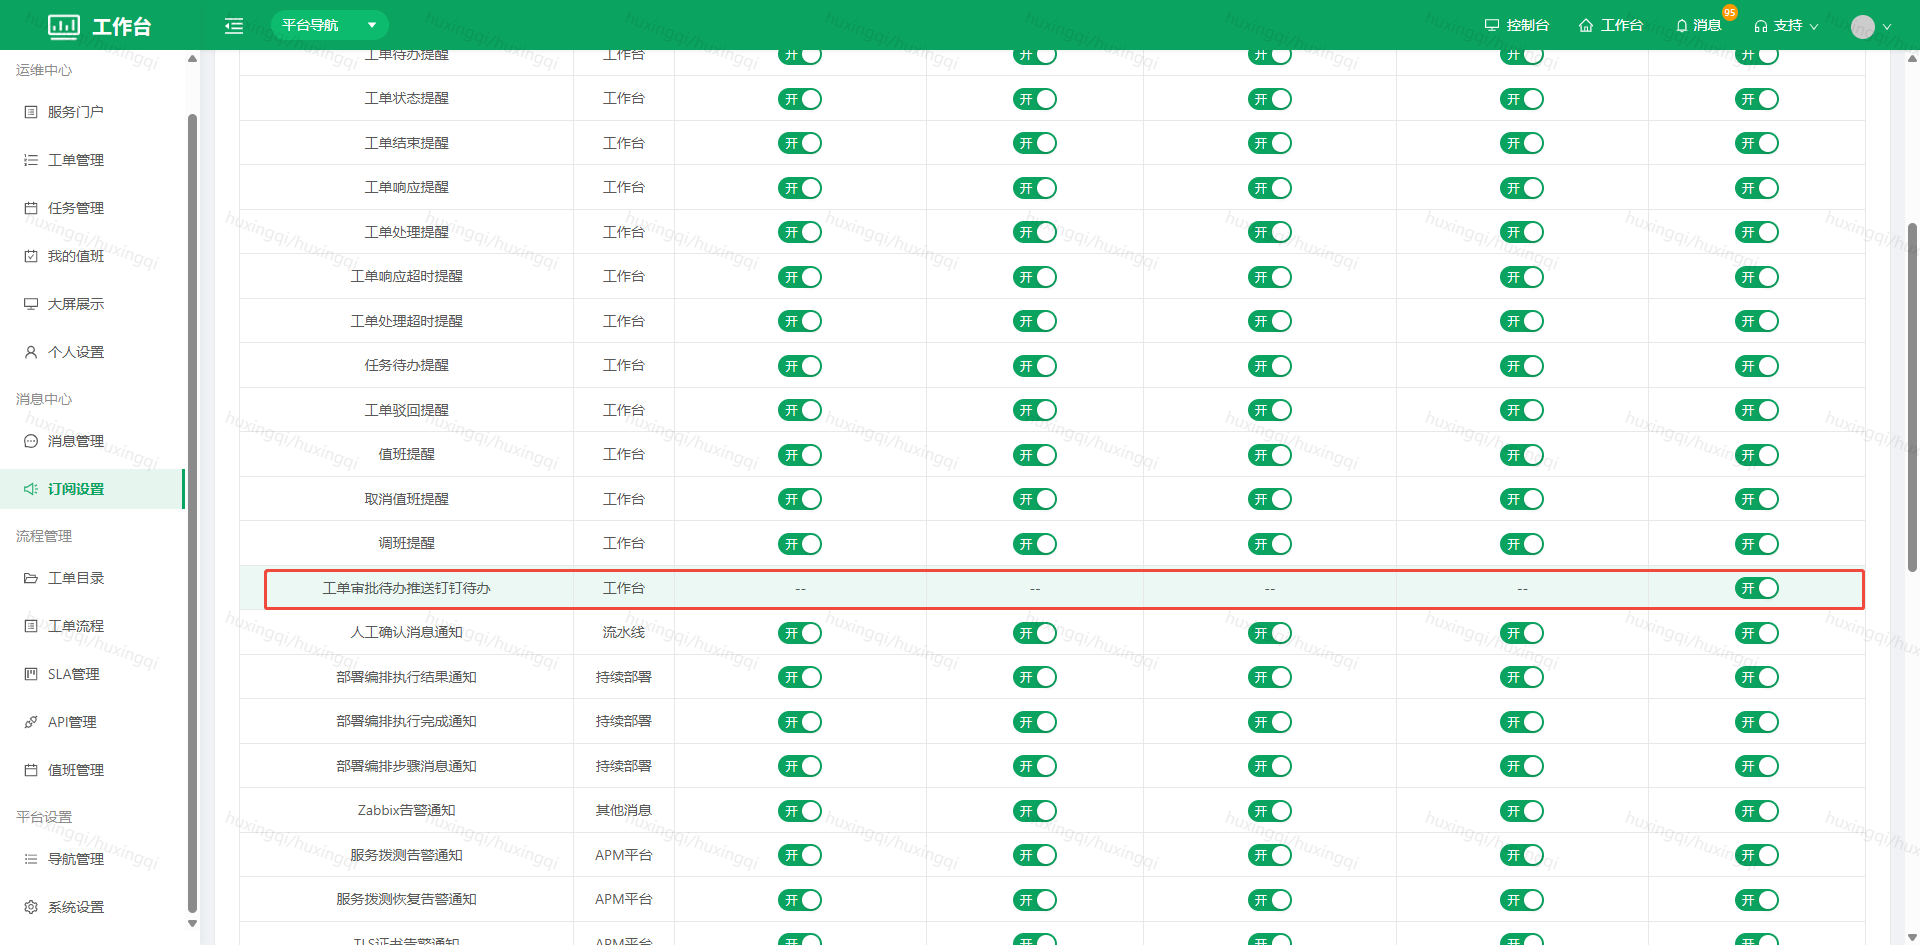
-
Publish the application
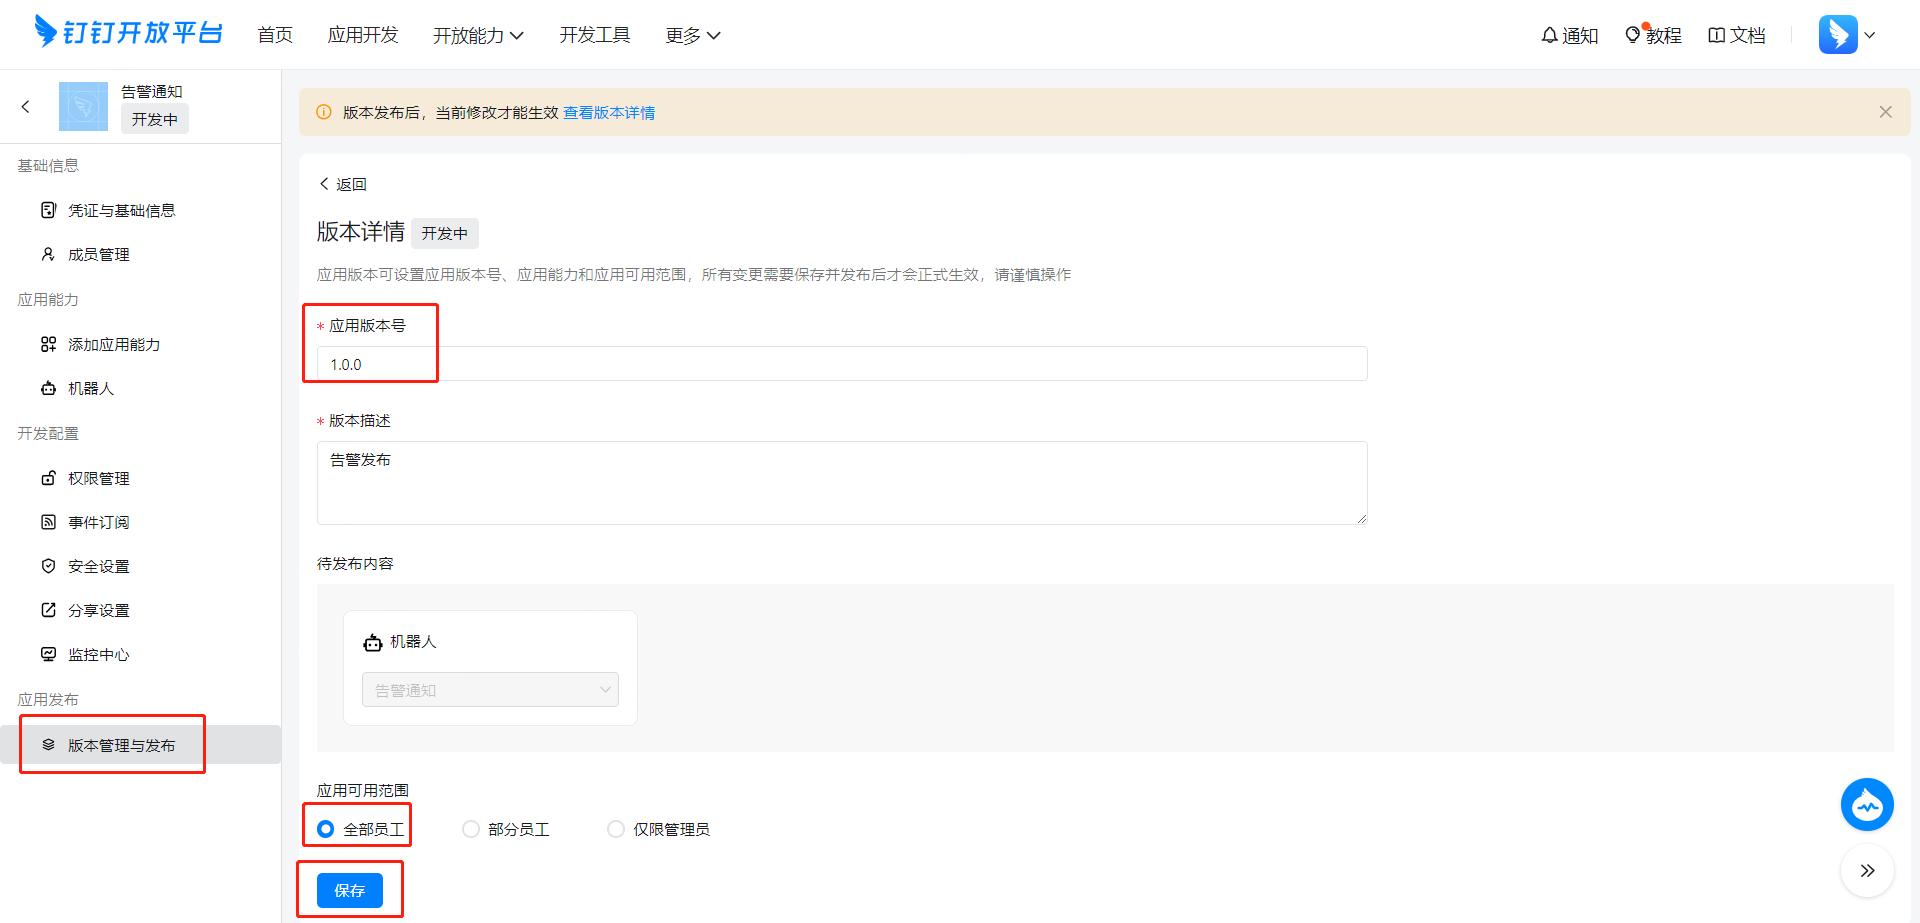
-
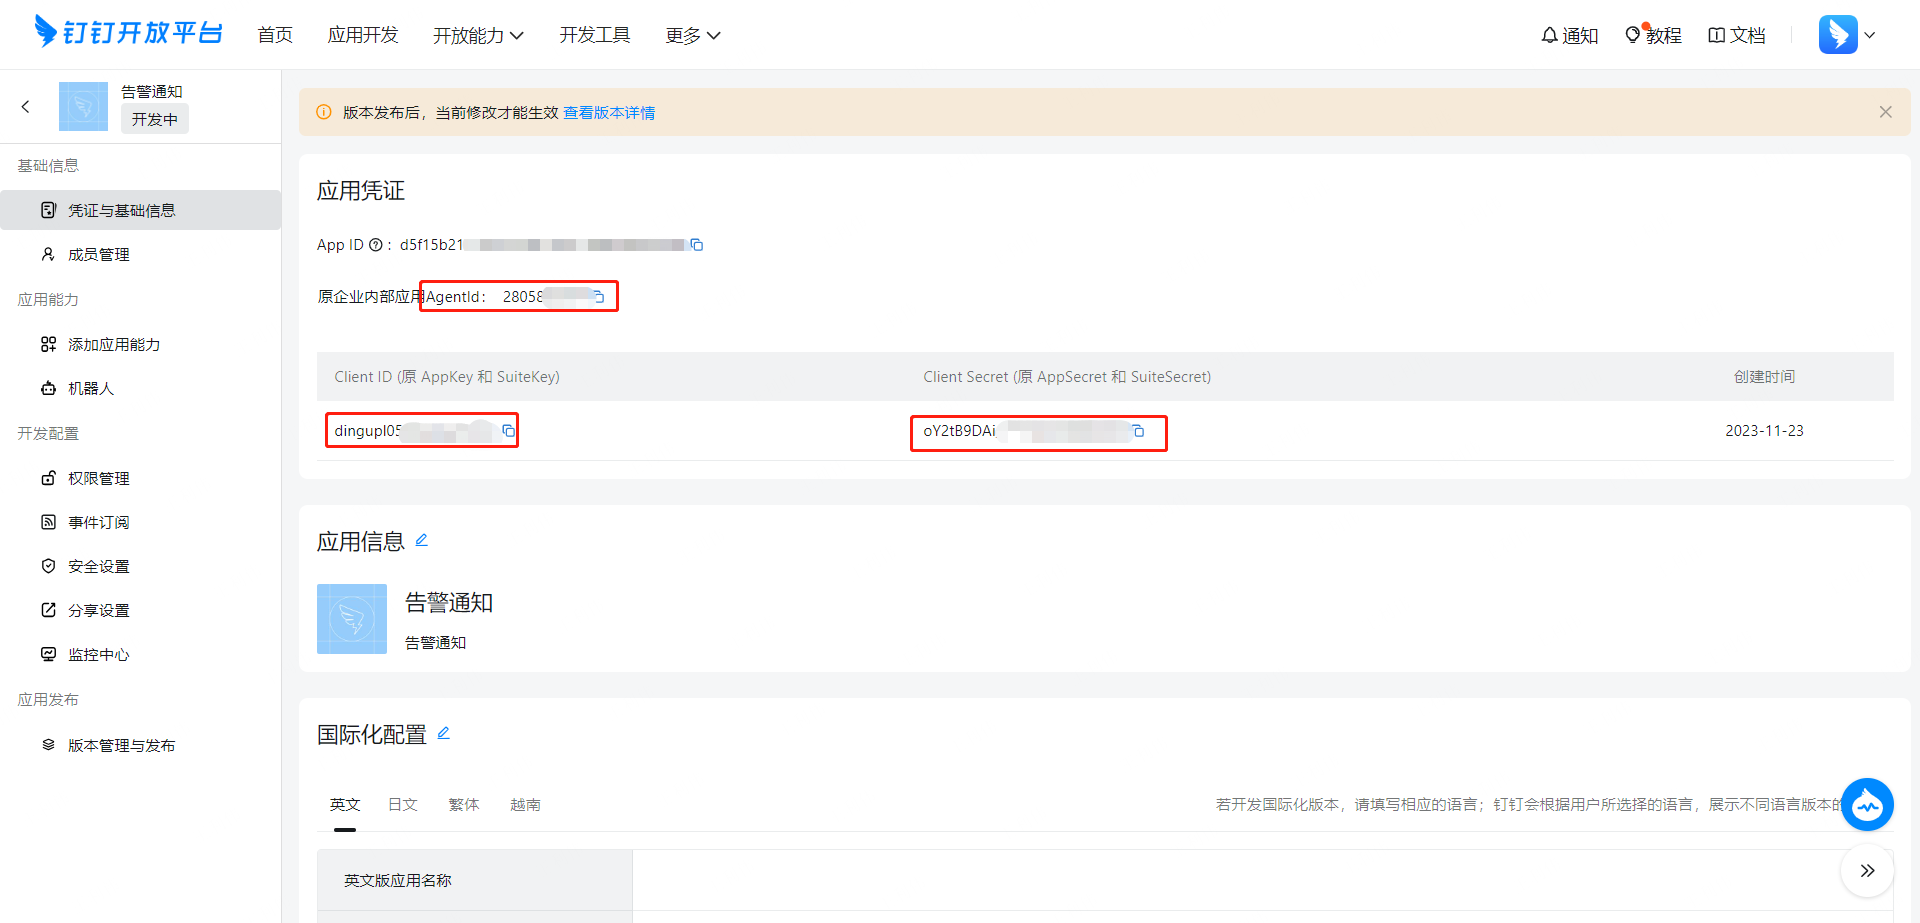
Obtain the relevant parameters: enter the corresponding values of AgentId, AppKey, AppSecret and so on on the Configure DingTalk Integration page
-
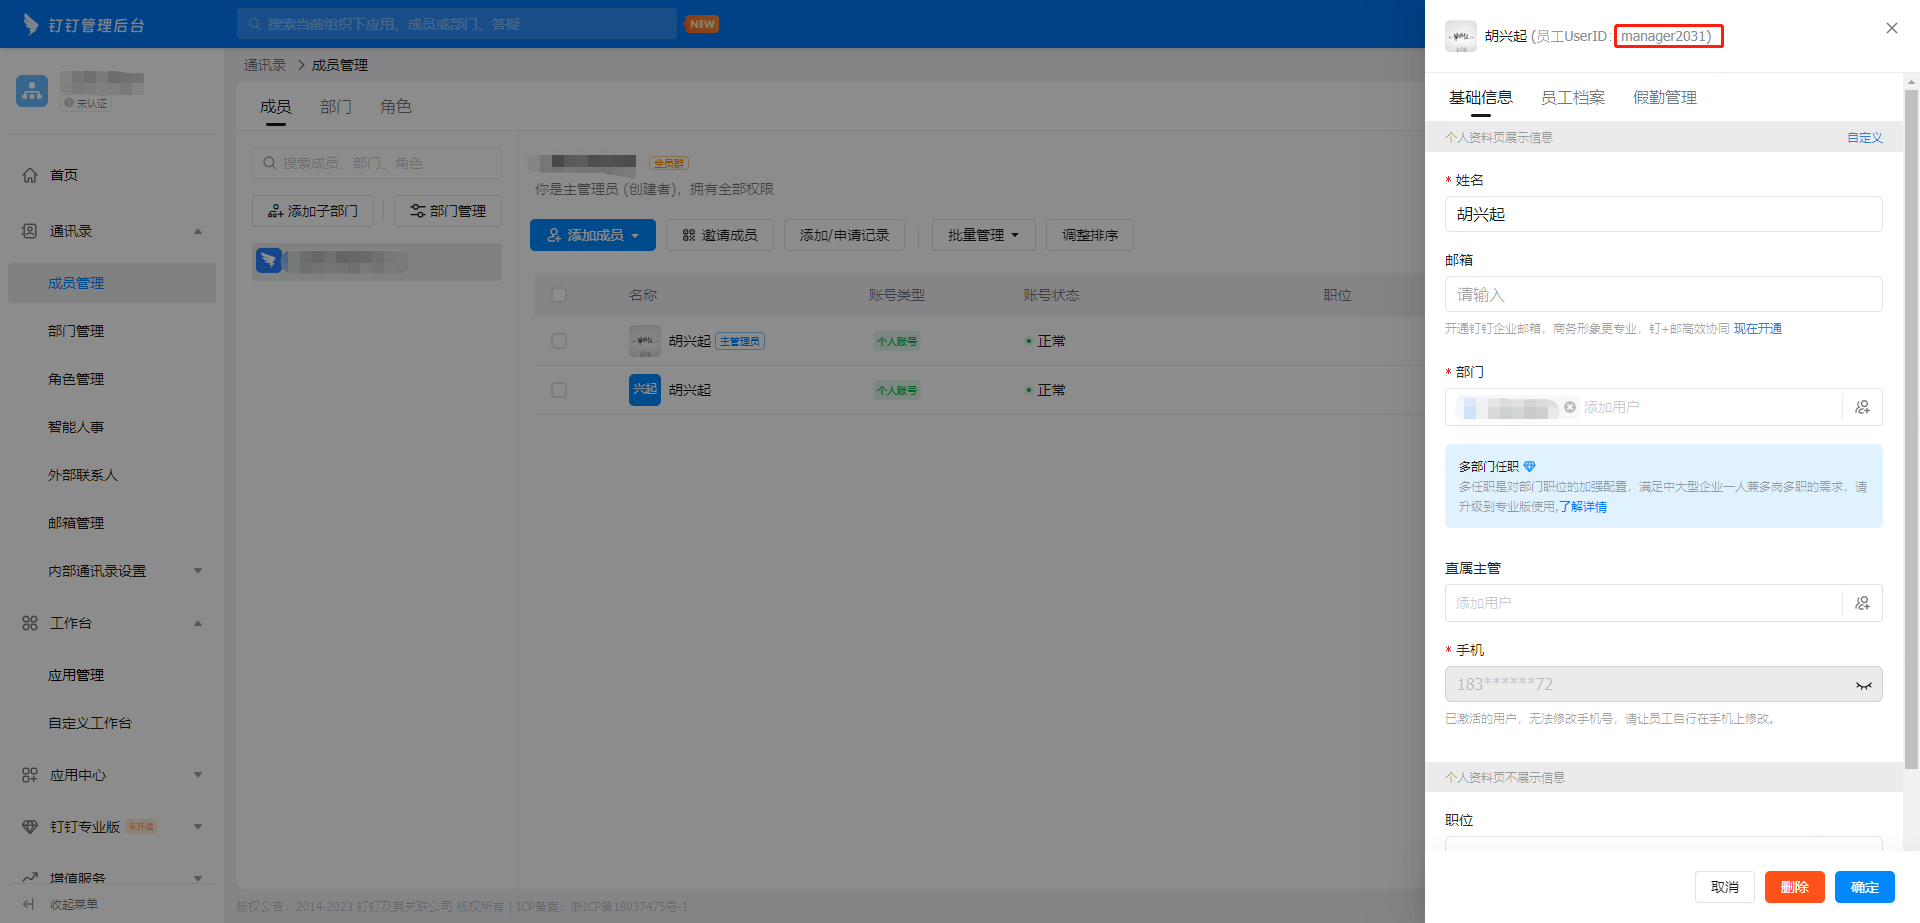
Obtain the employee UserID (Personal Settings - Notification Settings - Recipient)
Address: https://oa.dingtalk.com/contacts.htm#/contacts
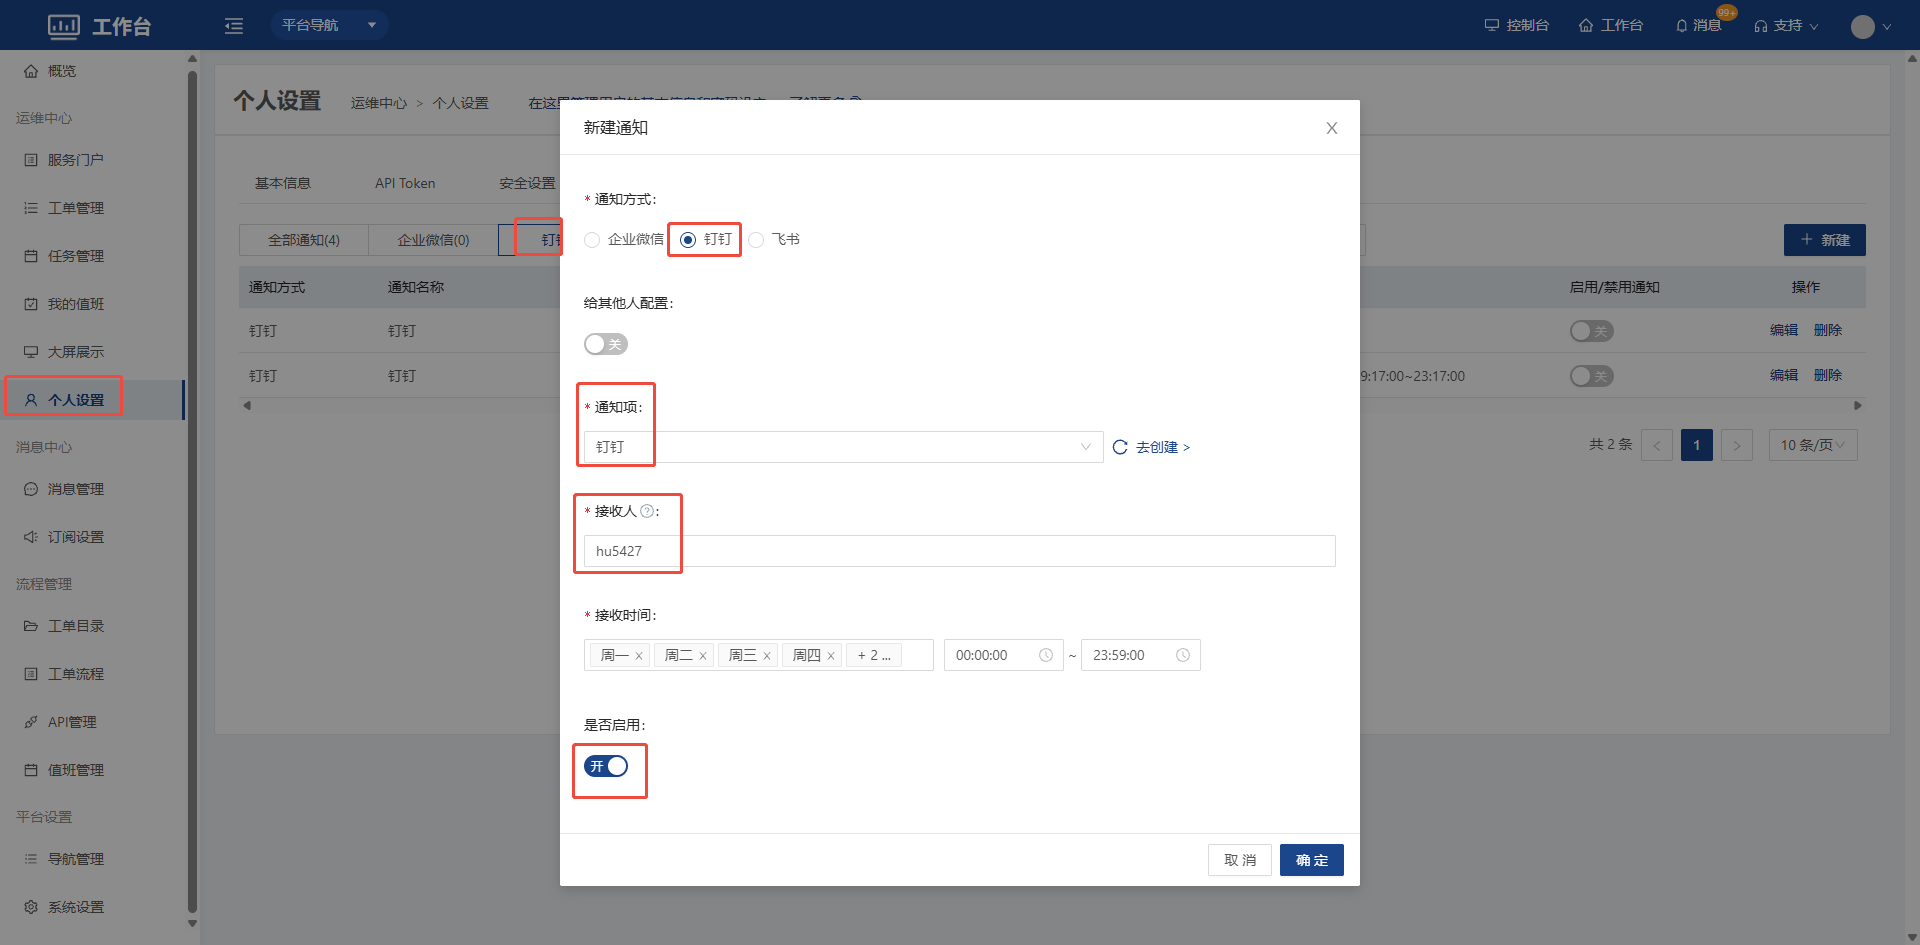
- Enter the DingTalk application information
Application notification: after the application is published, a conversation is opened for message push
Work notification: a separate work notification conversation is used for message push
- Configure the DingTalk robot
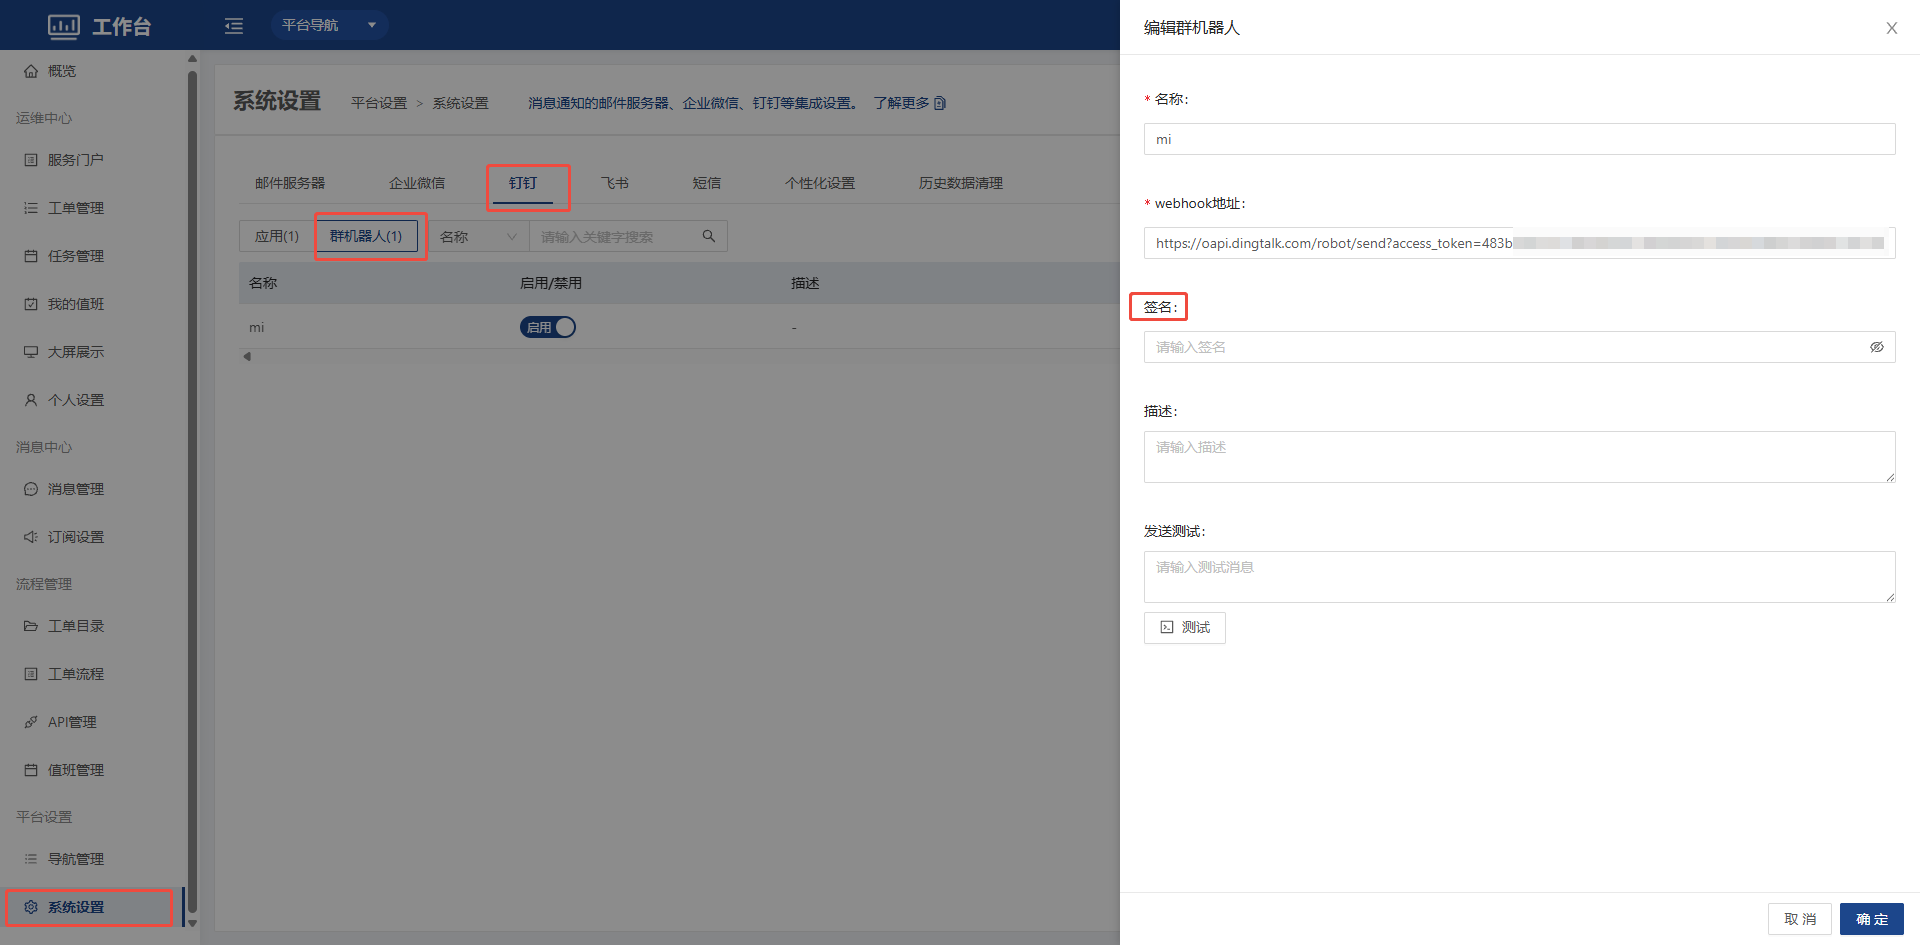
Open the DingTalk desktop client, enter a group chat ==> Group Settings in the upper right corner ==> Group Management ==> Robots ==> Add Robot ==> Custom (connect a custom service through WebHook) ==> Add
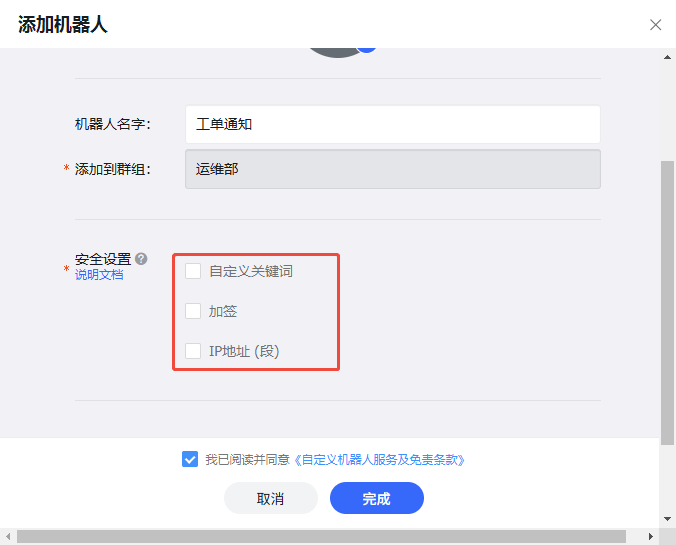
Custom keywords: setting keywords is not recommended. Enable them only when you need certain notifications such as tickets. OpsAny supports dozens of notification types, and keywords may block some notifications
Signature: recommended. Once enabled, configure the signature in the robot configuration
IP address: recommended. Configure the IP address of the OpsAny production environment
4.3.4 Feishu
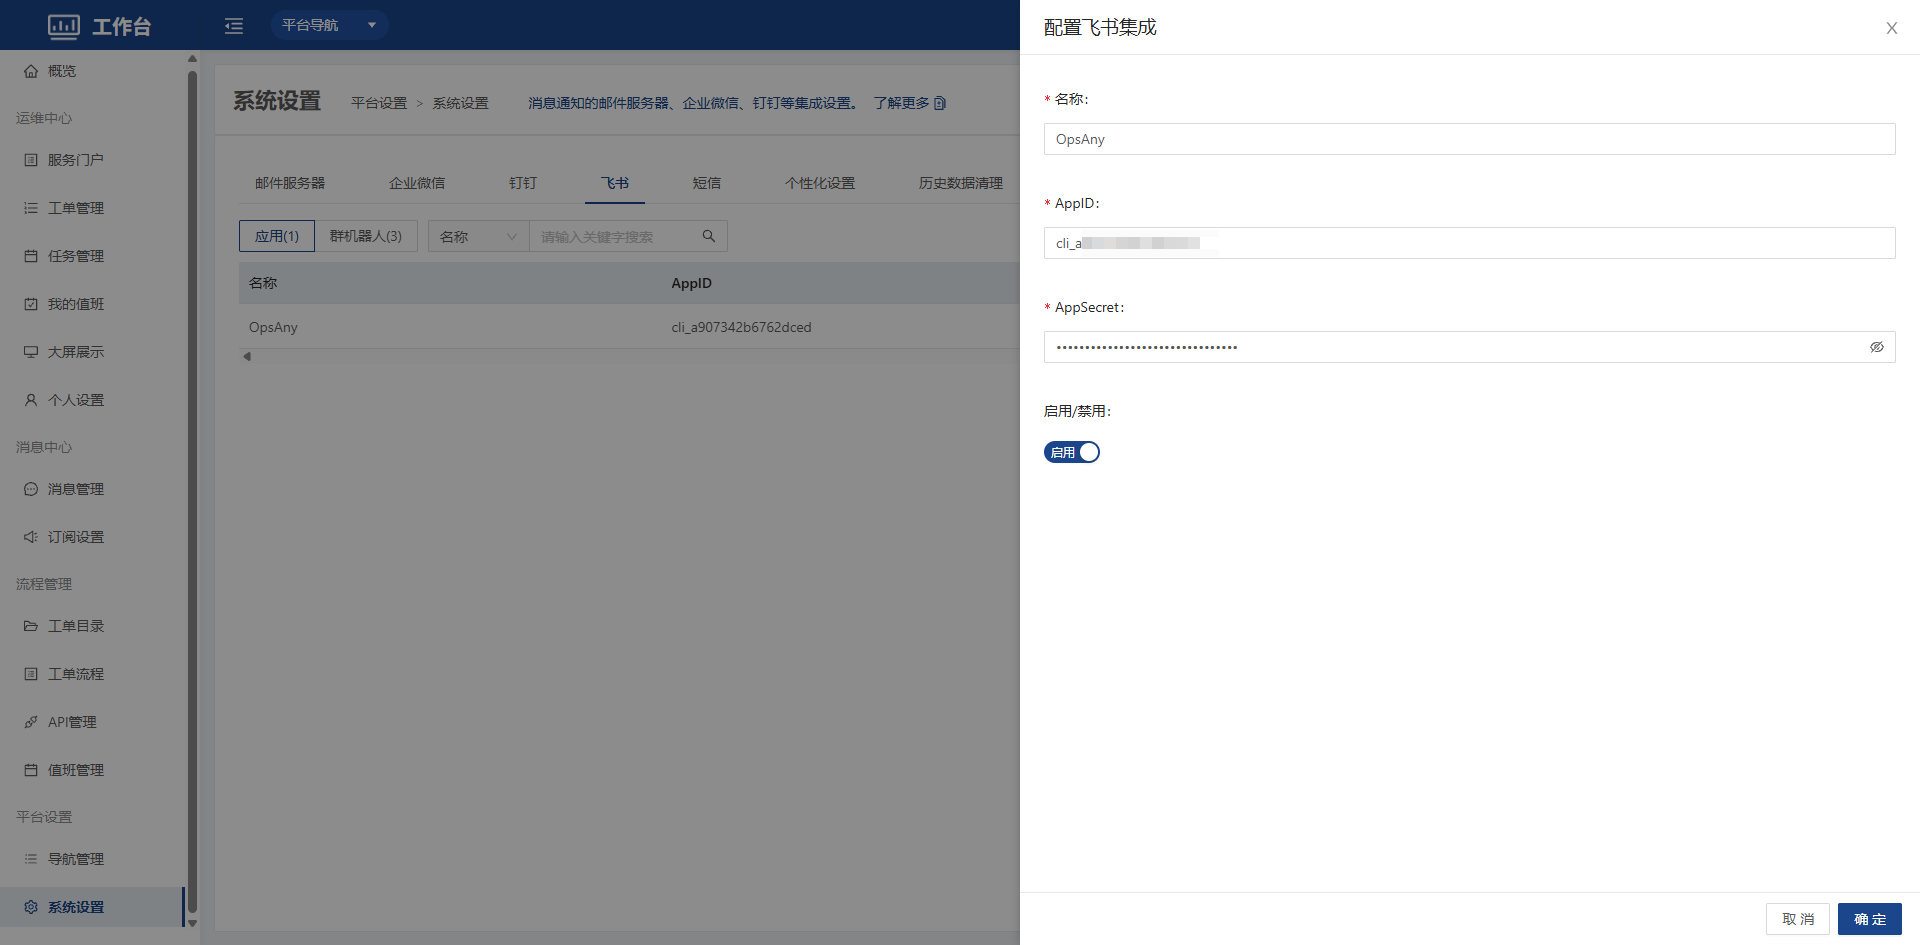
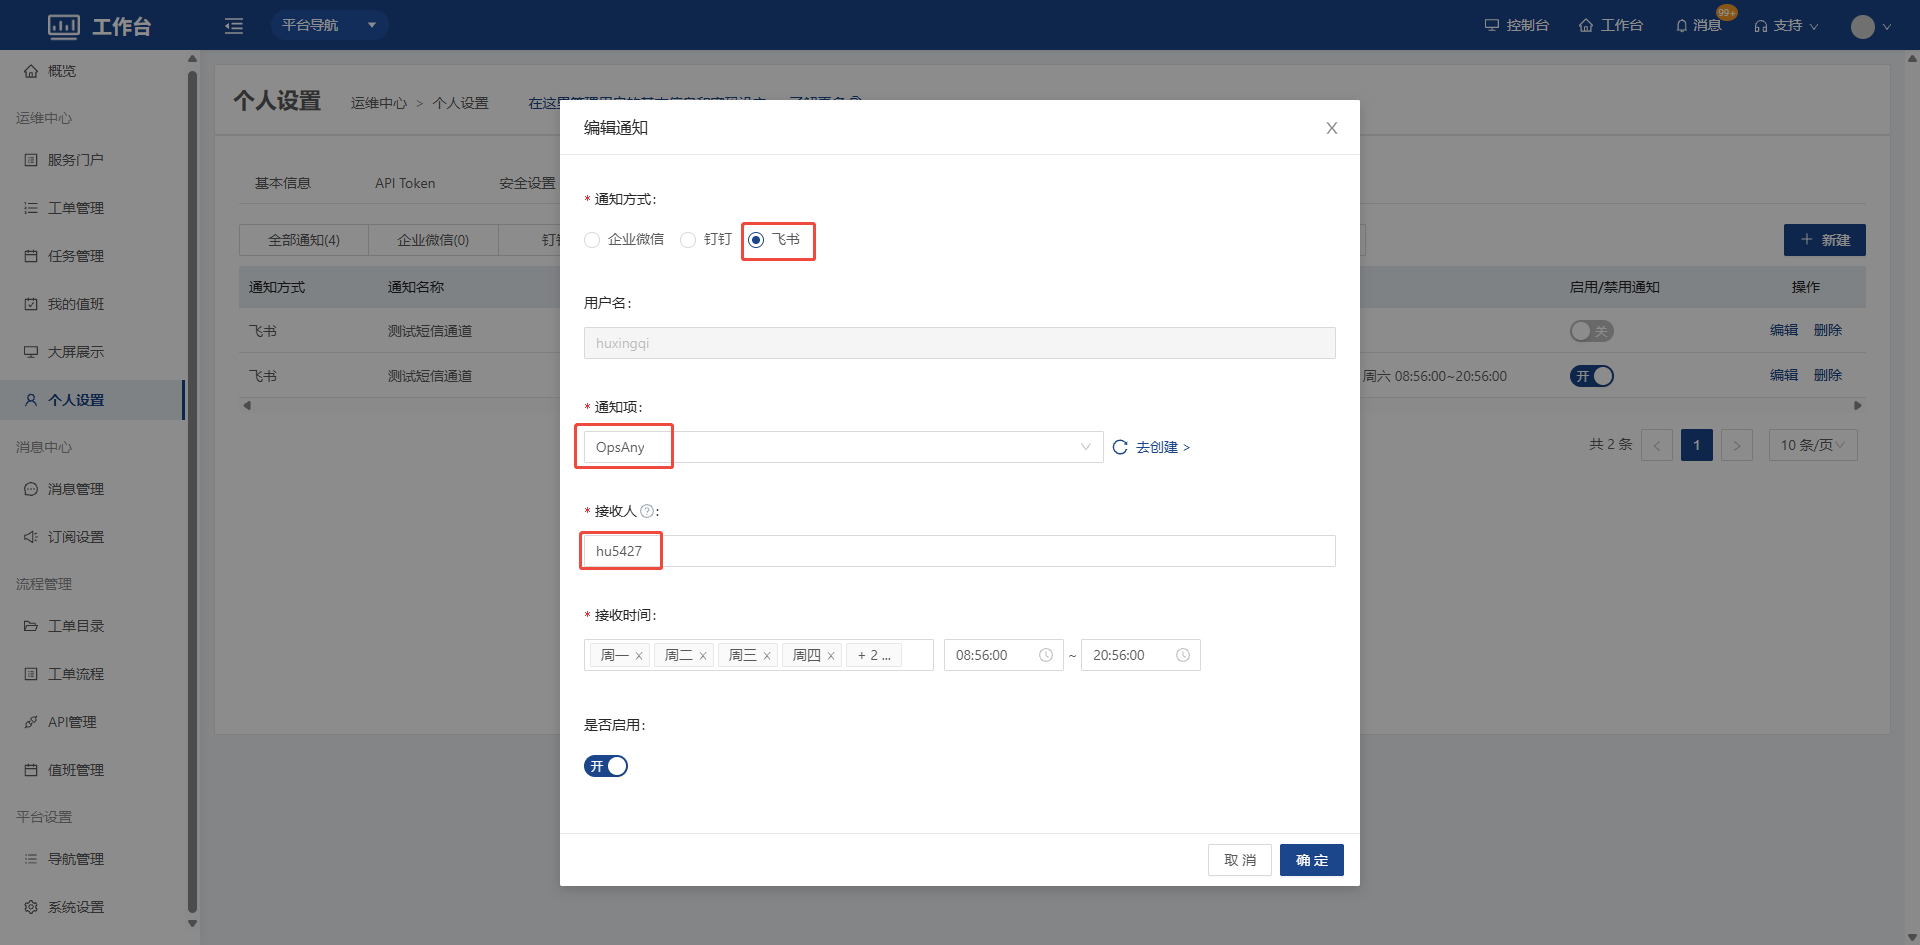
After configuring Feishu, users need to go to Personal Settings - Notification Settings to create a notification, configure the recipient (employee UserID) and associate the notification application.
-
Configure the Feishu integration: fill in the content according to the fields on the page
-
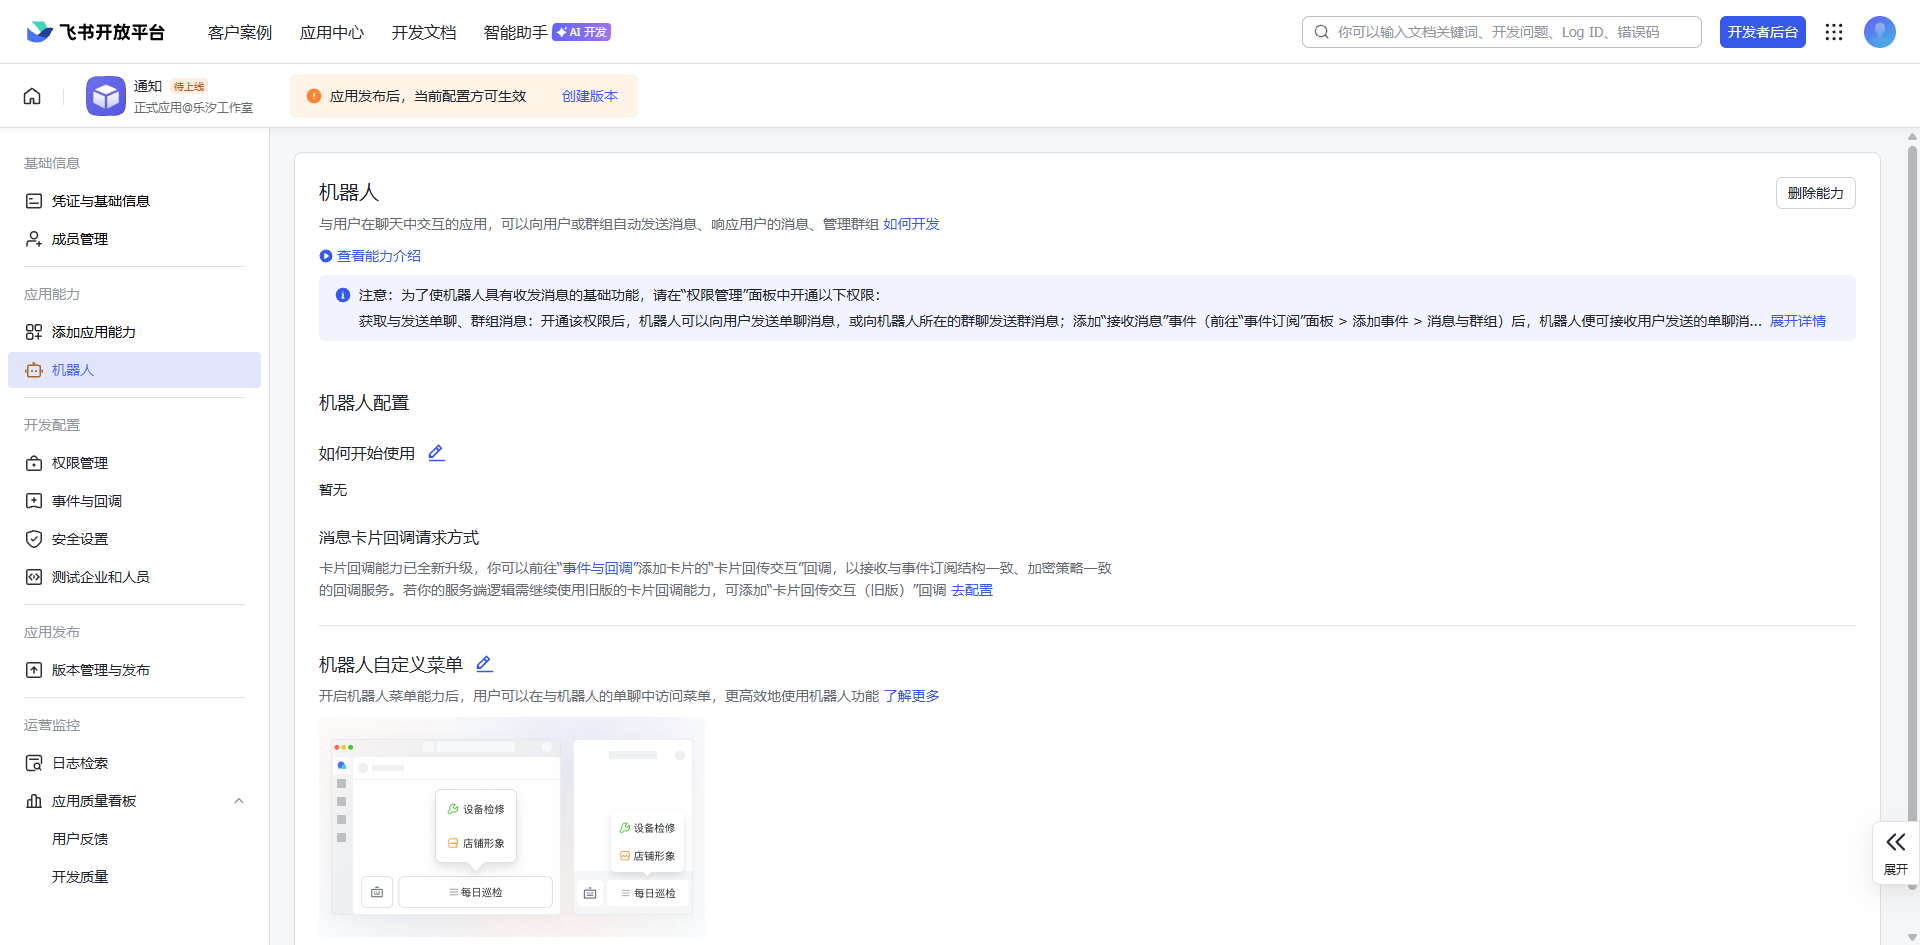
Create a robot application
Address: https://open.feishu.cn/app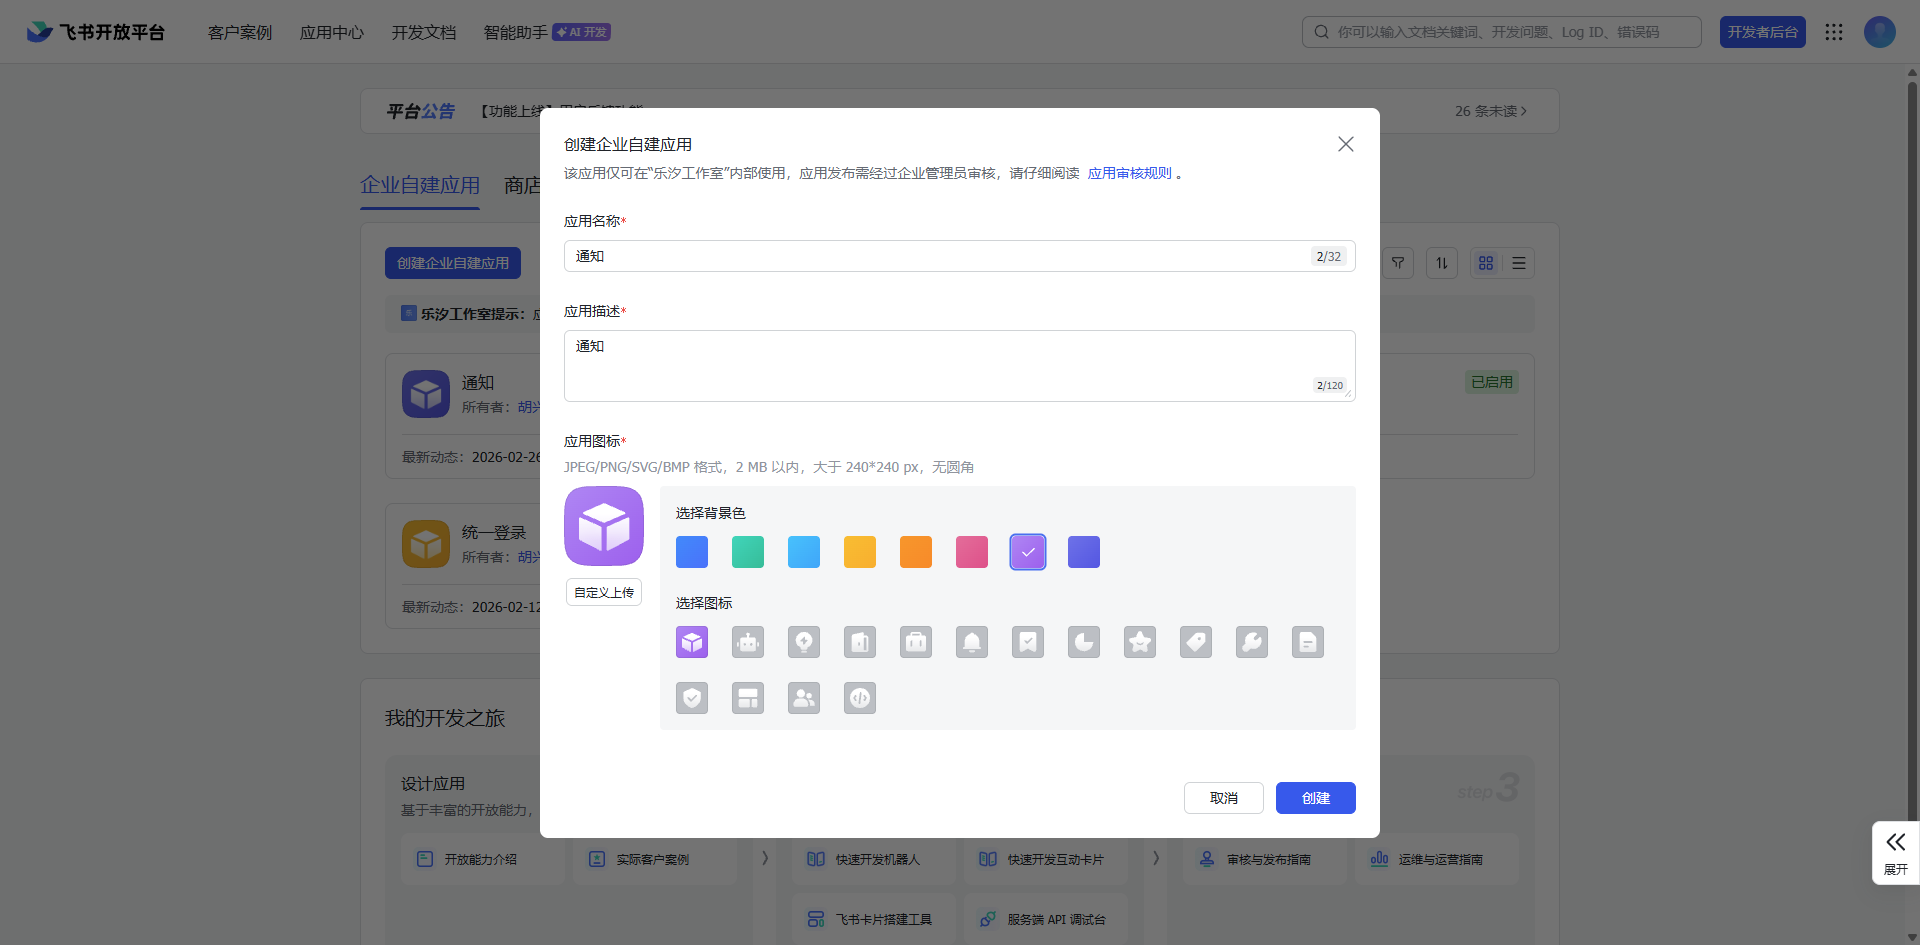
-
Configure and publish the robot application
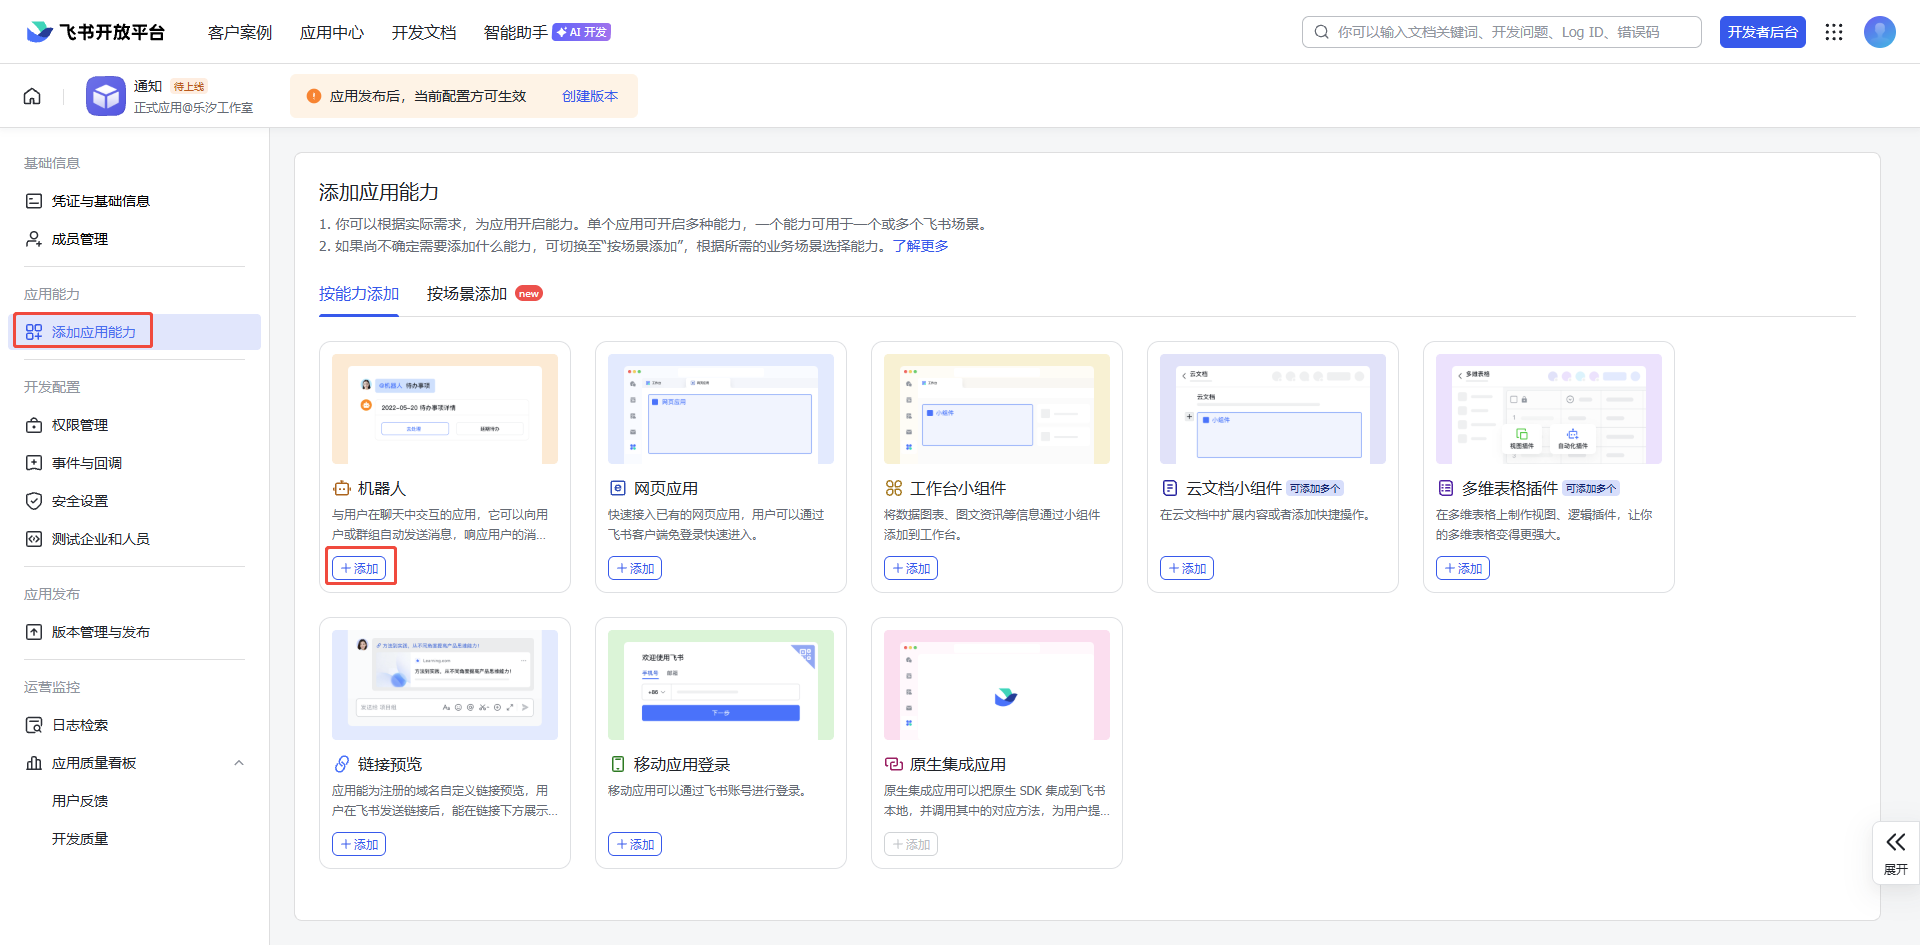
-
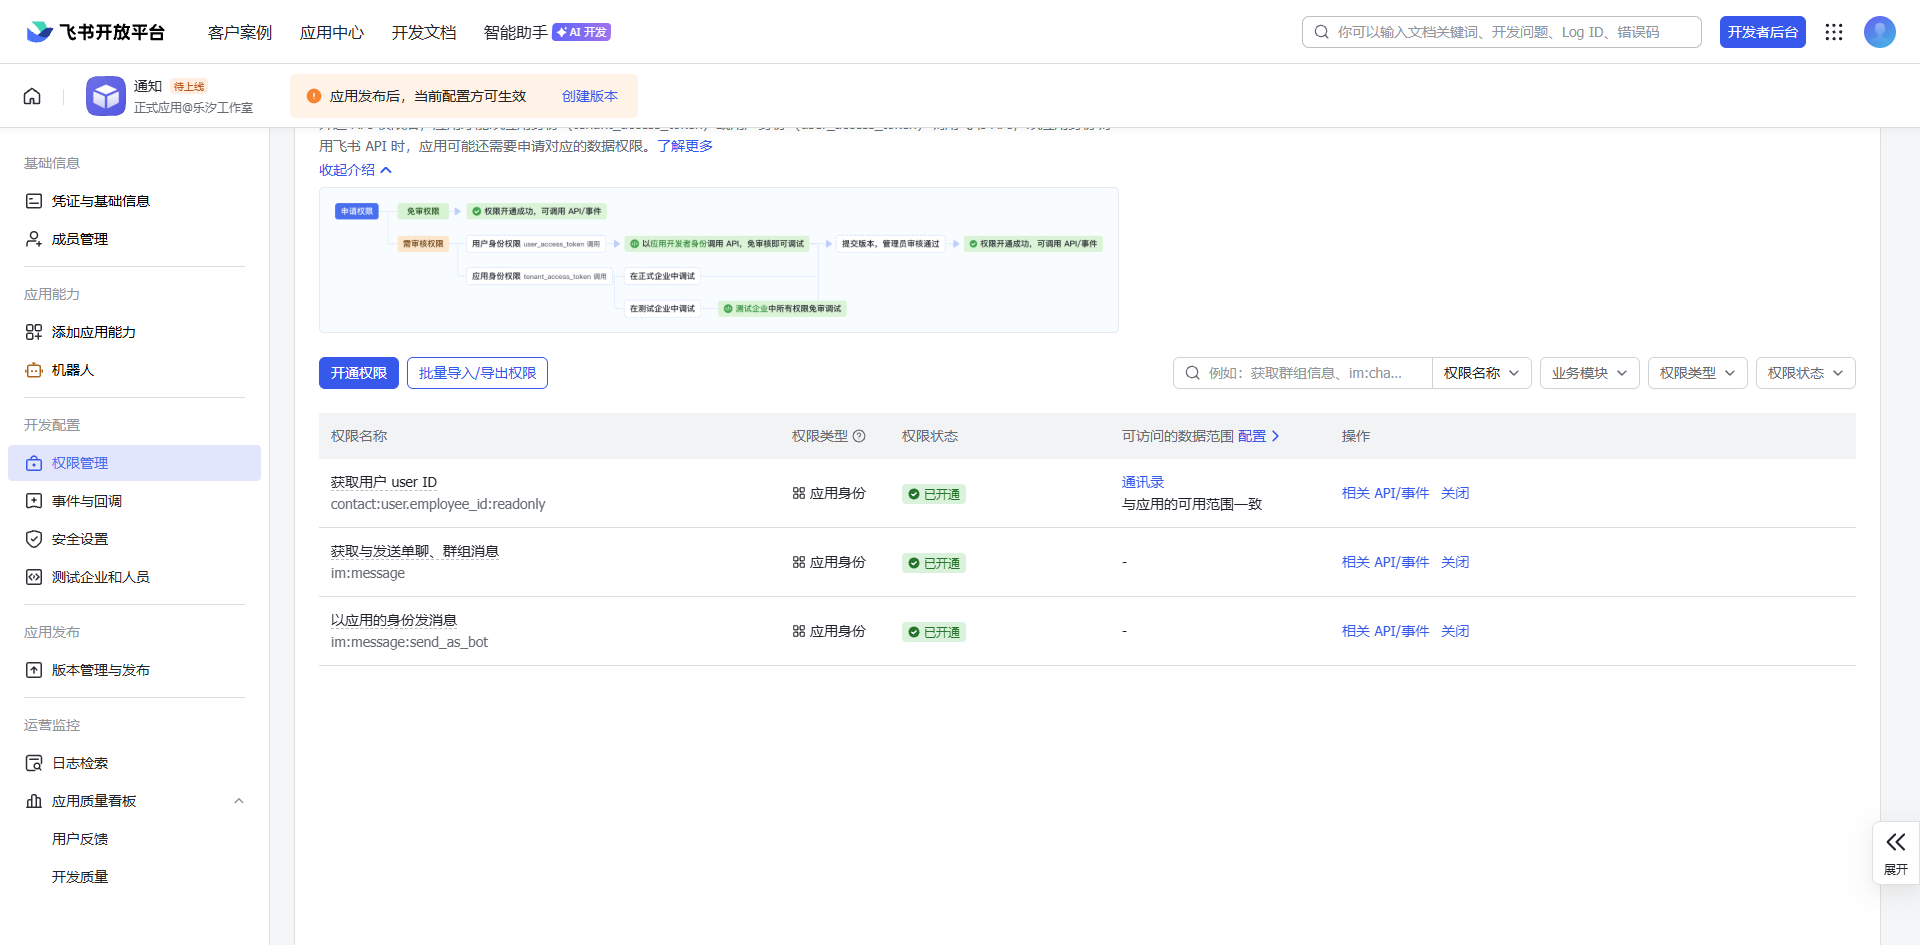
Authorize the robot to send messages
-
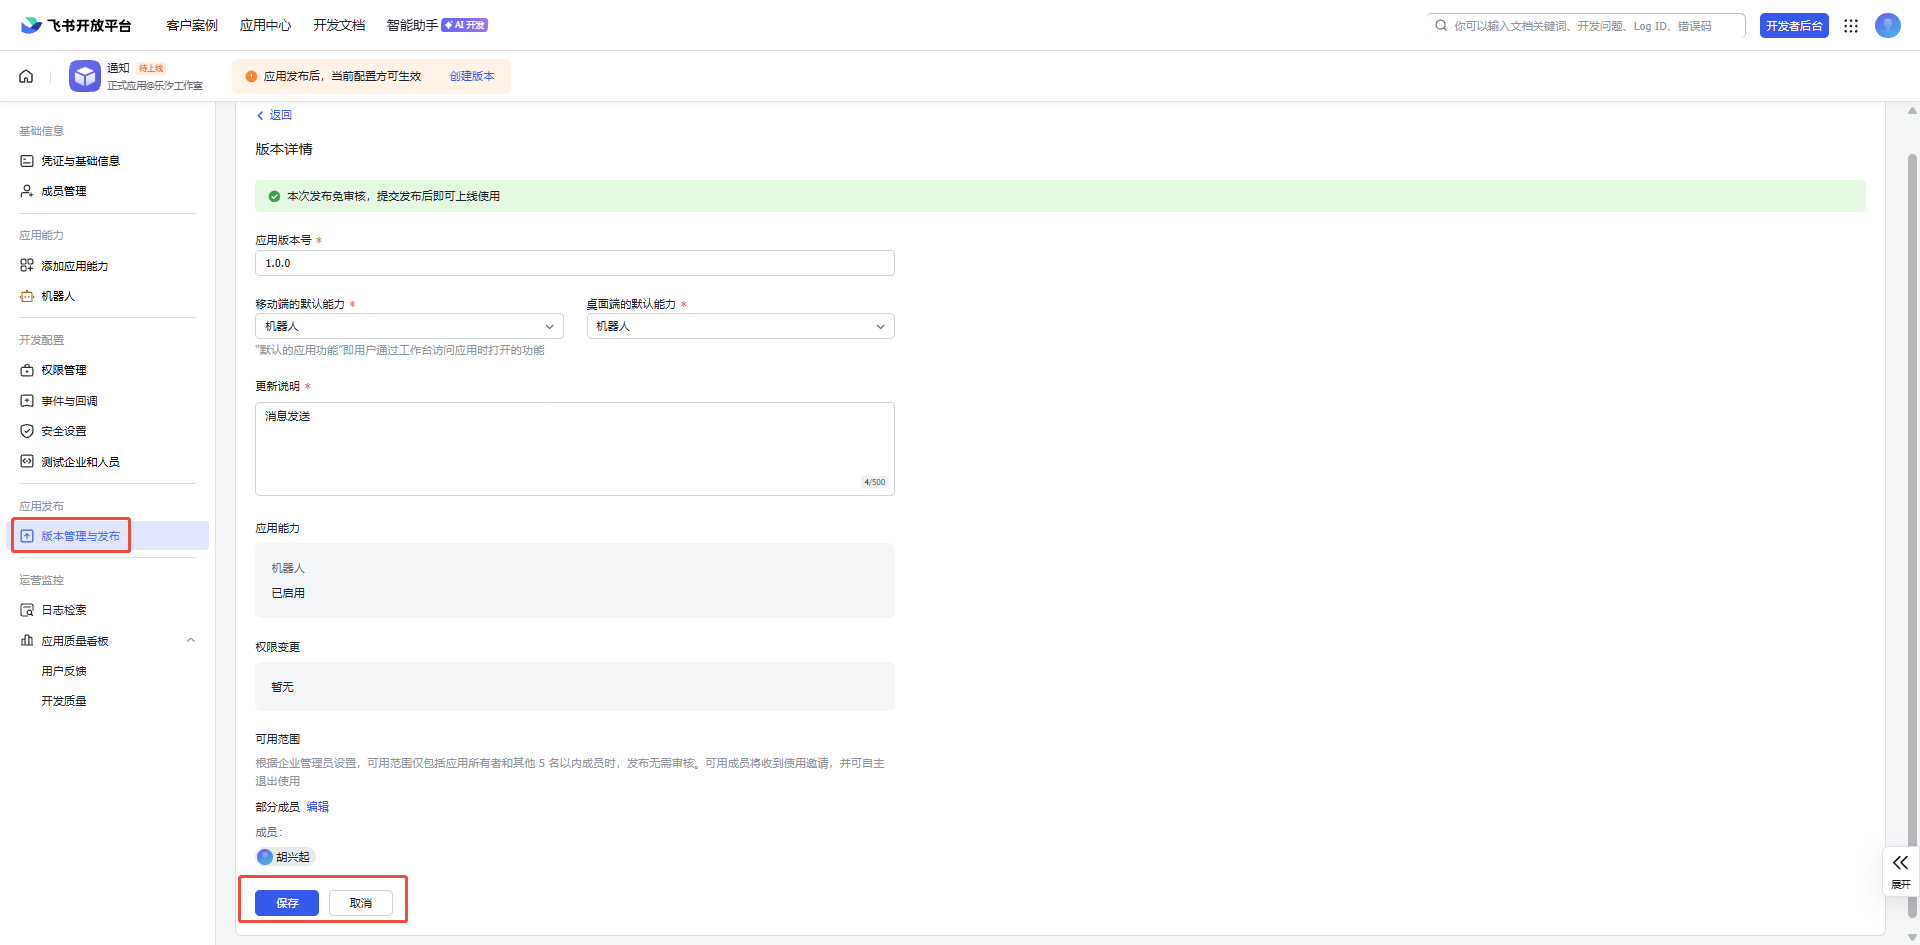
Publish the application
-
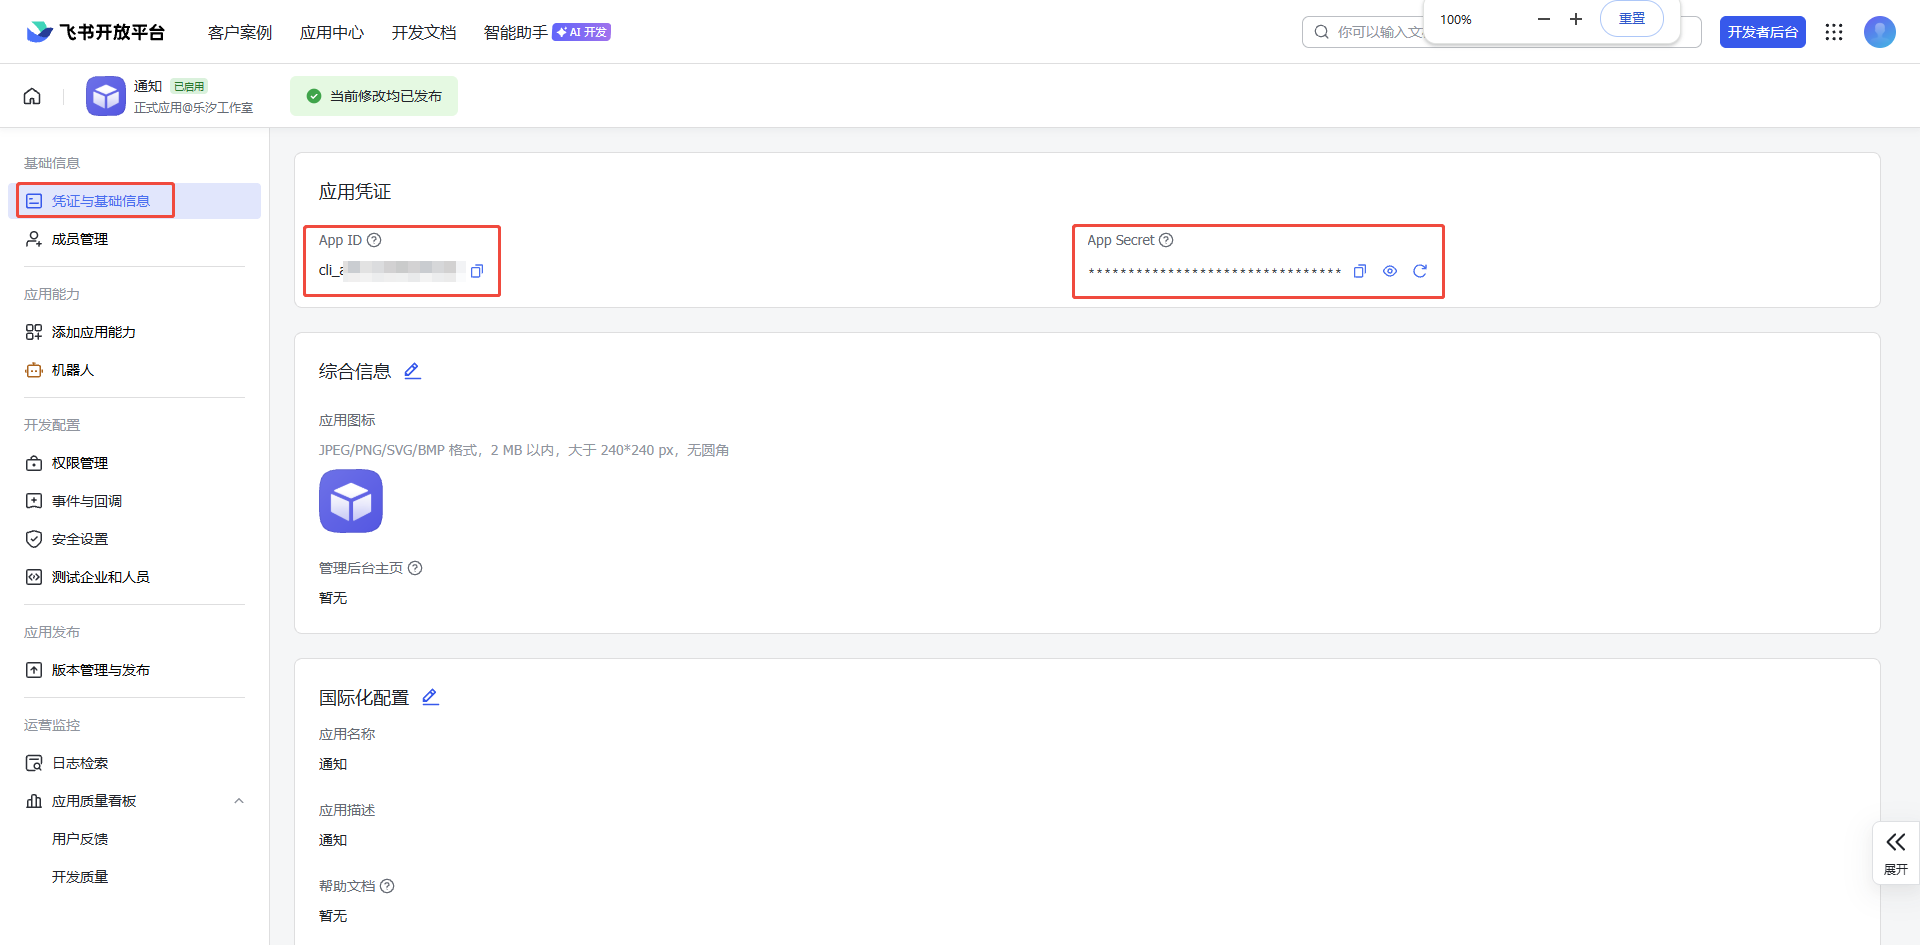
Obtain the relevant parameters: enter the corresponding values of AppID, AppSecret and so on on the Configure Feishu Integration page
-
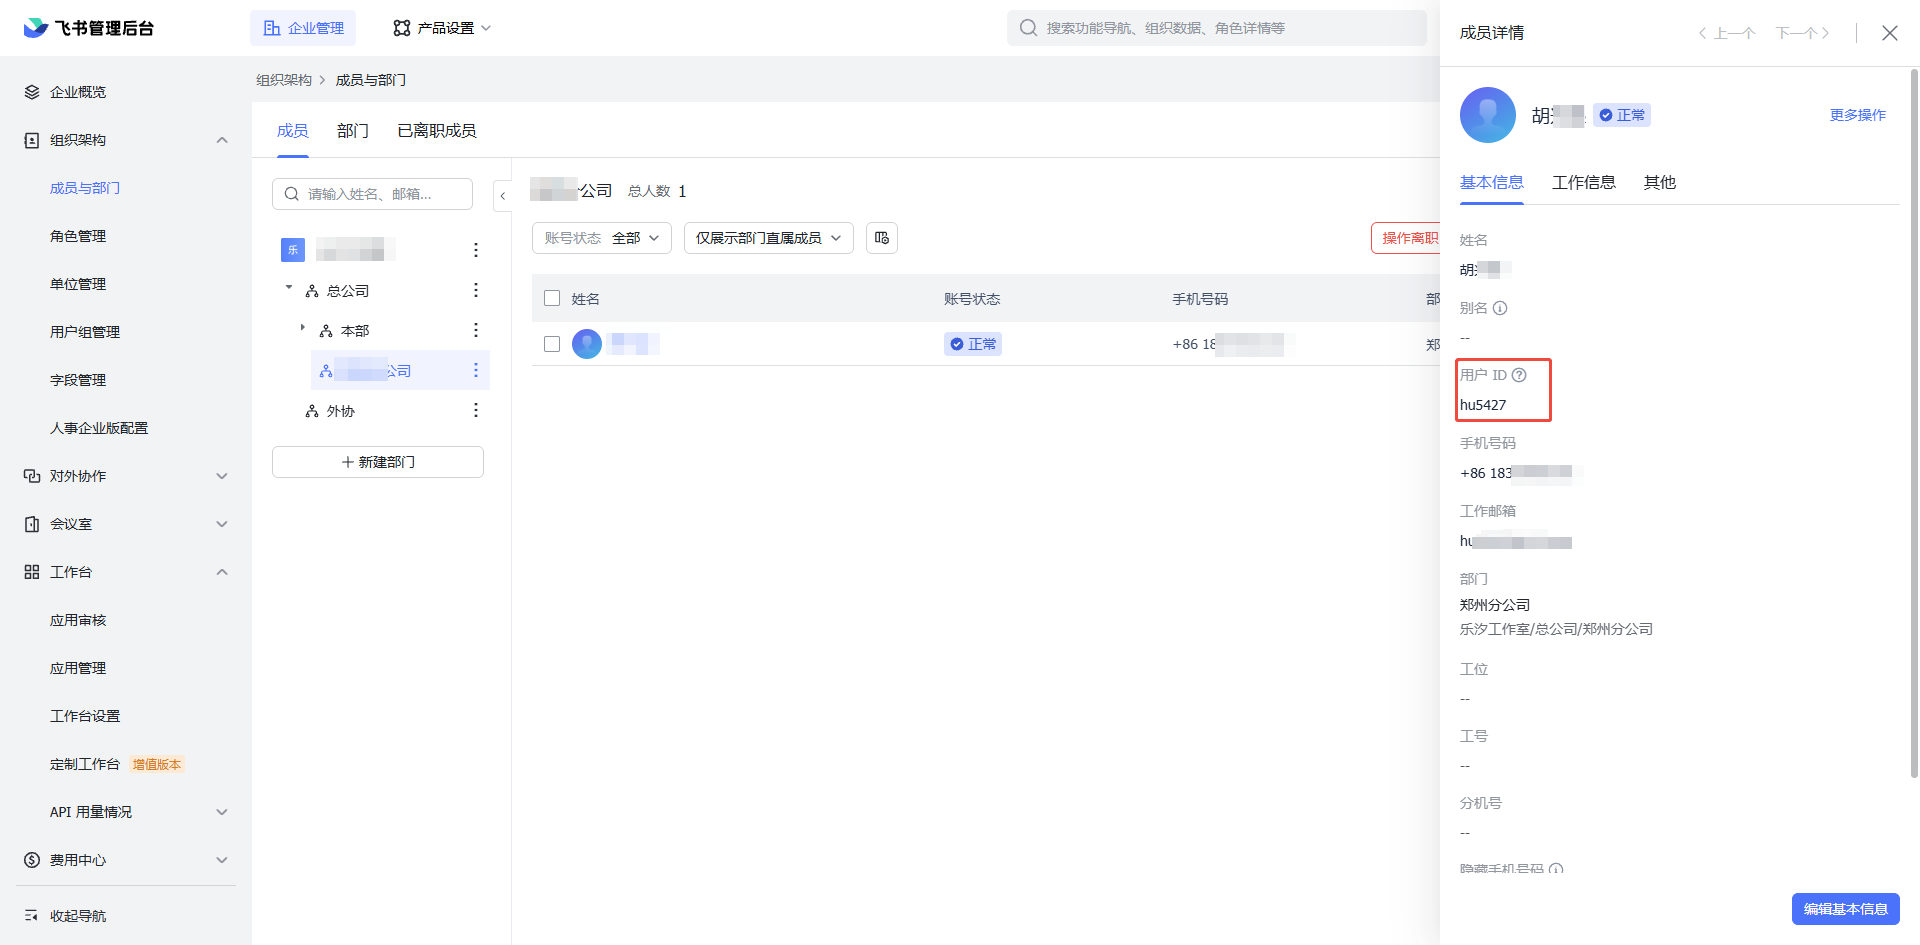
Obtain the employee UserID (Personal Settings - Notification Settings - Recipient)
Address: https://cnq6rl7efe.feishu.cn/admin/contacts/departmentanduser
- Configure the Feishu robot
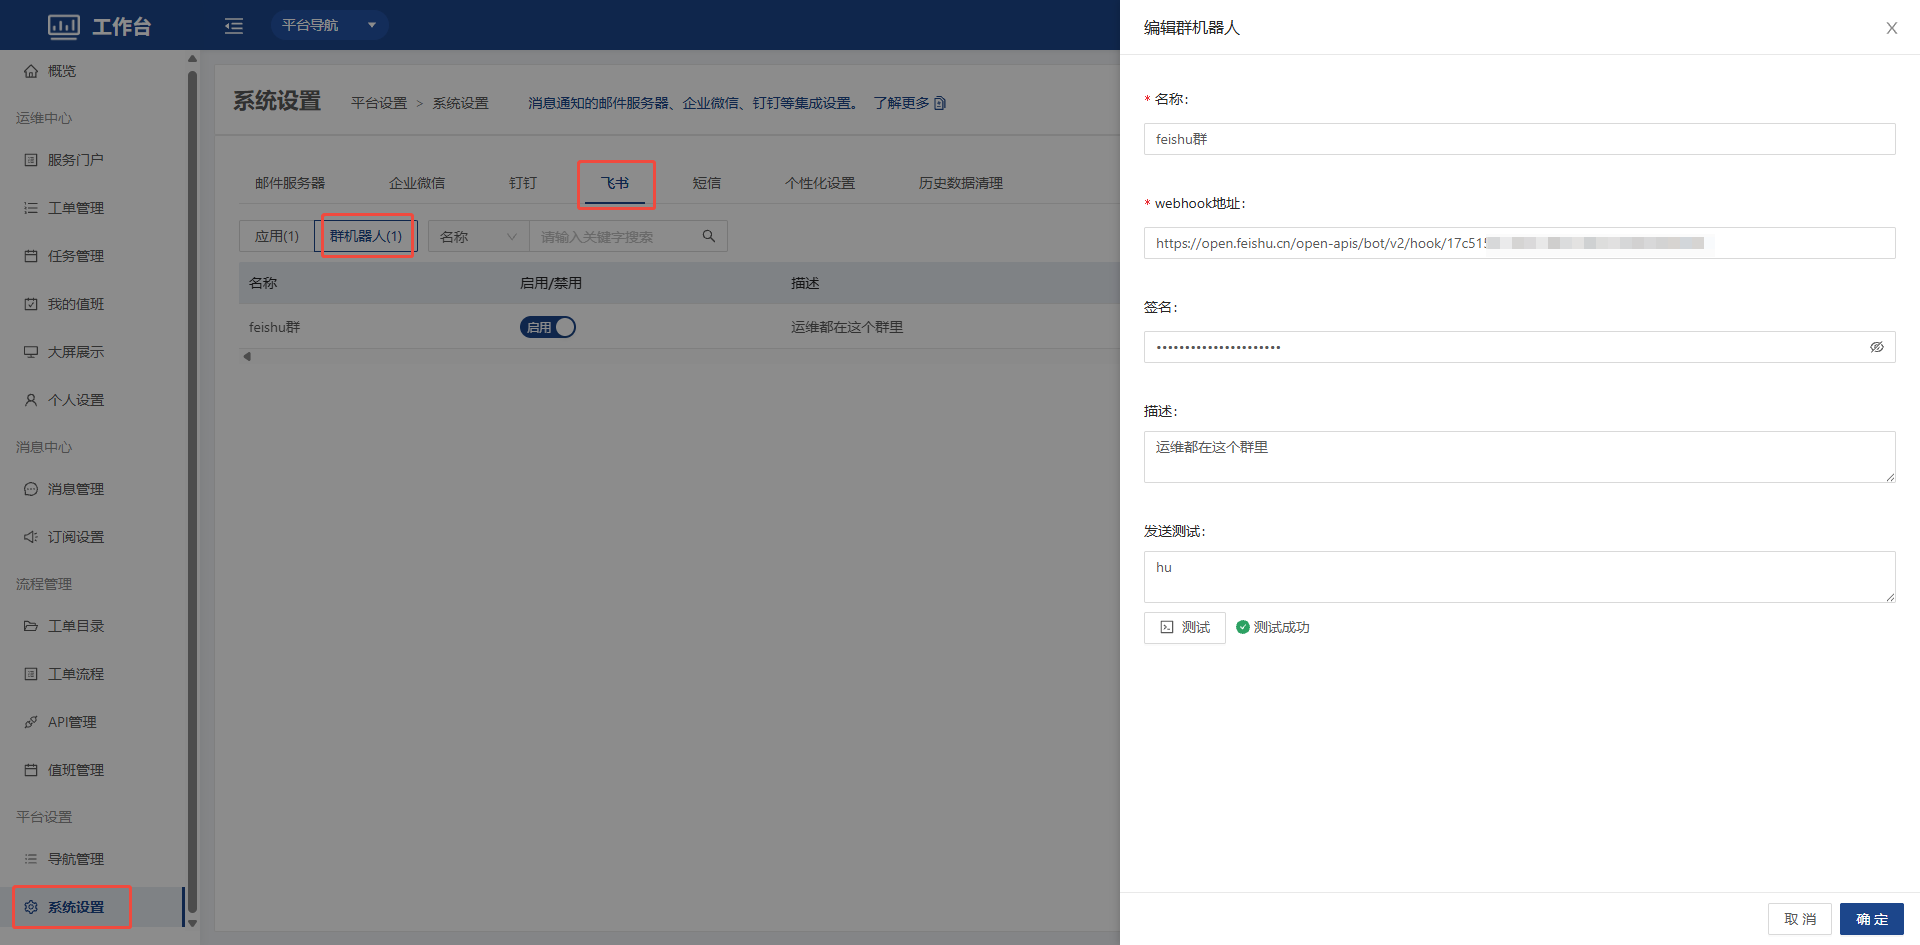
Open the Feishu desktop client, enter a group chat ==> ... in the upper right corner ==> Settings ==> Group Robots ==> Add Robot ==> Custom Robot (push messages of a custom service to Feishu through WebHook) ==> Add
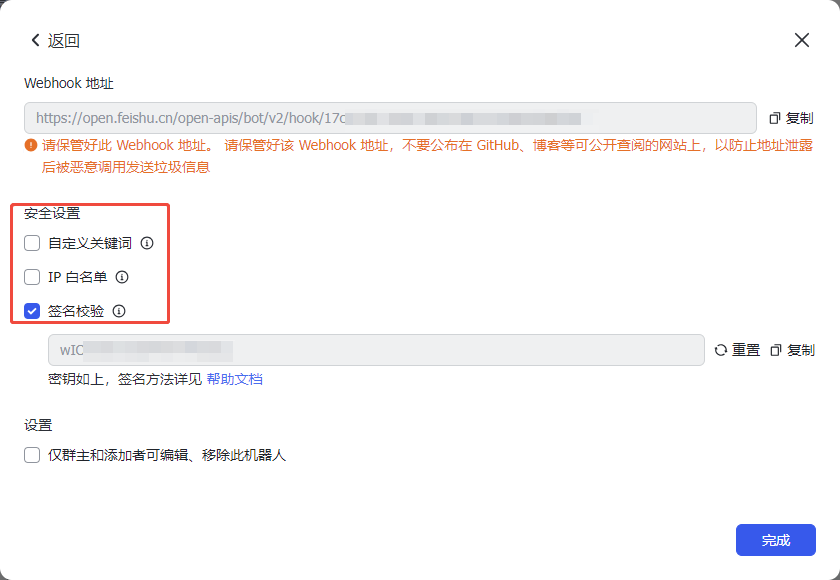
Custom keywords: setting keywords is not recommended. Enable them only when you need certain notifications such as tickets. OpsAny supports dozens of notification types, and keywords may block some notifications
IP allowlist: recommended. Configure the IP address of the OpsAny production environment
Signature verification: recommended. Once enabled, configure the signature in the robot configuration
4.3.5 SMS
Configure the SMS integration for event notifications, message notifications, alert notifications and so on.
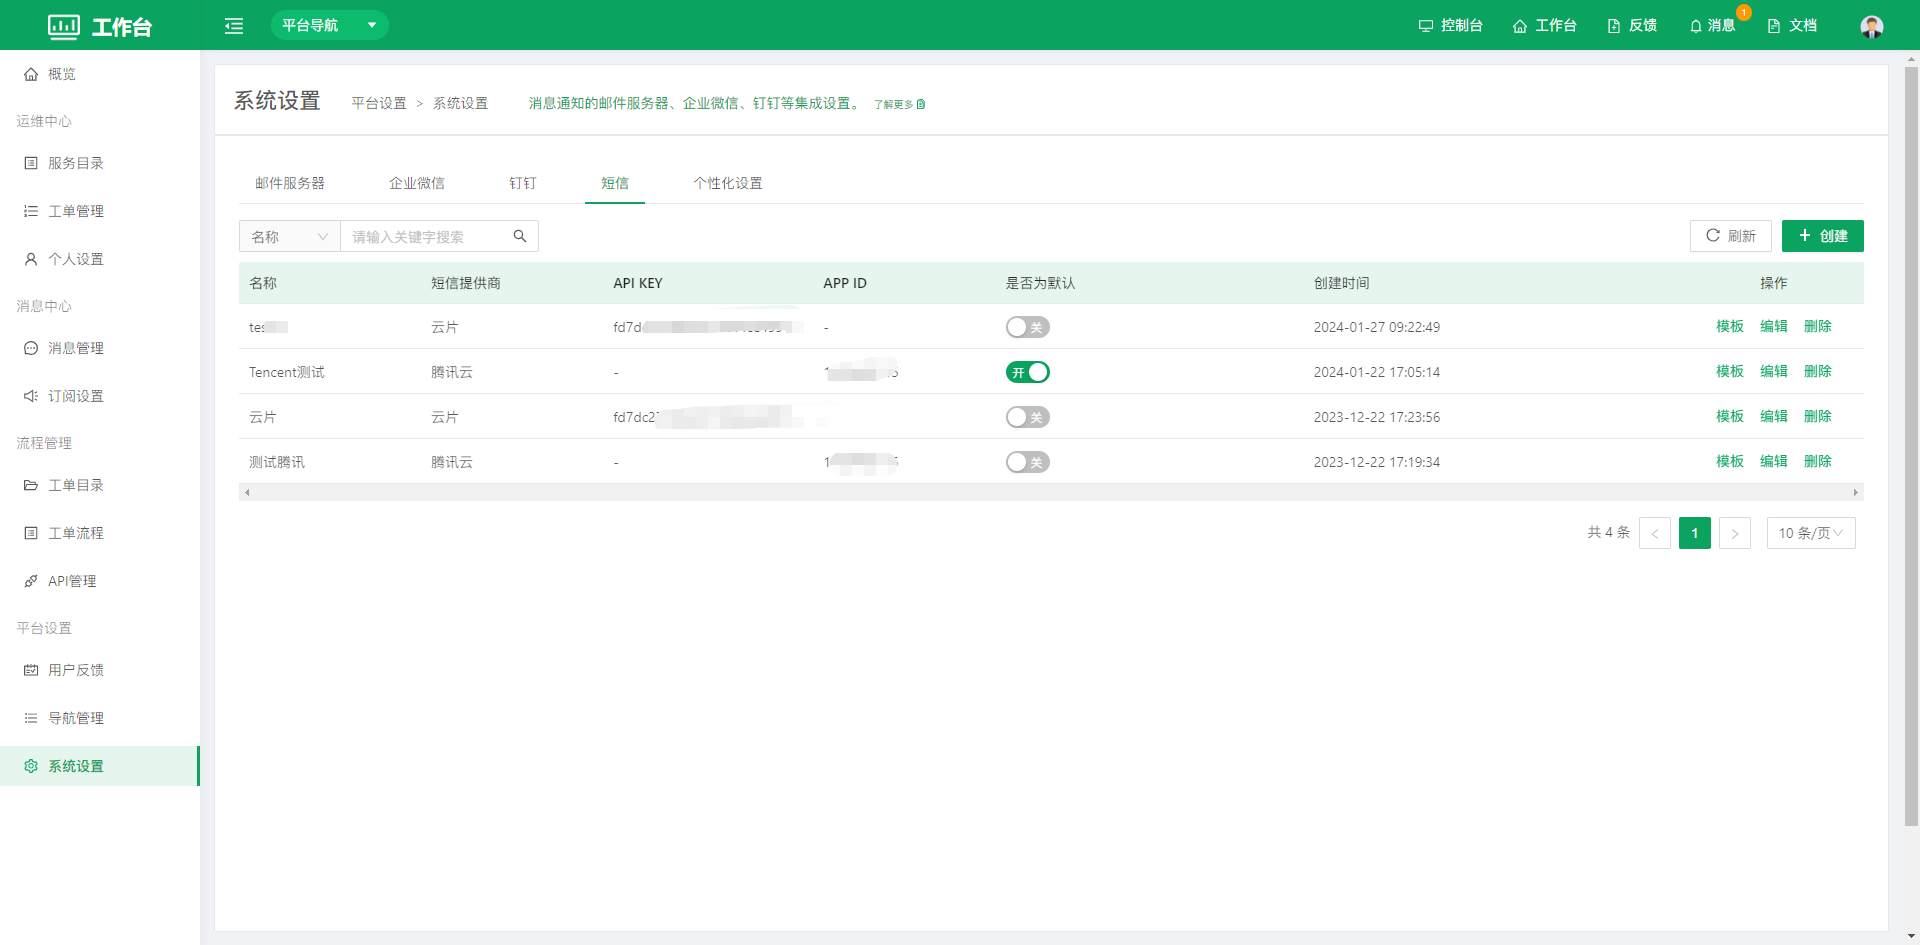
Click Create to open the SMS configuration dialog and select an SMS provider (currently only Tencent Cloud and Yunpian are supported)
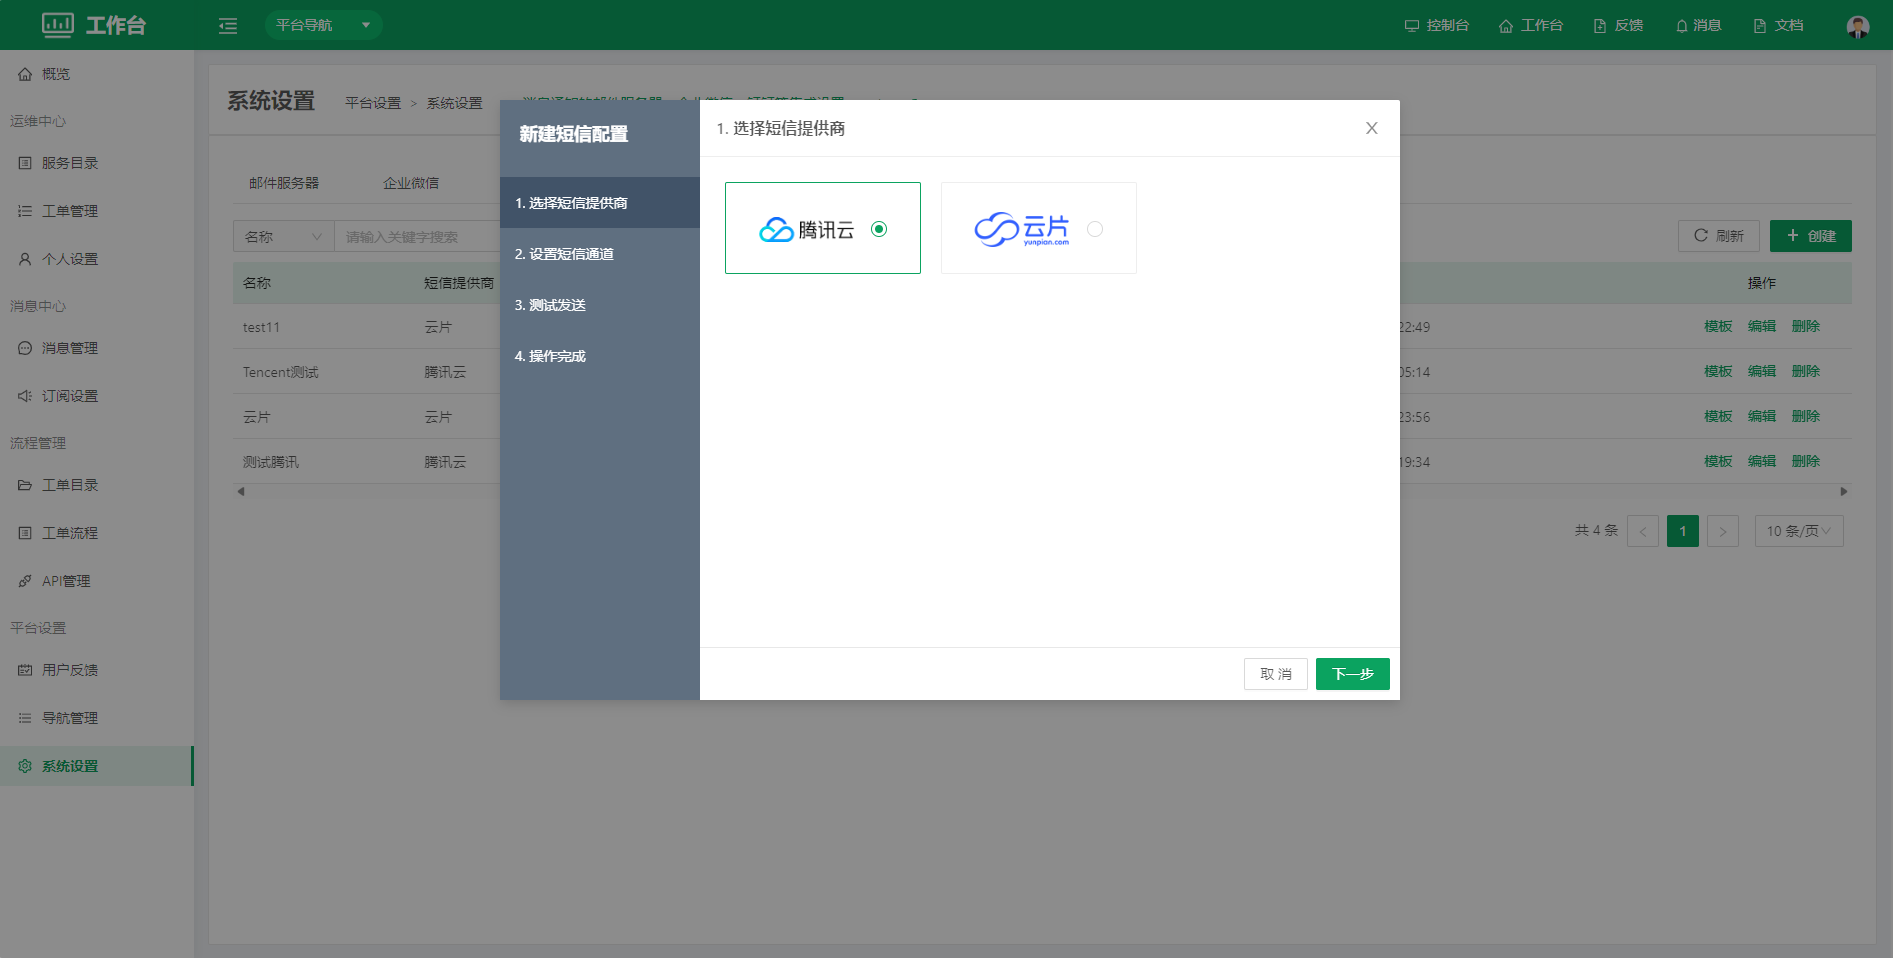
Tencent Cloud SMS Configuration
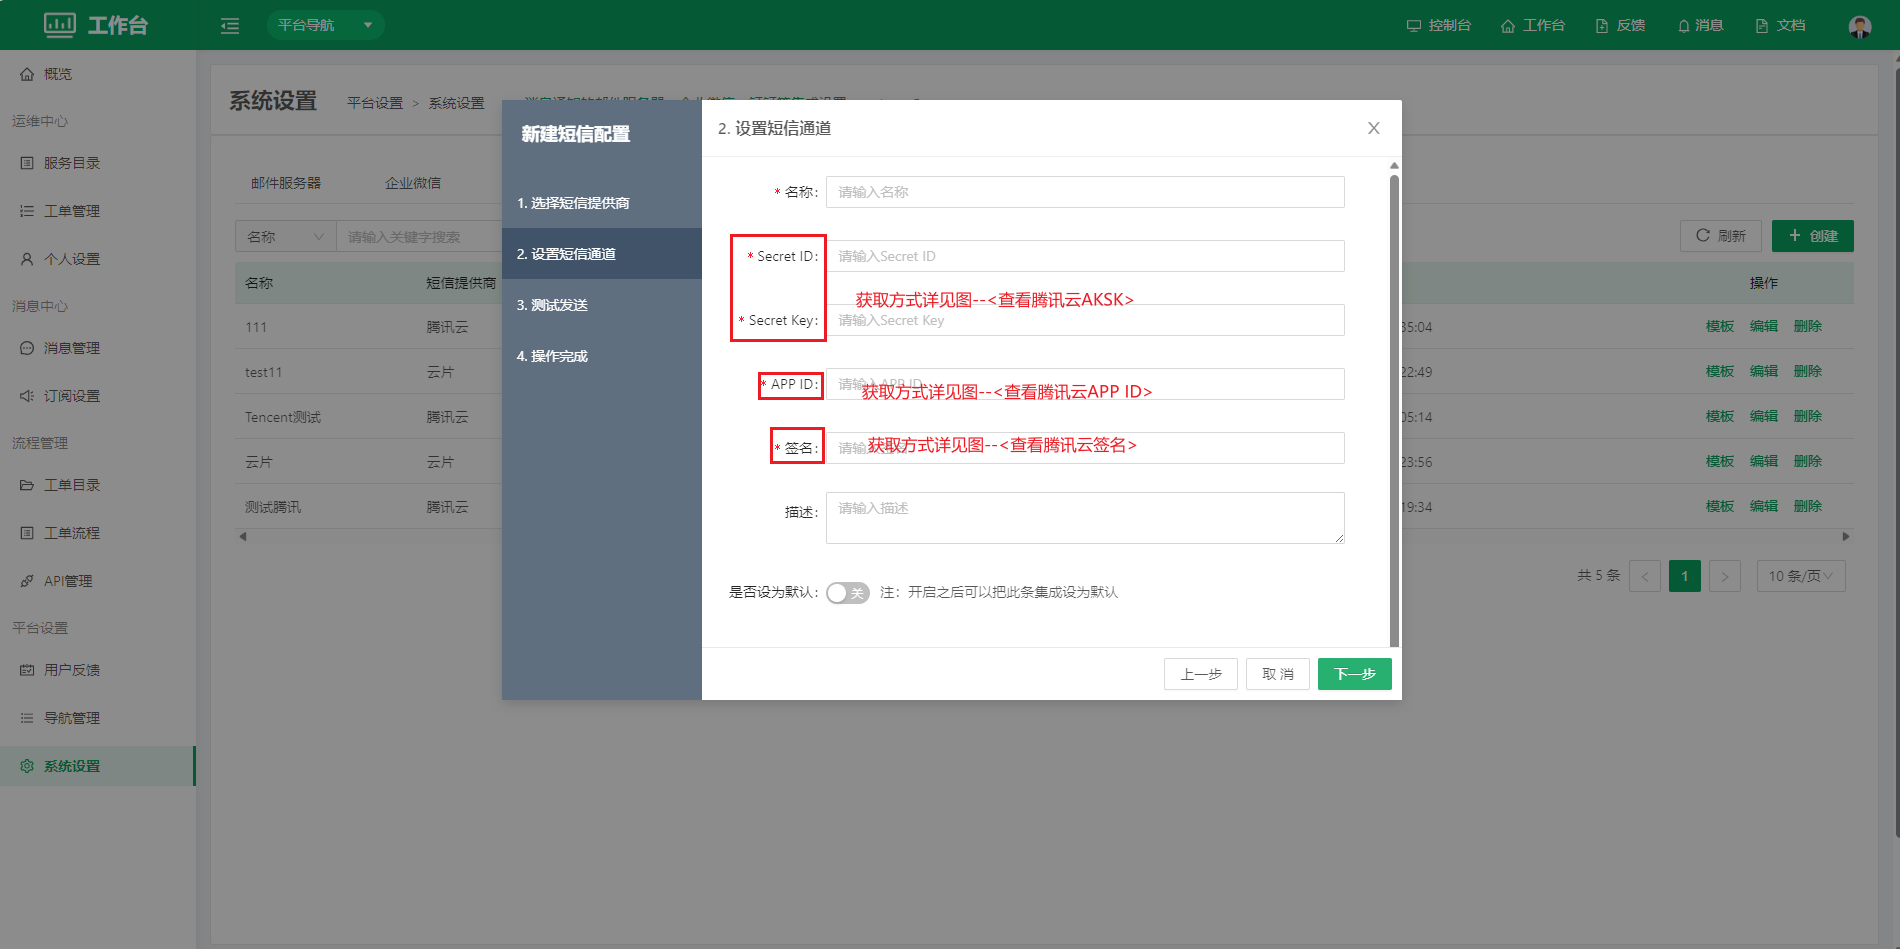
- Set the SMS channel: fill in the content according to the fields on the page
-
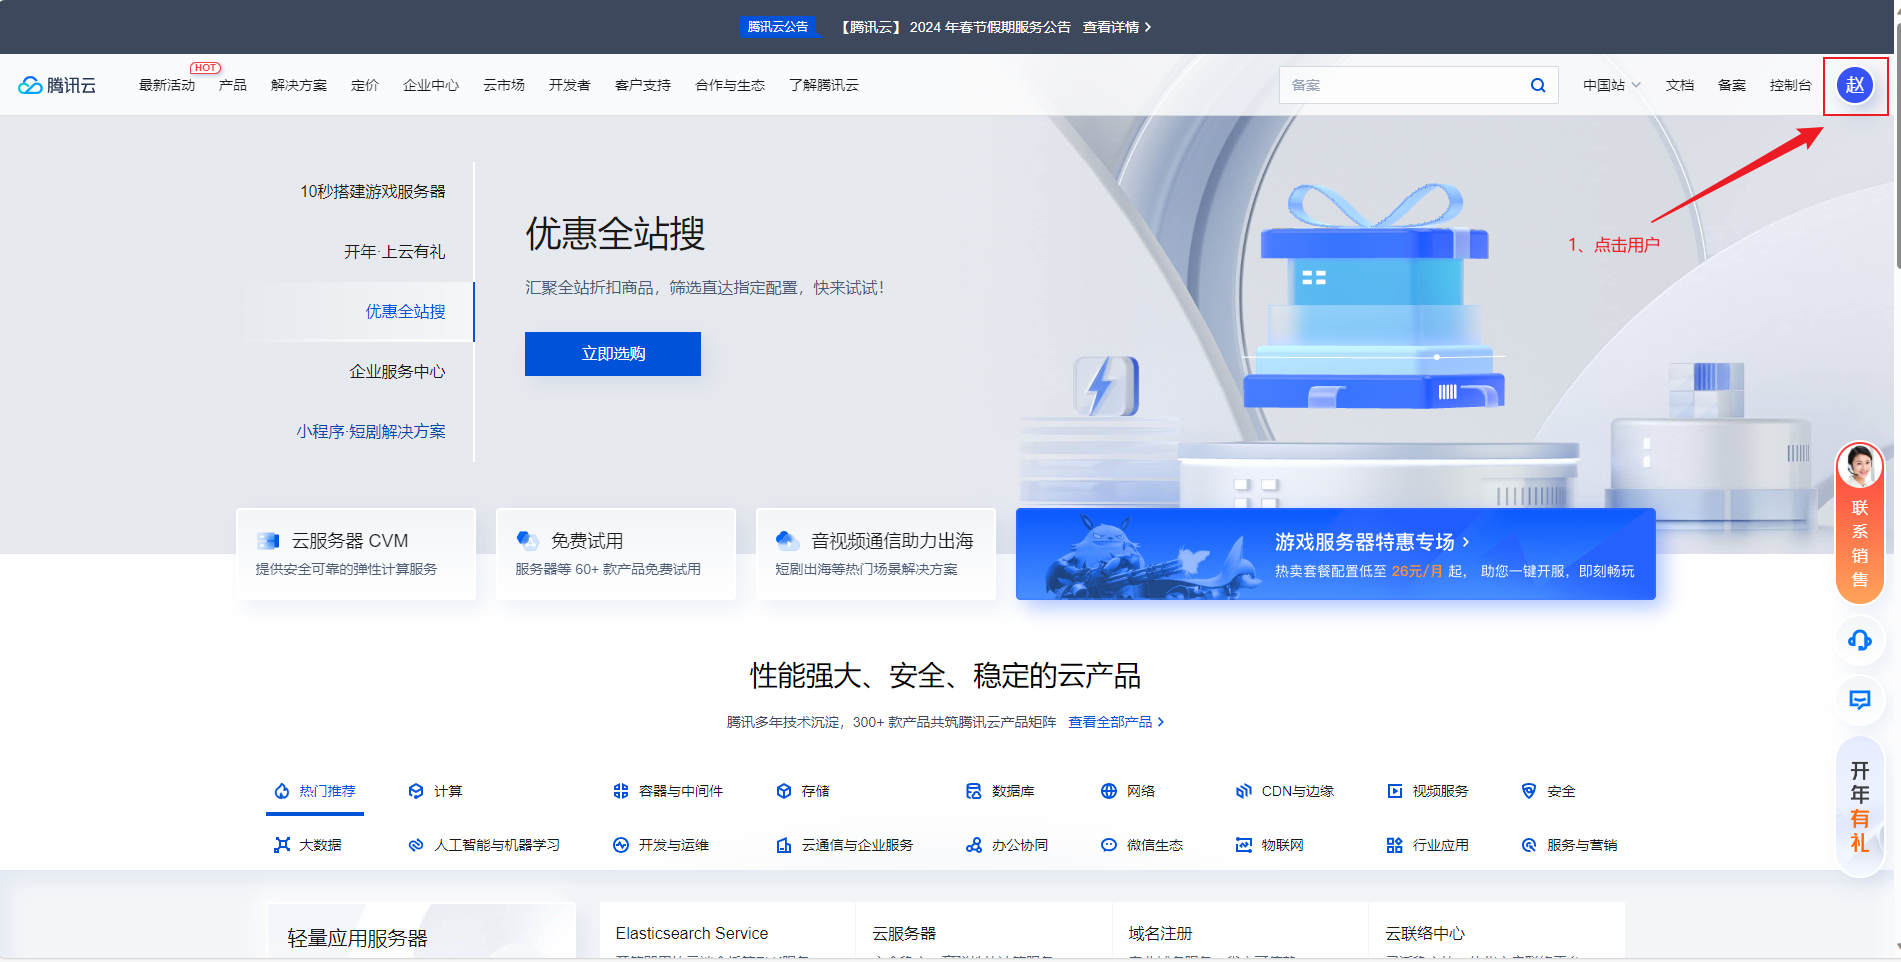
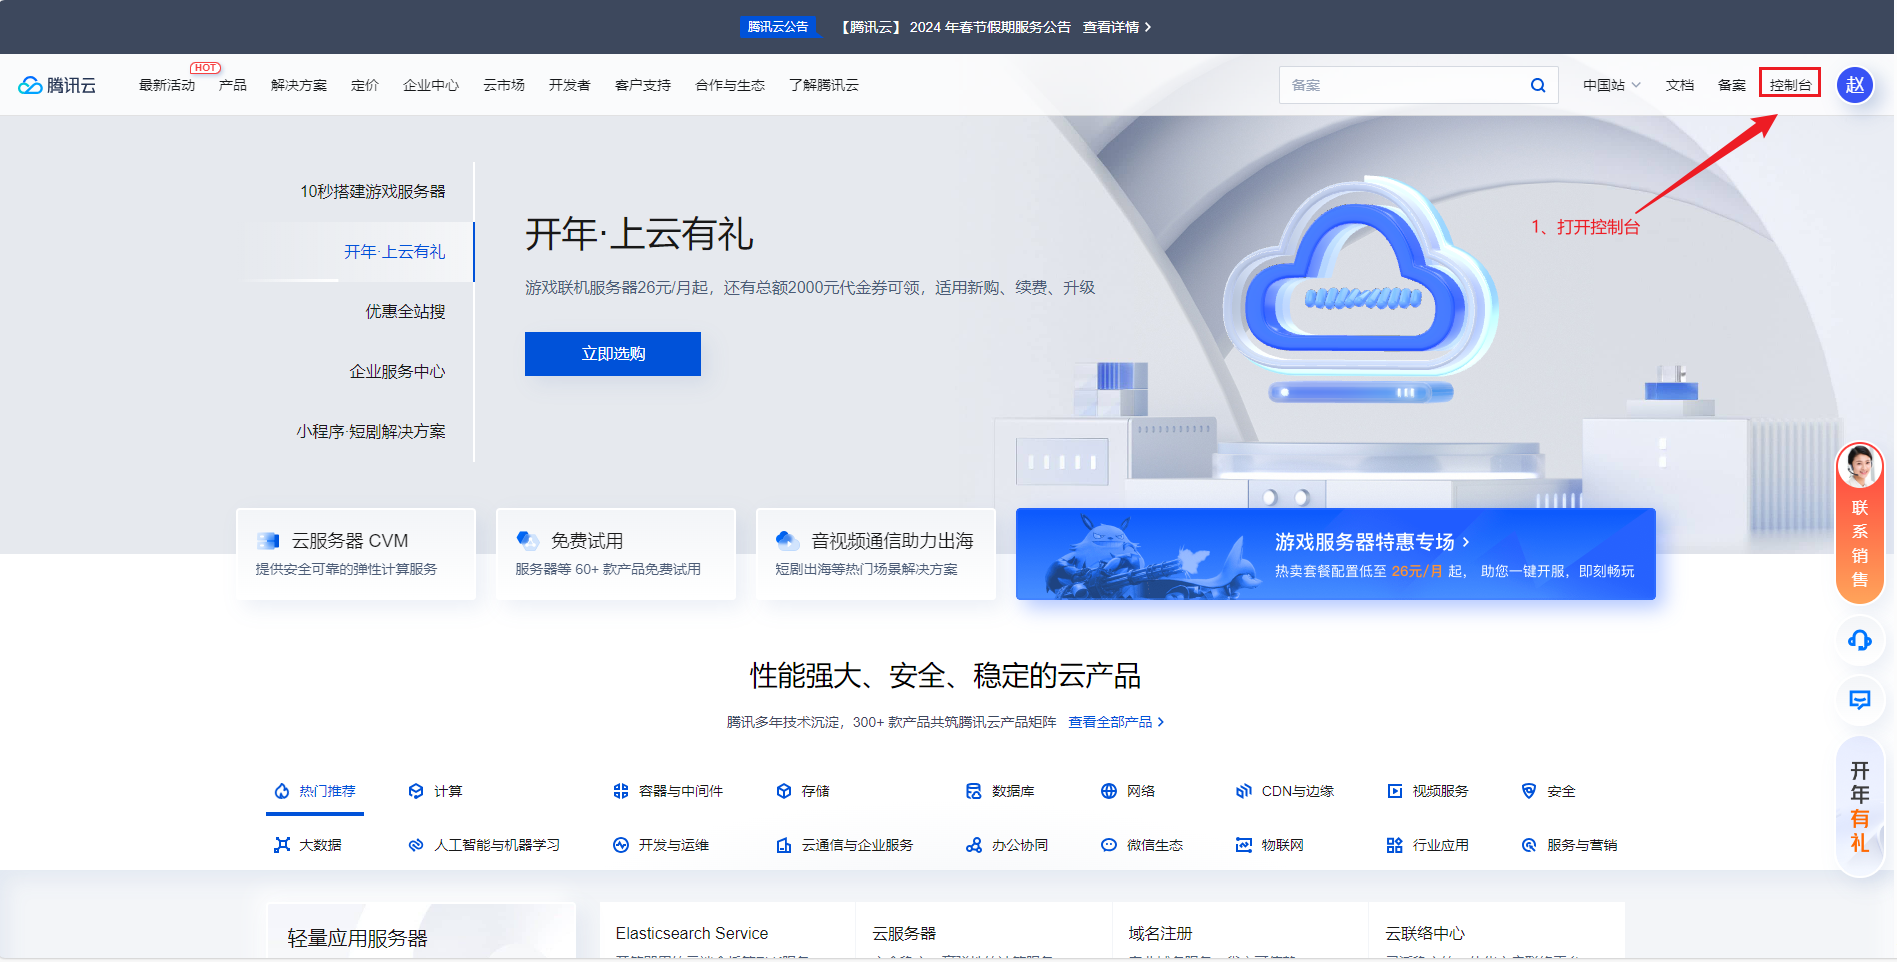
View the Tencent Cloud AKSK. Open Tencent Cloud (address: https://cloud.tencent.com/), register an account and sign in
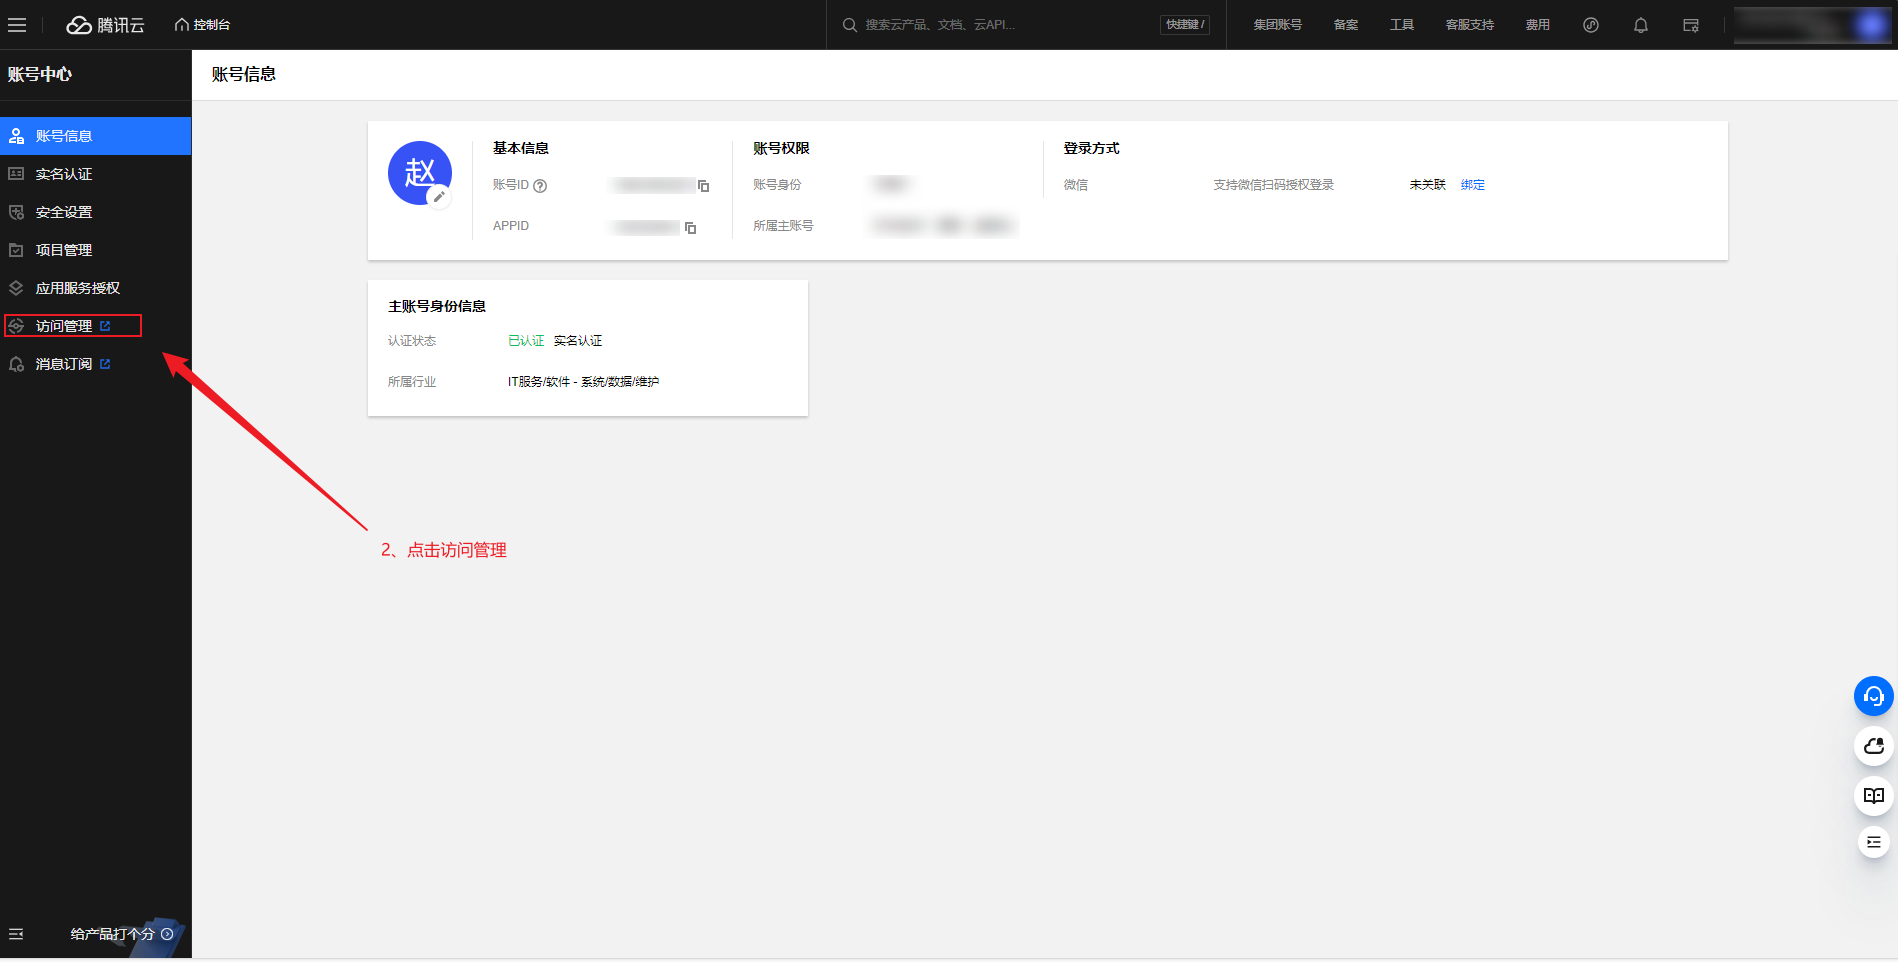
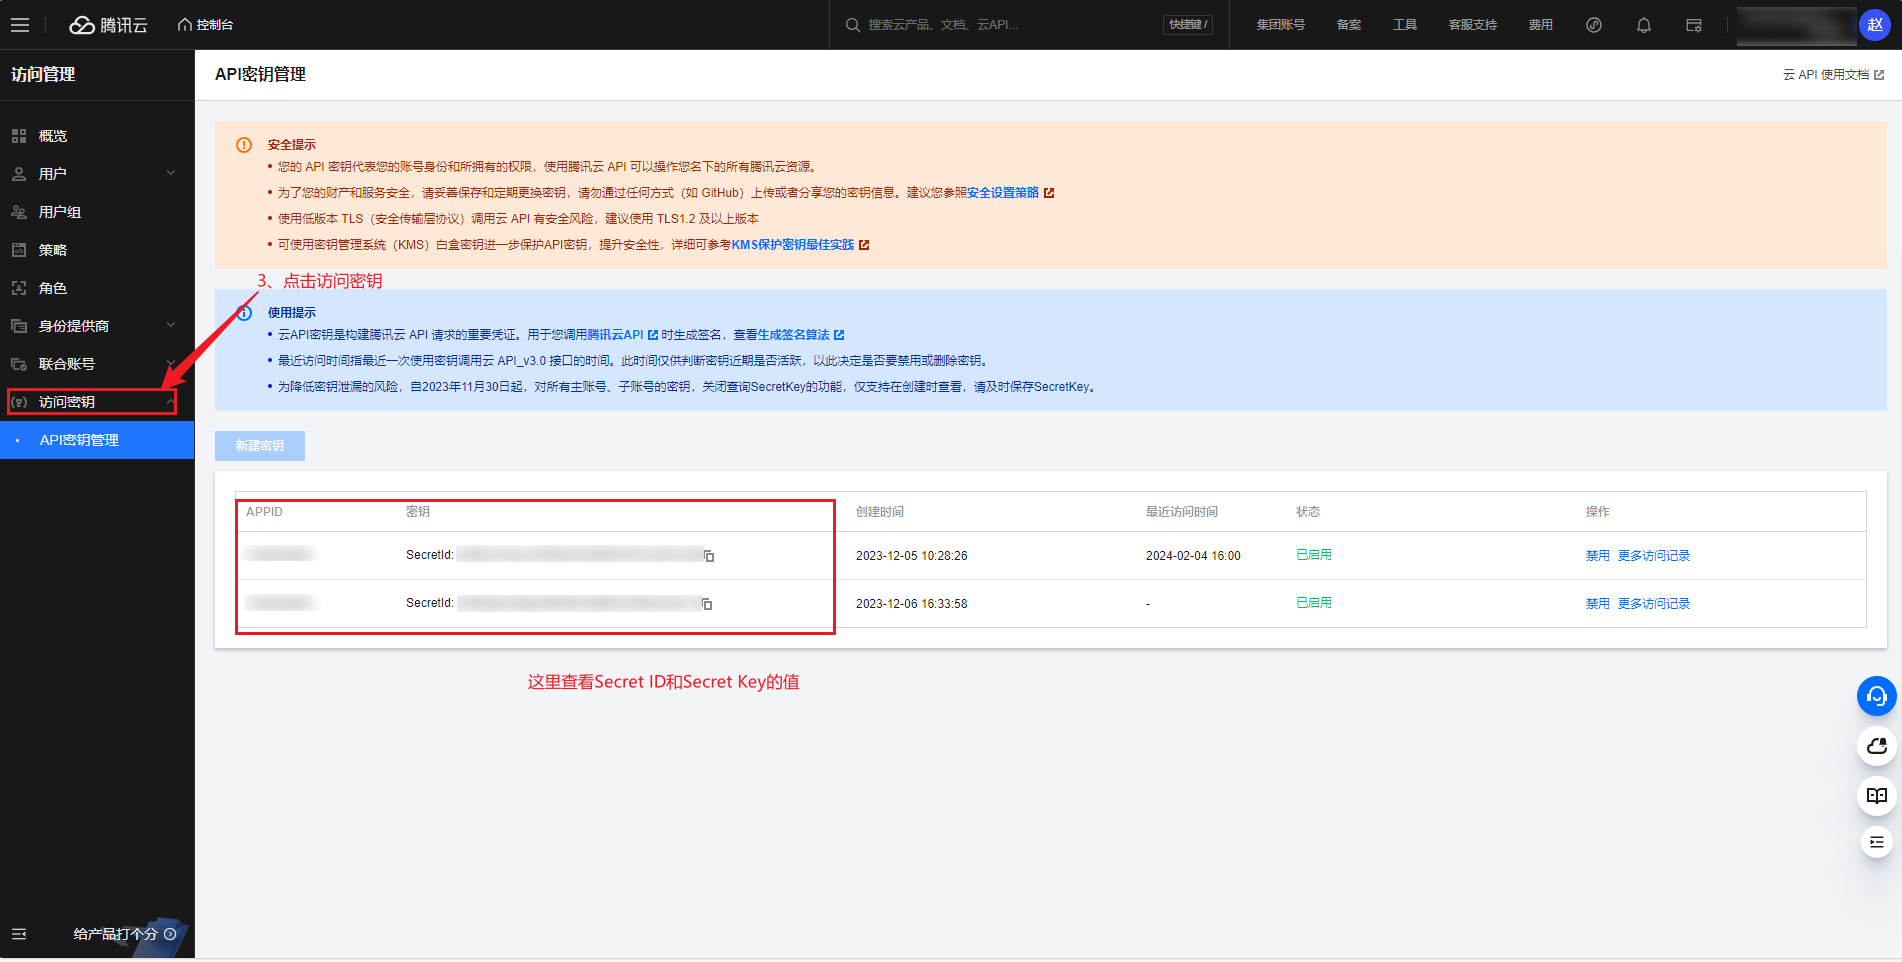
-
View the Tencent Cloud APP ID
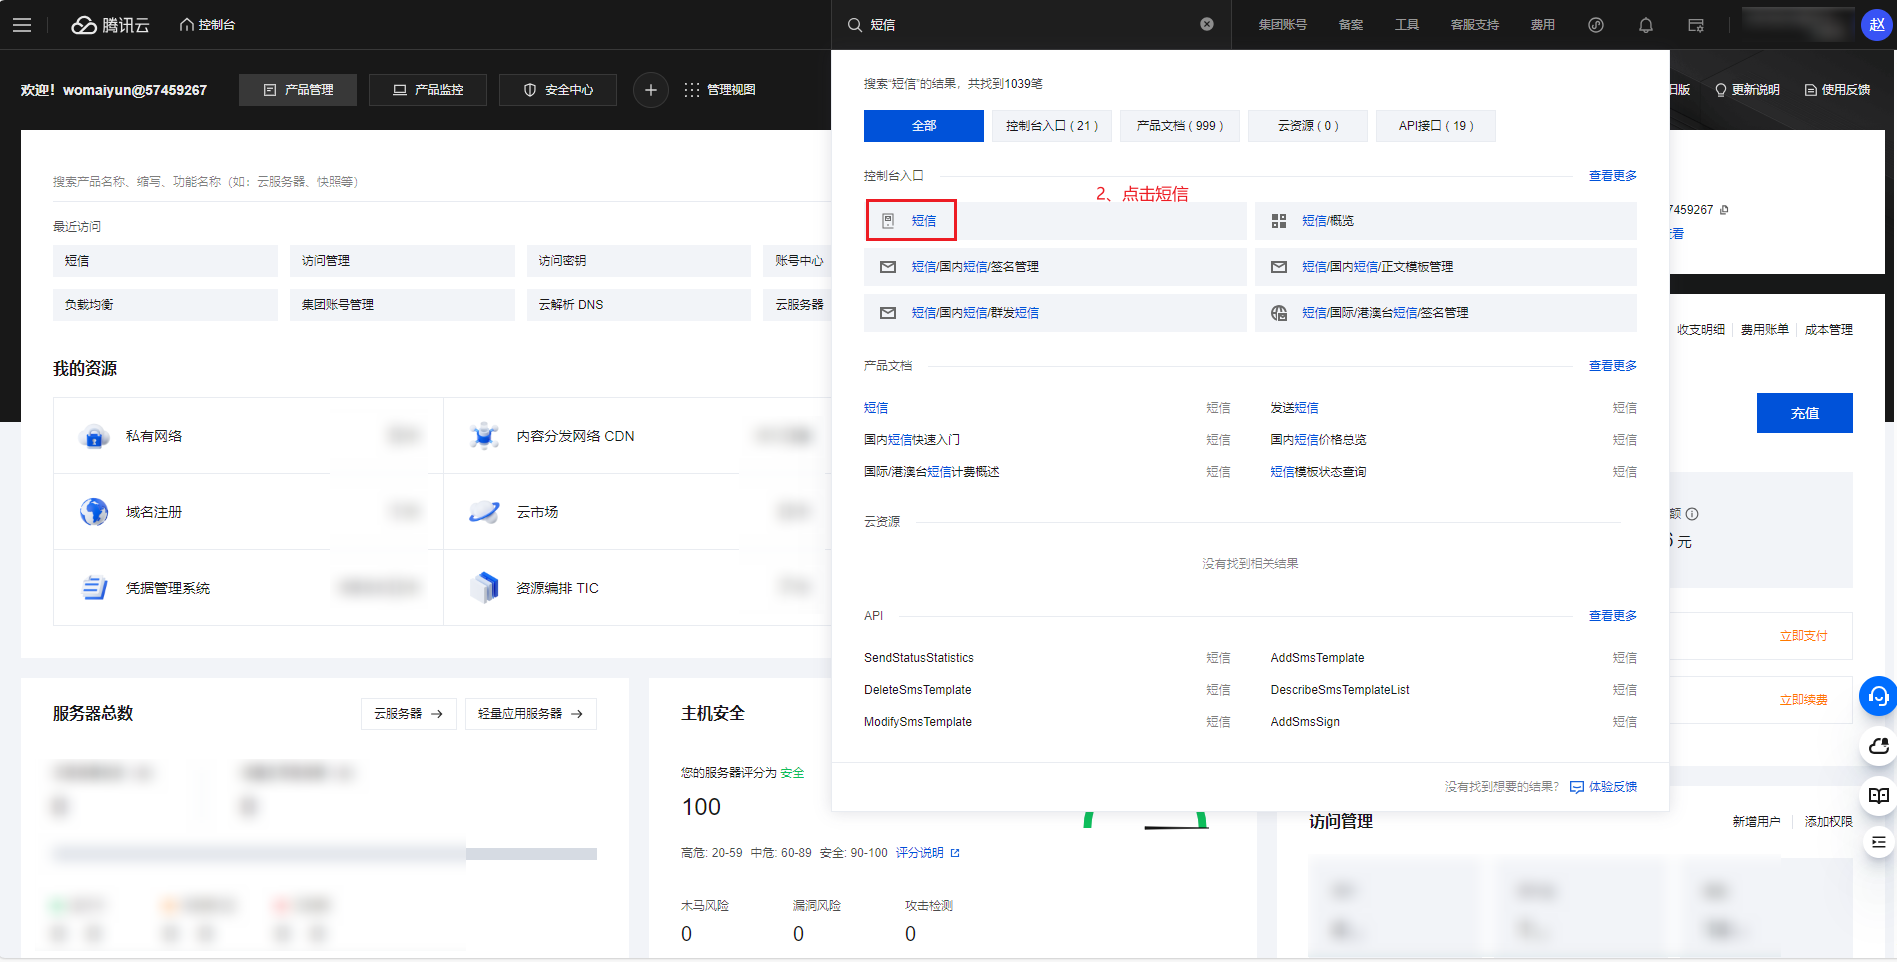
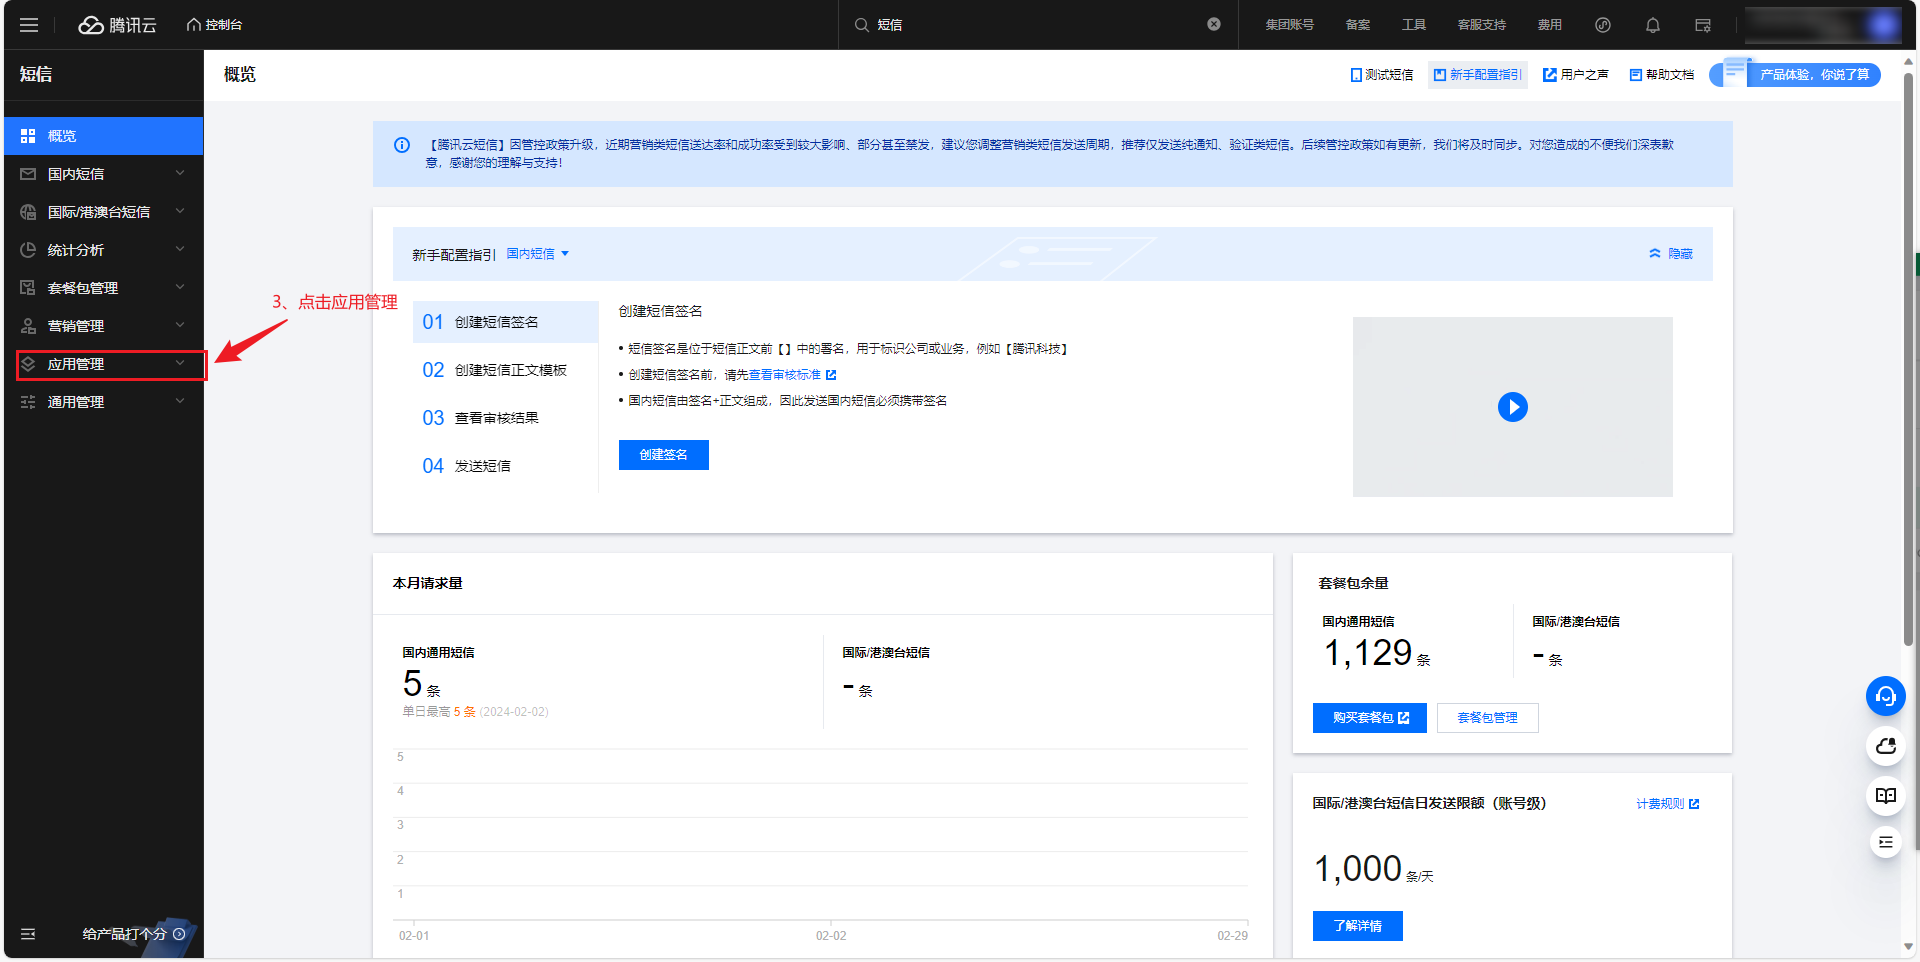
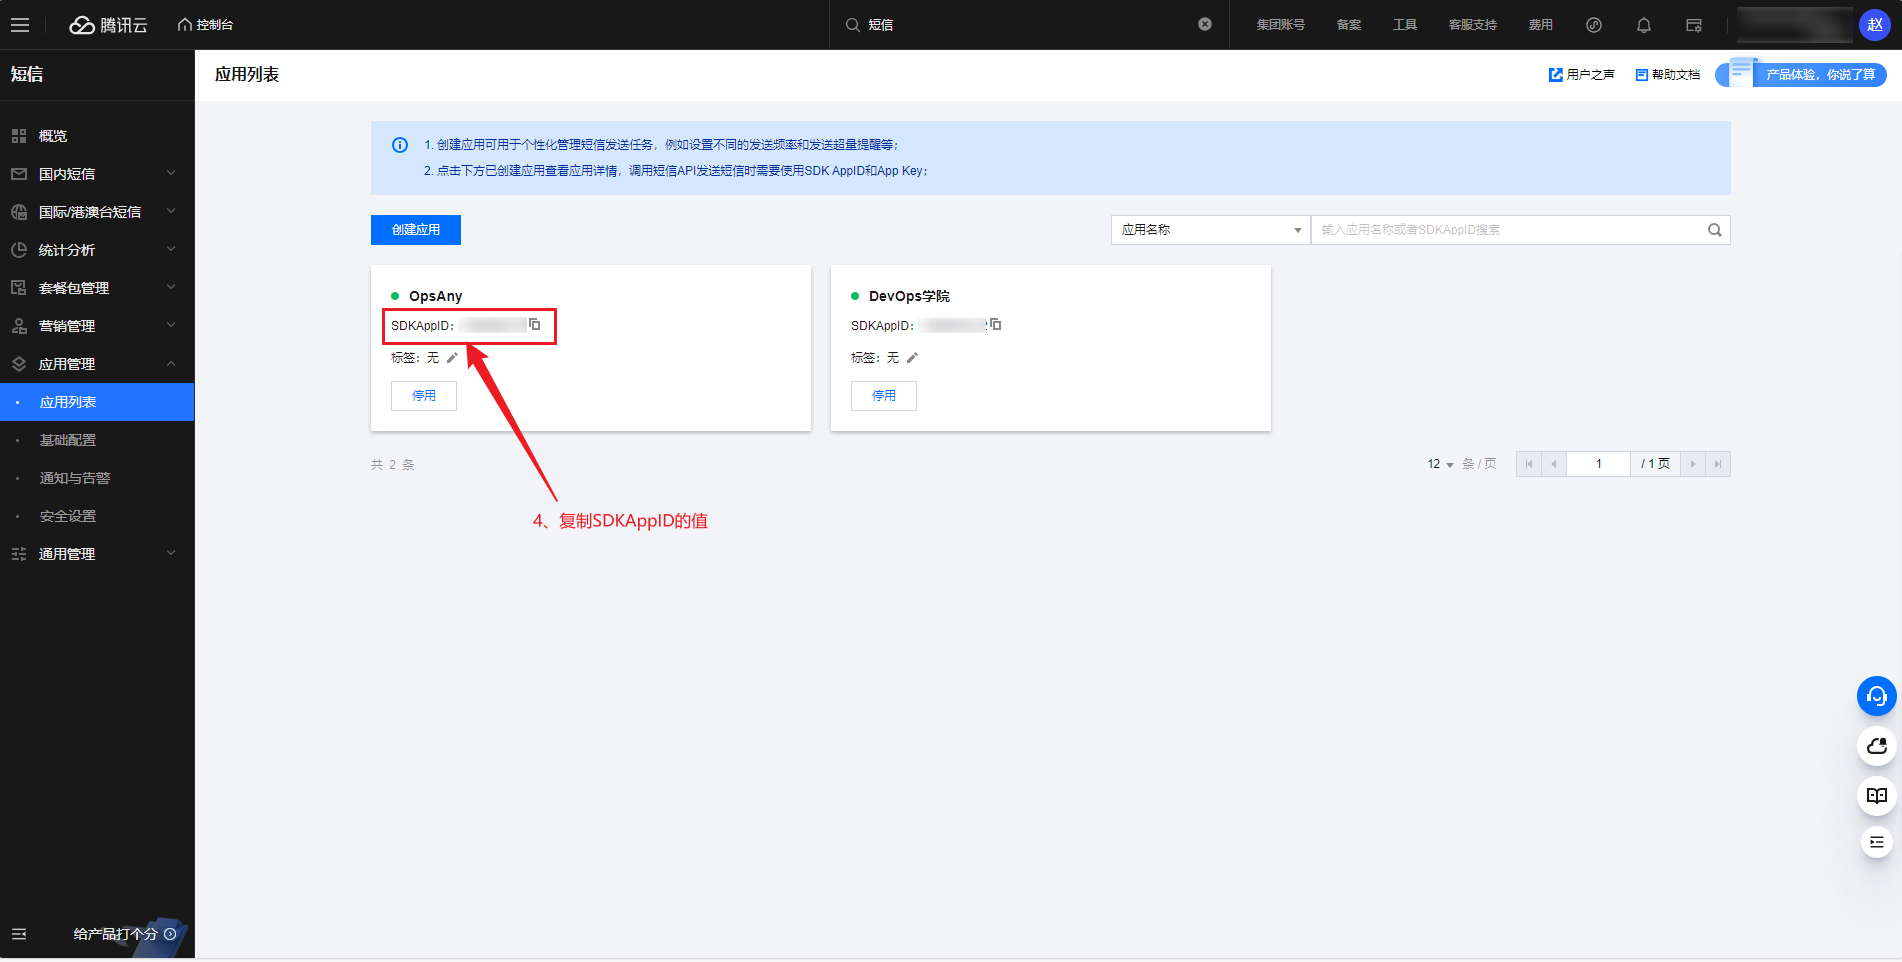
-
View the Tencent Cloud signature
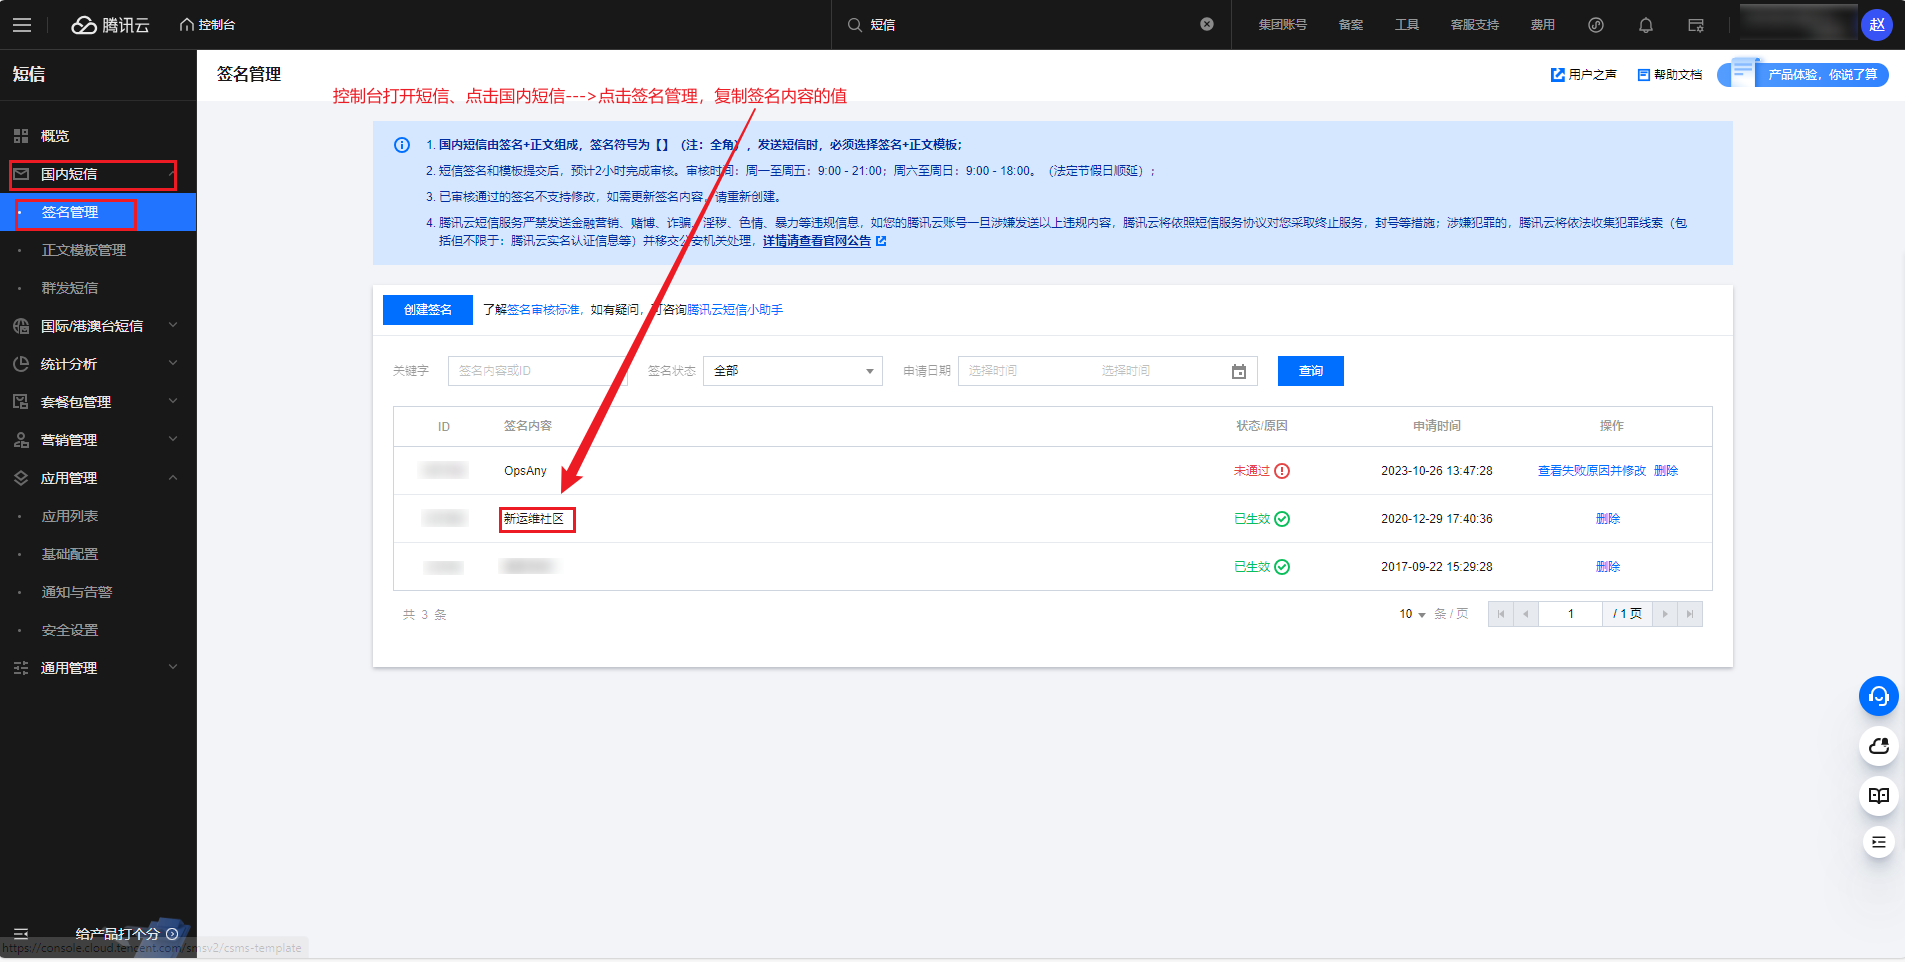
-
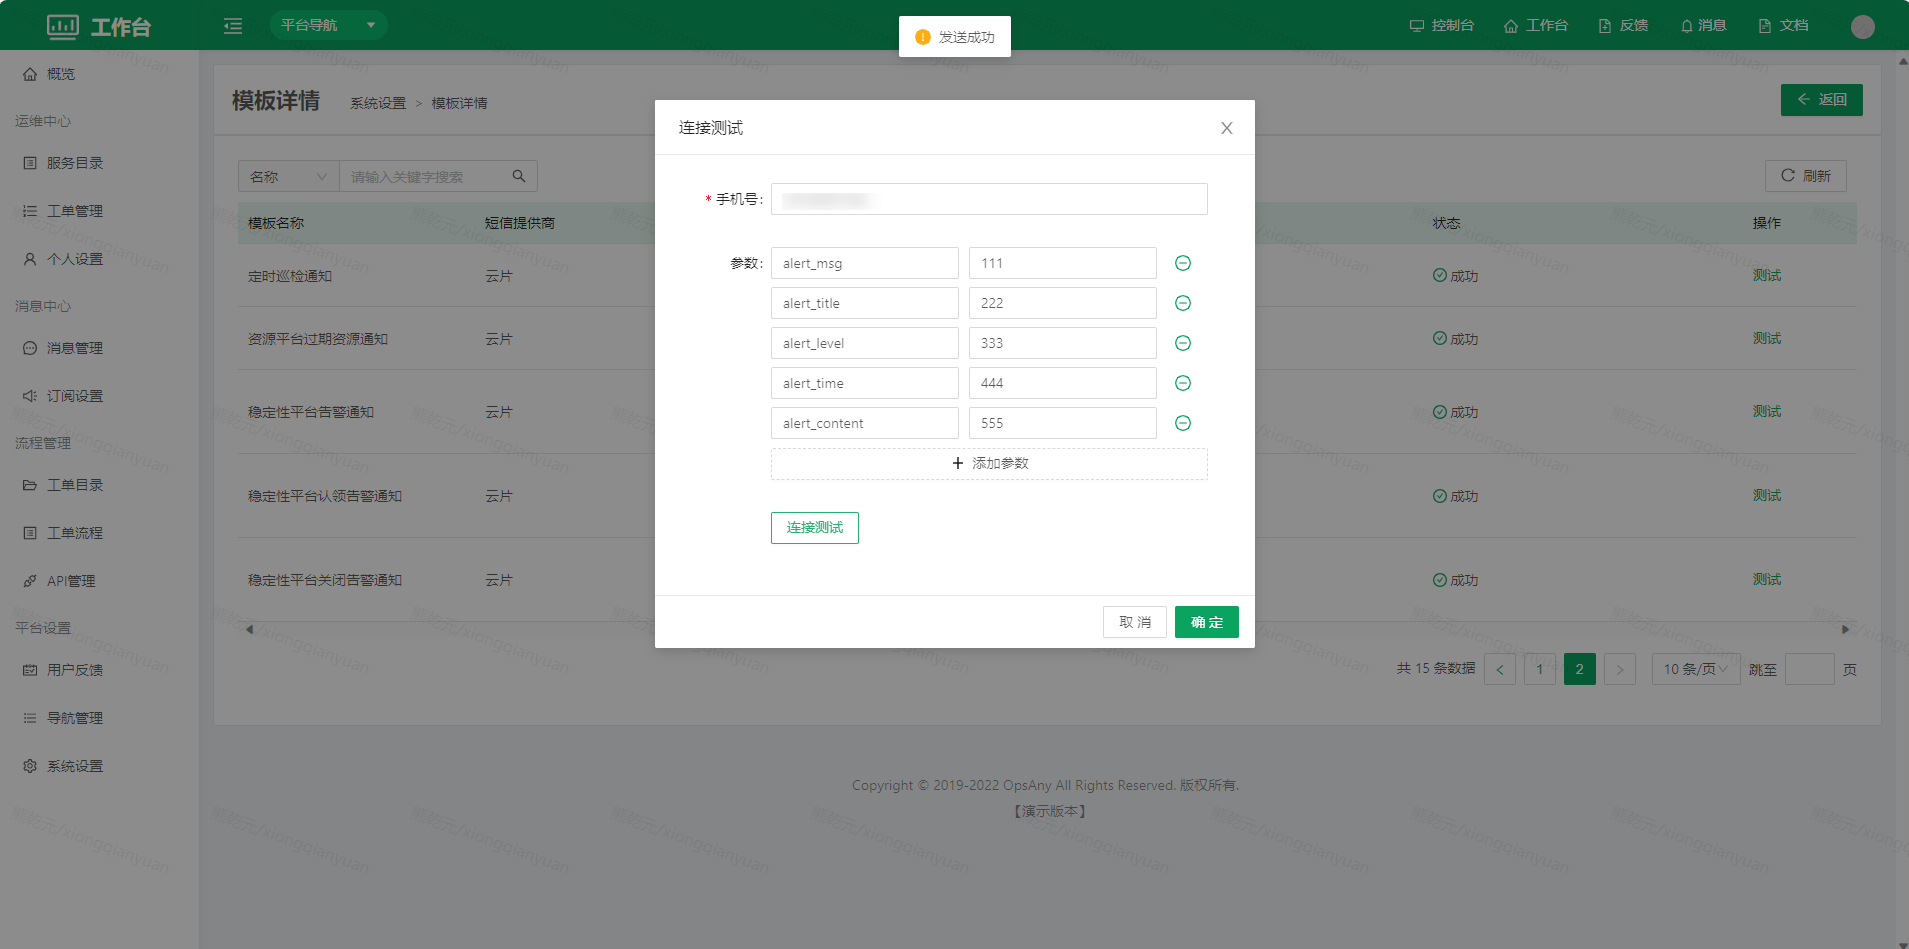
Test sending
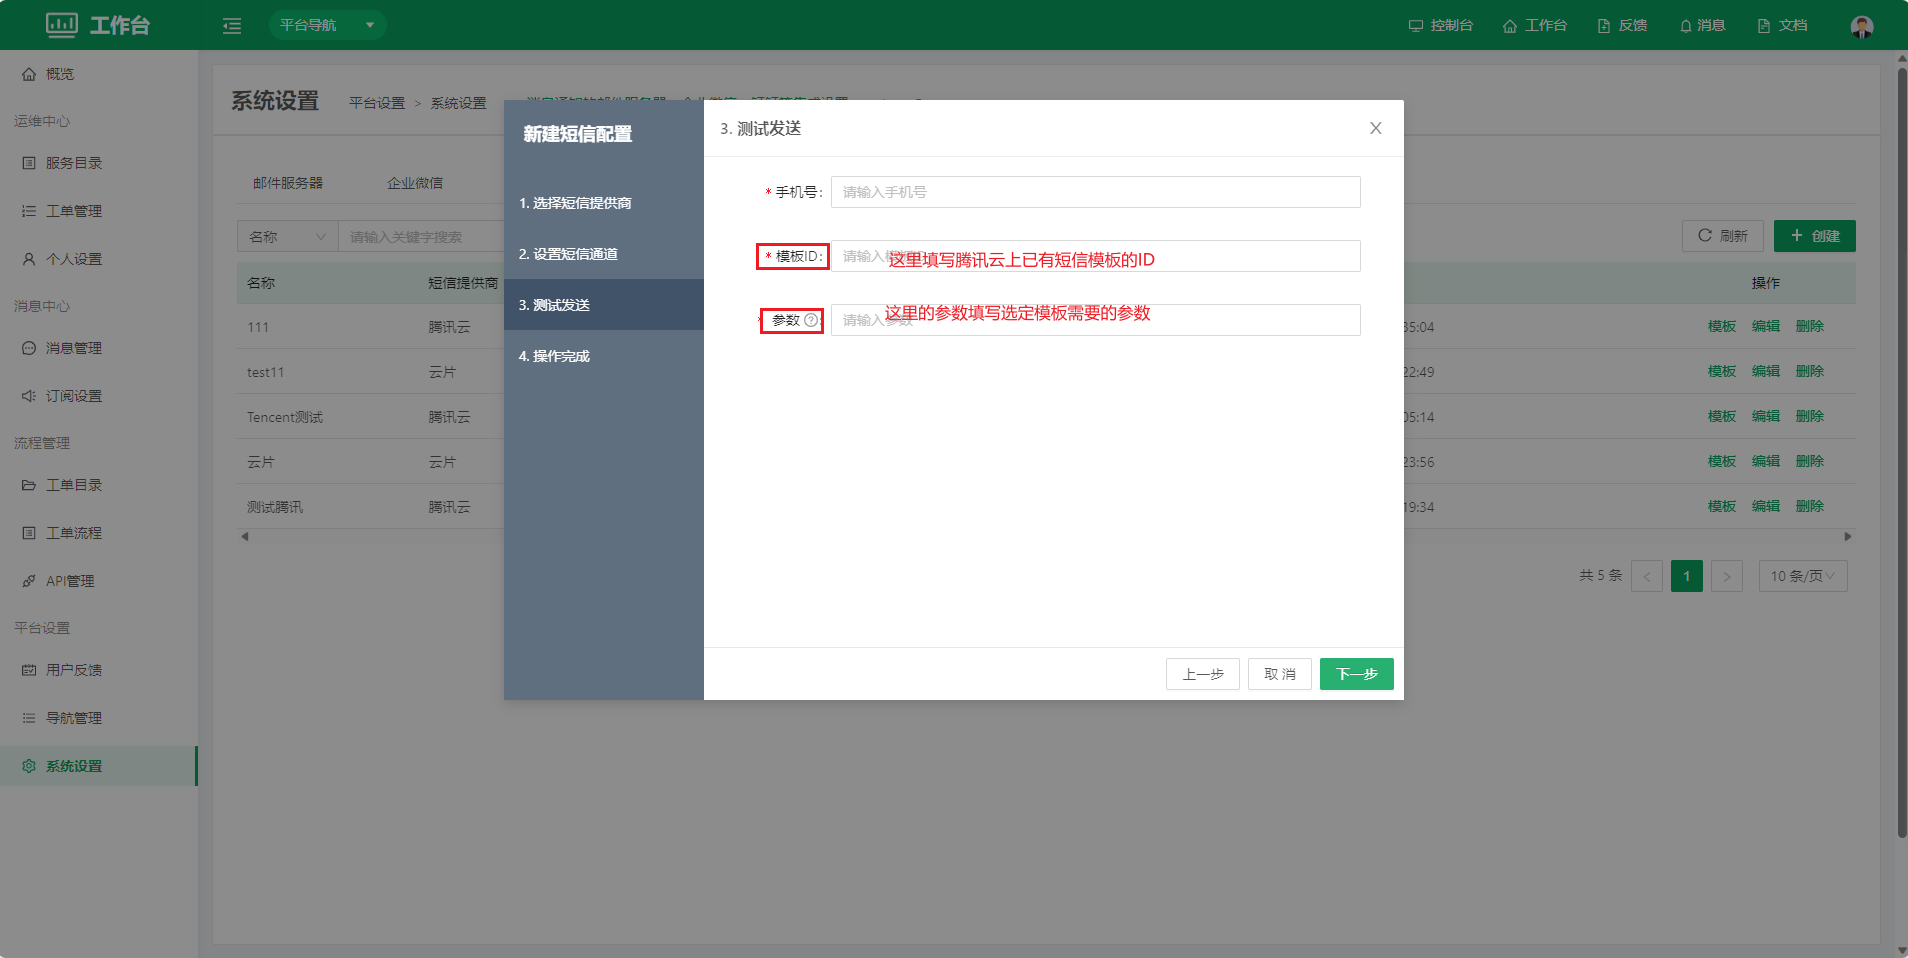
For example:
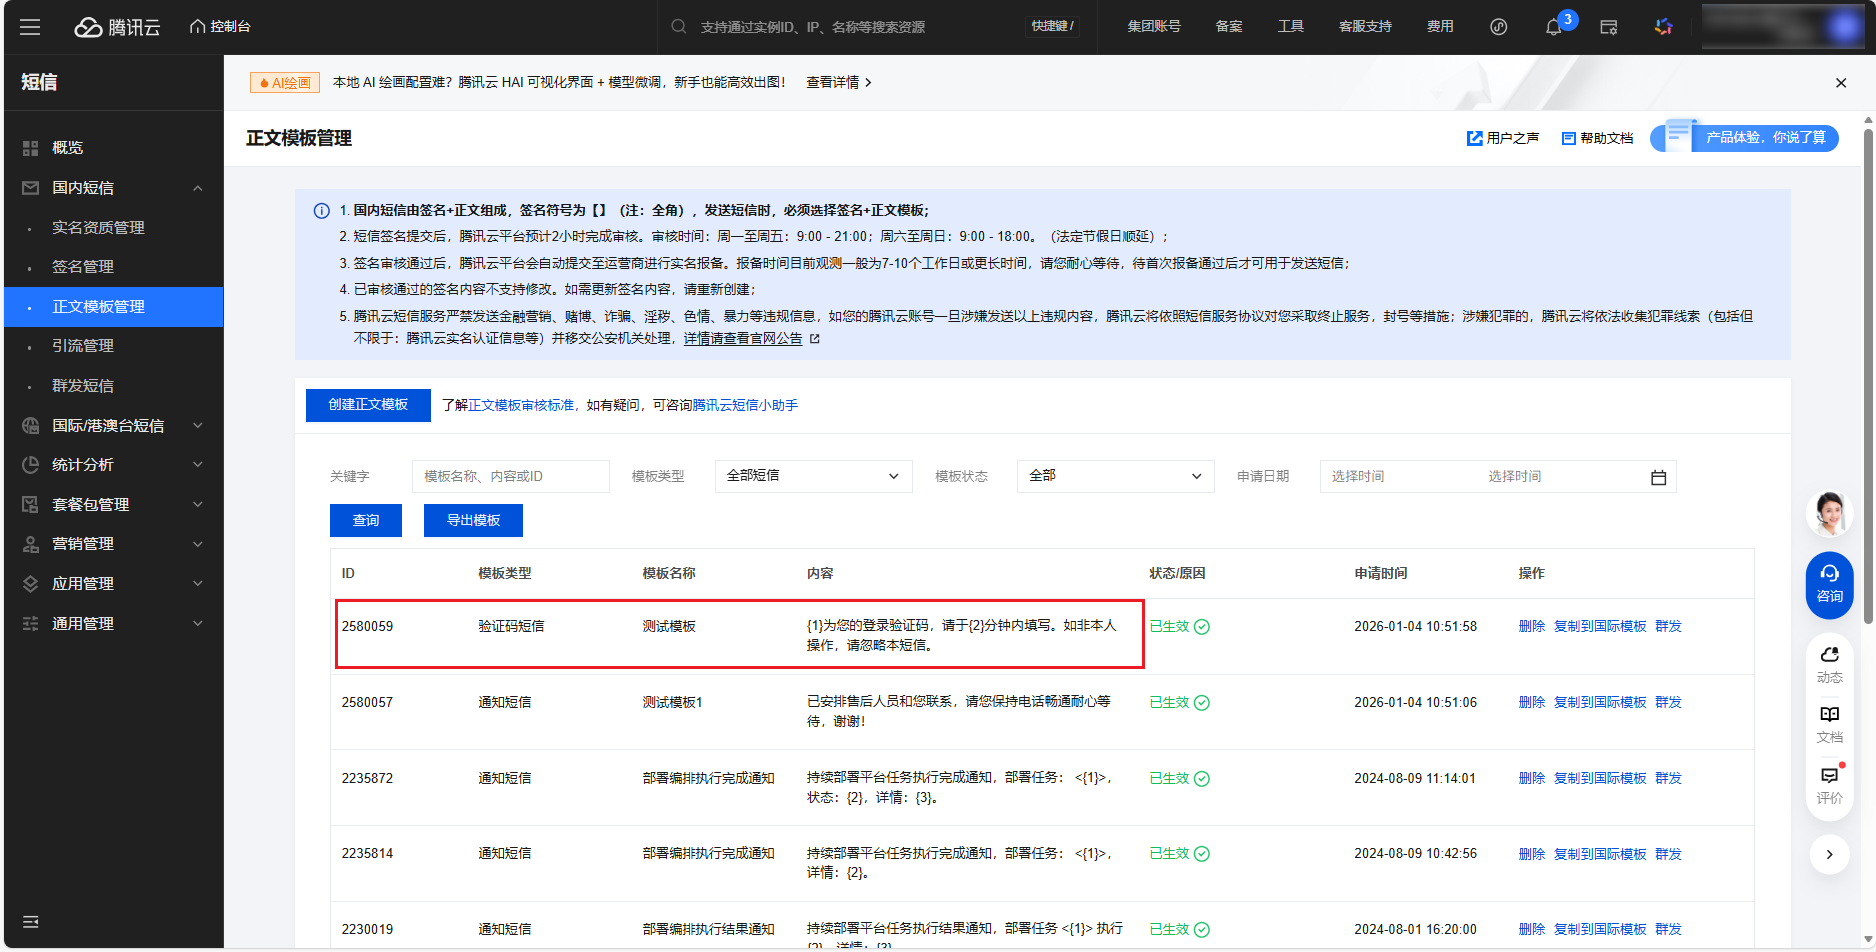
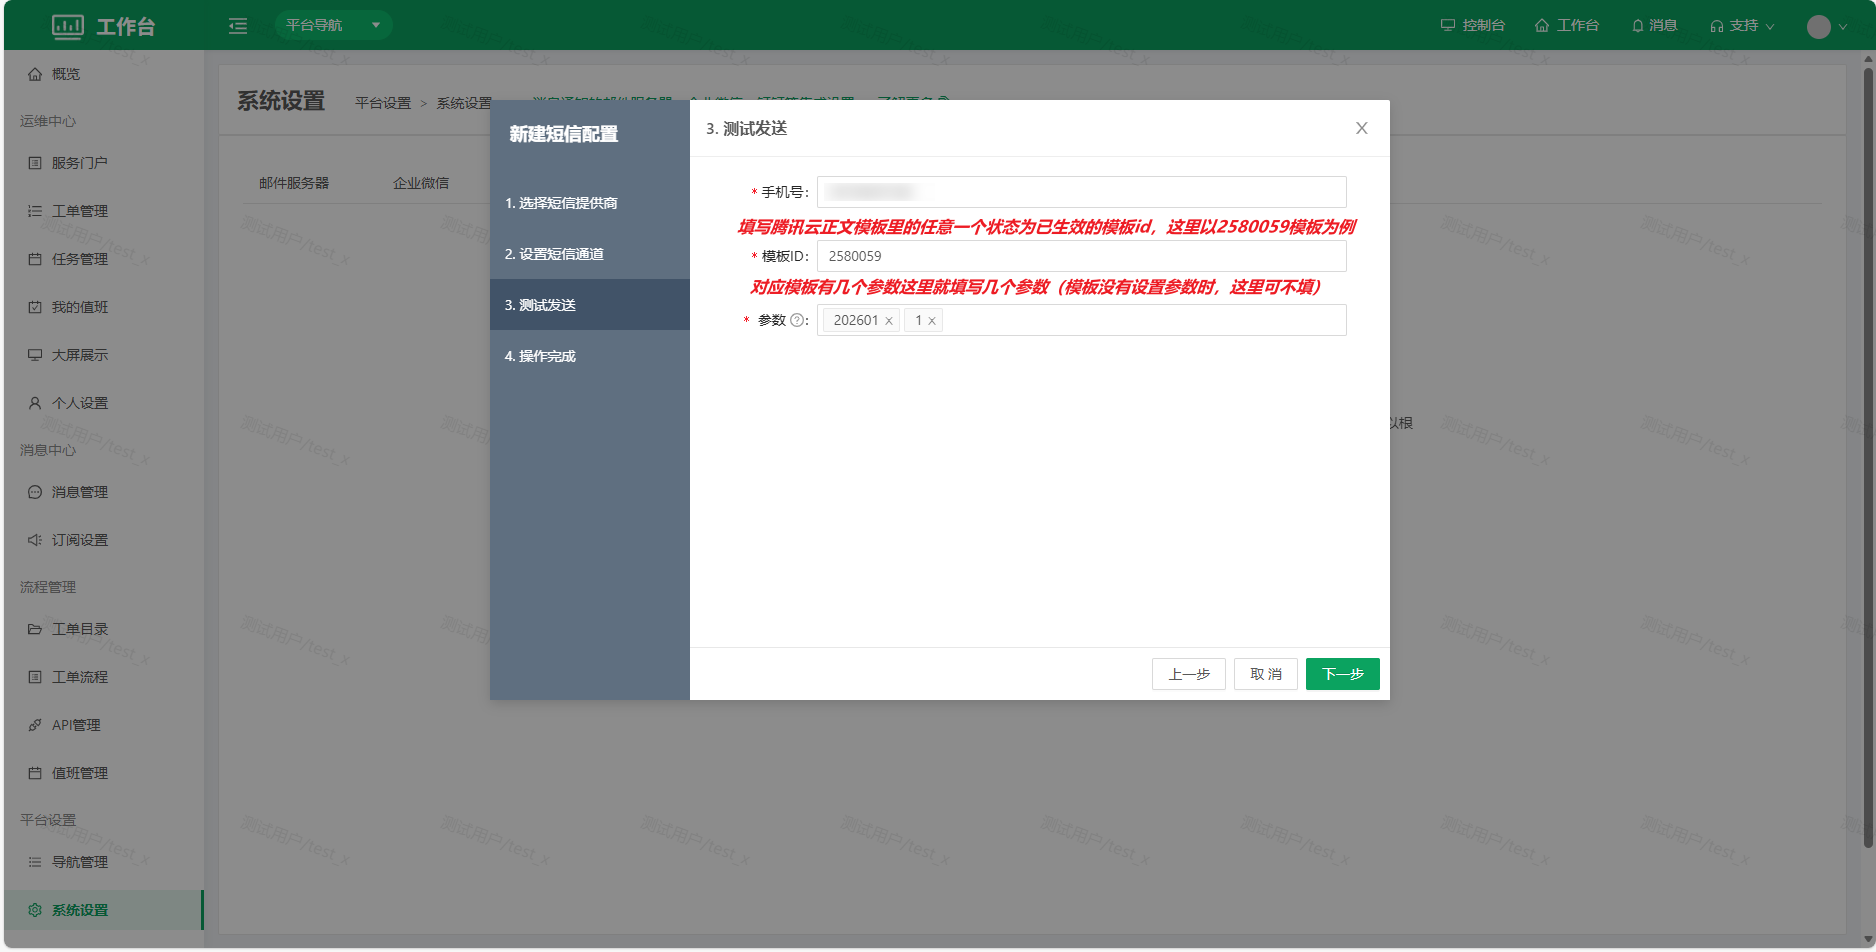
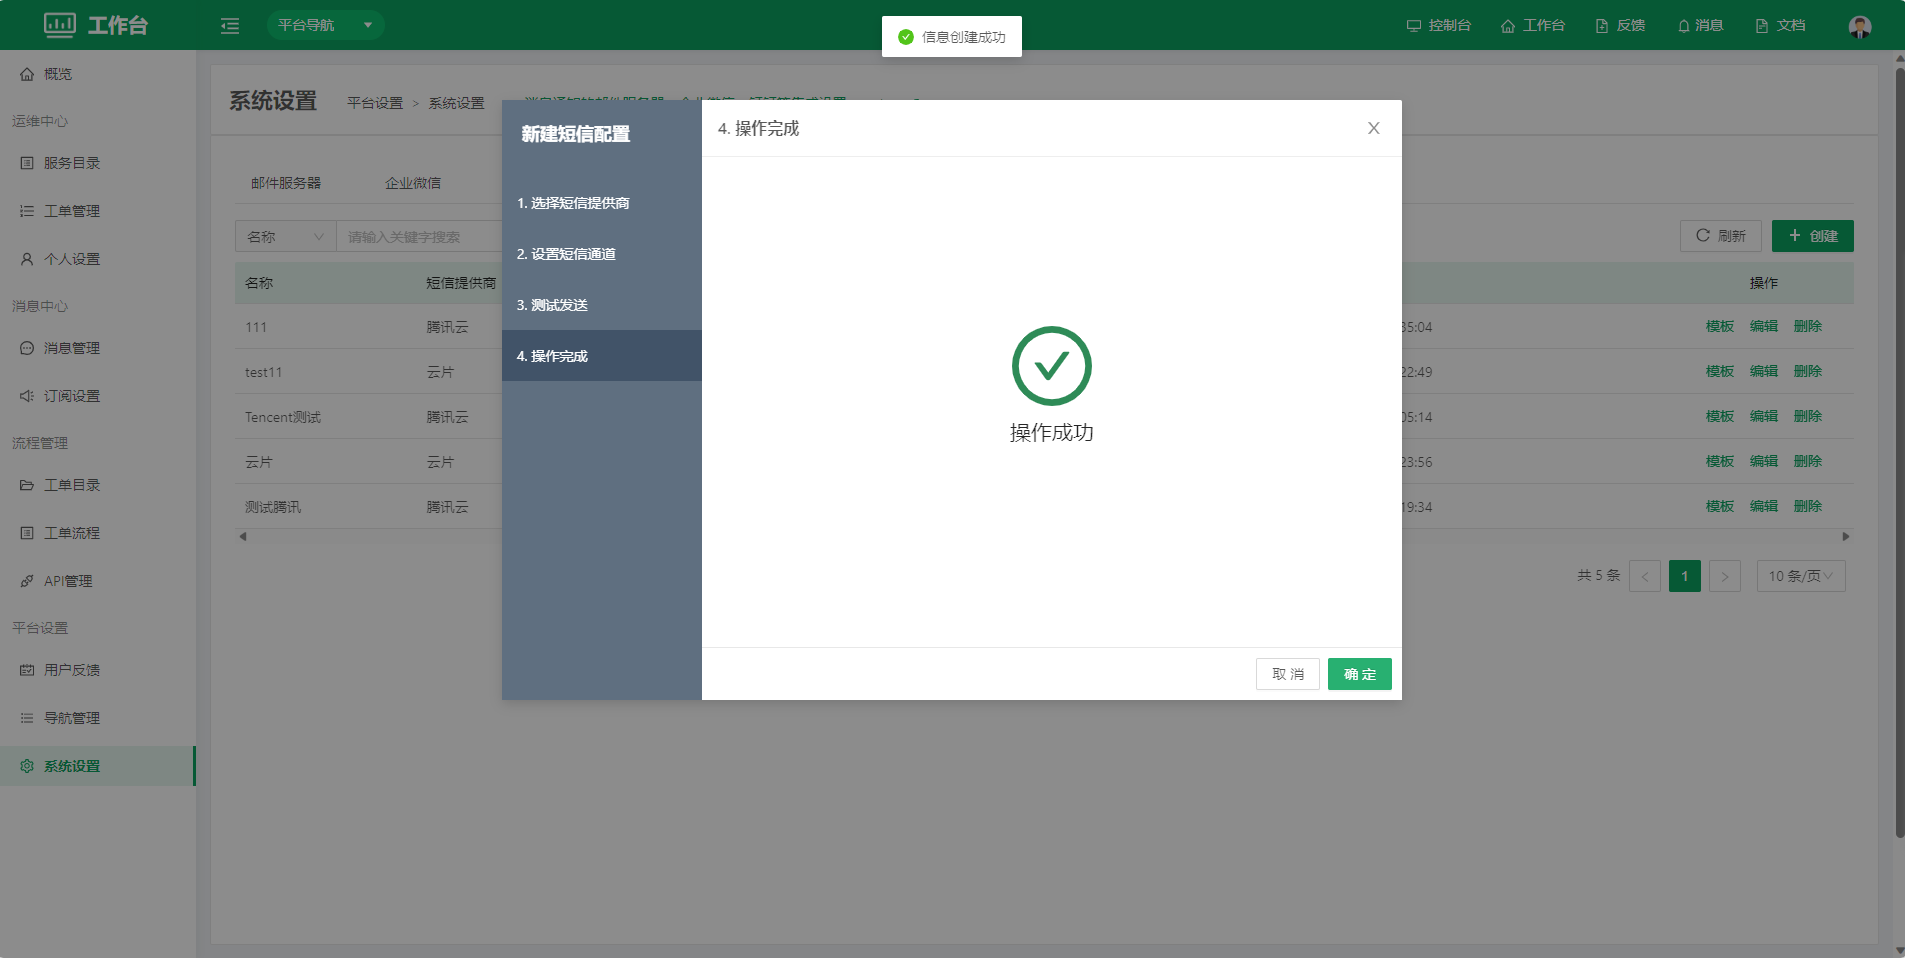
- Operation completed
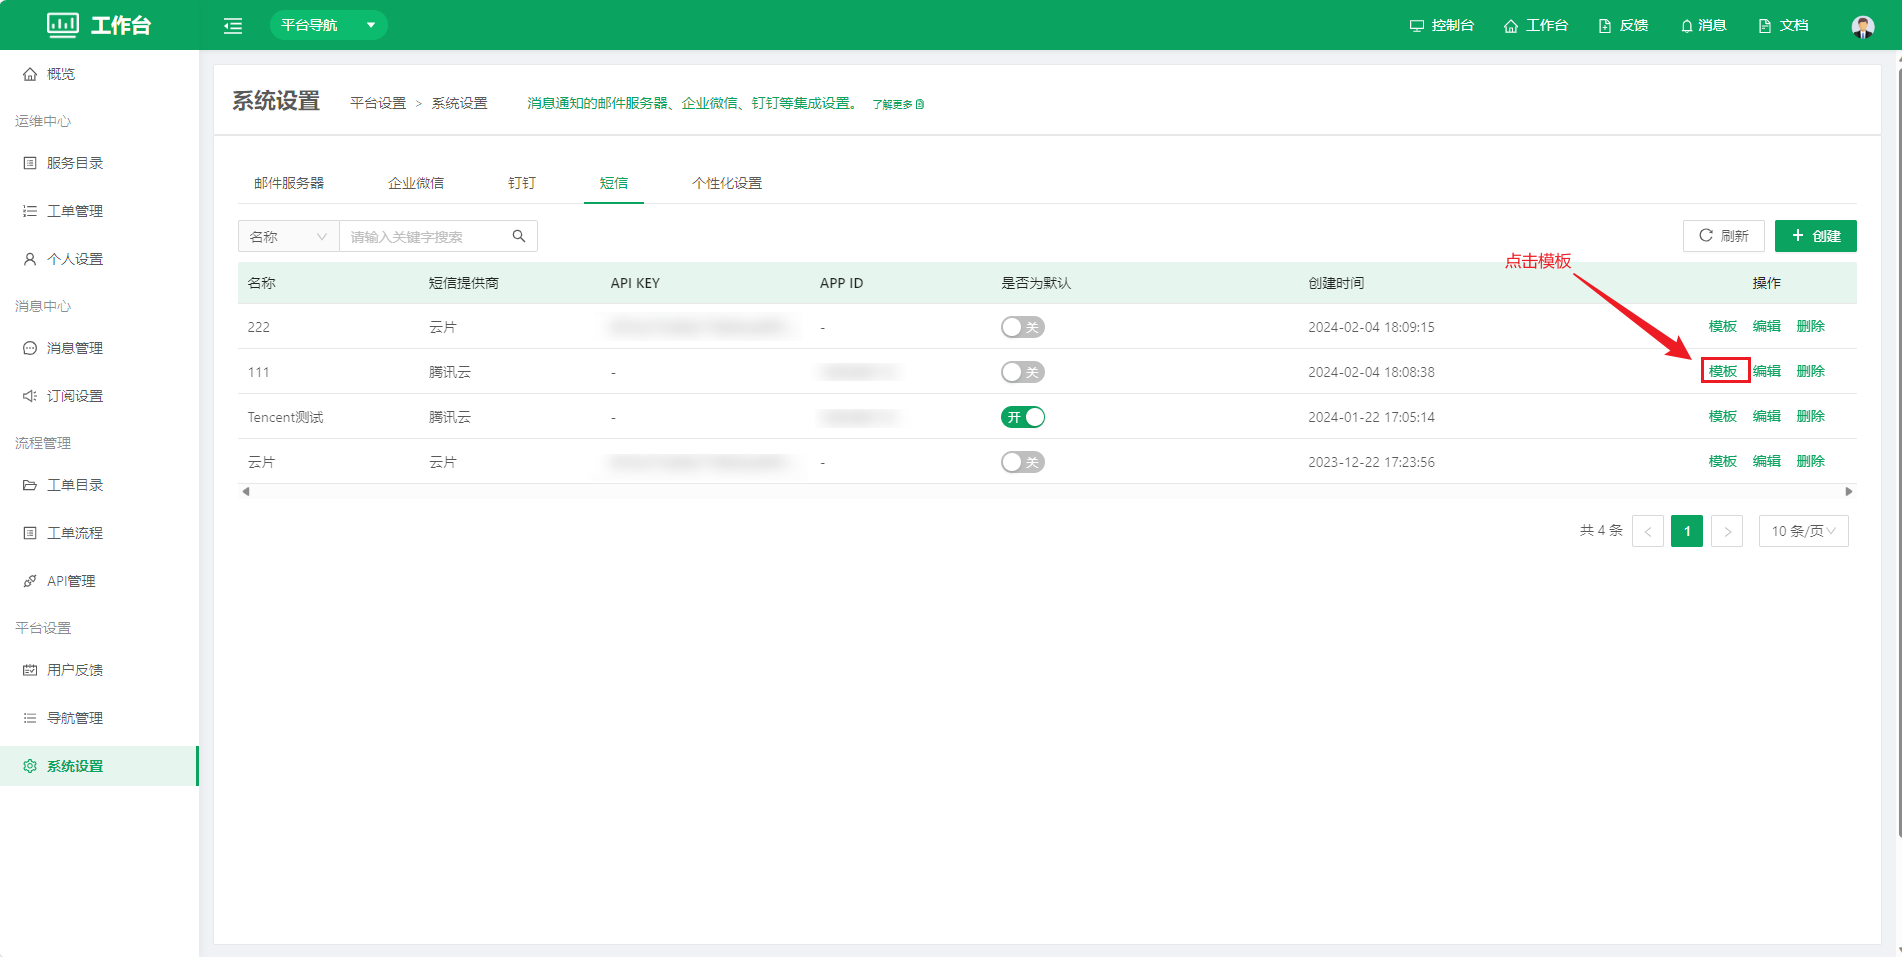
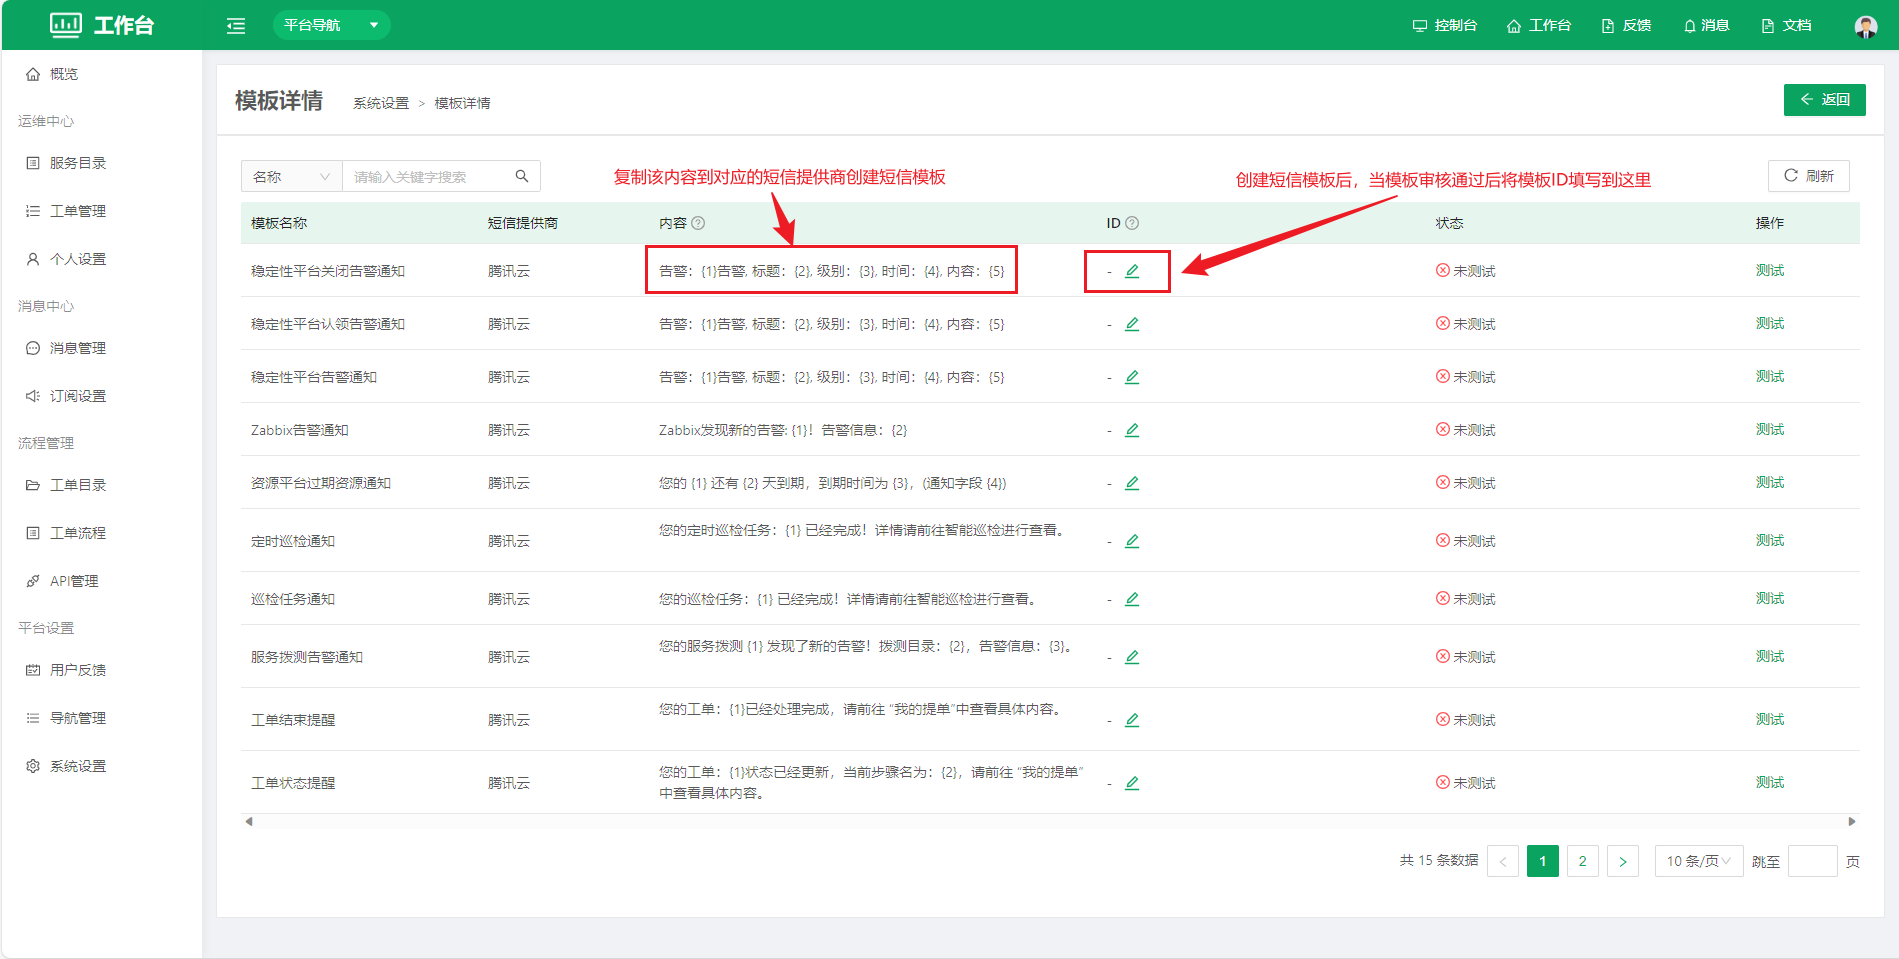
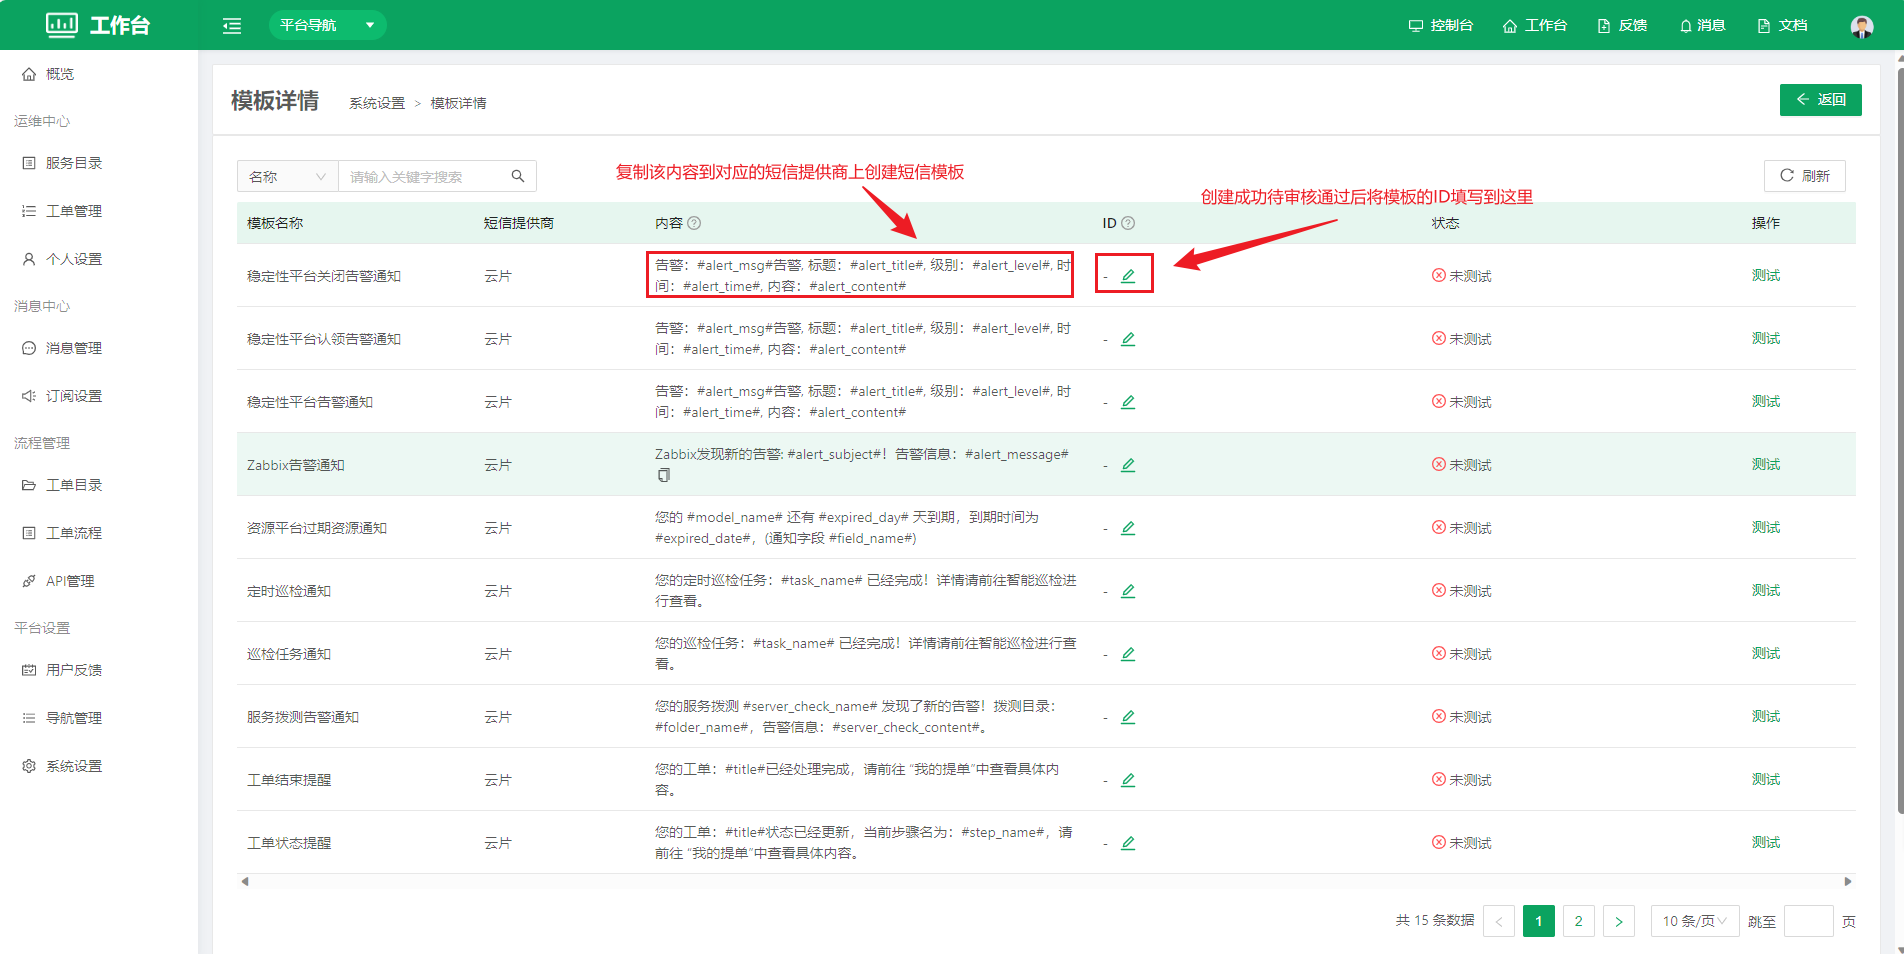
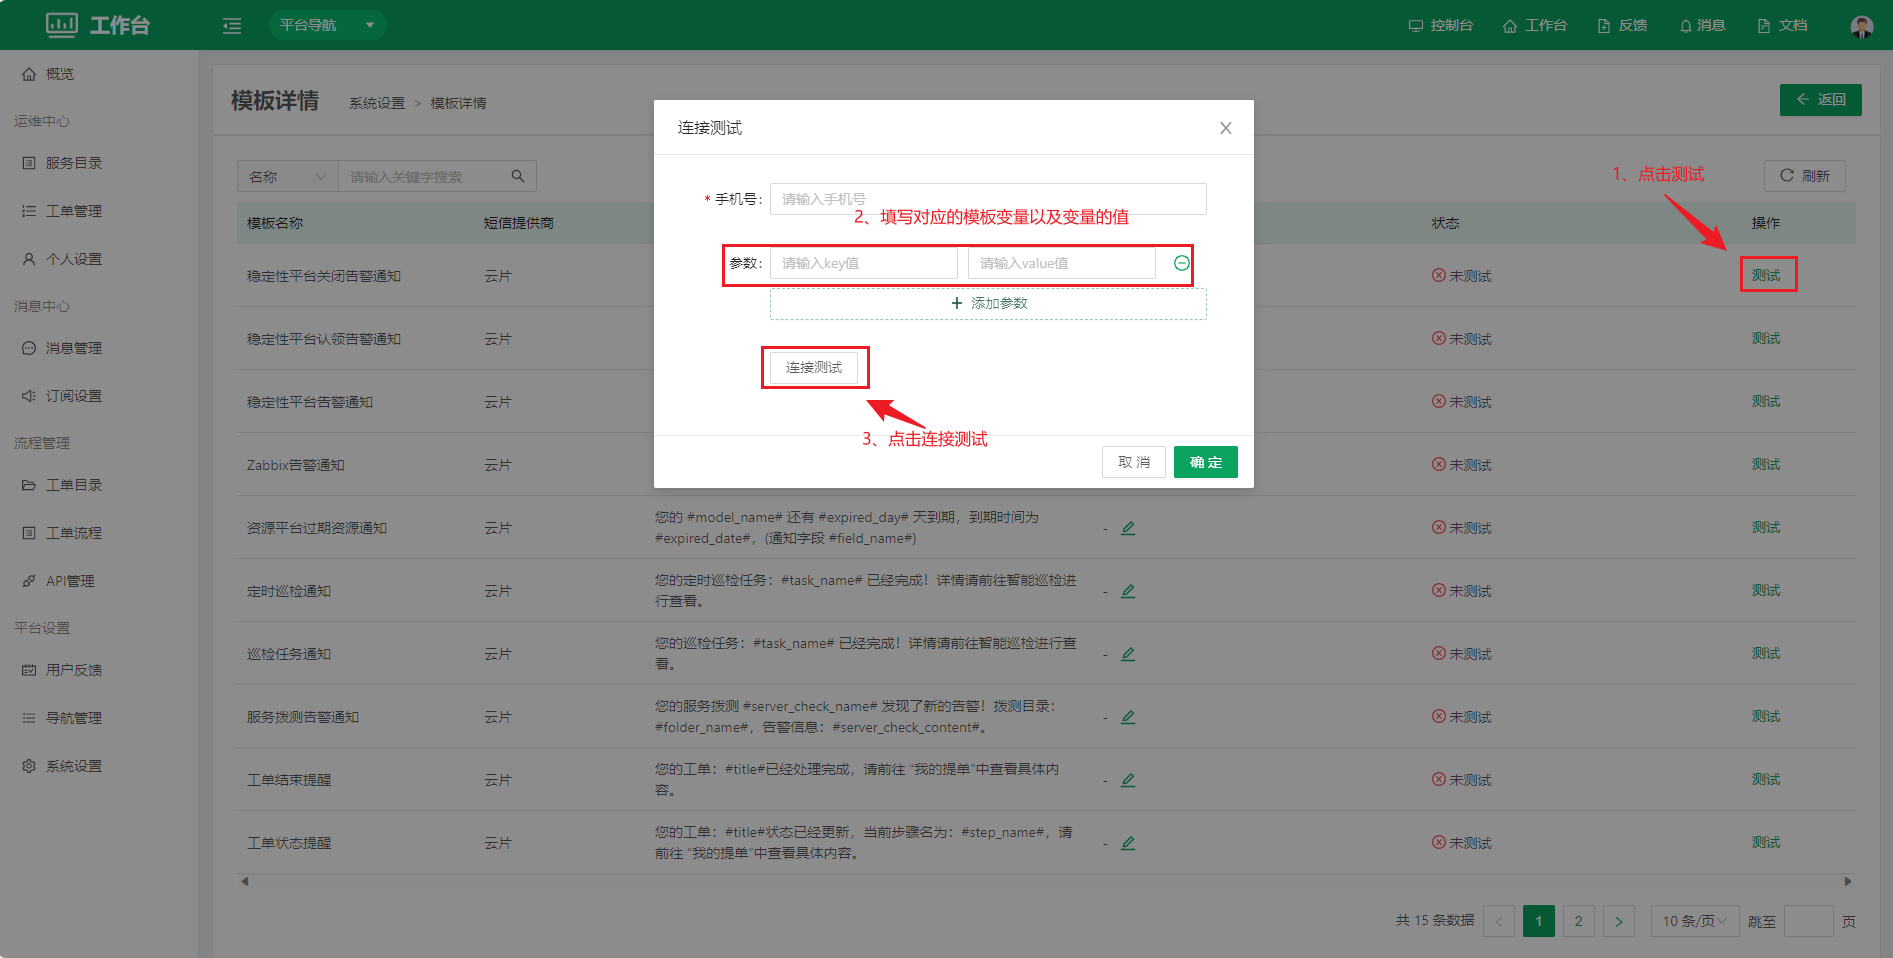
- Click Template in the actions column to open the template details page
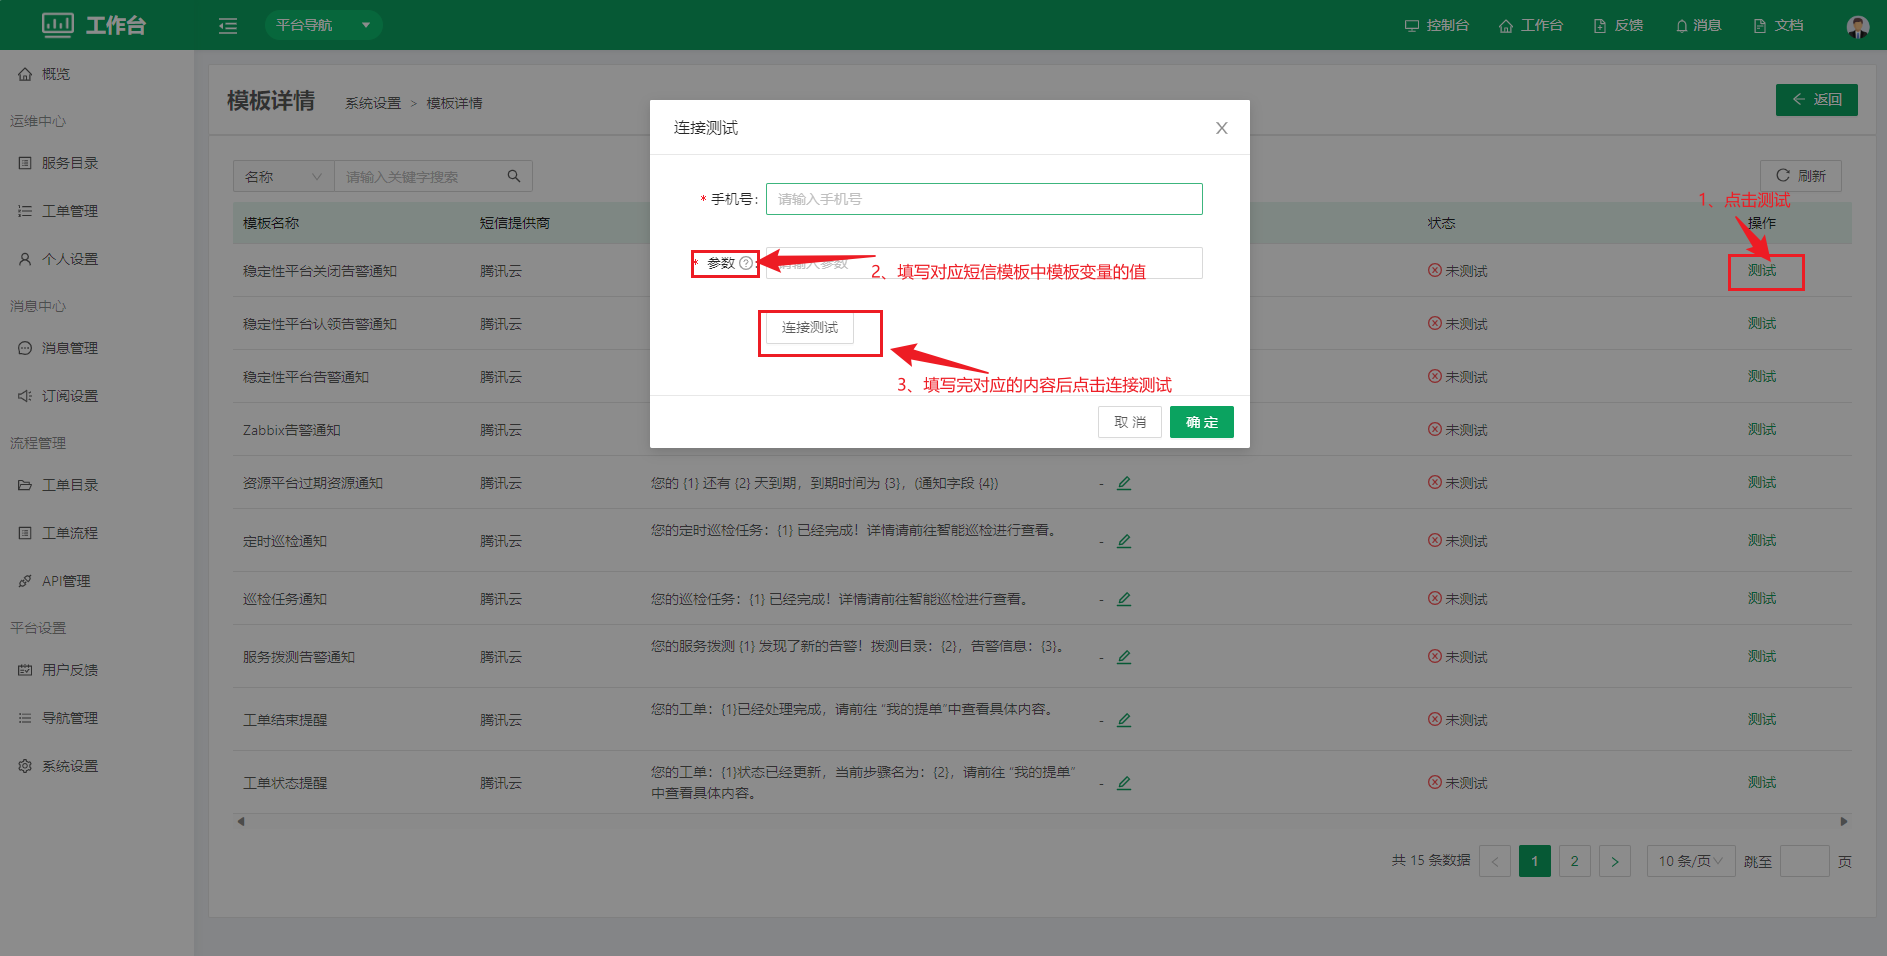
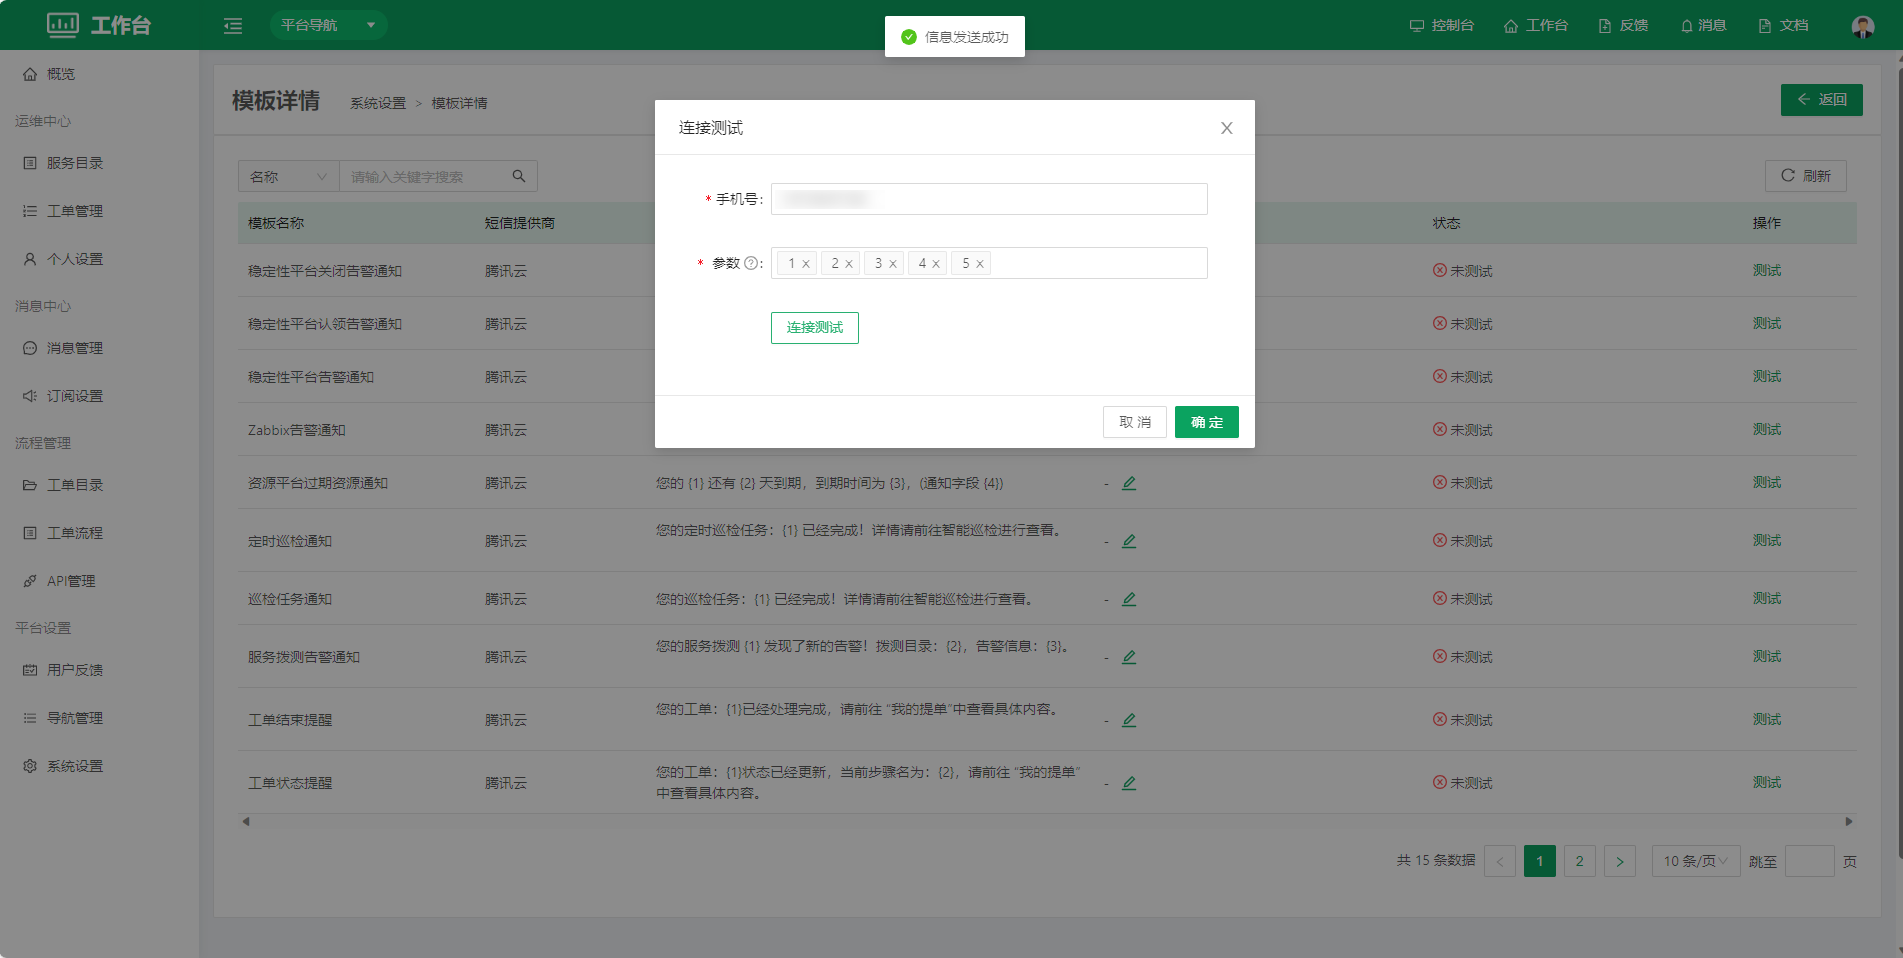
- On the template details page, perform the related operations according to the notes in the following images
Yunpian SMS Configuration
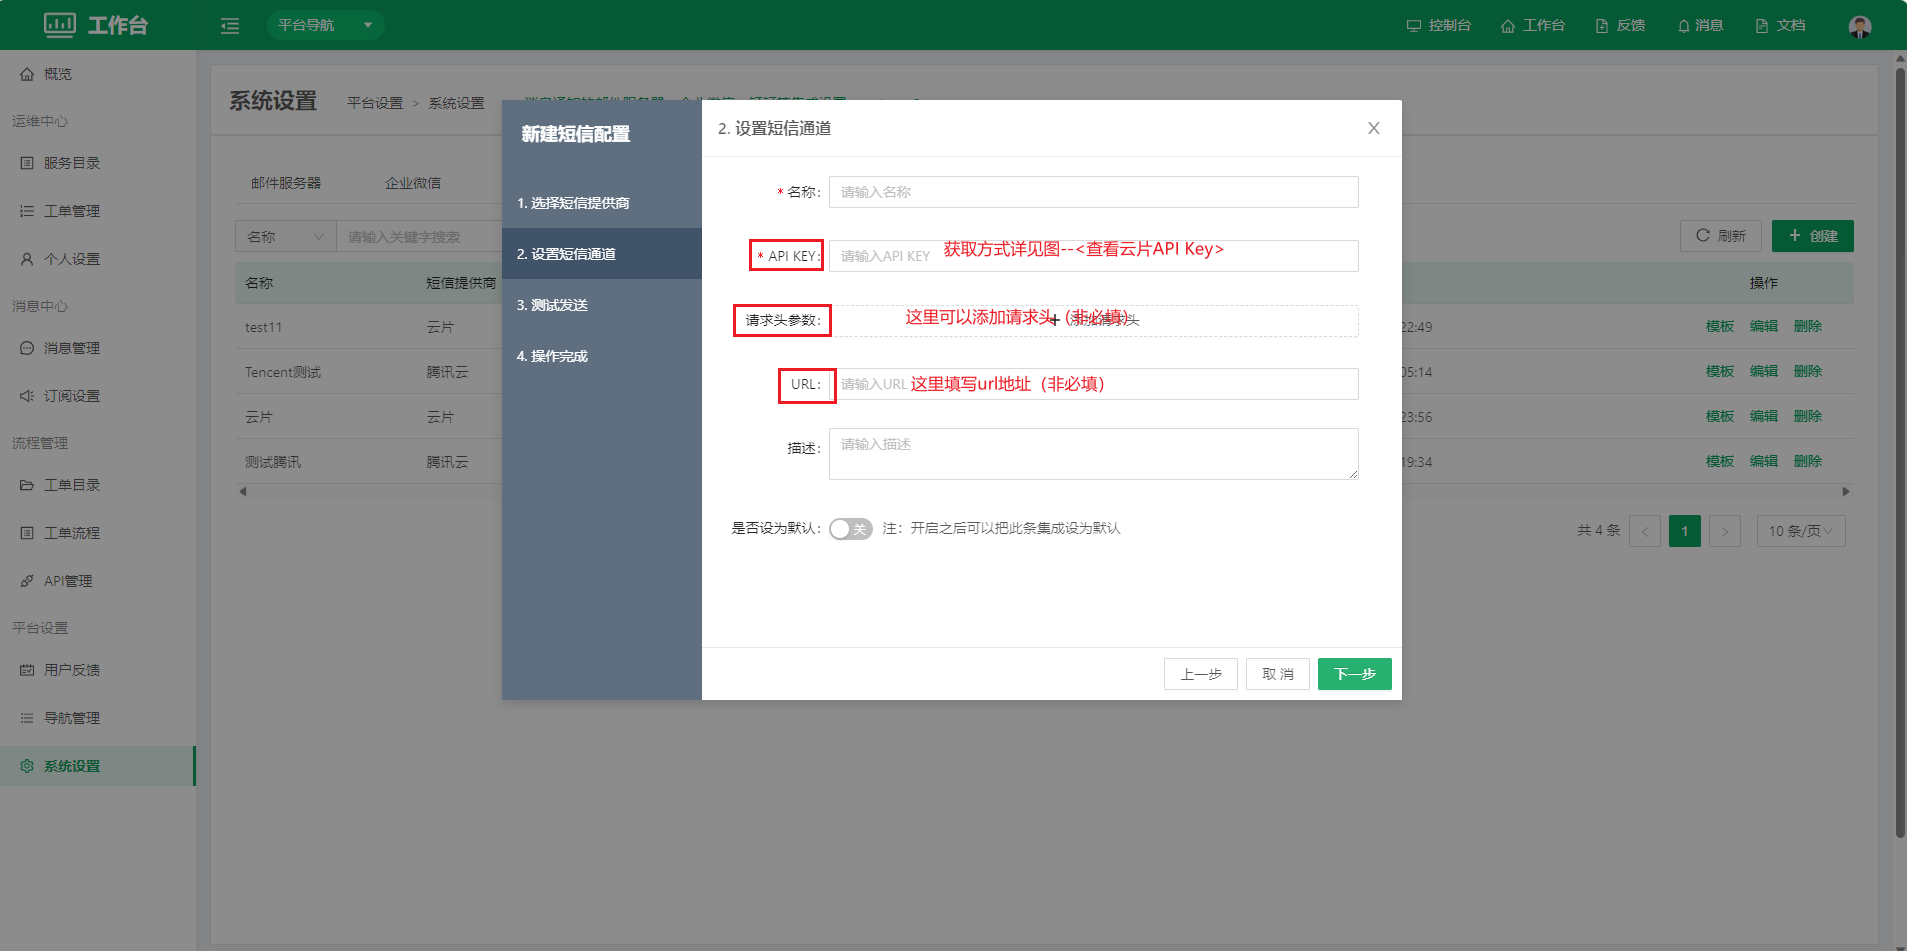
- Set the SMS channel: fill in the content according to the fields on the page
-
View the Yunpian API Key. Open Yunpian (address: https://www.yunpian.com/), register an account and sign in
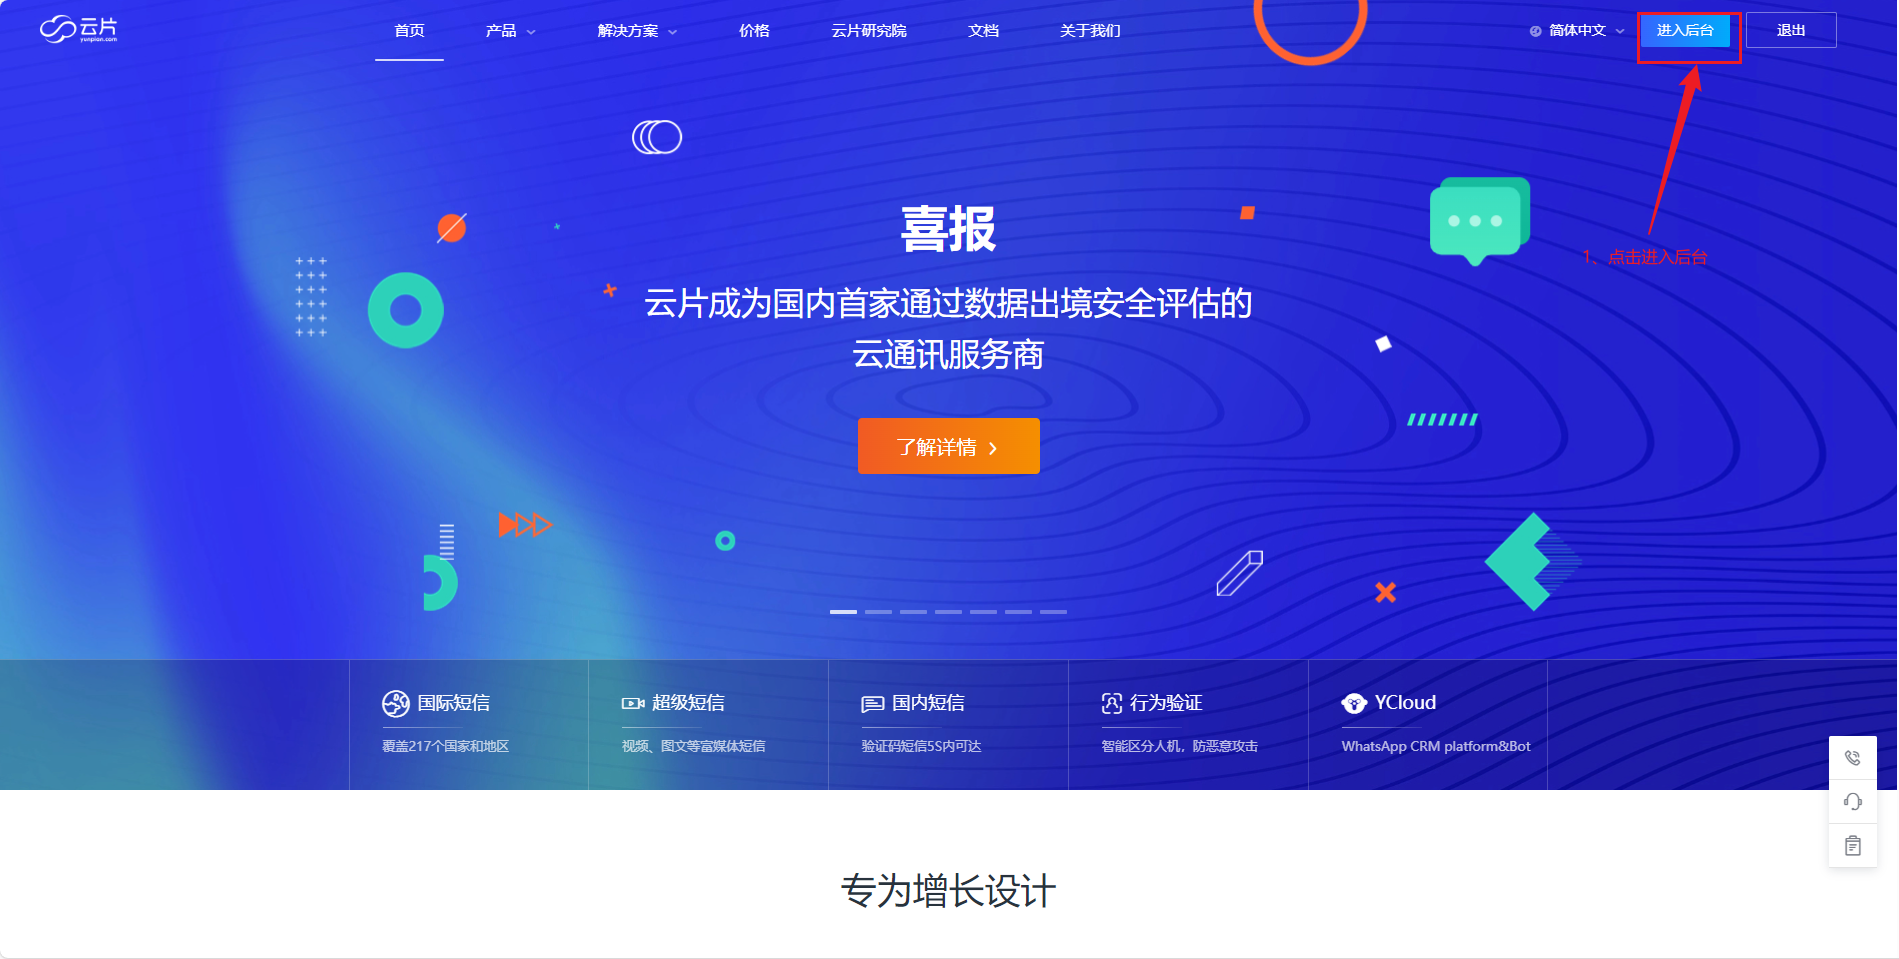
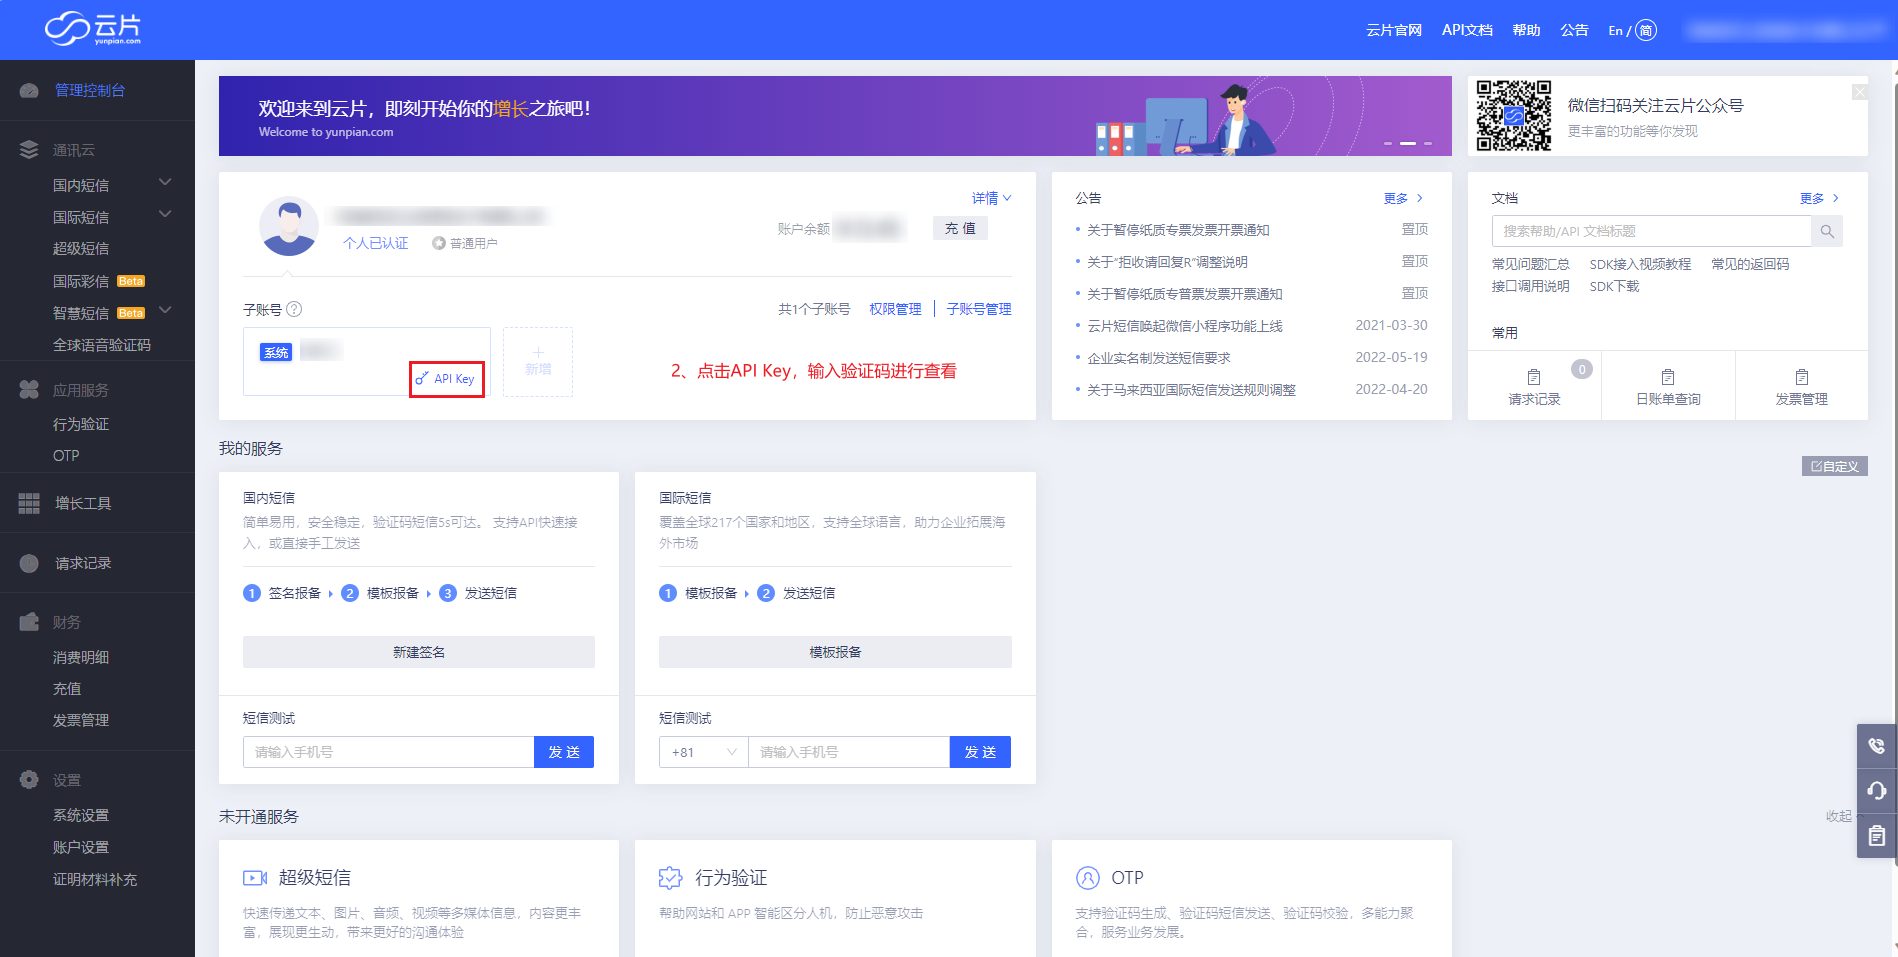
-
Test sending
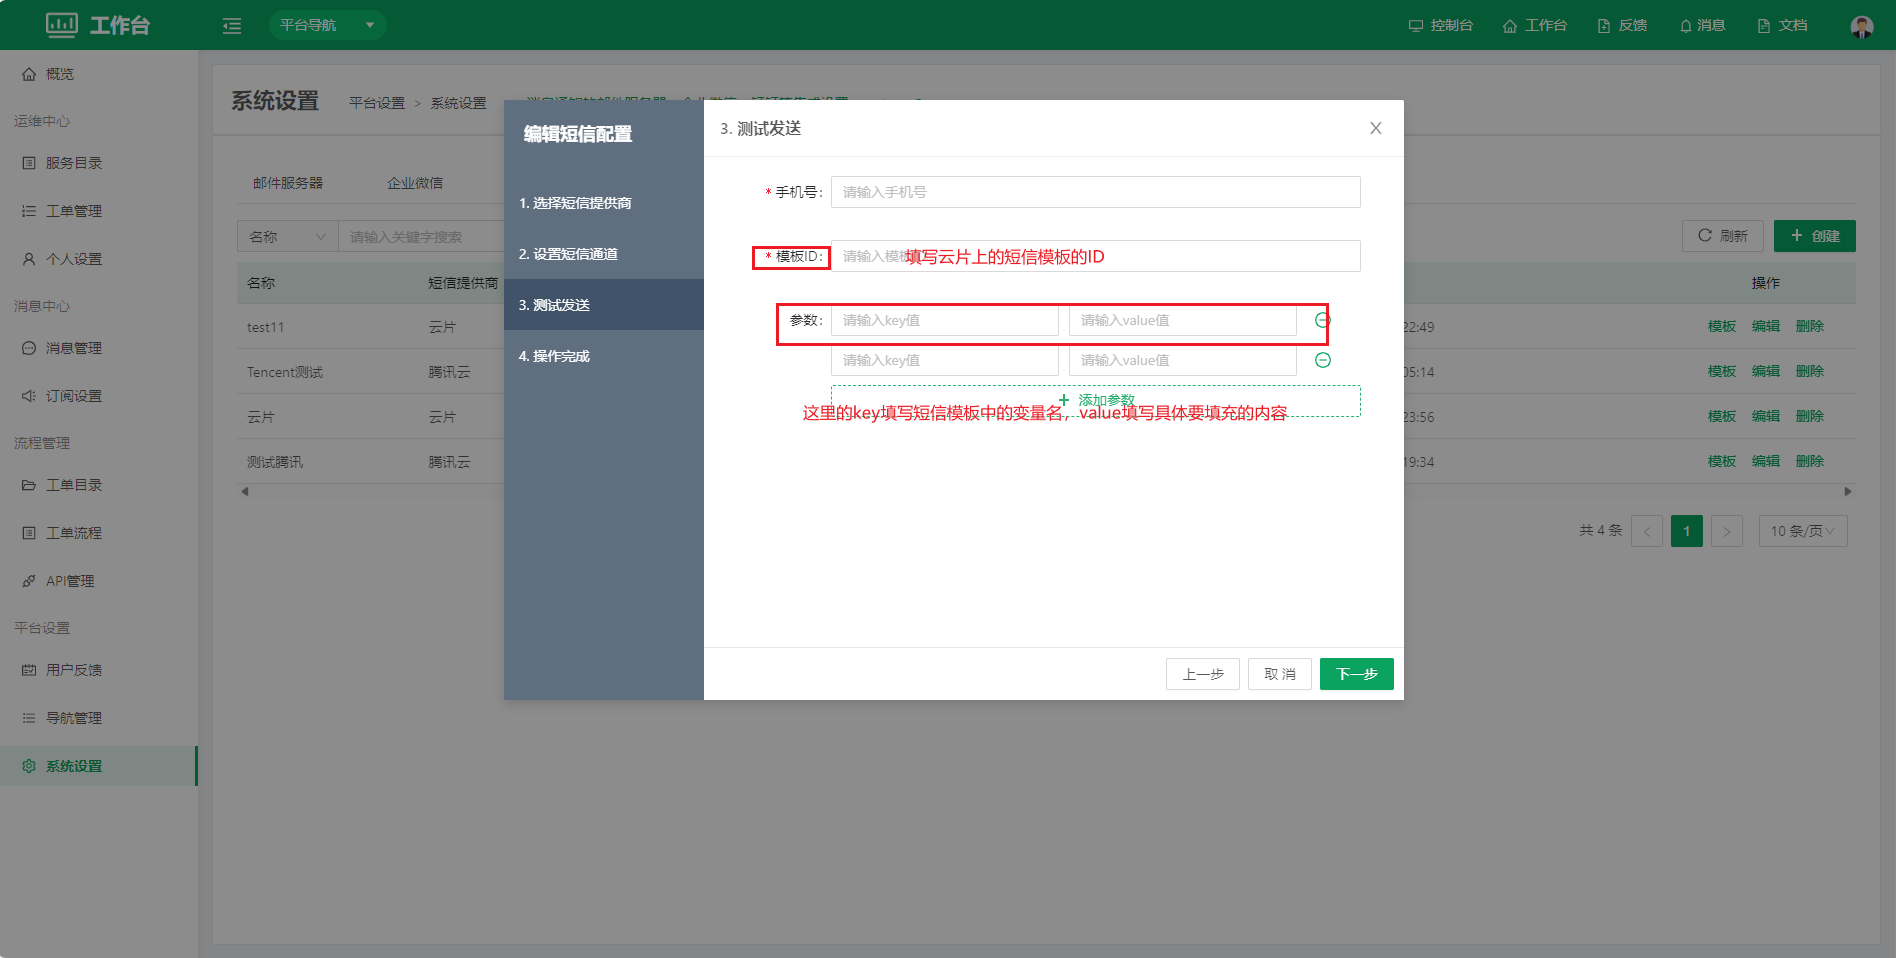
- Operation completed
- Click Template in the actions column to open the template details page
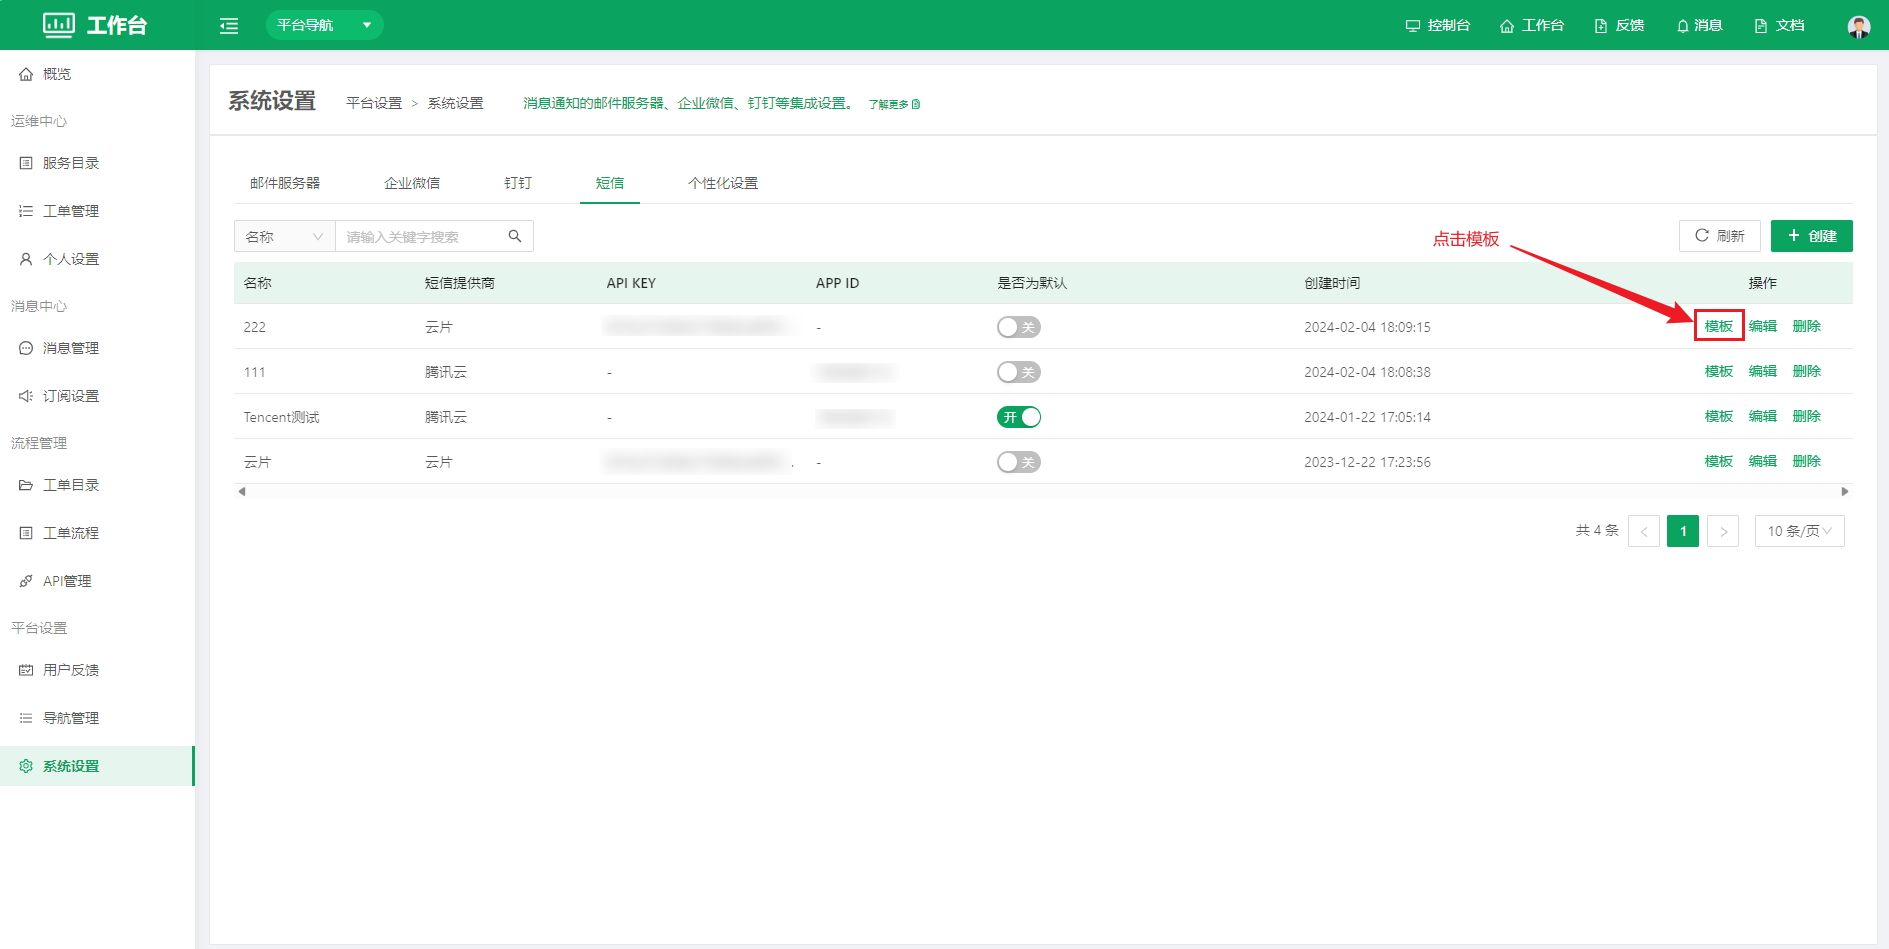
- On the template details page, perform the related operations according to the notes in the following images
4.3.6 Personalization
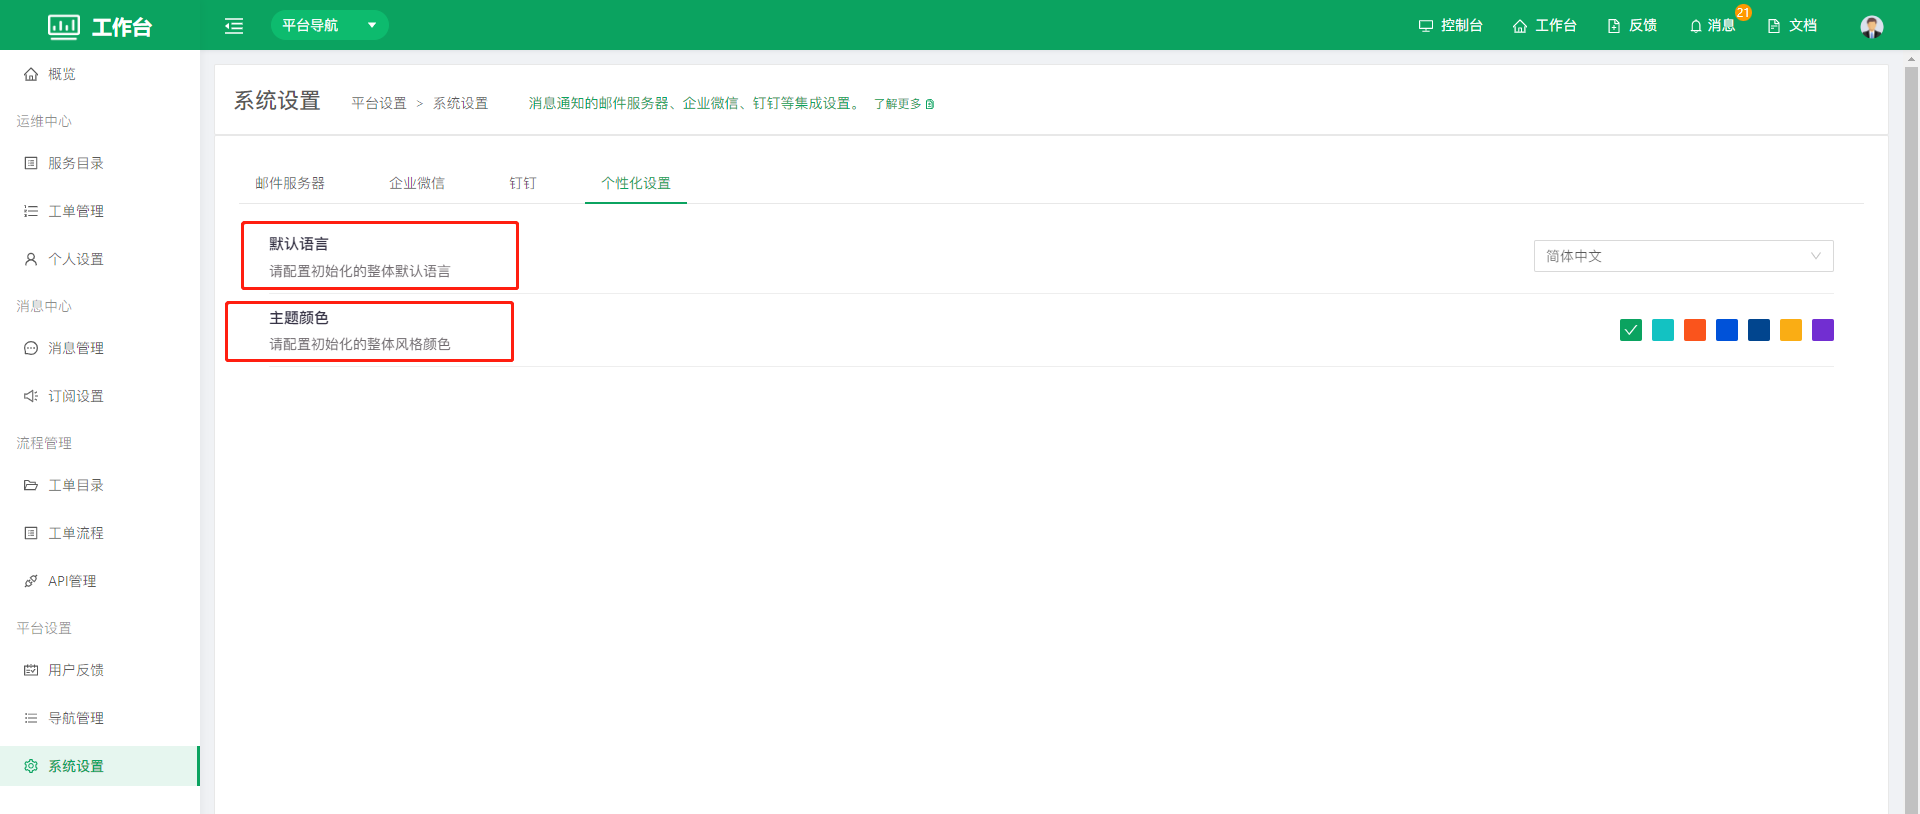
Default language: users can configure the default language of the whole platform.
Theme color: users can configure the default style color of the whole platform