













Bastion Host
Product Introduction
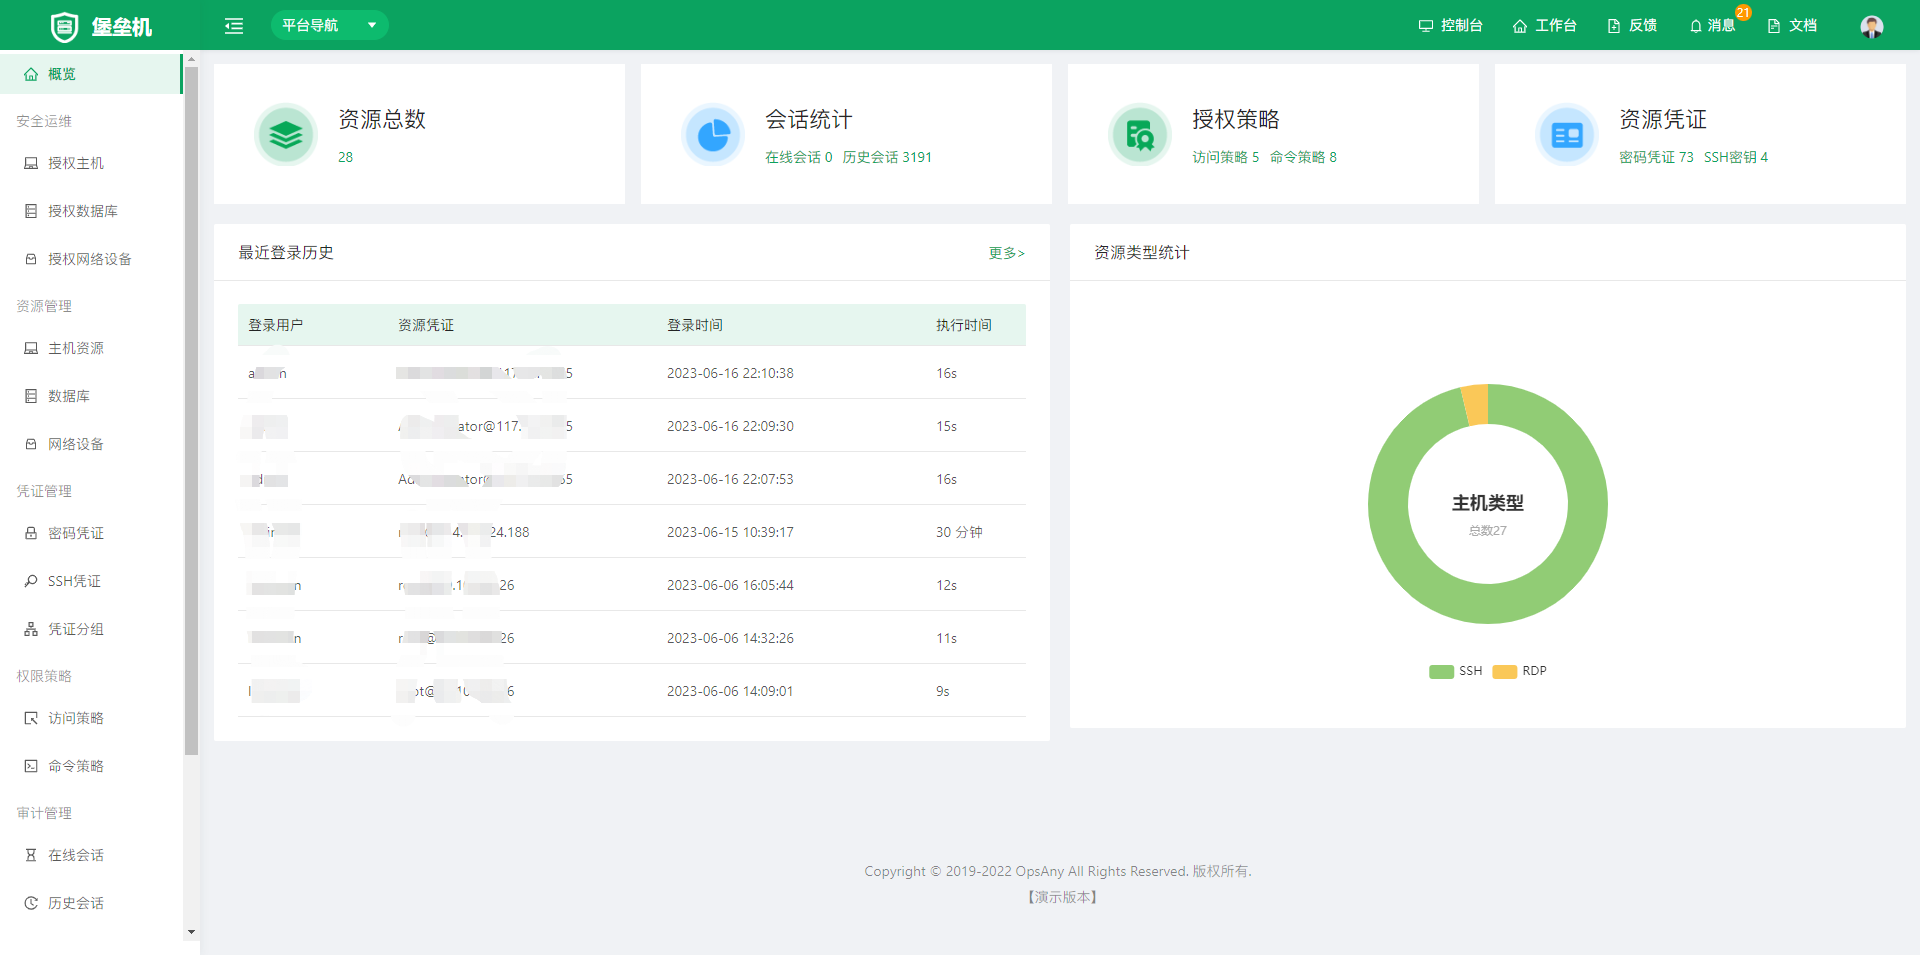
The Bastion Host (APPID: bastion) is a unified security O&M platform from OpsAny that supports 4A audit, providing enterprises with centralized Account, Authorization, Authentication, and Audit management. OpsAny Bastion Host offers HTML5 access with no client or browser plug-in required. On Windows, Linux, macOS, Android, iOS, and other operating systems, you can access and operate resources through mainstream browsers, freeing O&M staff from the constraints of tools and operating systems and enabling secure O&M anytime, anywhere.
OpsAny Bastion puts forward the concept of "Bastion everywhere", extending the Bastion entry point to other OpsAny platforms such as Resource, Control, Monitor, and Cloud Management. For any host-related operation, you can click Login to enter the Bastion Host page and quickly start manual management and debugging.
Basic Concepts
Resource
Resource management covers host resources and database resources, that is, the objects you need to log in to and manage. You must create resources before performing any subsequent operations.
Credential
To log in to a resource, you must create a login credential in advance, such as a username and password or an SSH certificate. The credential is associated with the resource (host or database). One resource can be associated with multiple credentials, for example, a host with multiple login users. One credential can be associated with multiple resources, for example, multiple hosts that share the same username and password.
Policy
Policies are divided into access policies and command policies. In general, administrators use policies to associate hosts and databases, users and user groups, and resources and credentials, and to define the time range, the specific time, and the credential (identity) with which a user logs in to a specific host or database.
By default, users with the administrator role do not need to create authorization policies; they can see all resources by default. Administrators do not need to authorize themselves.
Audit
Audit allows administrators to view operations performed by users after login. On Linux, operation playback plus command text display and export are supported. On Windows, operation playback is supported. (Note: Windows playback is in video format and occupies a large amount of disk space, while Linux uses a custom text format to achieve the recording effect and occupies very little disk space.)
Login
All the features above are provided for the administrator role. When authorizing ordinary users, grant only the pages under the Secure O&M menu. When an administrator authorizes hosts to a user through an access policy, the user can see the authorized hosts under Authorized Hosts and click Login to open the operation interface.
1. Resource Management
To test and use Bastion Host features, first create an ordinary non-administrator user to facilitate resource authorization and testing.
1.1 Host Resources
Host resources are mainly used by administrators to add host resources. The correct usage is: the Host Resources menu is for administrators and the Authorized Hosts menu is for non-administrators. Menu permission control is configured in the permission policies of unified permissions.
Create a Host
-
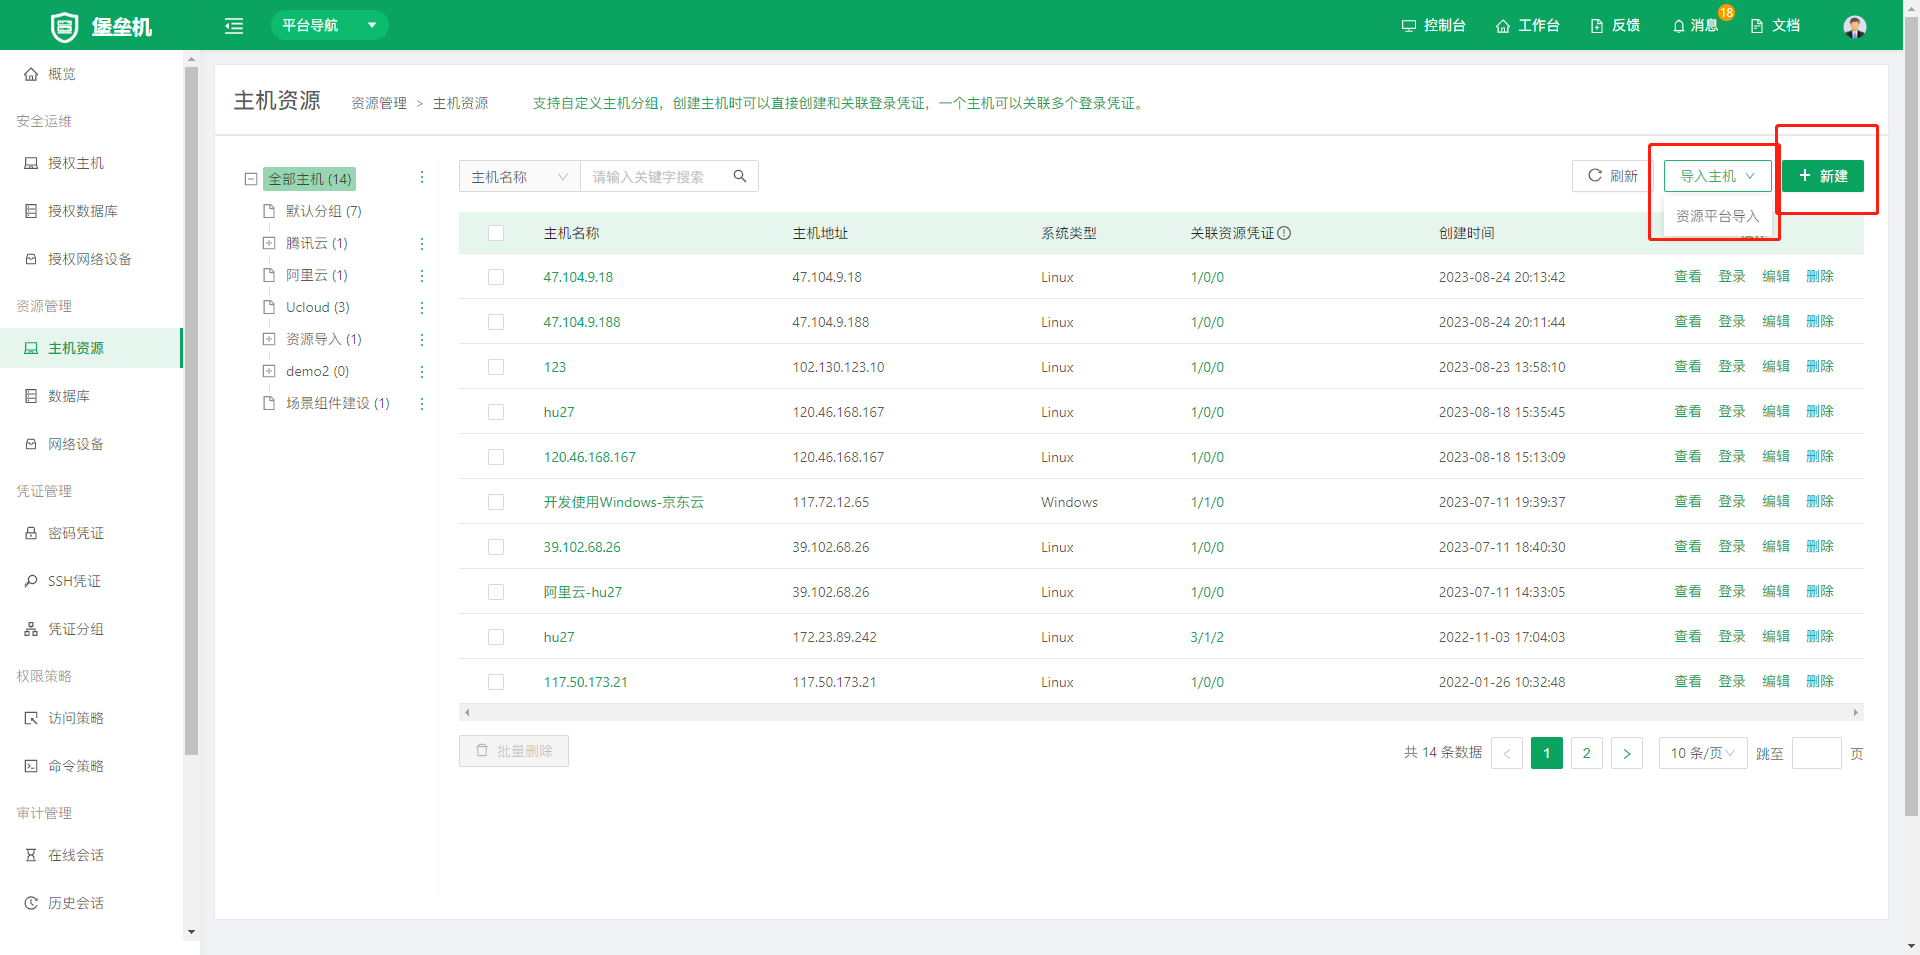
Create host resource: go to the host resource list page, click Create in the upper-right corner, and complete host creation on the New Host page.
-
Import host resource: click Import from Resource Platform next to the Import Host button in the upper-right corner, and complete the import of physical machines, virtual machines, cloud hosts, and other host resources on the Resource Platform import page.
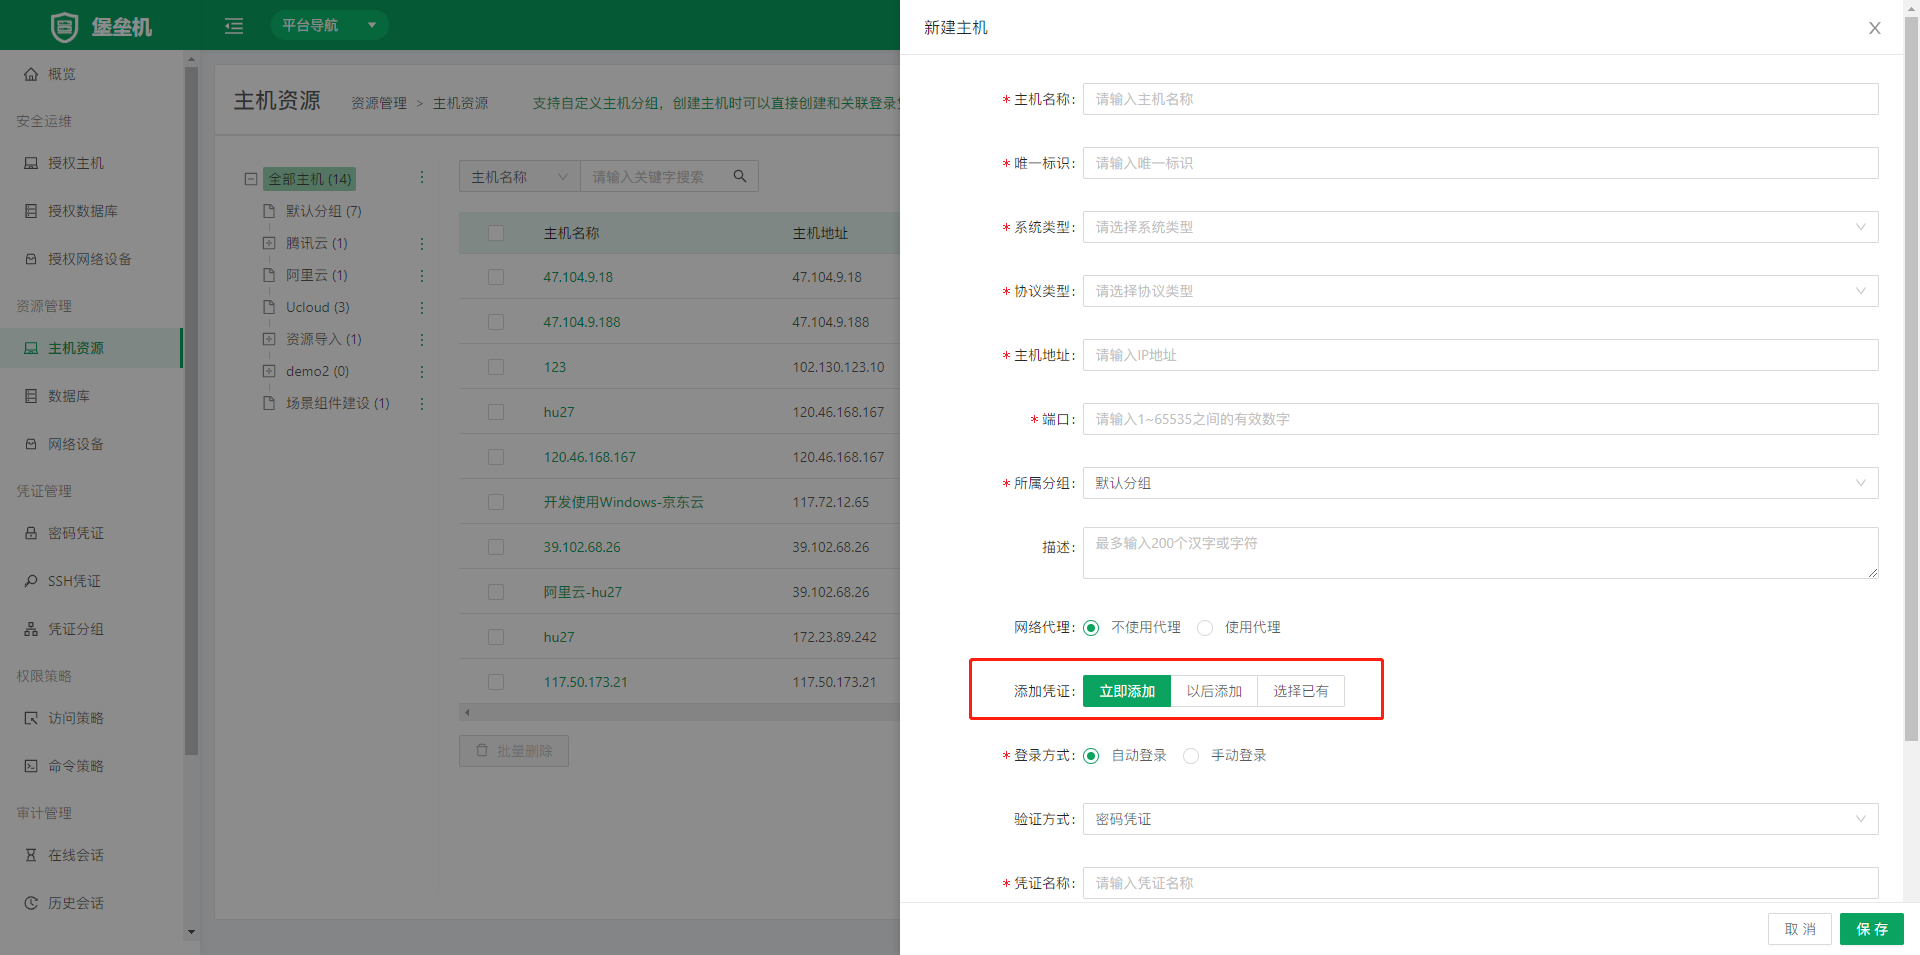
Three methods are supported by default for adding host login credentials:
- Add now: with this method, the credential is also created in Credential Management.
- Add later: only the host is added; the login credential is added afterwards.
- Add existing: select an already-created credential to use.
Importing hosts from the Resource Platform is supported, which facilitates user management and use.
Log In to a Host
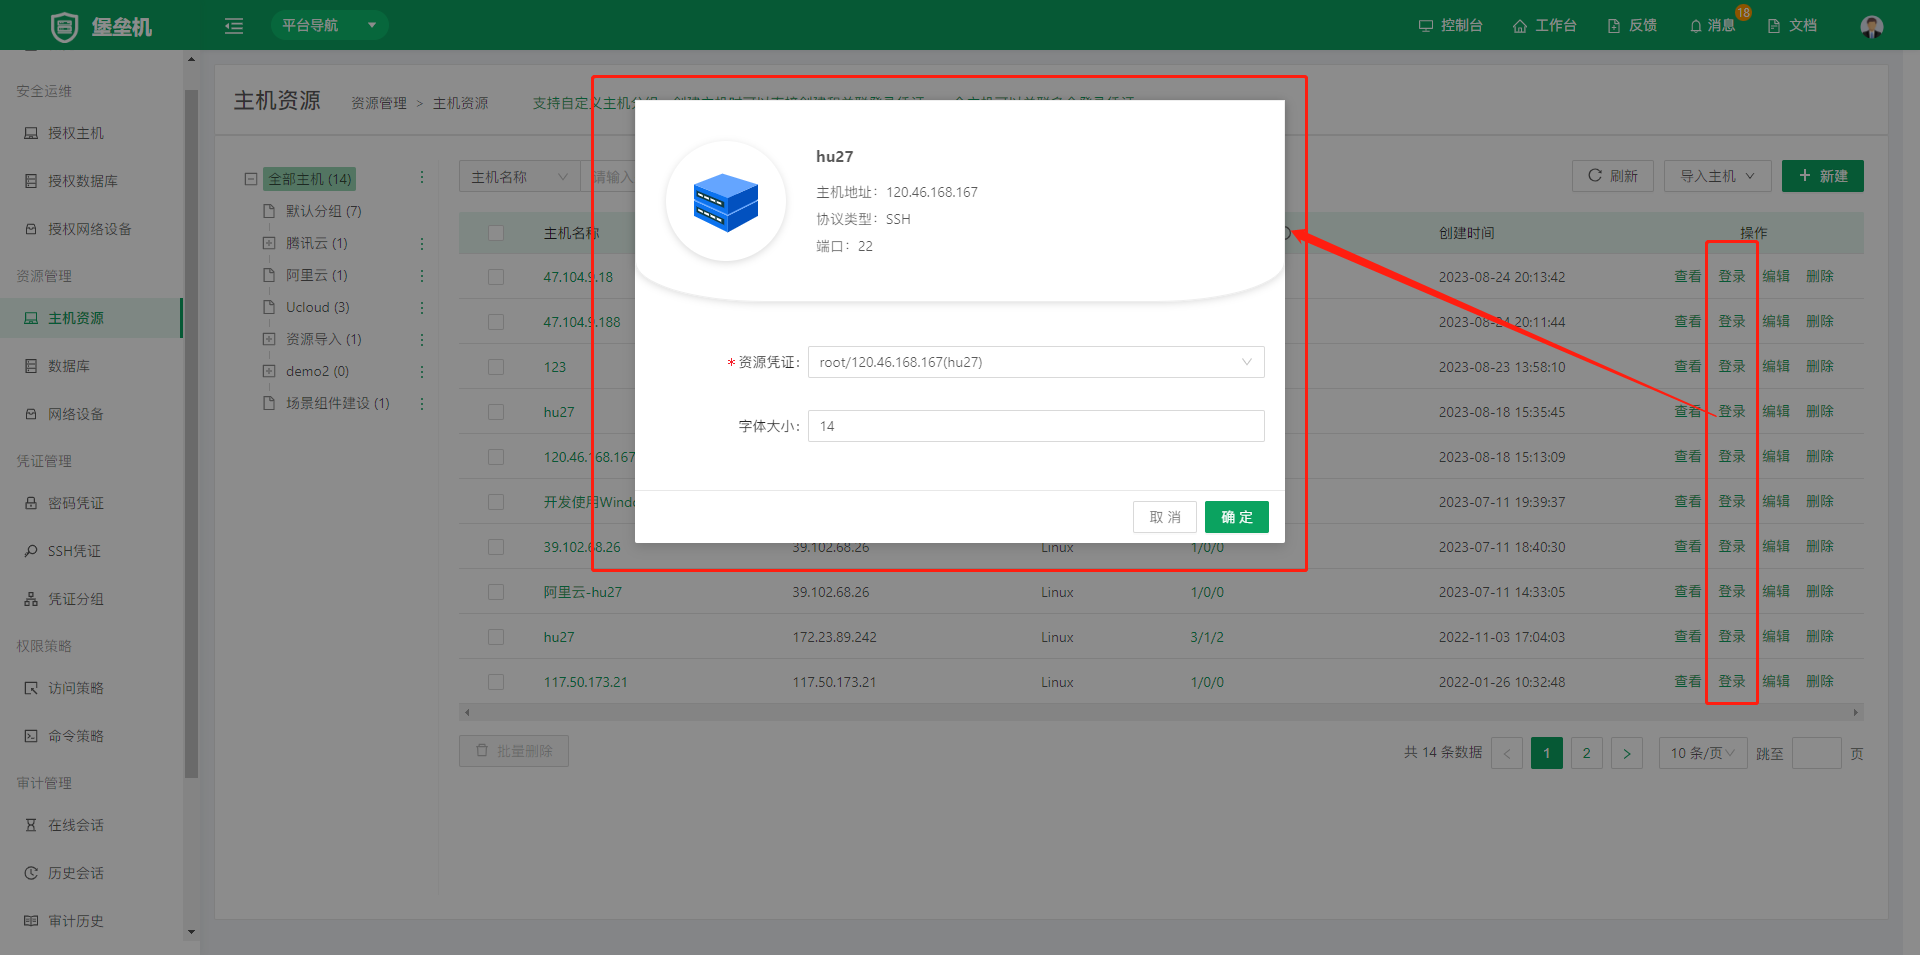
- Log in to a host: click the Login button on the right side of the page, select an available resource credential in the login dialog, and click OK to log in.
1.2 Databases
Database resources are used to log in to databases directly through Bastion Host. MySQL, MongoDB, and Redis are currently supported.
Create a Database
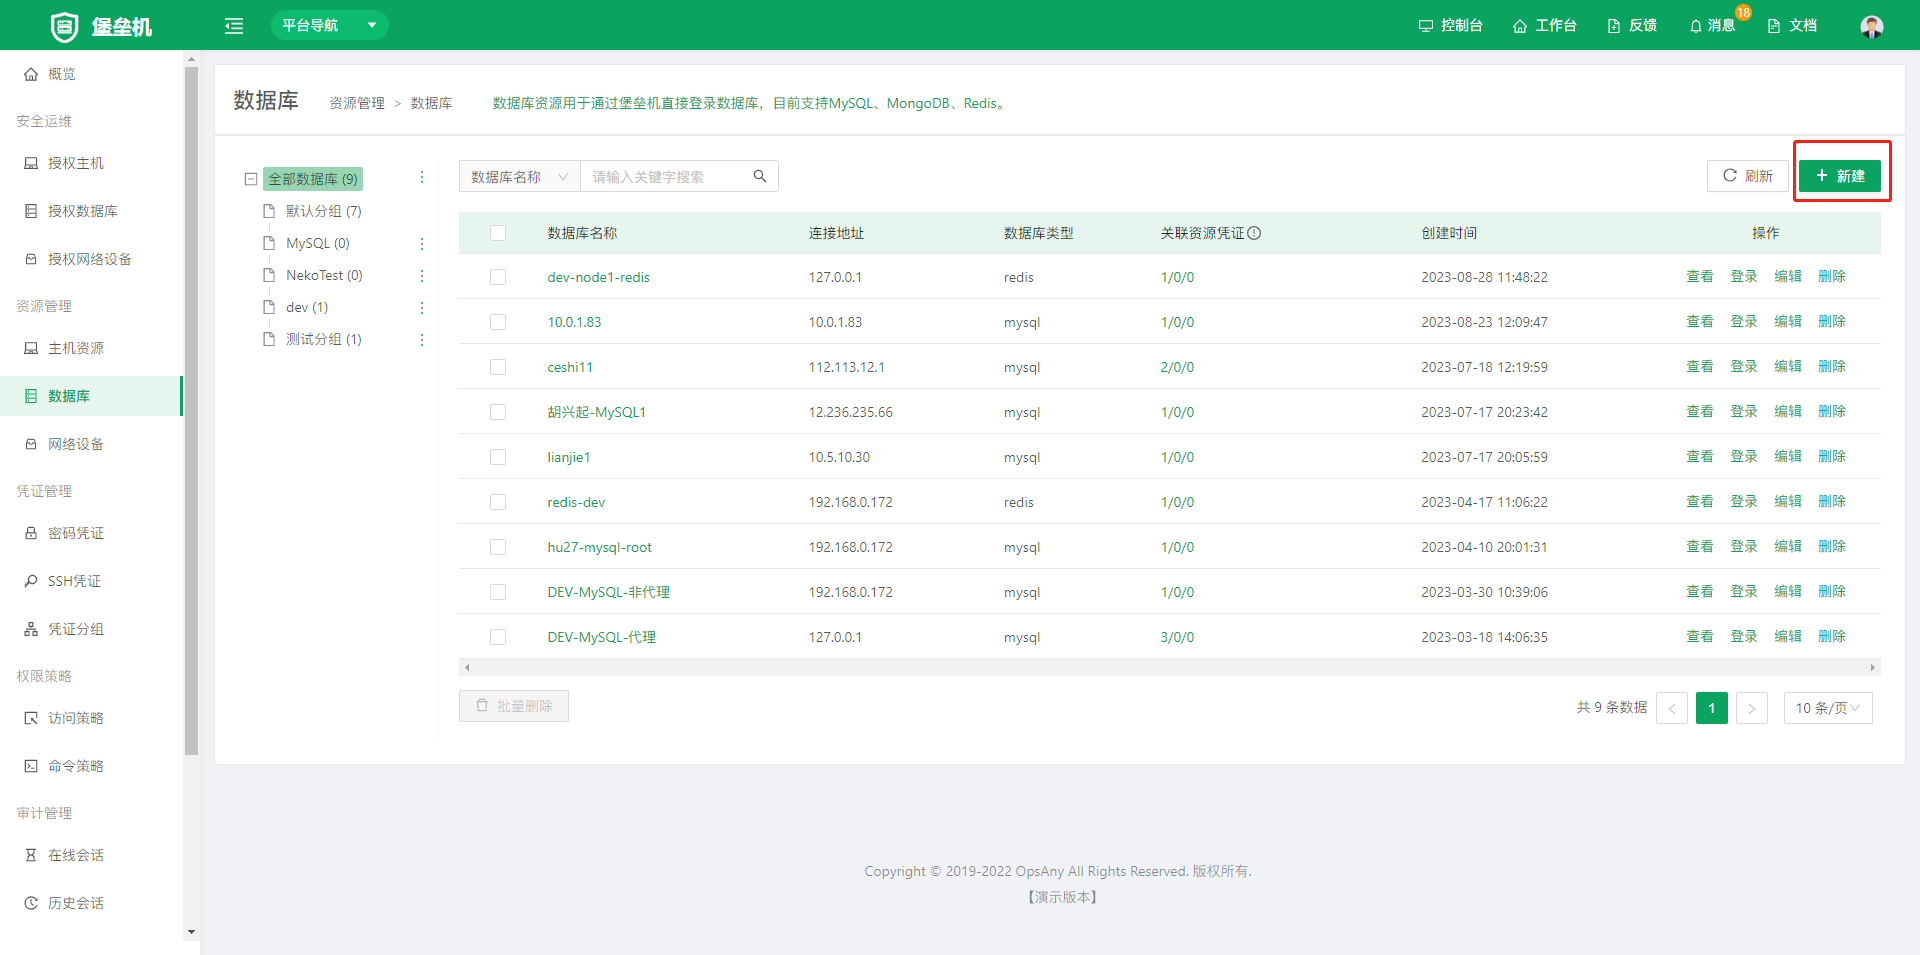
- Create database: go to the database list page, click Create in the upper-right corner, and complete database creation on the New Database page.
Log In to a Database
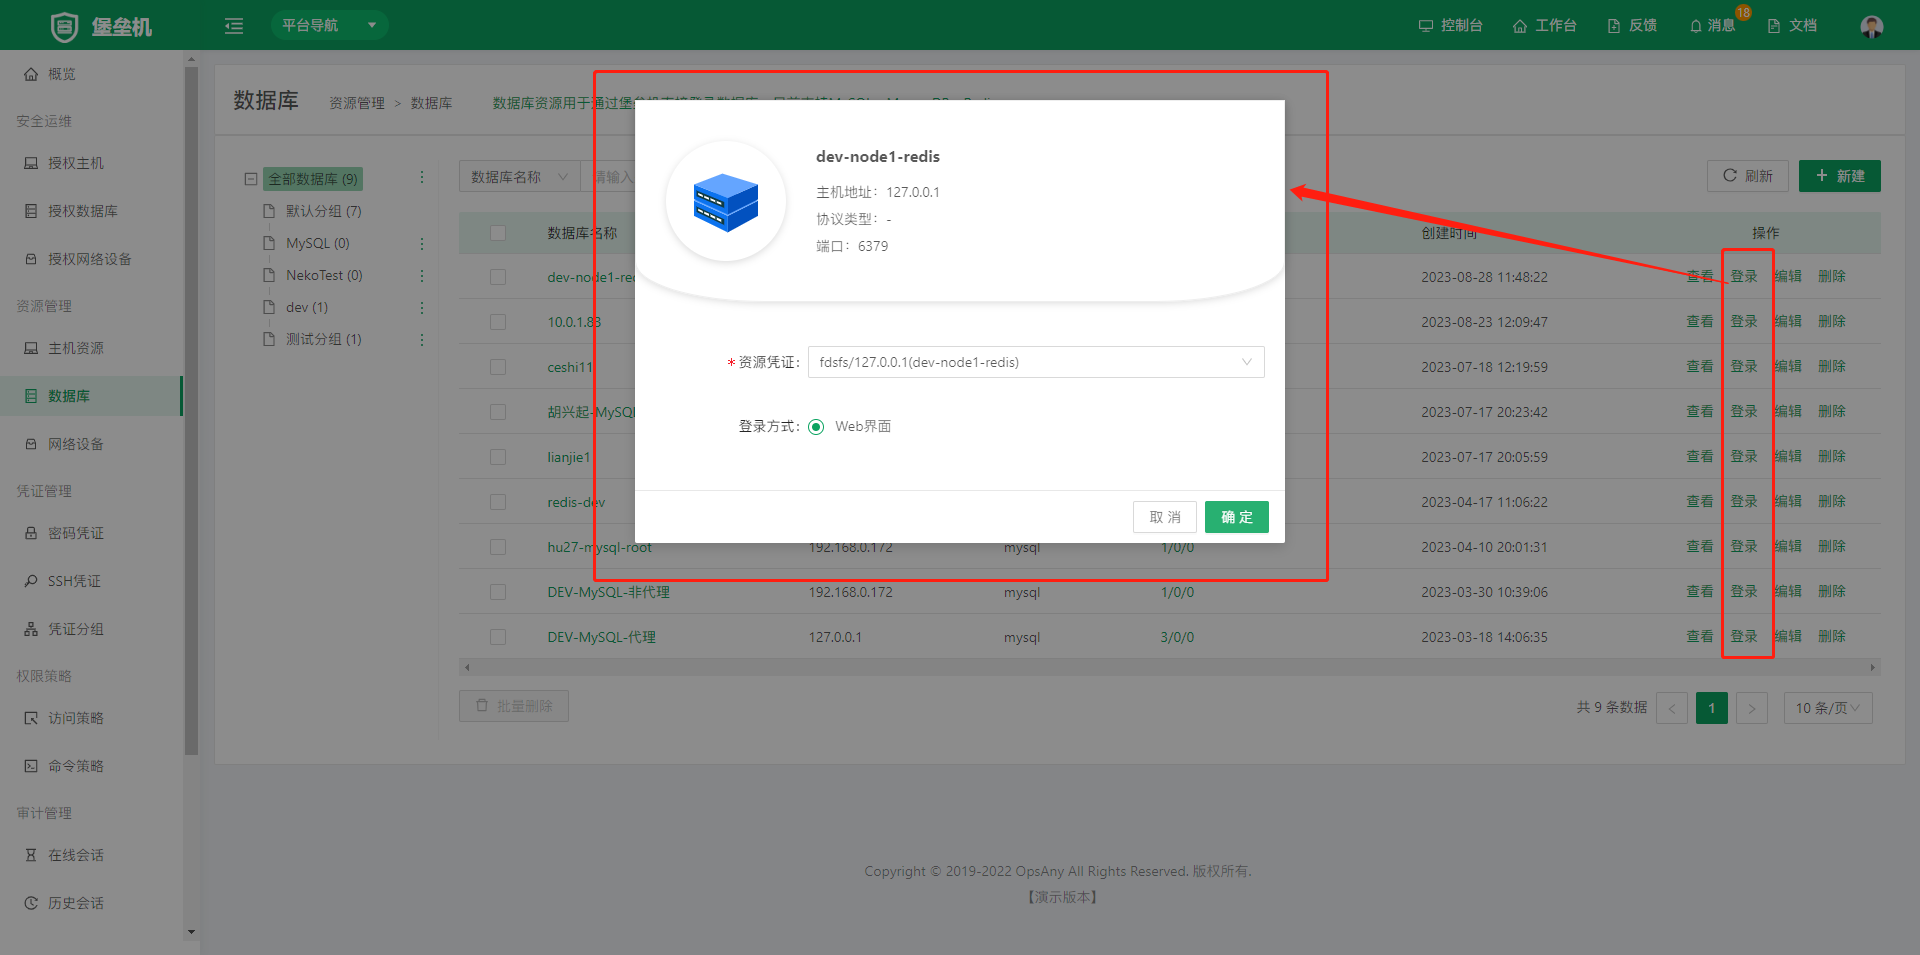
- Log in to a database: click the Login button on the right side of the page, select an available resource credential in the login dialog, and click OK to log in.
1.3 Network Devices
Manage network device resources over SSH and Telnet.
Create a Network Device
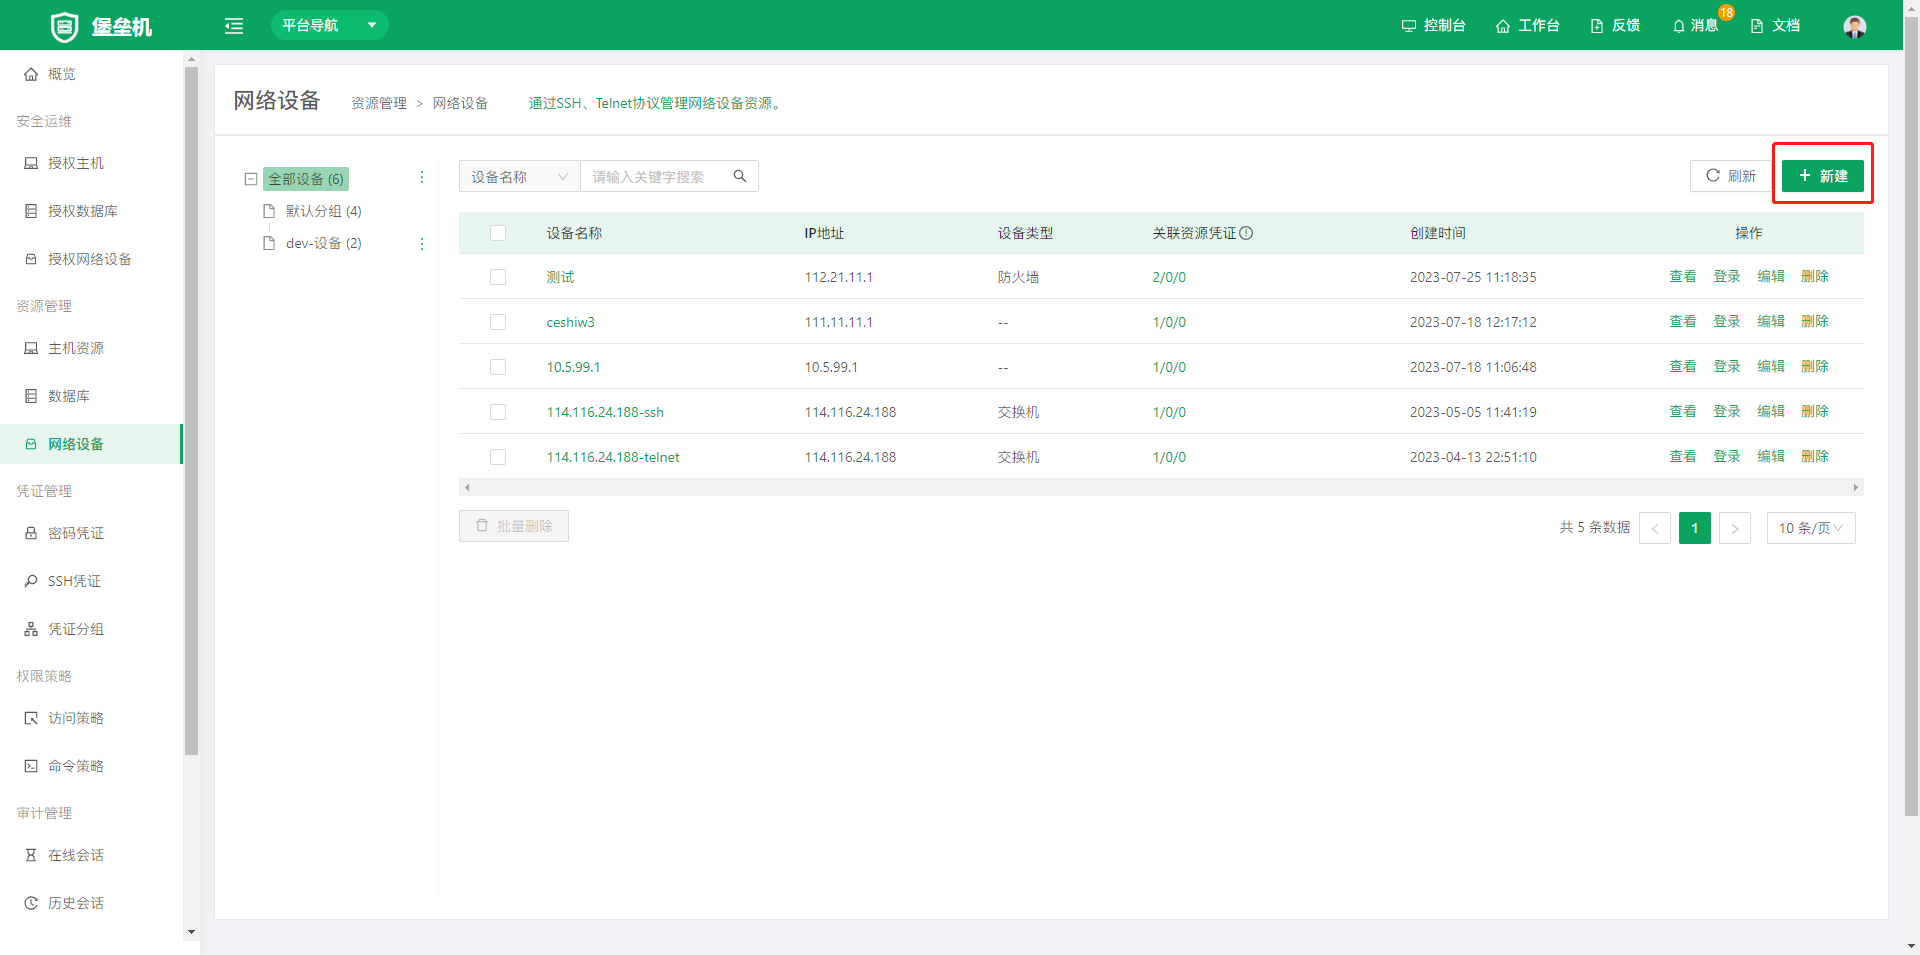
- Create network device: go to the network device list page, click Create in the upper-right corner, and complete network device creation on the New Network Device page.
Log In to a Network Device
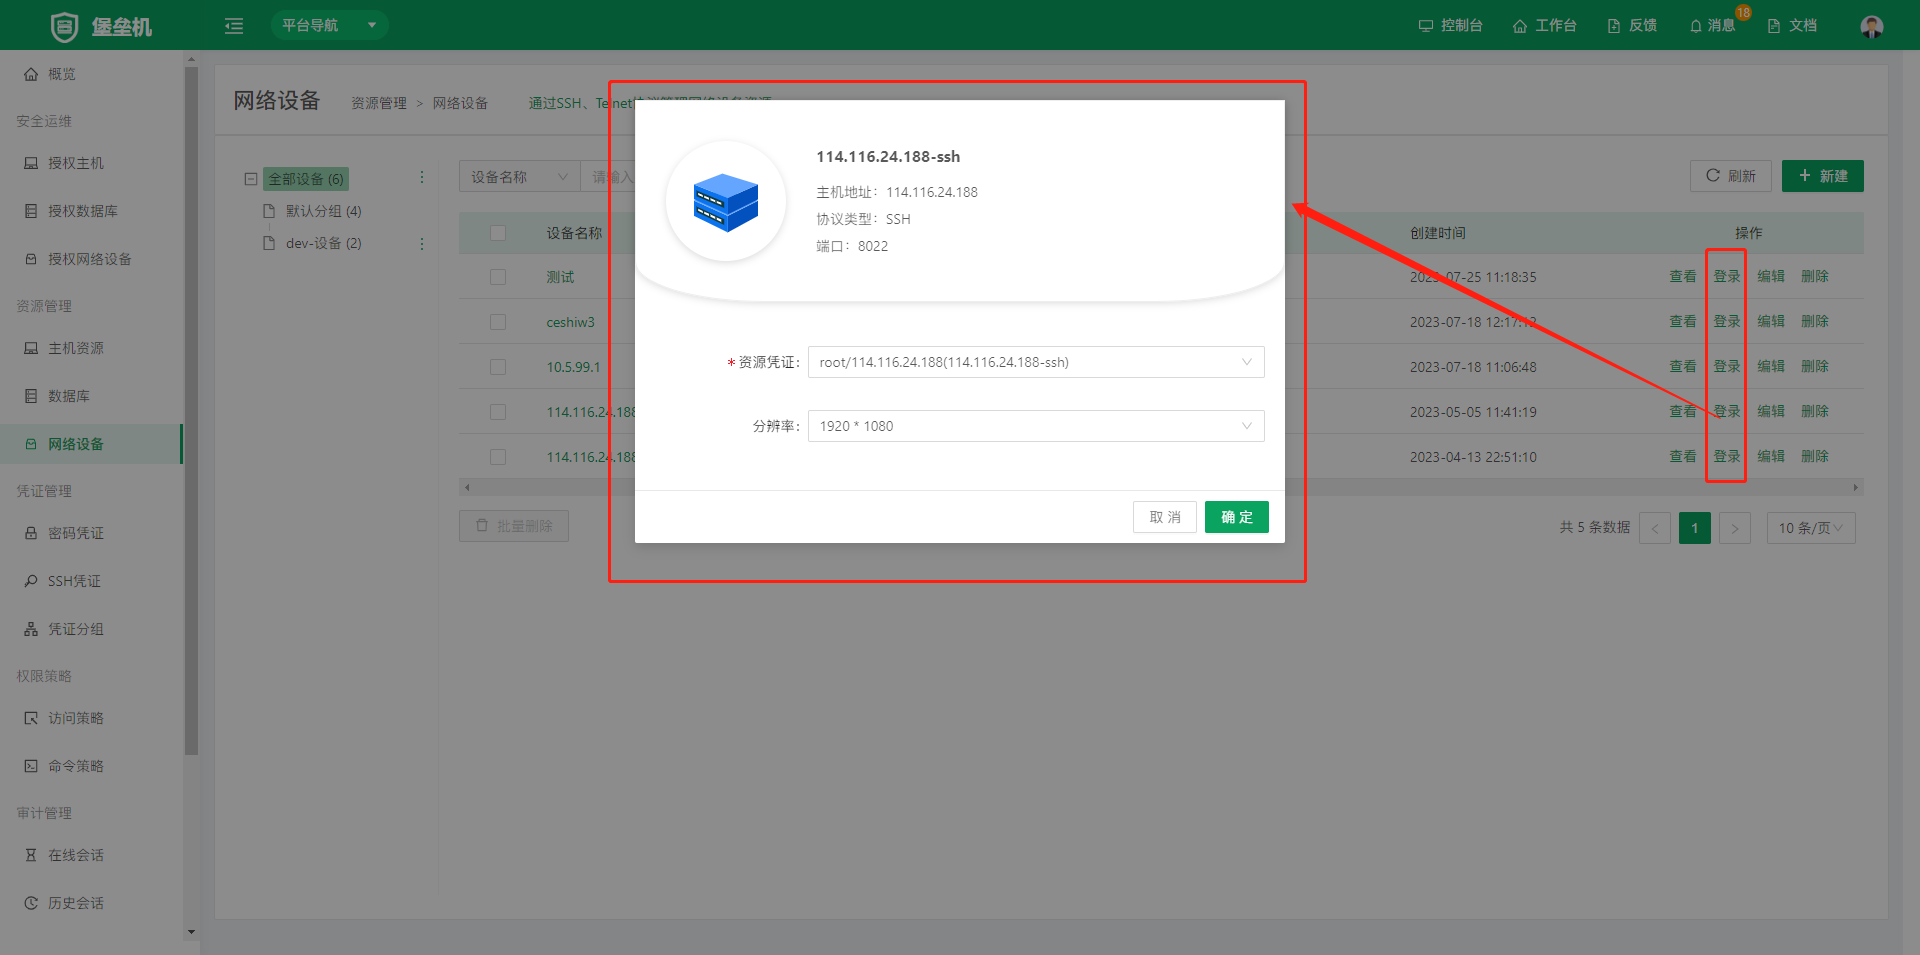
- Log in to a network device: click the Login button on the right side of the page, select an available resource credential in the login dialog, and click OK to log in.
2. Credential Management
Bastion Host provides key and password management. You can create keys and passwords and associate them with hosts in host resources to improve host account management efficiency. You can also change the basic information of keys and passwords and add or remove associated host accounts to better meet O&M requirements. This section describes how to create and edit keys and passwords.
2.1 Password Credentials
Password credentials support automatic and manual login. With manual login, the user must enter the password at login. One password credential can be associated with multiple host resources and application resources.
- Create password credential: fill in the fields on the page to complete the operation.
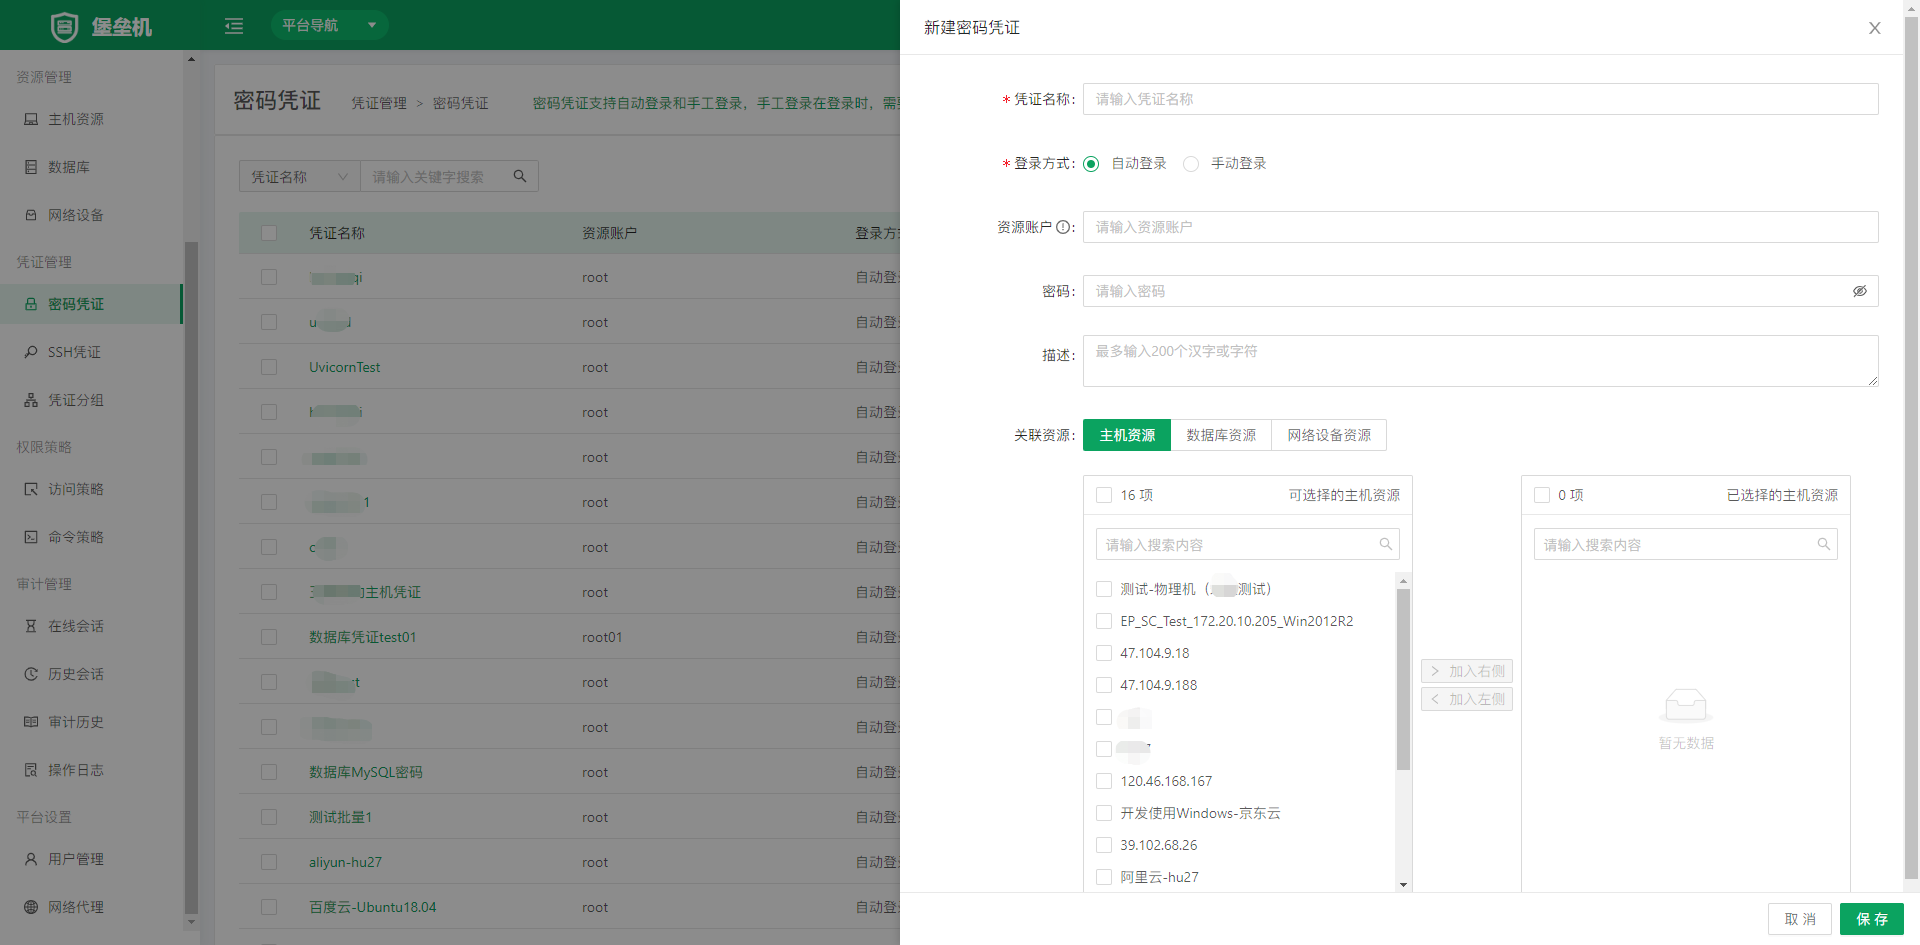
The difference between manual and automatic login is that manual login requires the user to enter the password. Associated resources can be host resources, database resources, and network device resources.
2.2 SSH Key Credentials
SSH key credentials support a passphrase. Create a key pair in advance, enter the private key in the SSH credential, and place the public key in the .ssh/authorized_keys file in the home directory of the corresponding user on the target host.
- Create key credential: fill in the fields on the page to complete the operation; enter the SSH private key here.
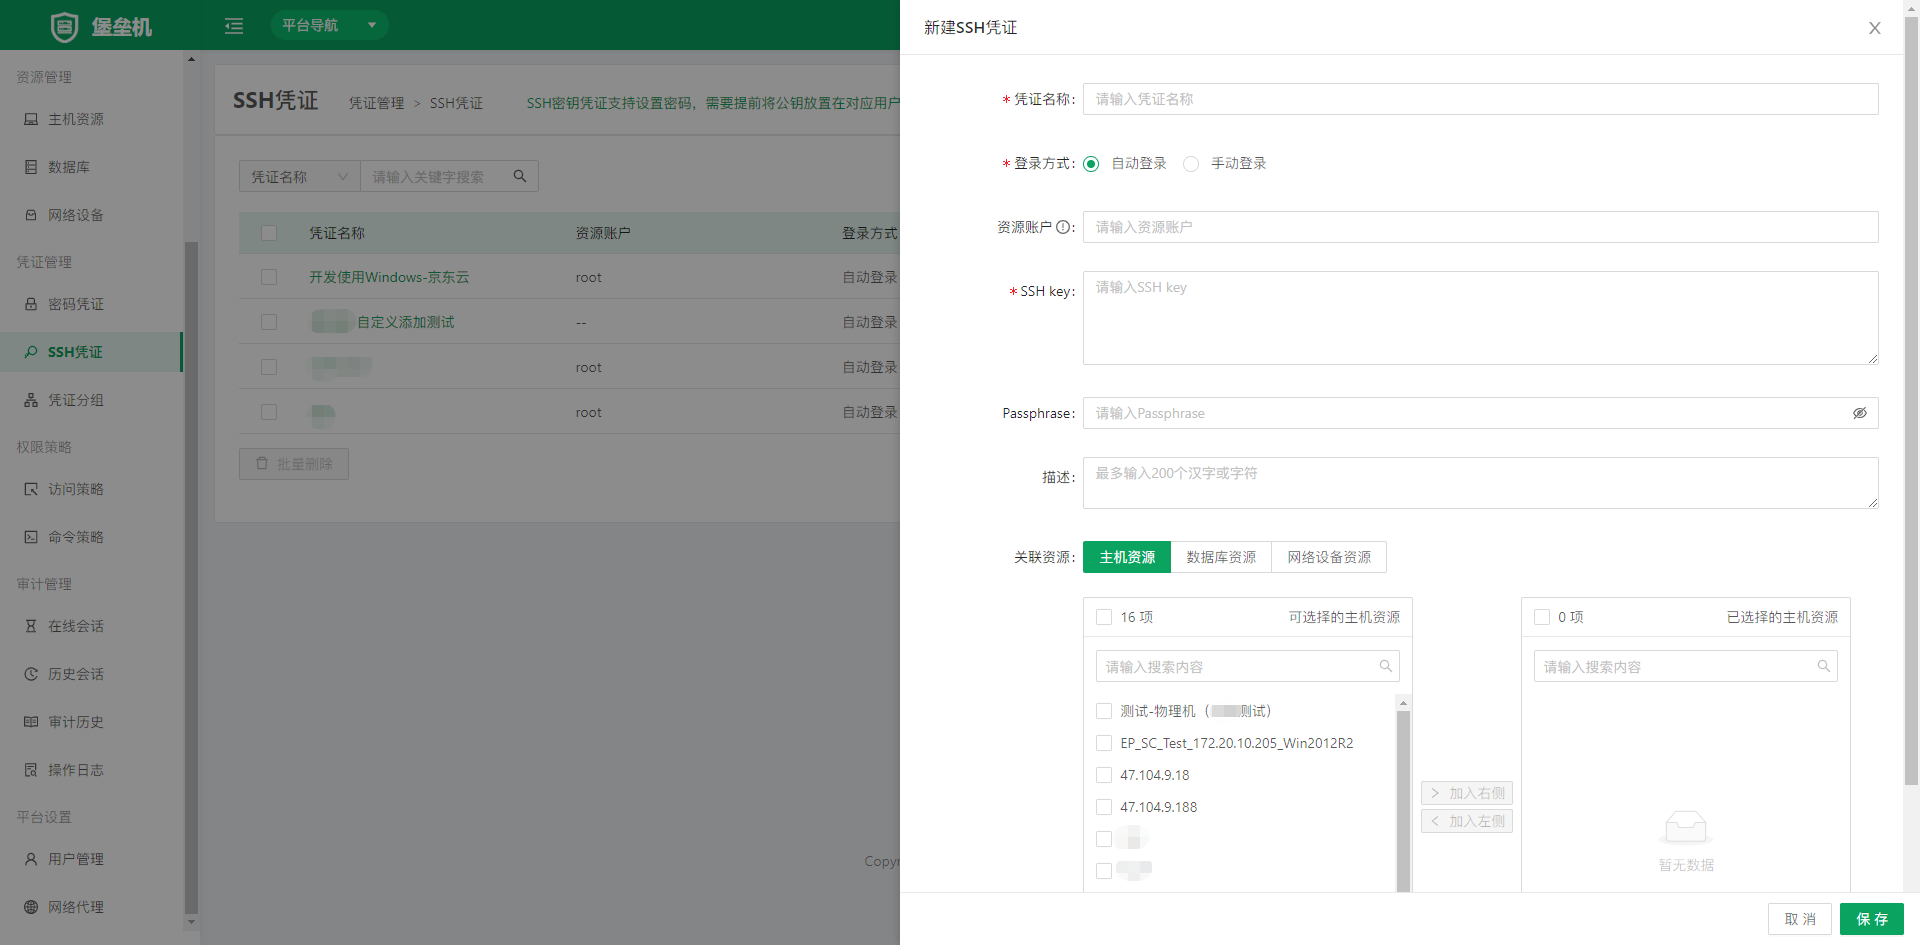
Associated resources can be host resources, database resources, and network device resources.
2.3 Credential Groups
After credentials are grouped, the group can be directly associated with access policies and command policies, which suits scenarios where multiple accounts are associated at the same time.
- Create credential group: fill in the fields on the page to complete the operation.
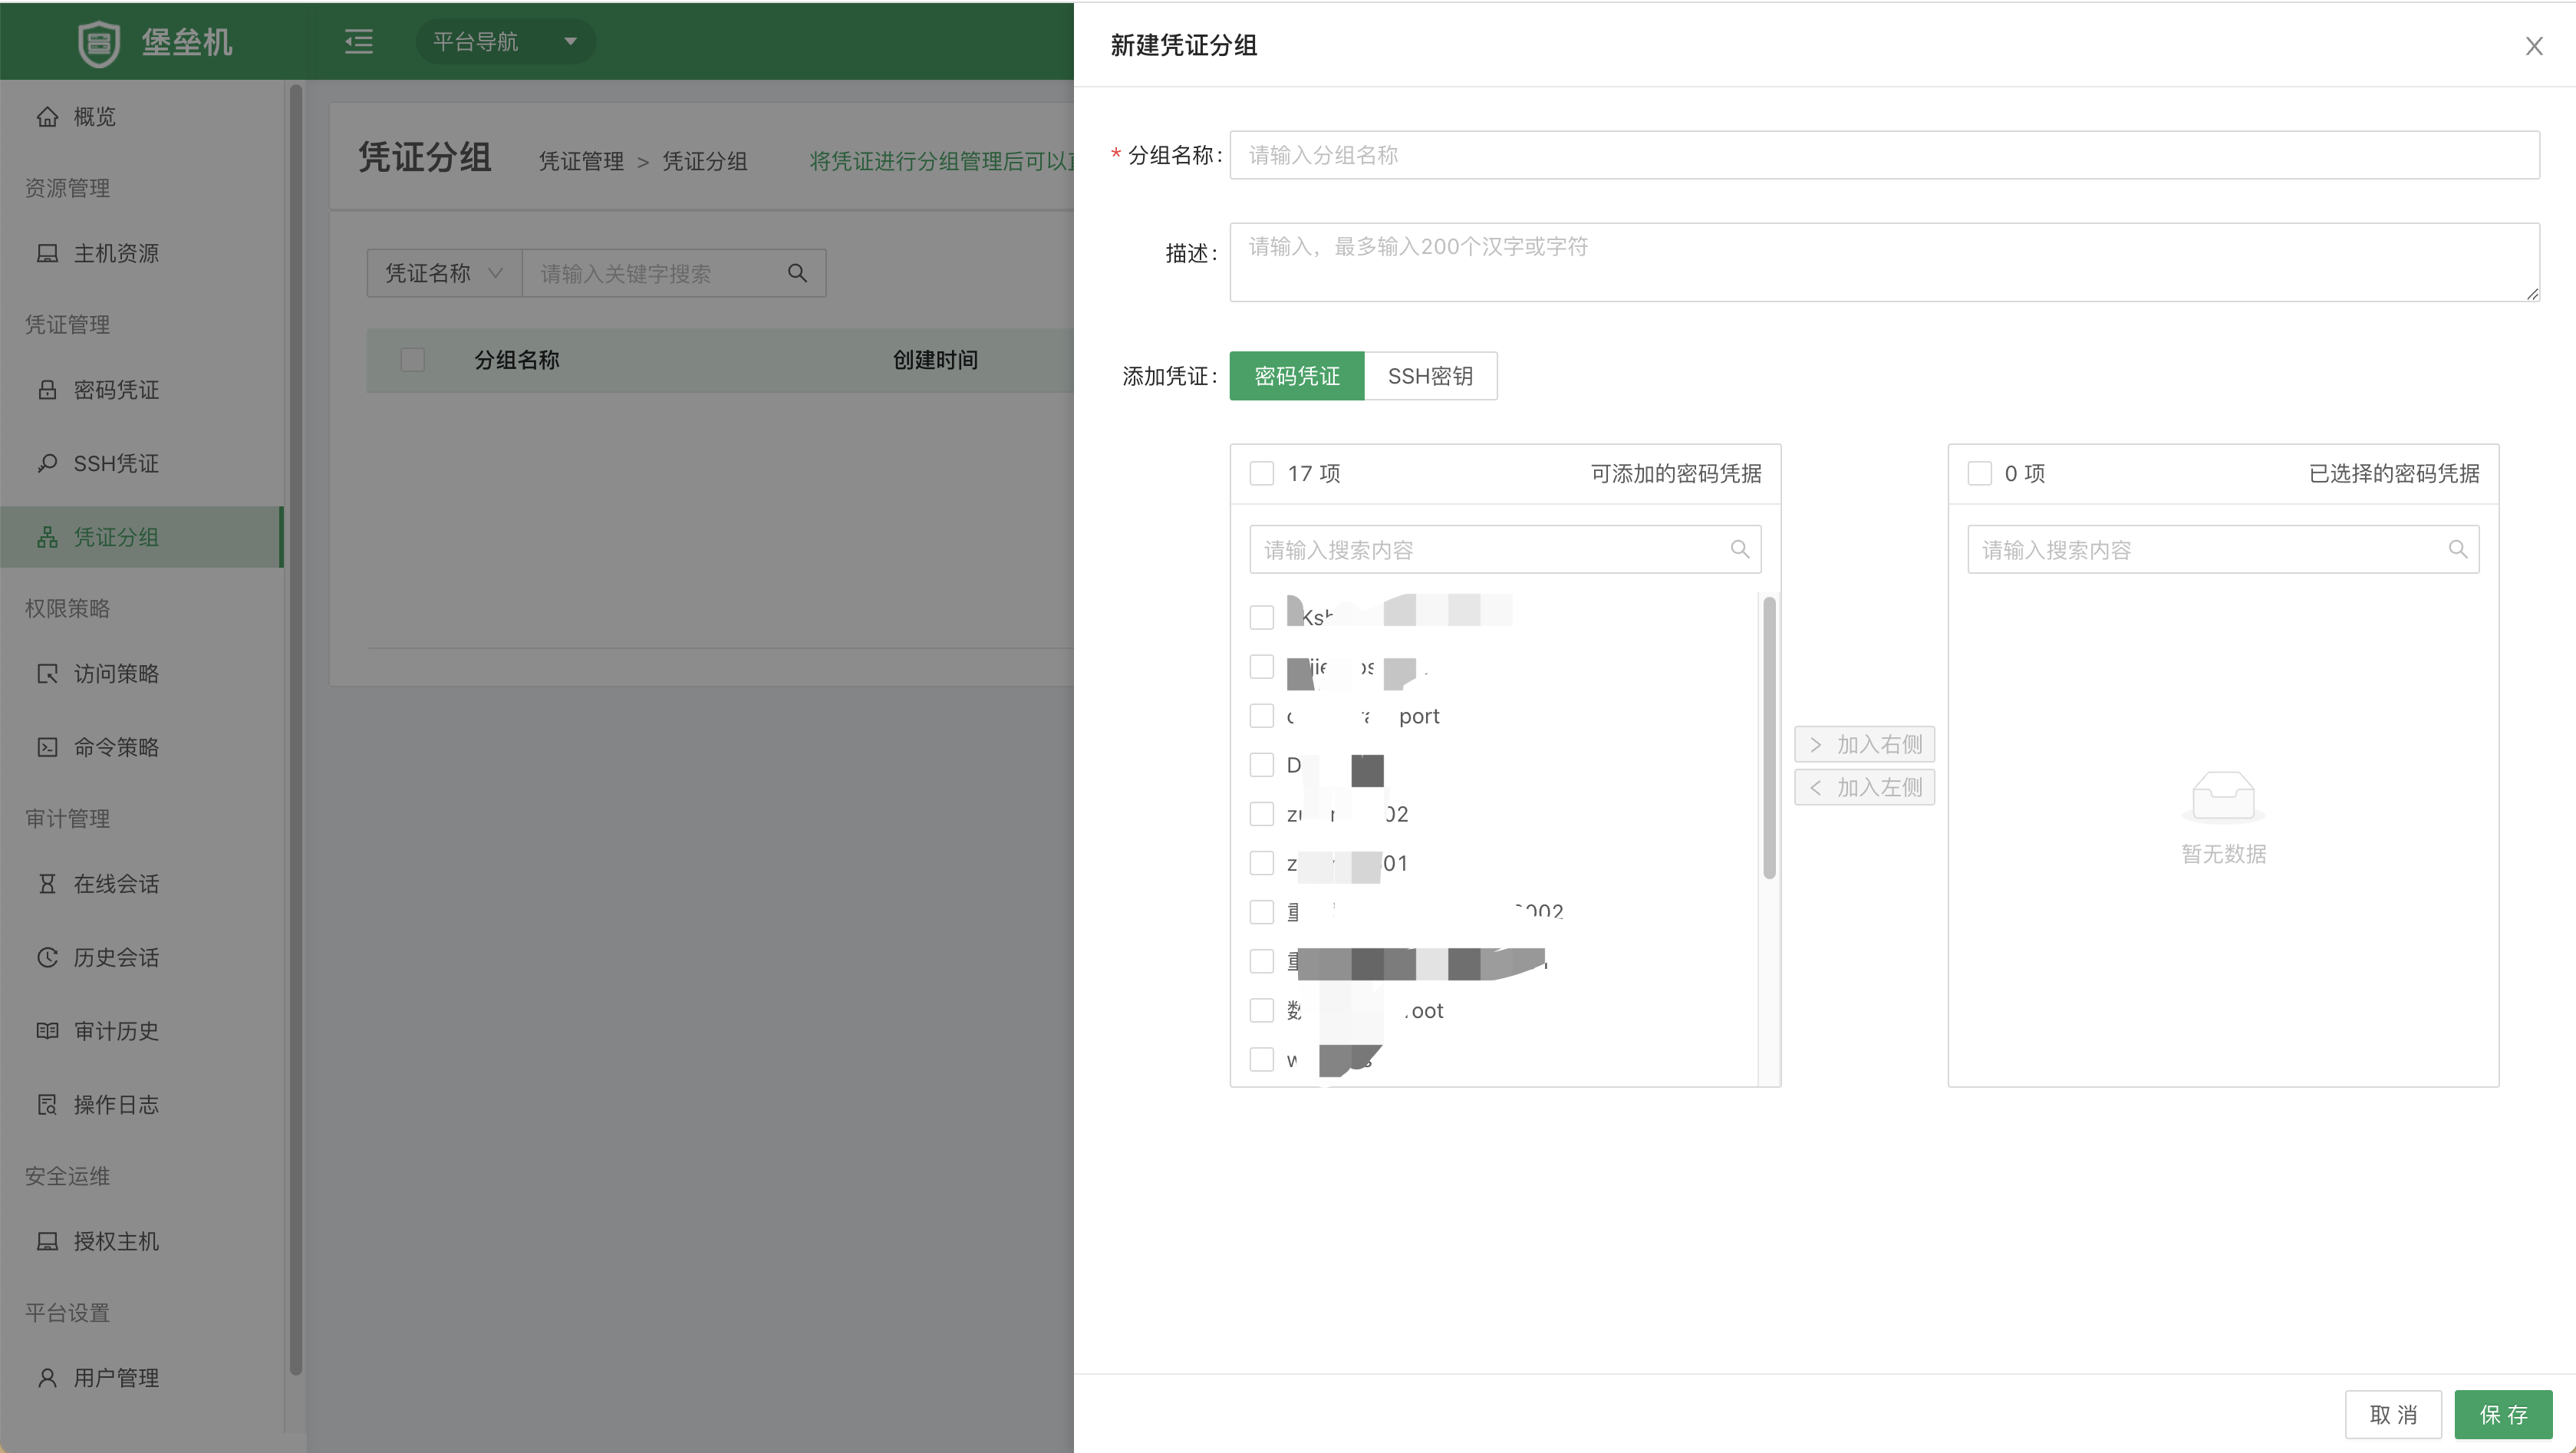
Adding credentials supports both password credentials and SSH key credentials.
3. Permission Policies
3.1 Access Policies
Access control policies are used to control users' permissions to access resources. Policies provide basic restriction and authorization capabilities, including validity period, login time period restrictions, user IP restrictions, file transfer permissions, file management permissions, and RDP clipboard. You can also associate user groups or account groups to grant access control permissions in batches.
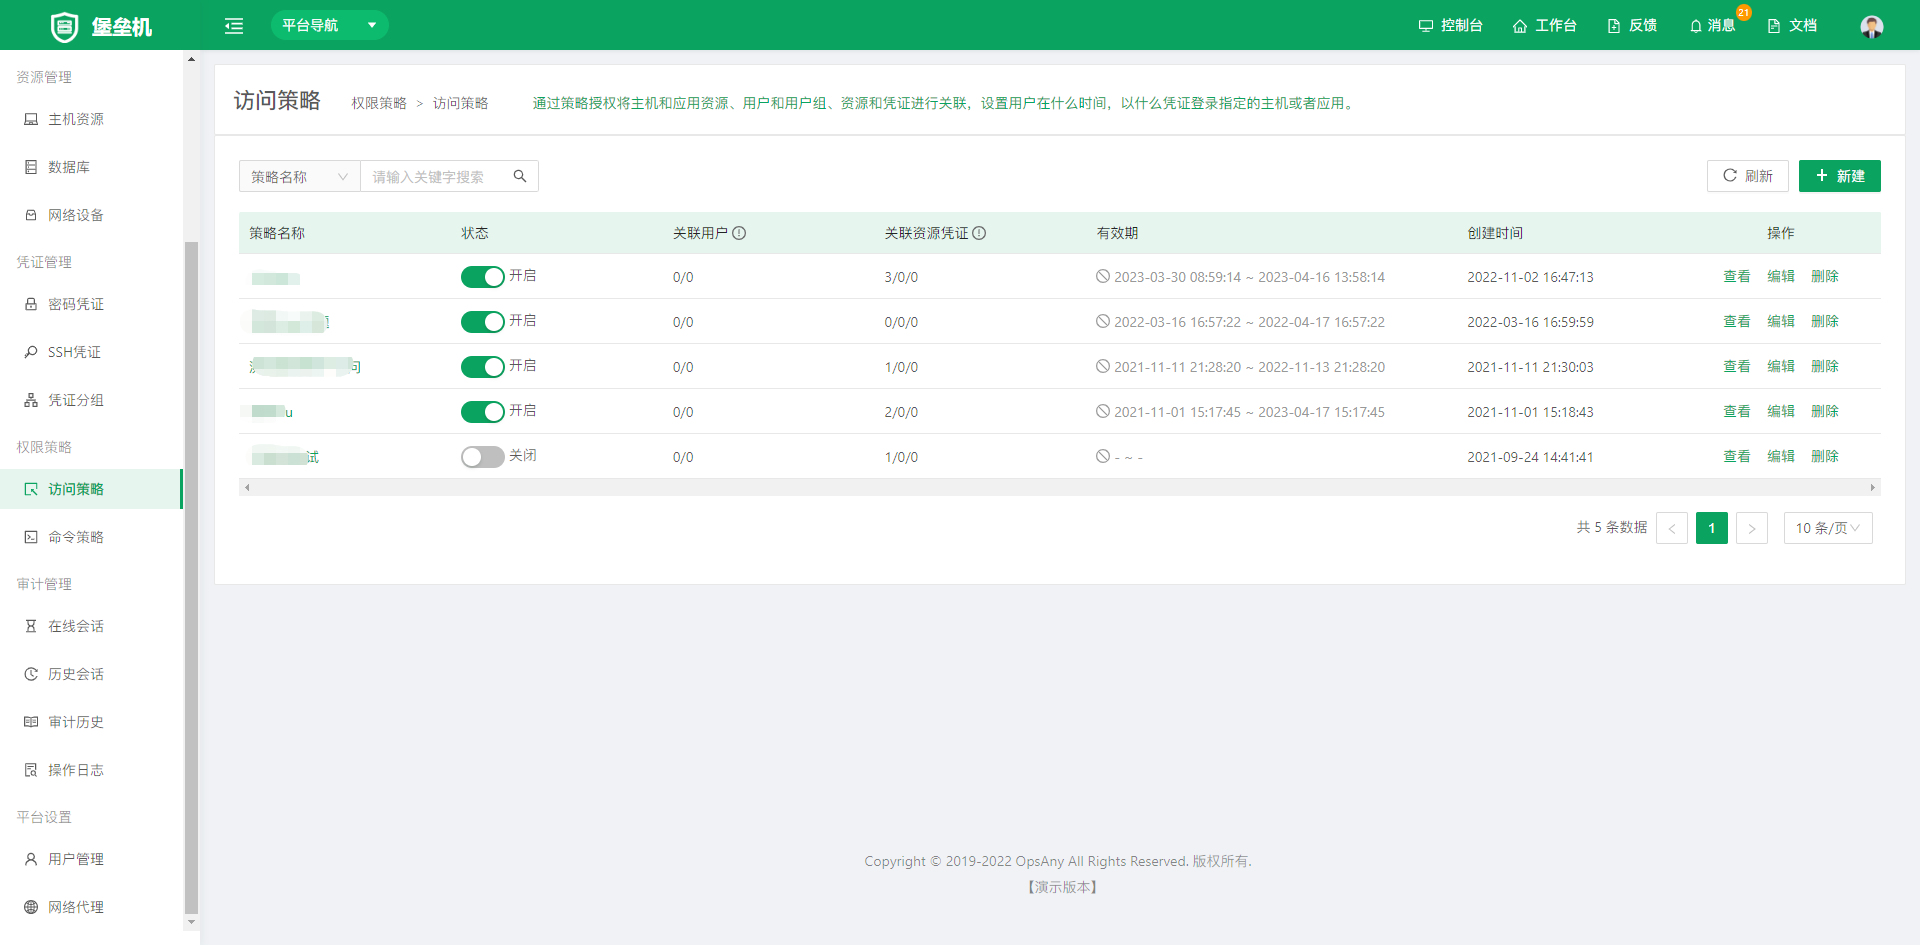
Create an Access Policy
Step 1: Configure basic information
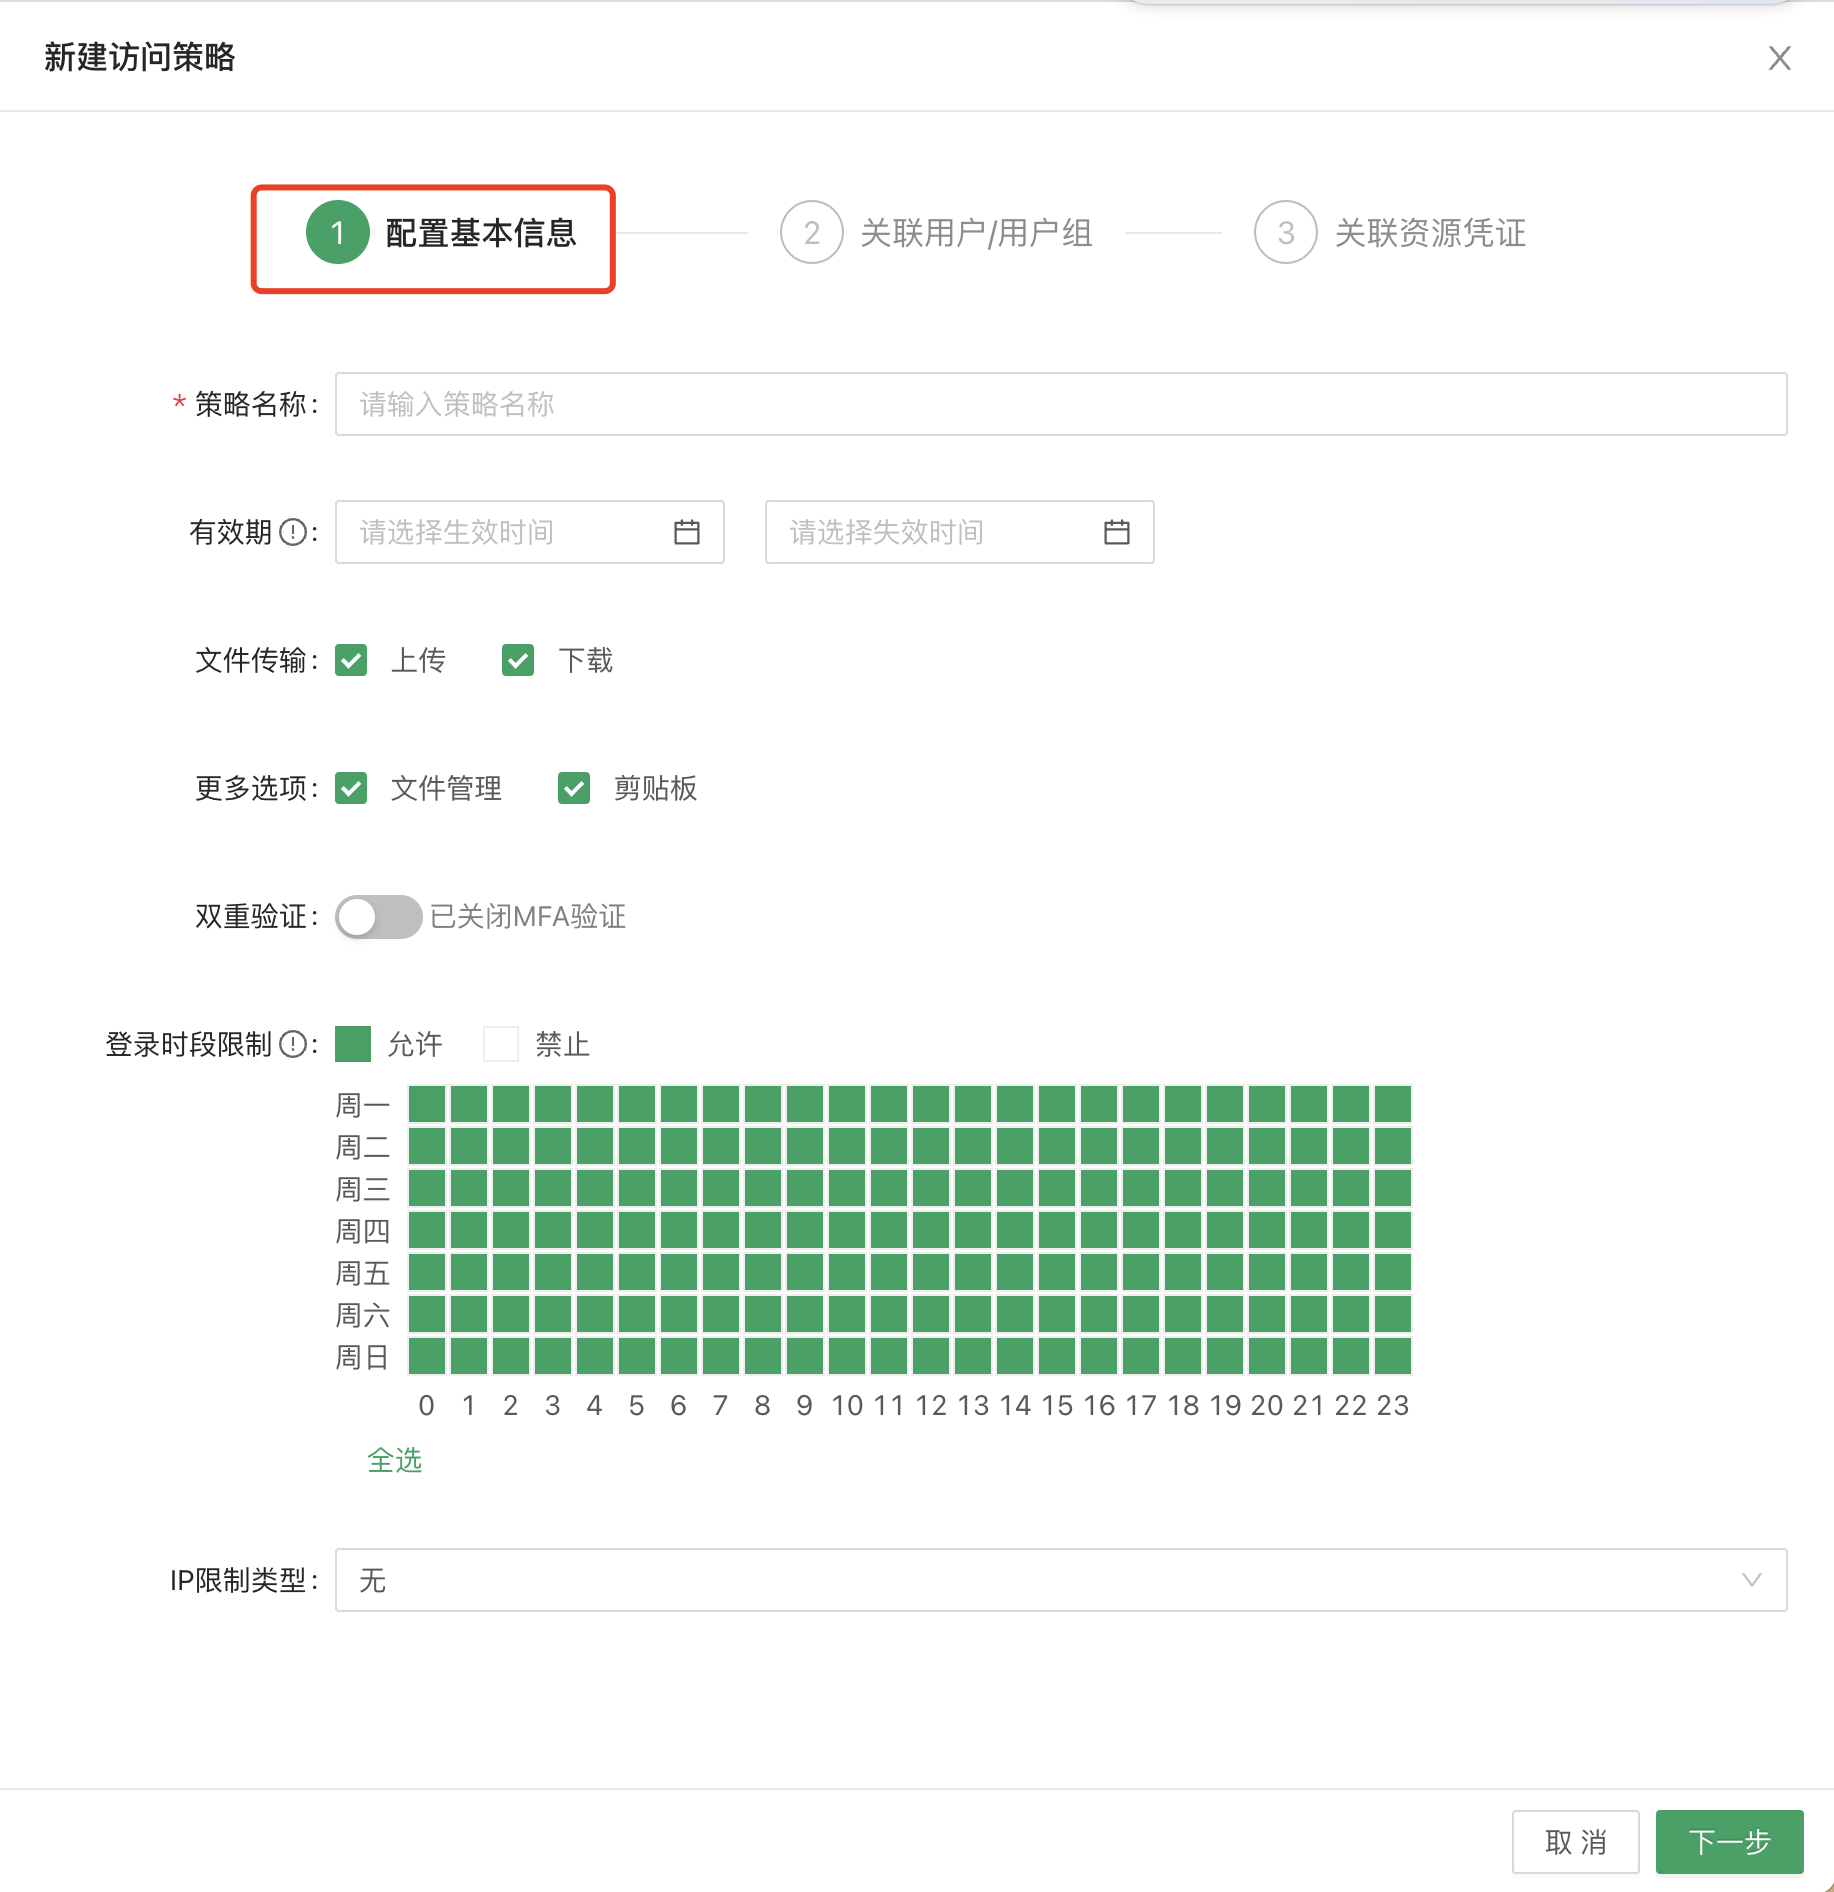
- Validity period: the period during which the policy is valid; it takes effect only within the specified time.
- Login time period restriction: the time range in which the policy can be used.
- IP restriction: restricts users with specified source IP addresses from accessing resources under this policy.
- File transfer: allows or denies file transfer, that is, the permission to upload or download resource files.
Step 2: Configure associated users/user groups
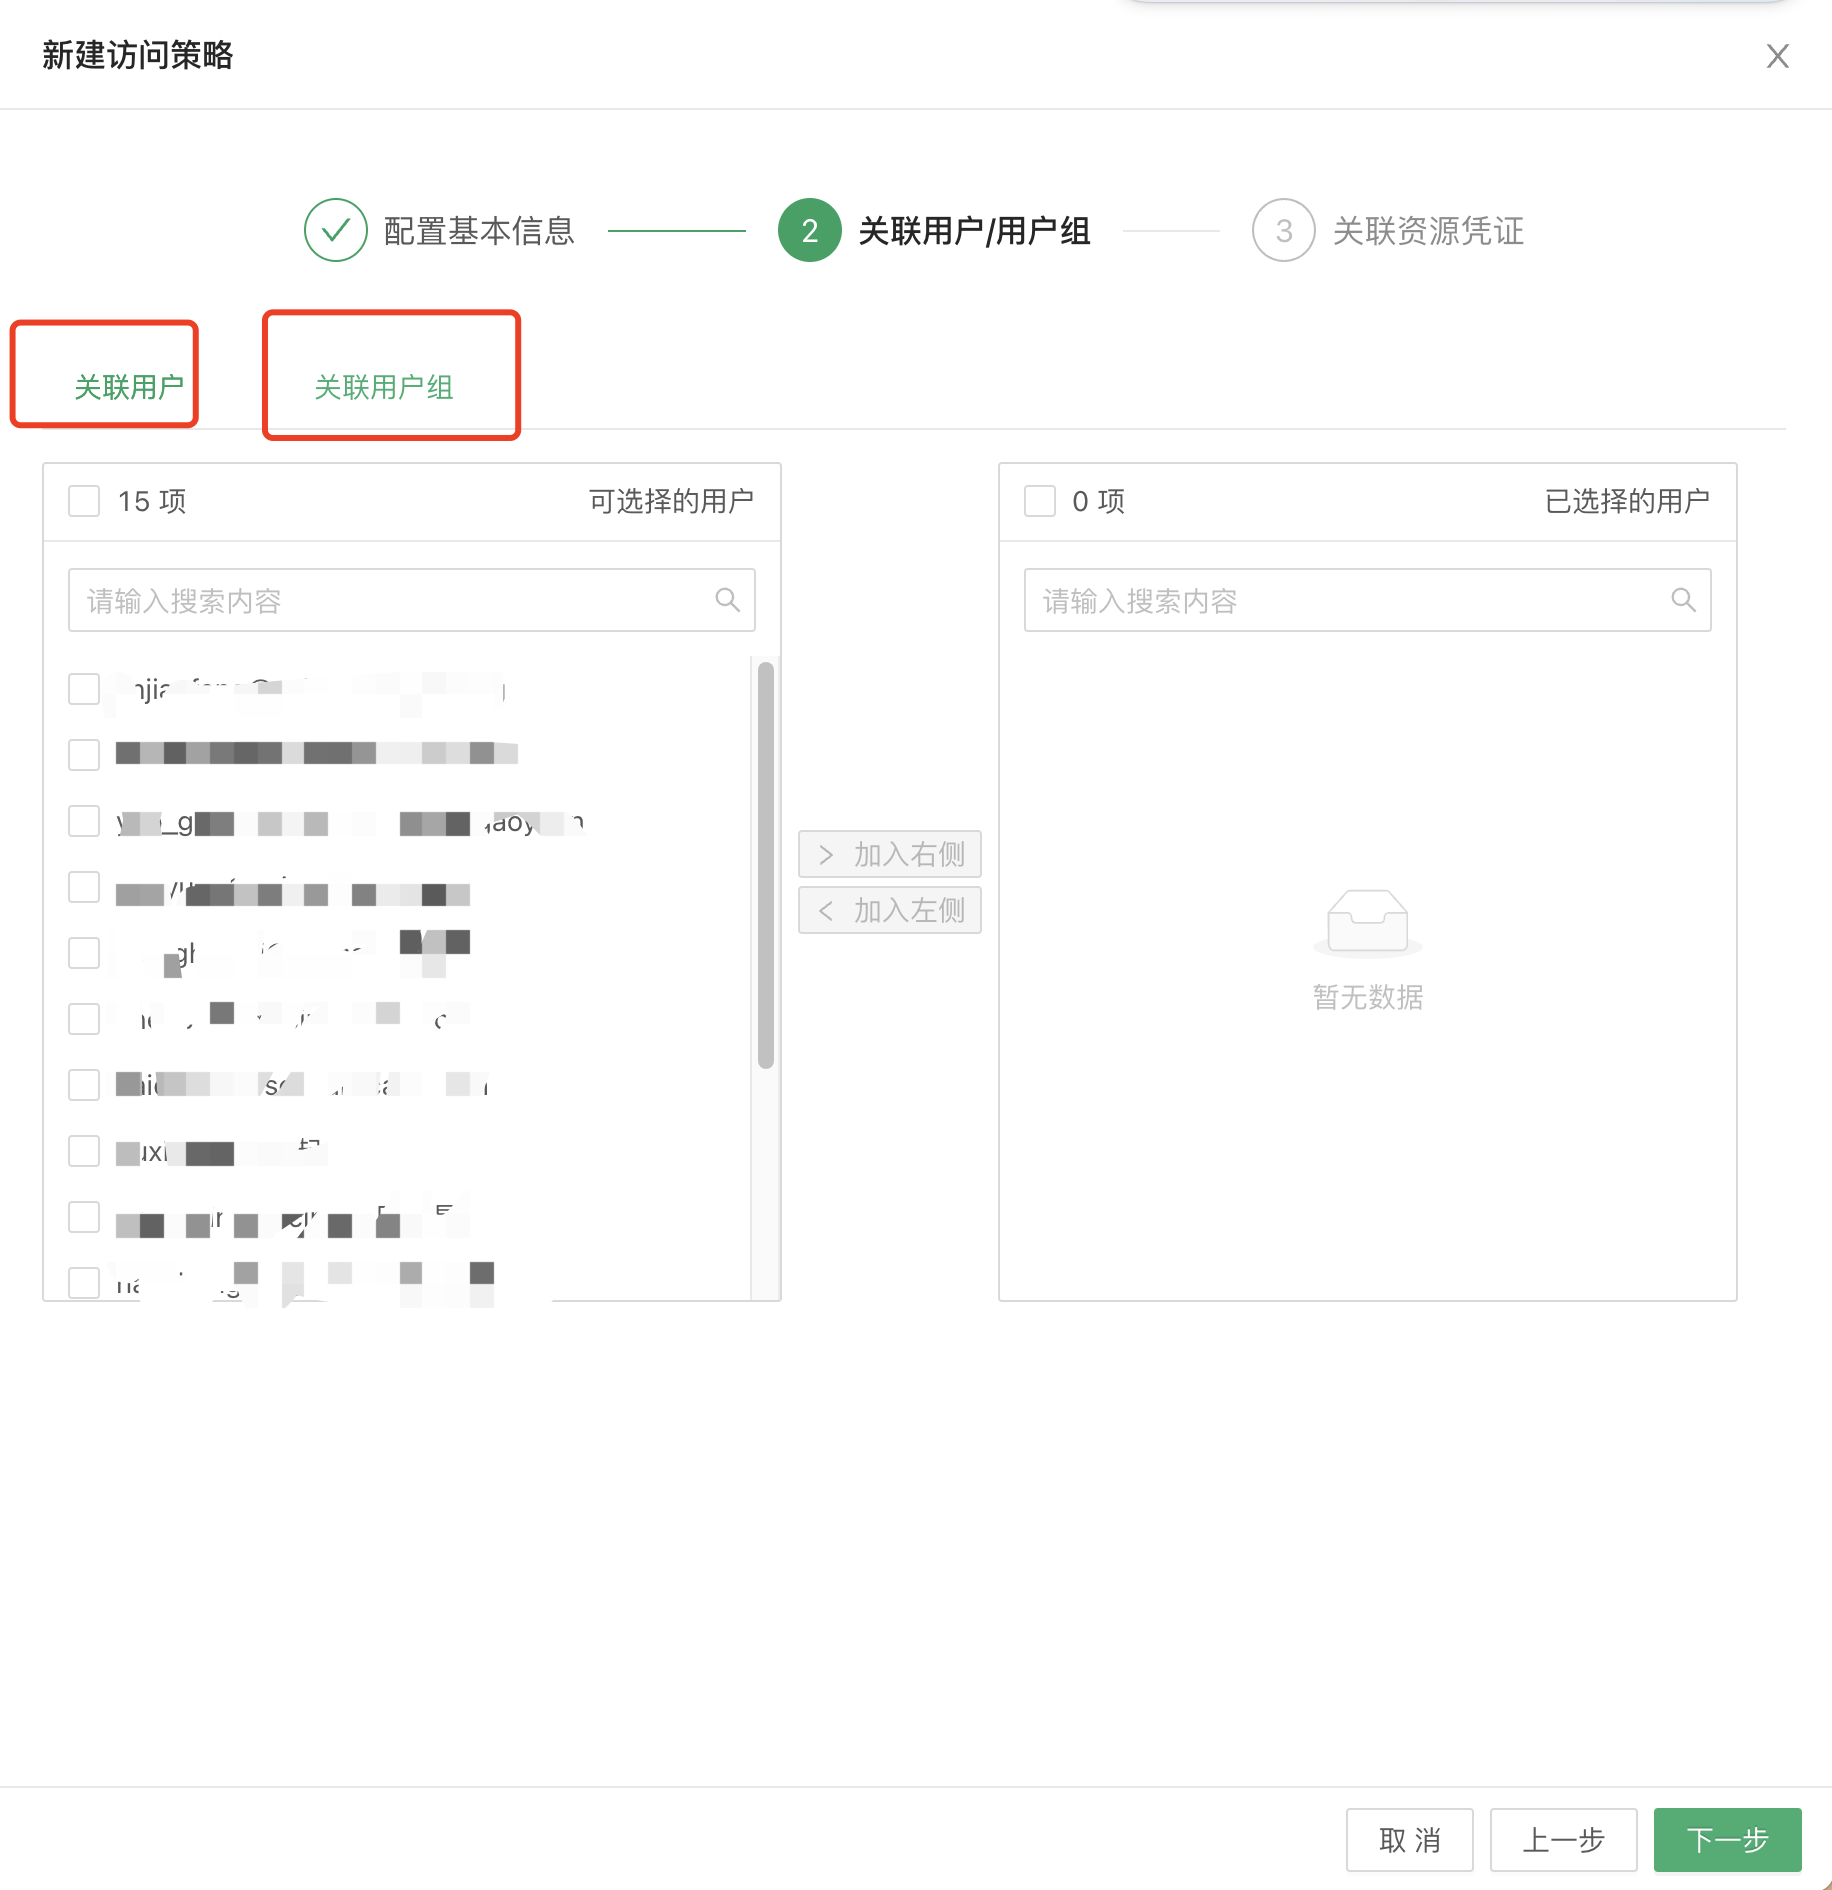
Step 3: Configure associated resource credentials
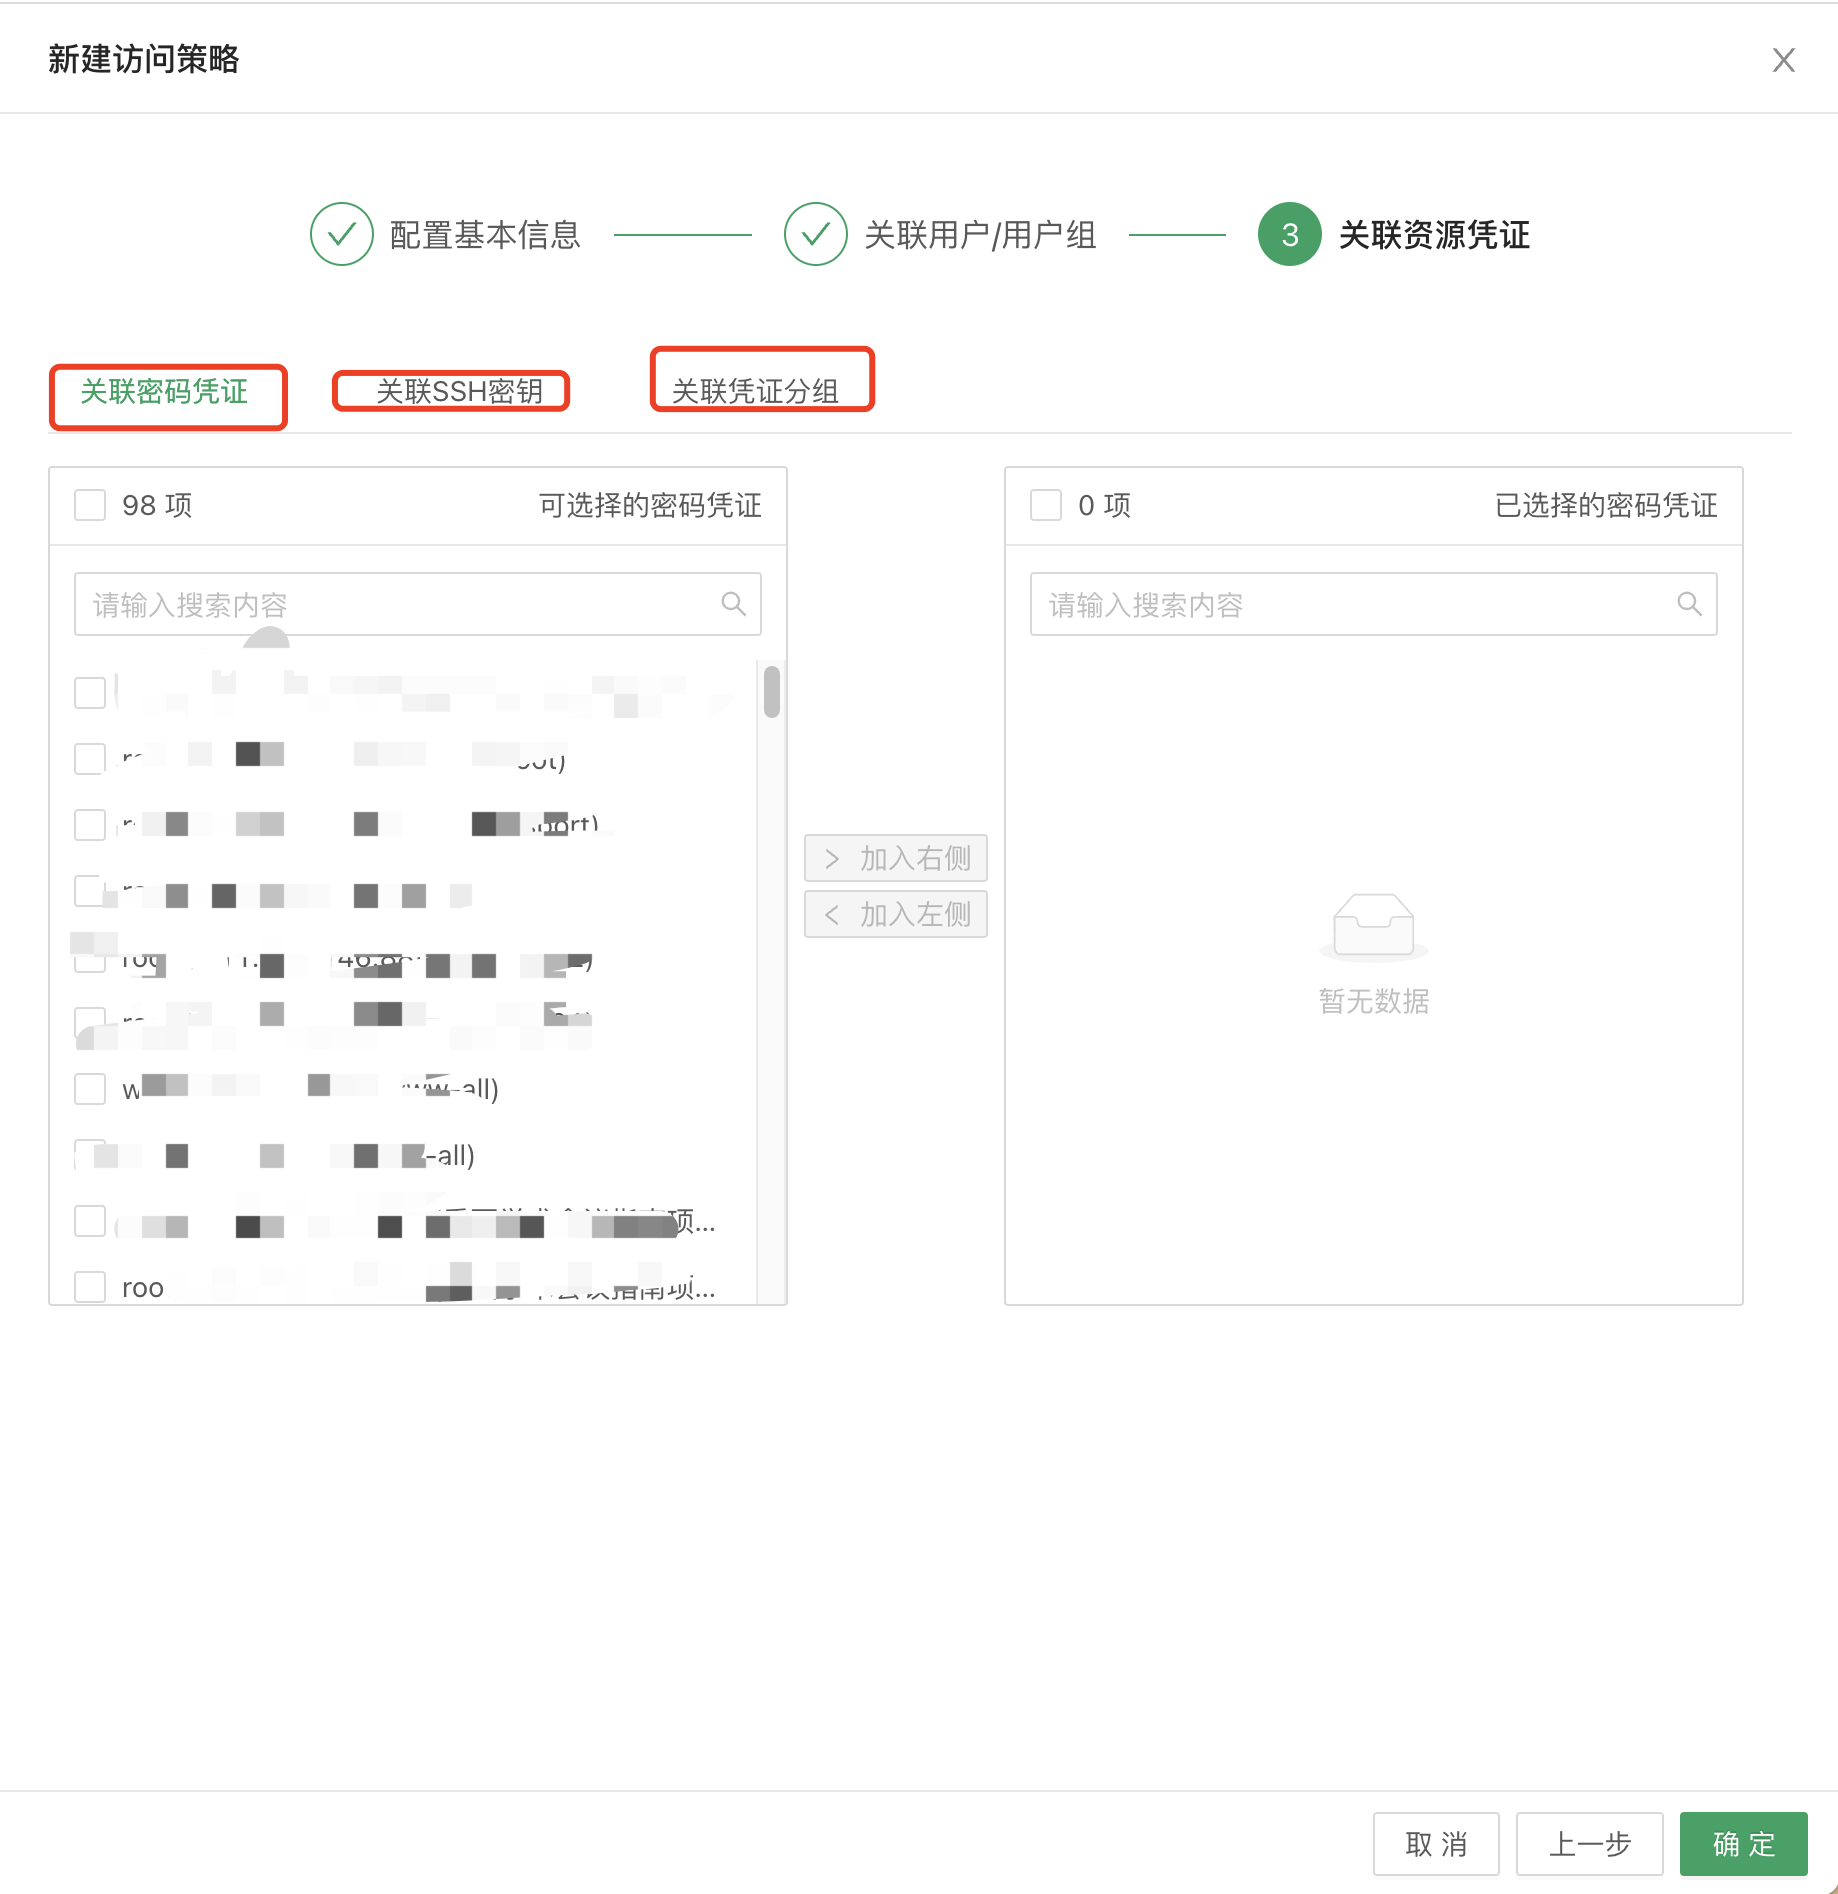
When creating an access policy, pay attention to the access time settings to avoid policy validation failures.
3.2 Command Policies
Command control policies are used to control users' permissions for critical operations on resources, enabling fine-grained control of O&M operations on Linux hosts.
Command control policies support the following items:
- Allow execution: when the policy rule is triggered, the command operation is allowed. All operations are allowed by default.
- Deny execution: when the policy rule is triggered, the command is denied and the interface displays "Command "xxx" has been denied".
- Validity period: the period during which the policy is valid; it takes effect only within the specified time.
Create a Command Policy
Step 1: Configure basic information
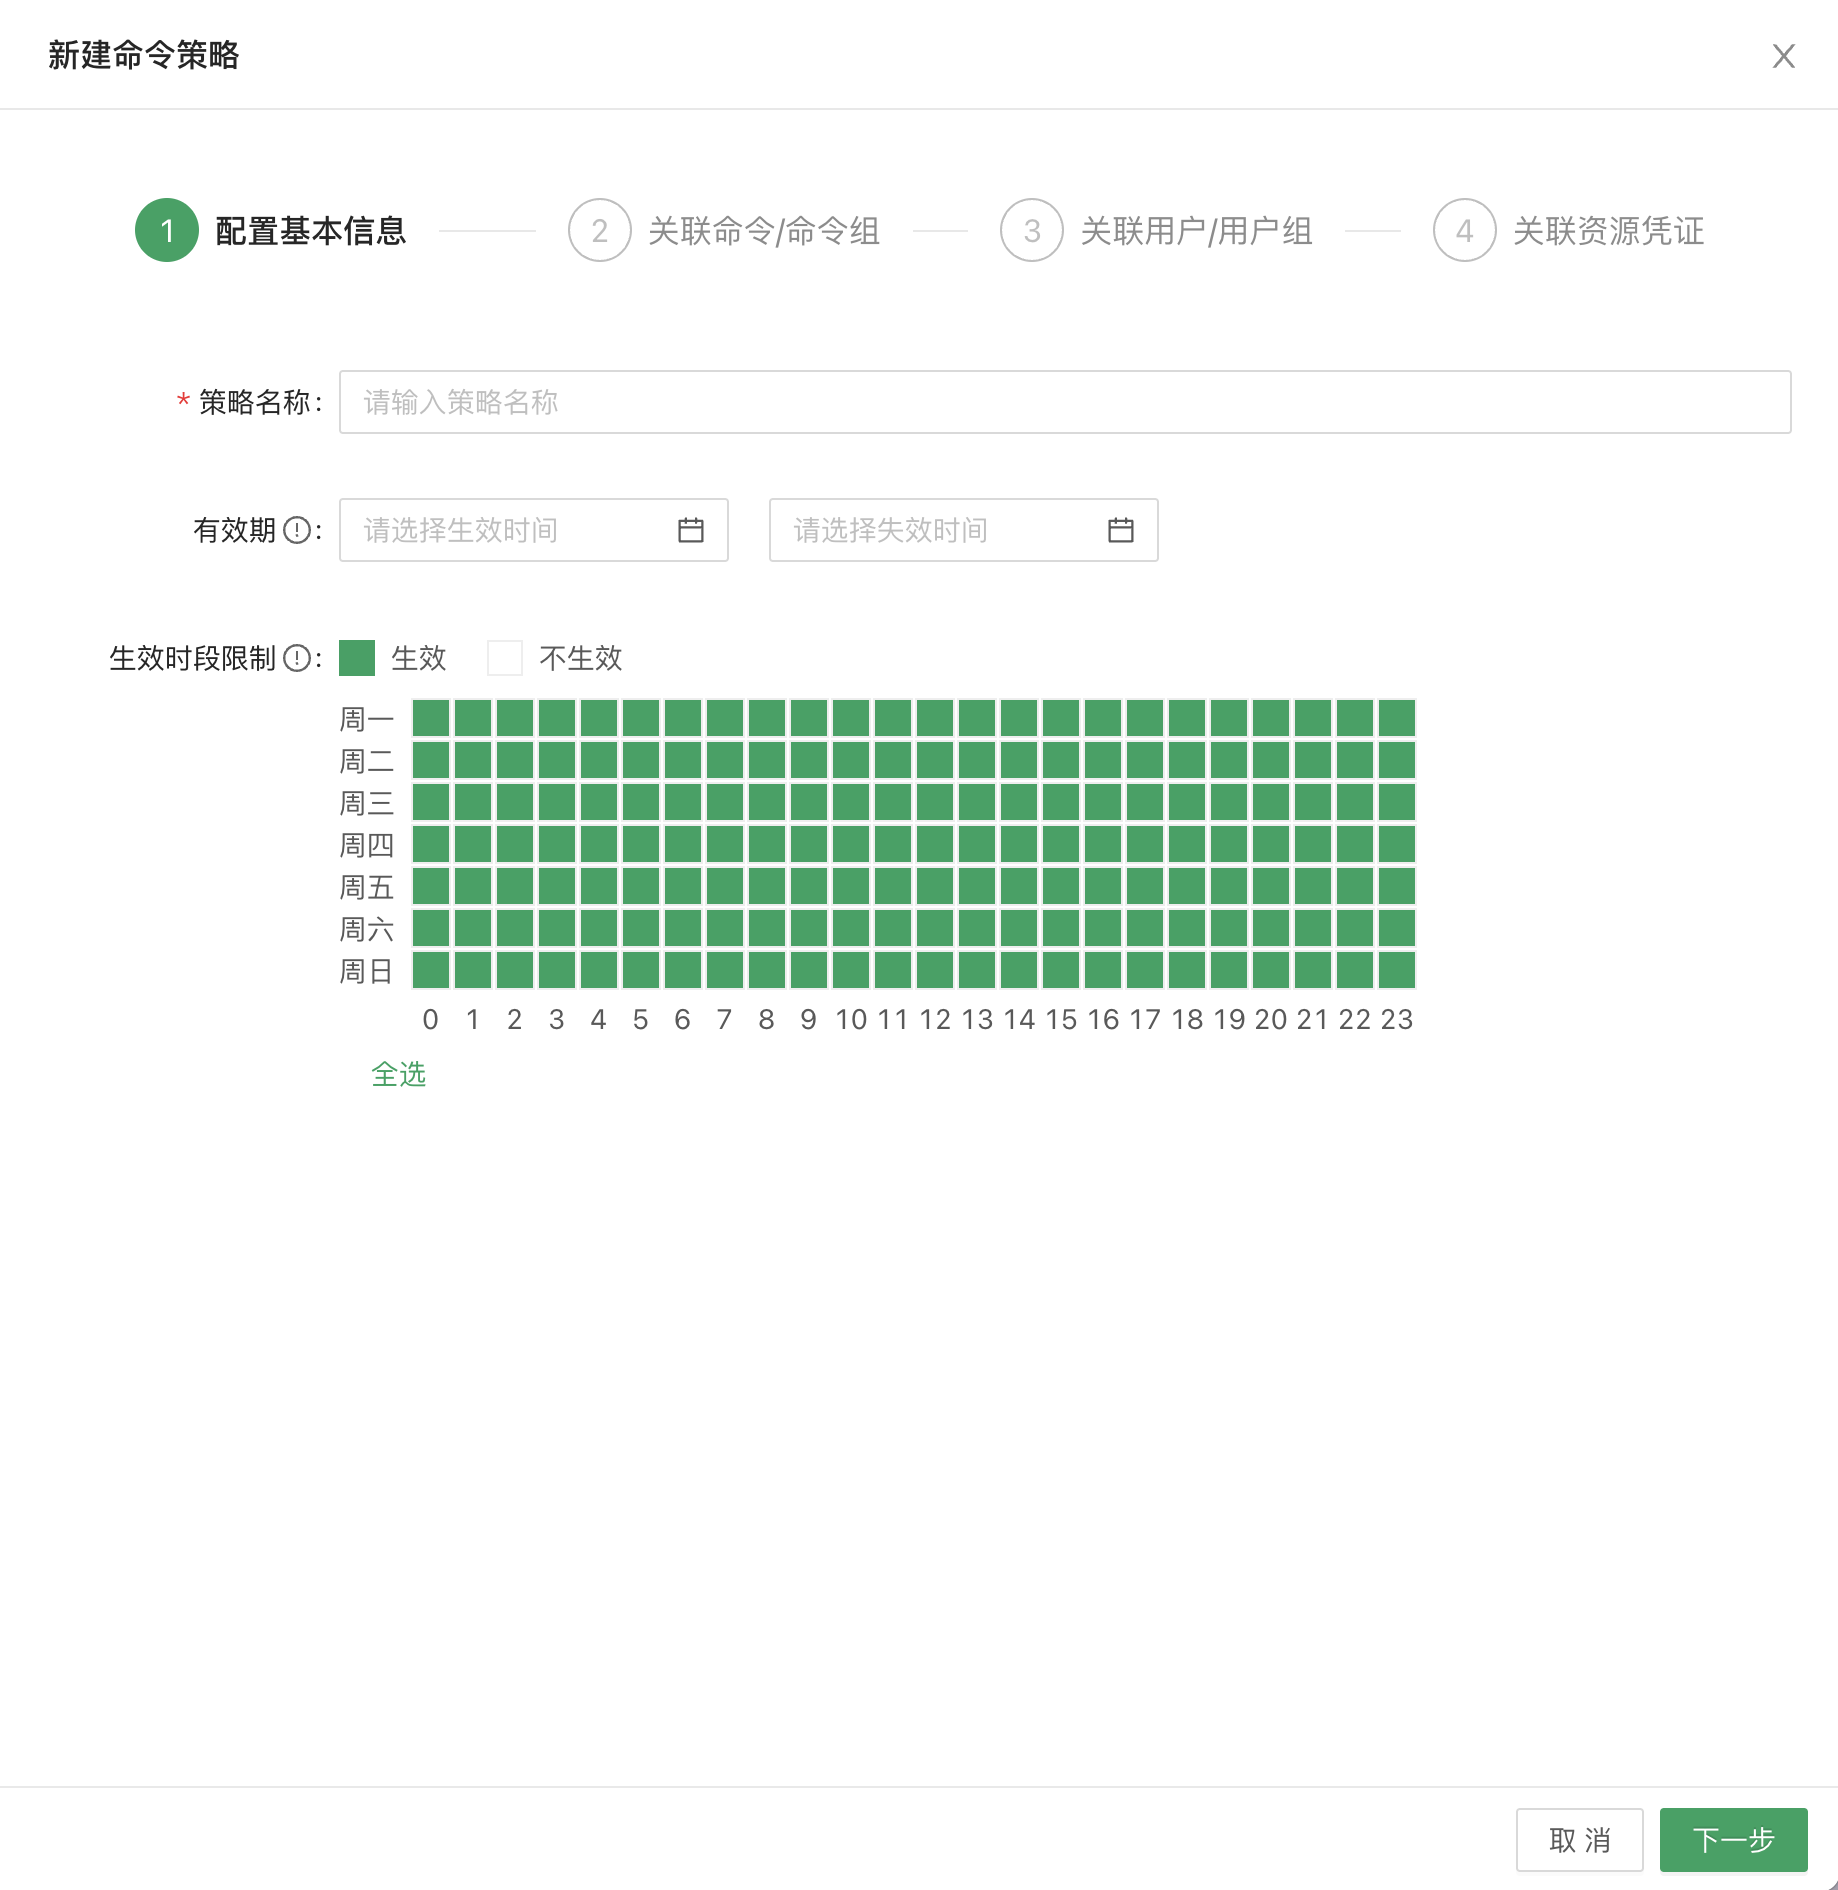
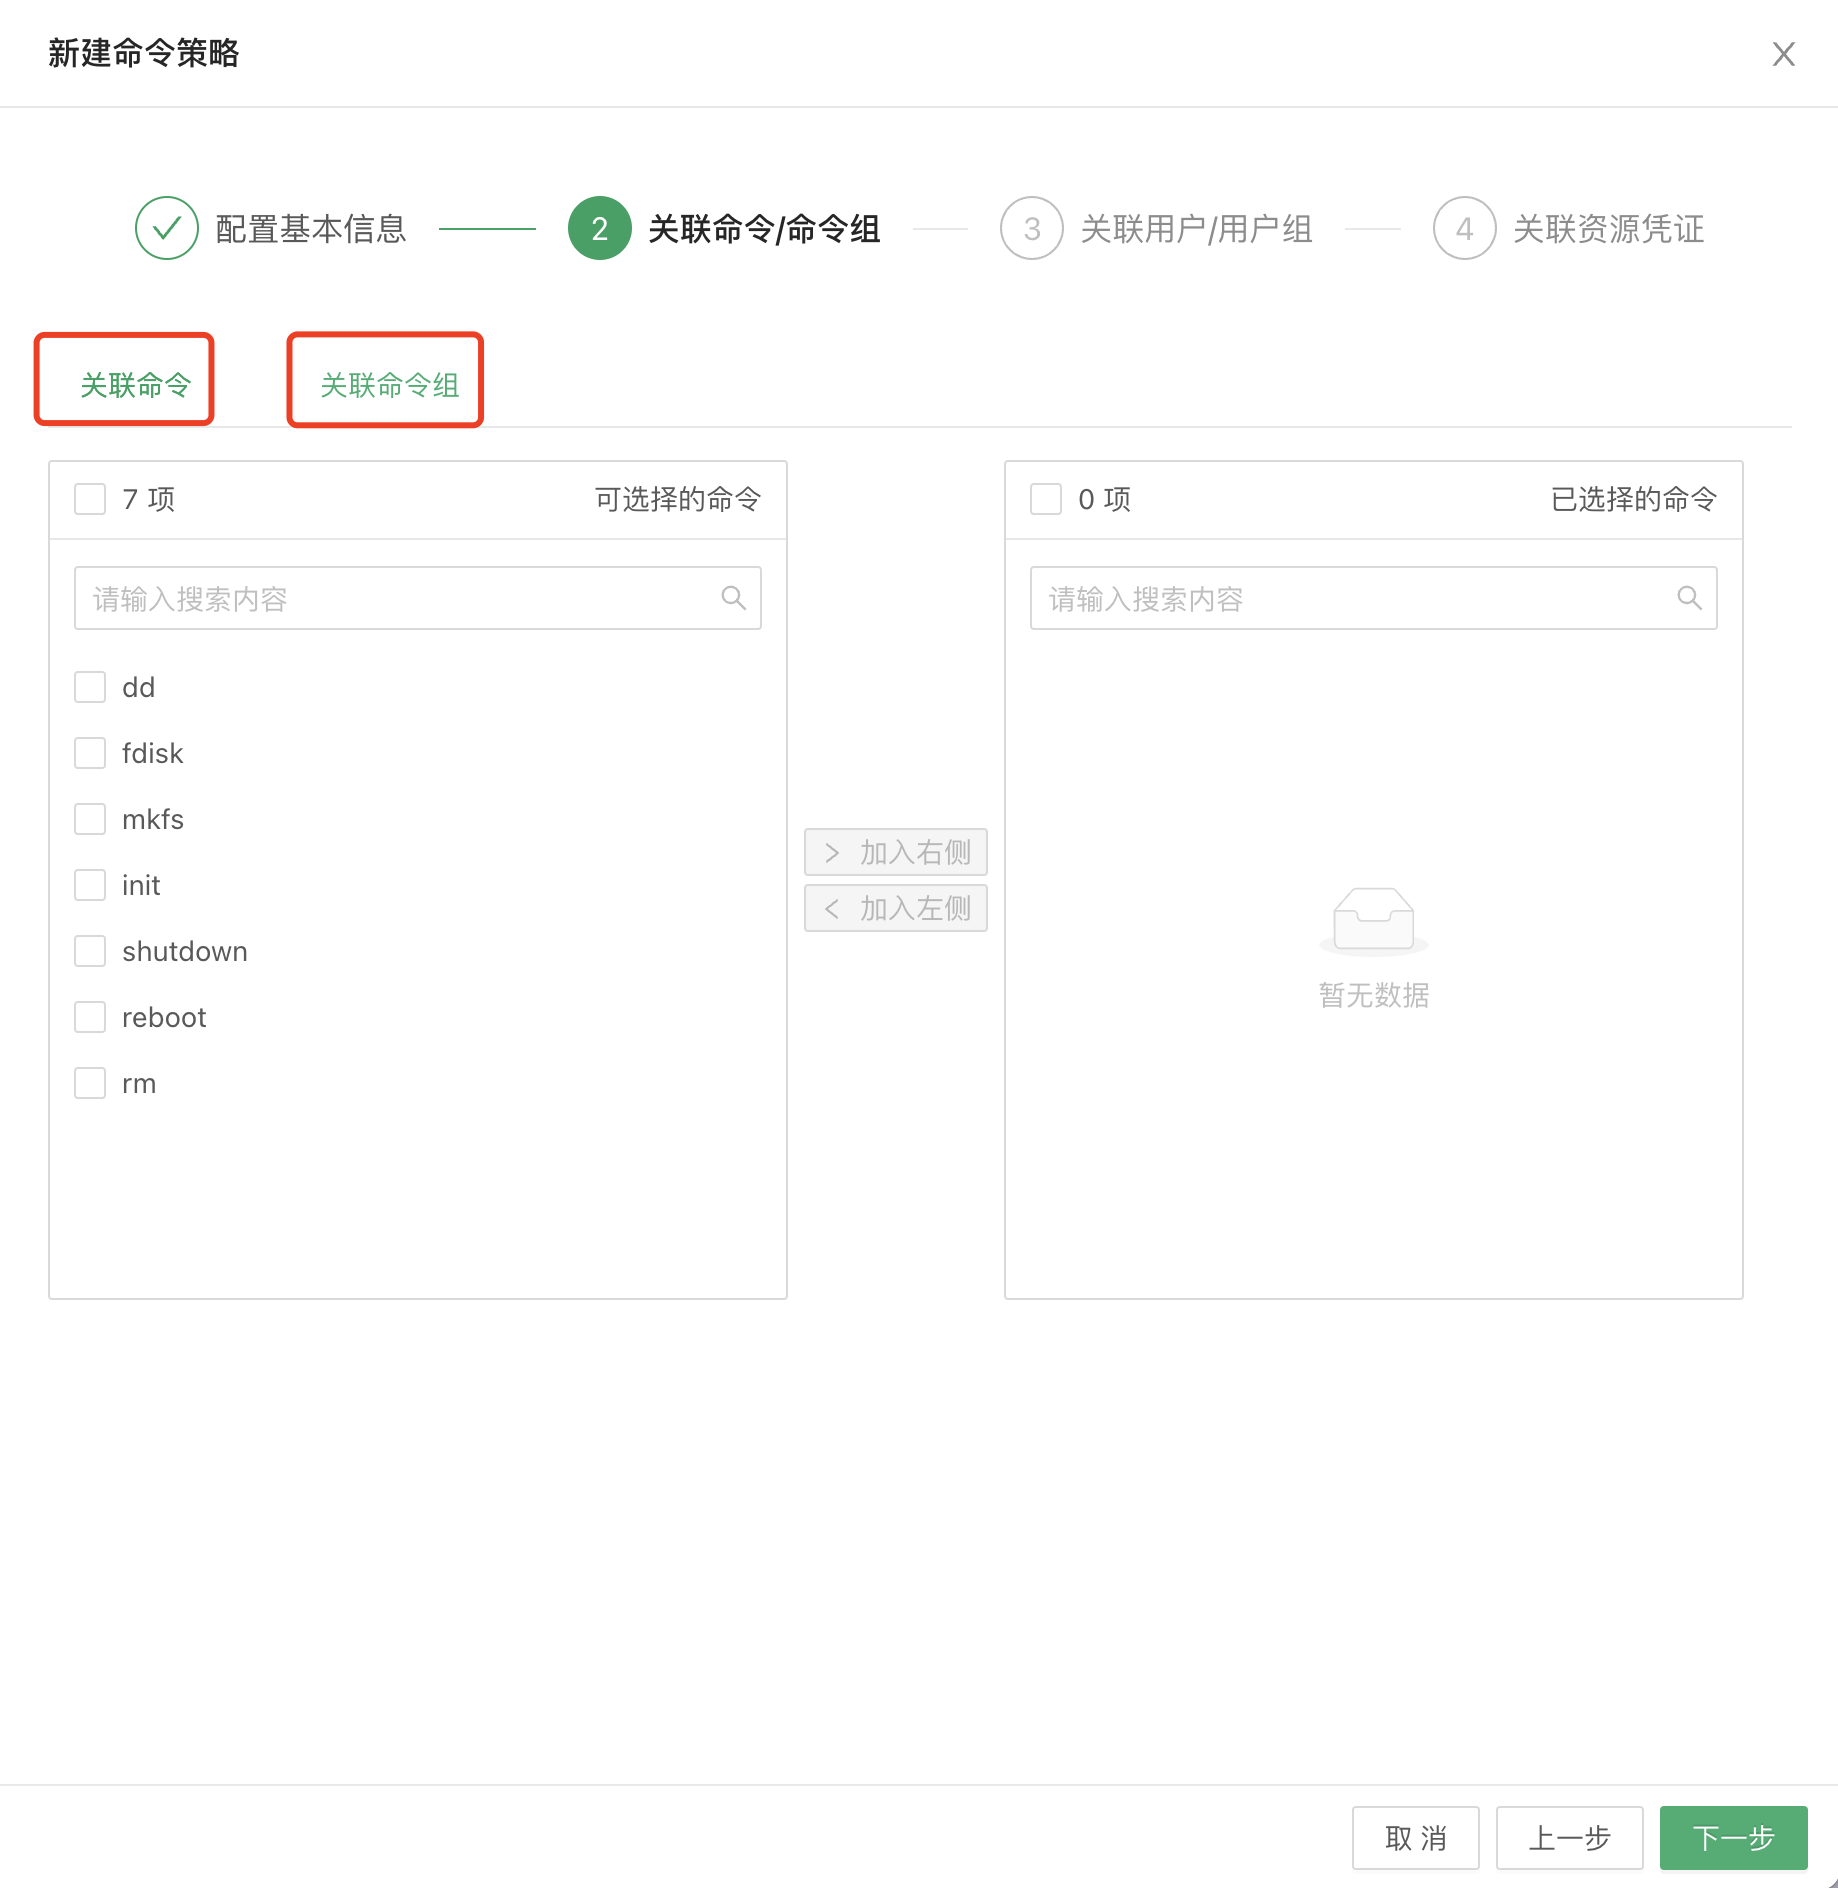
Step 2: Associate commands or command groups
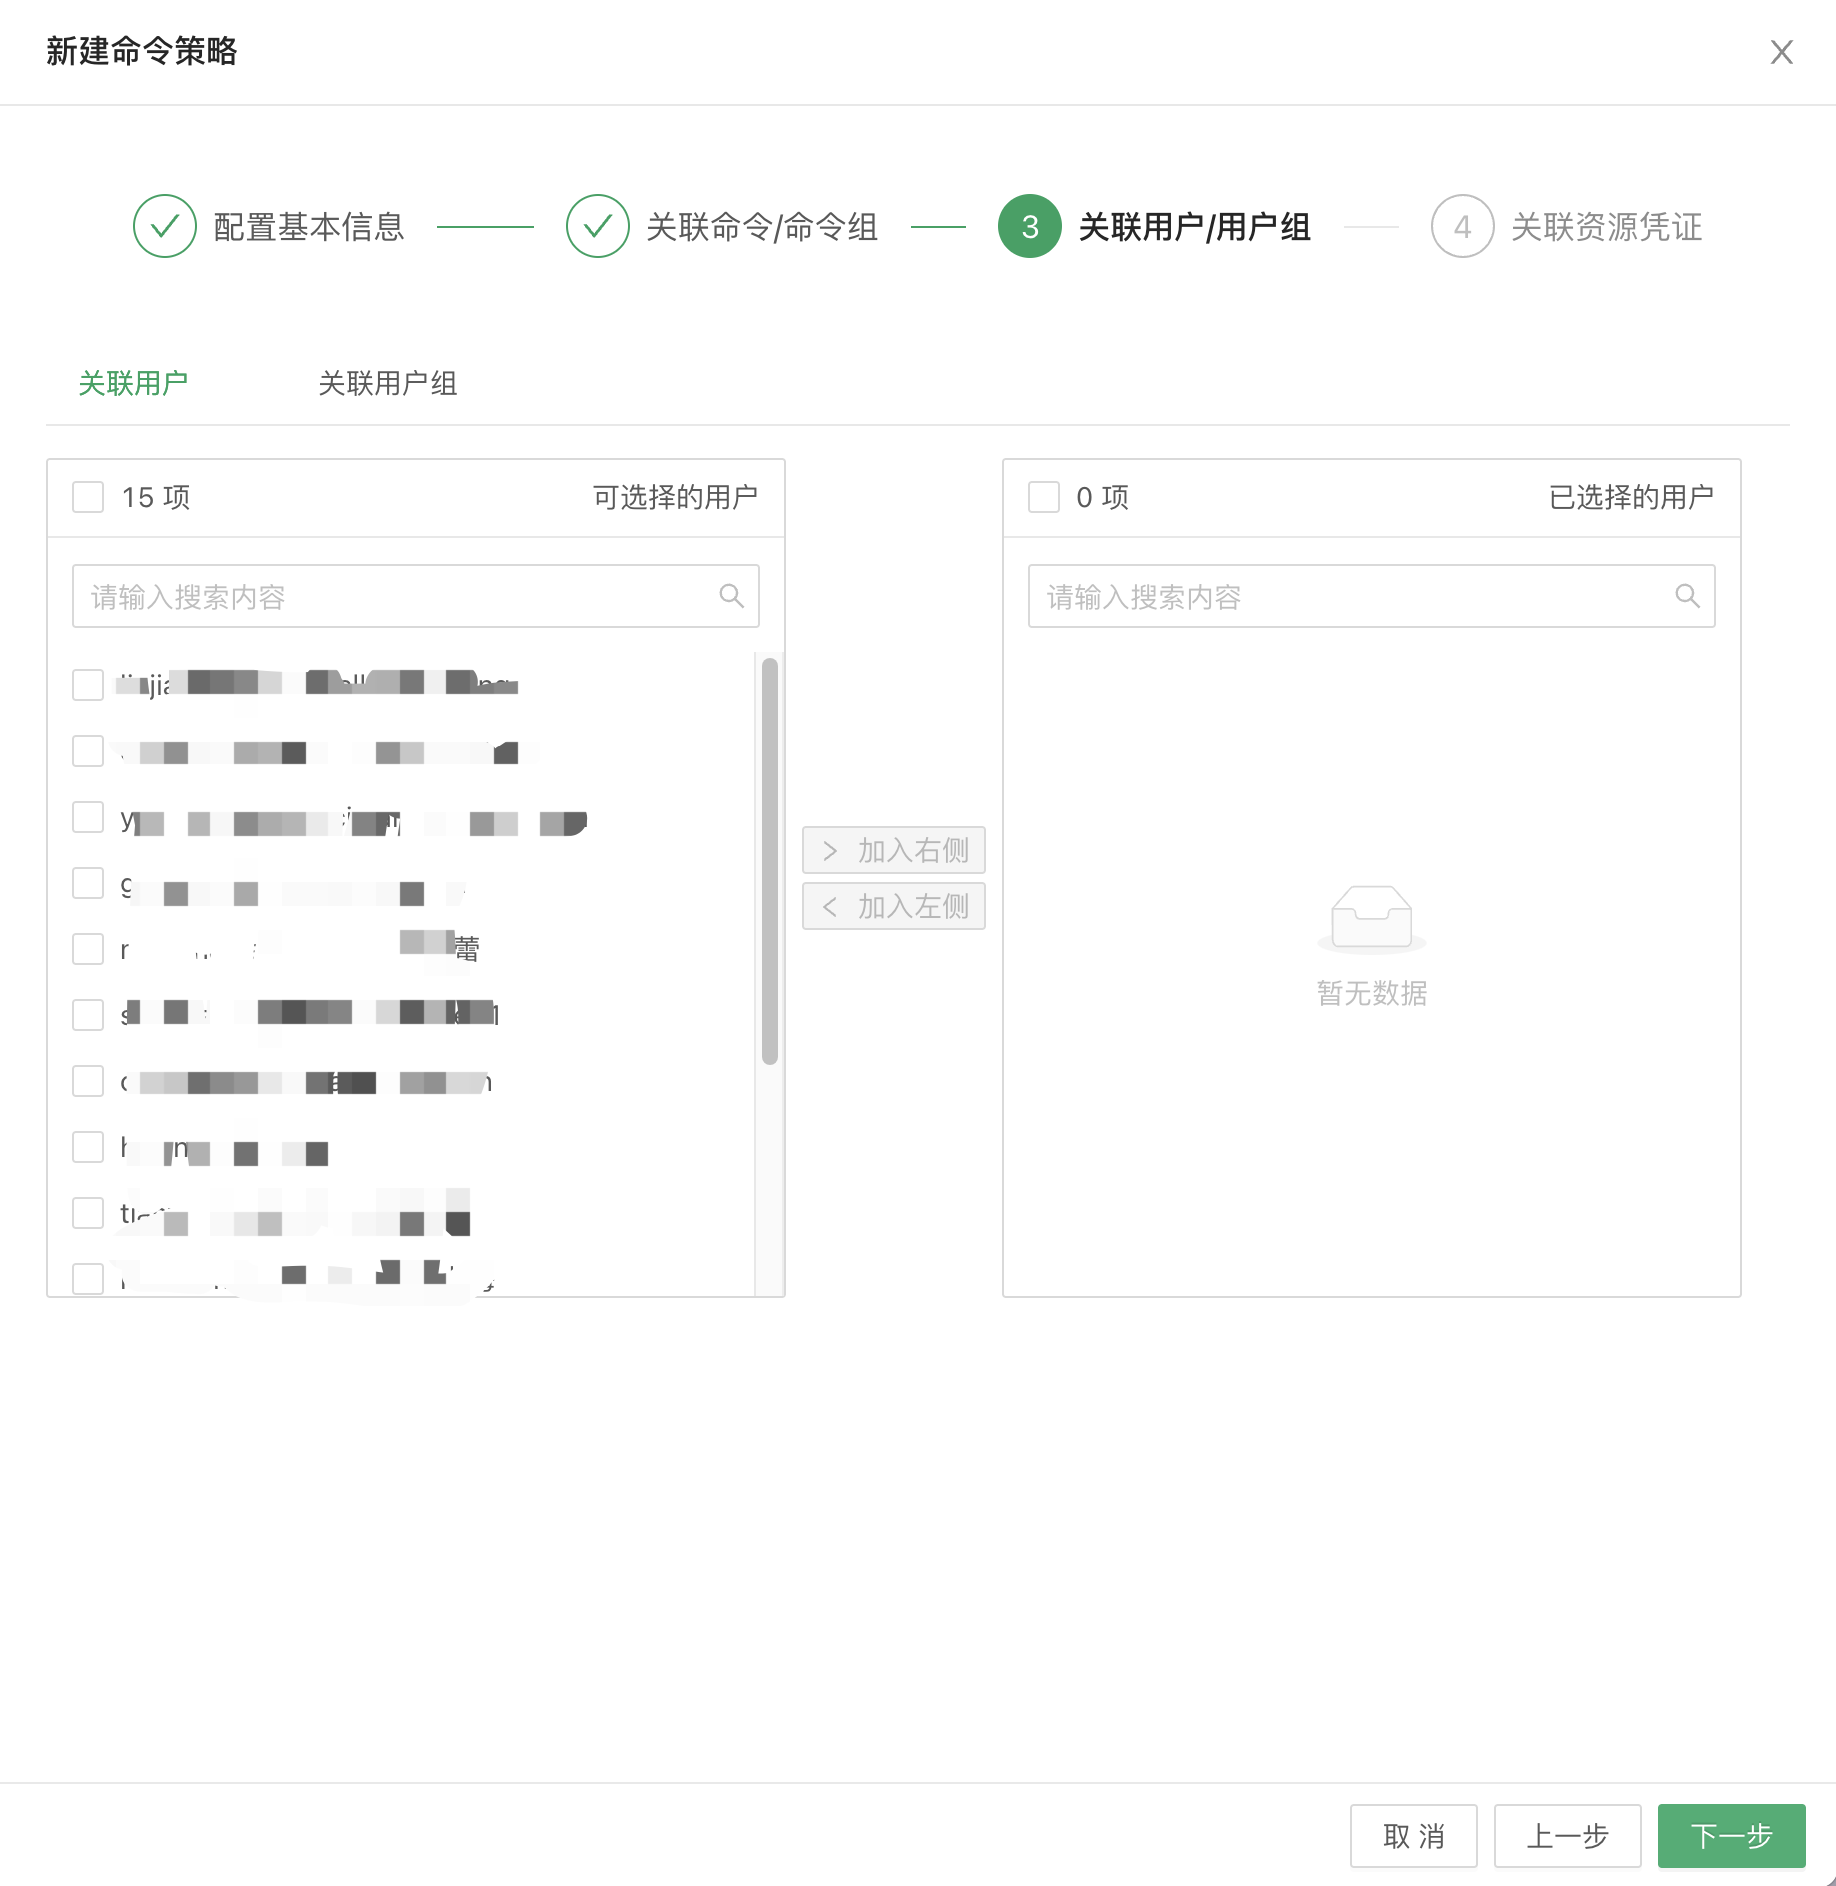
Step 3: Associate users or user groups
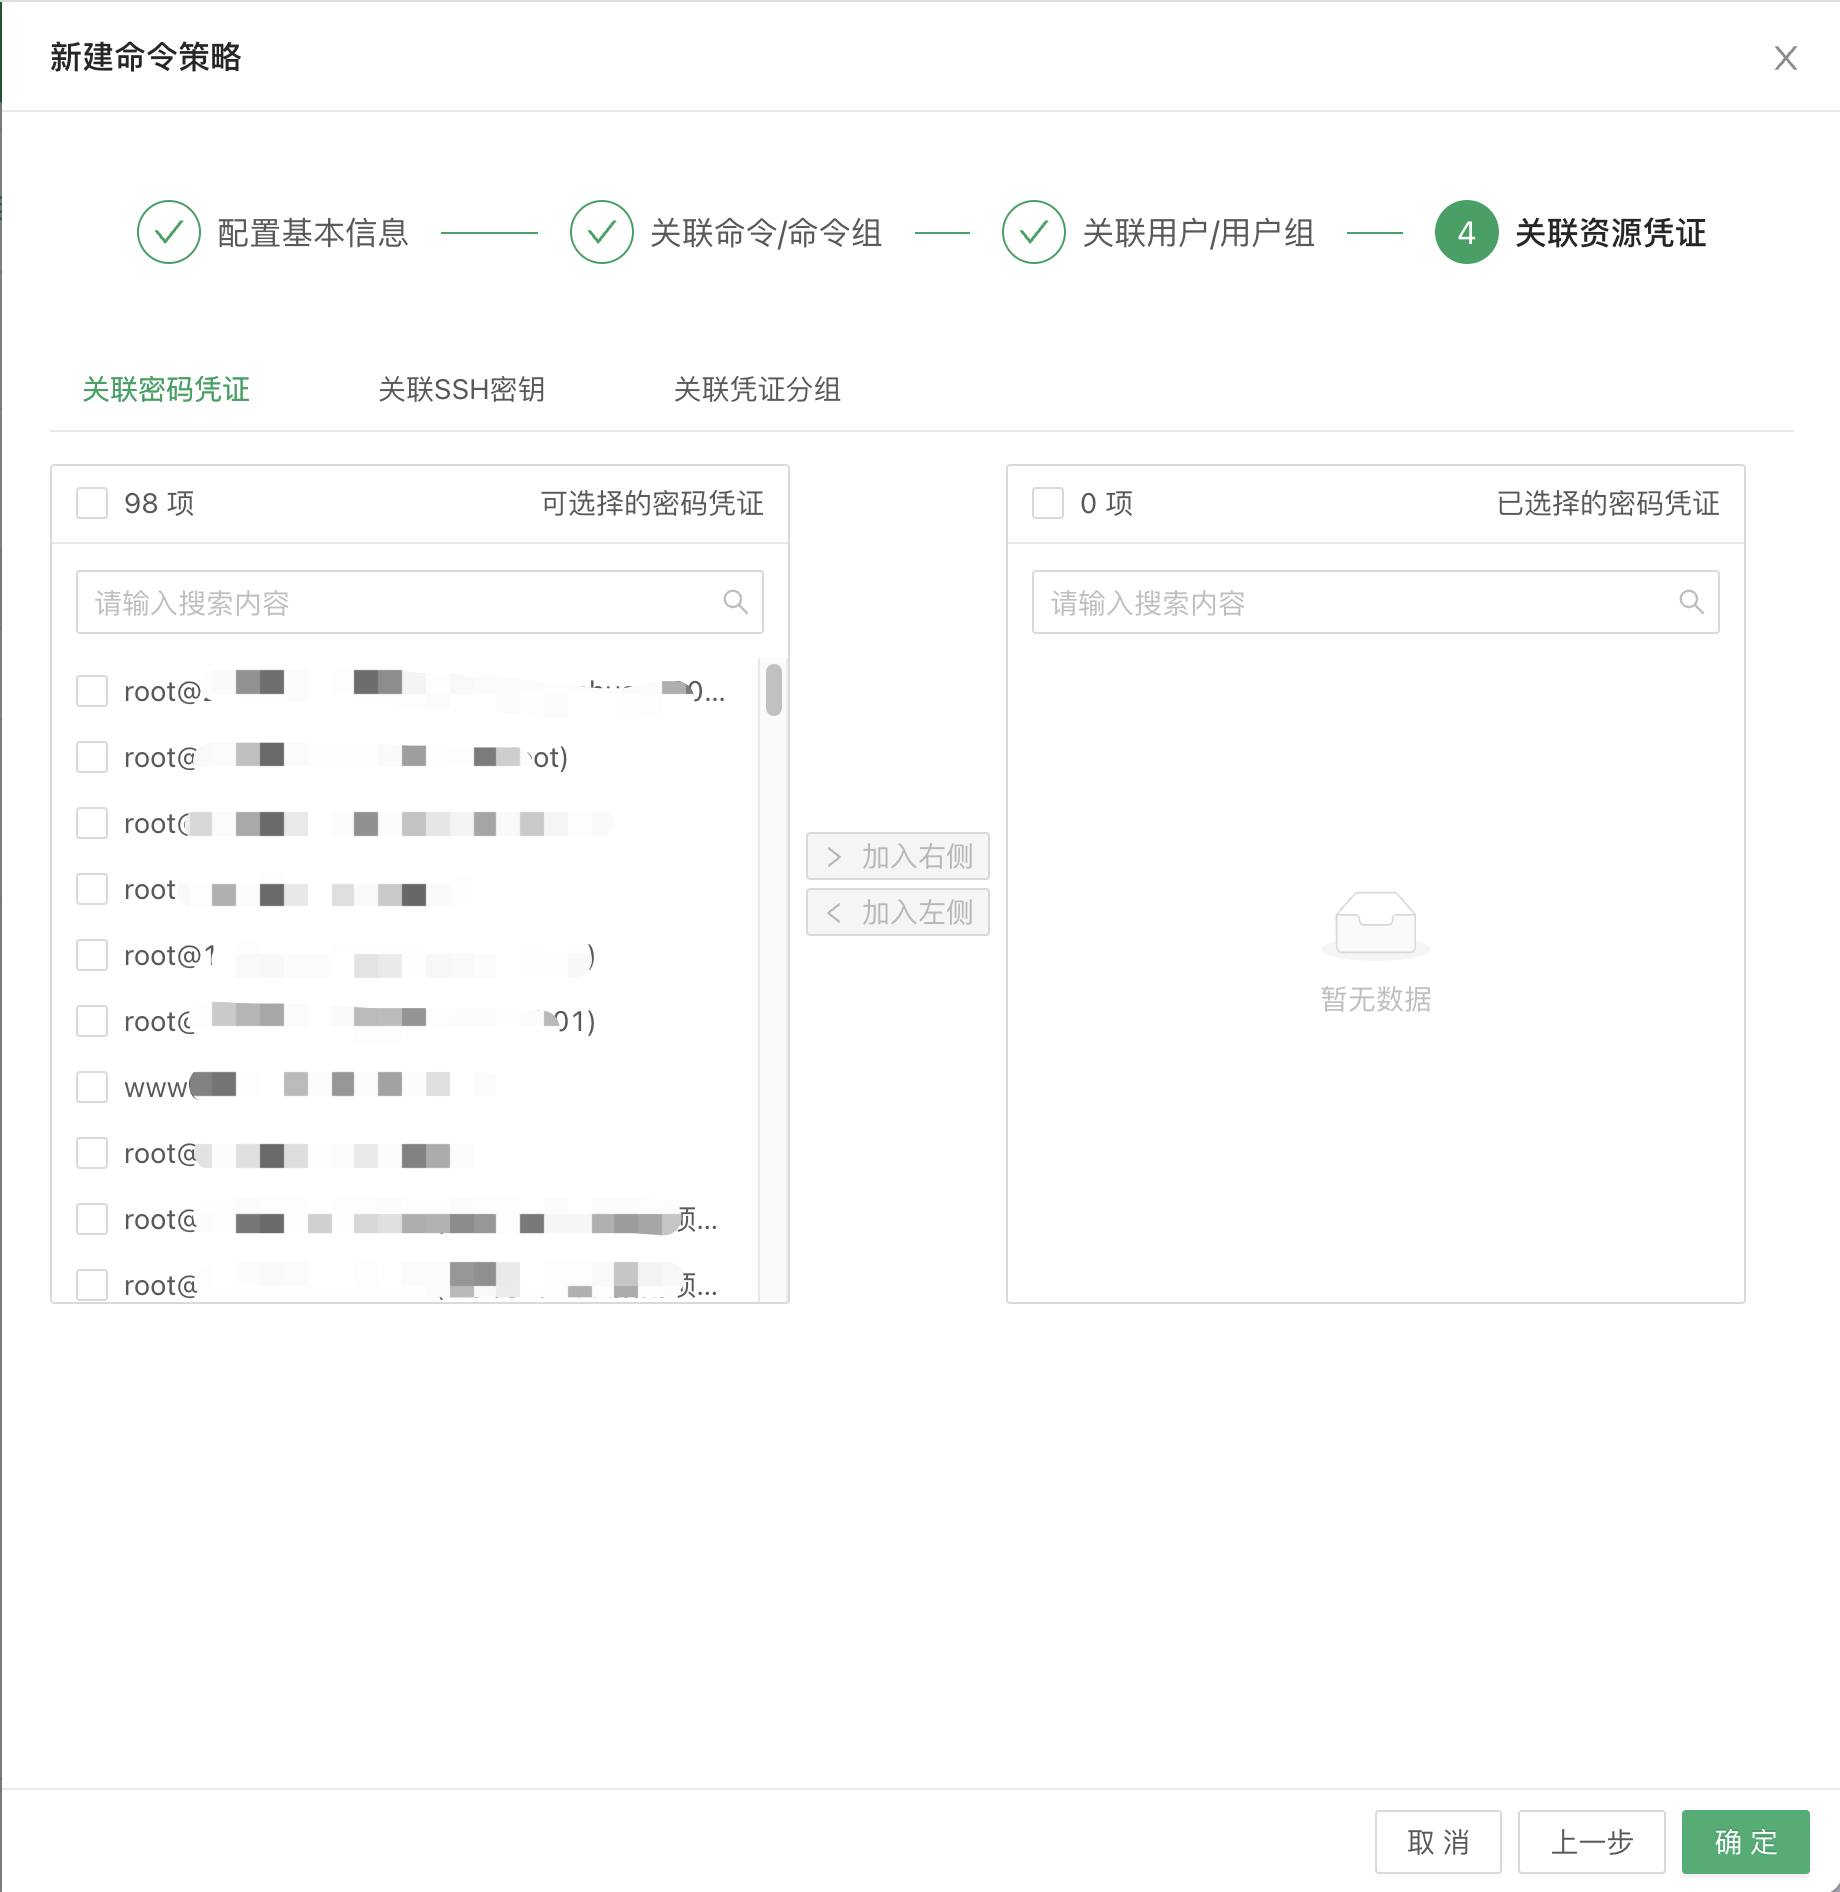
Step 4: Associate resource credentials
4. Audit Management
4.1 Online Sessions
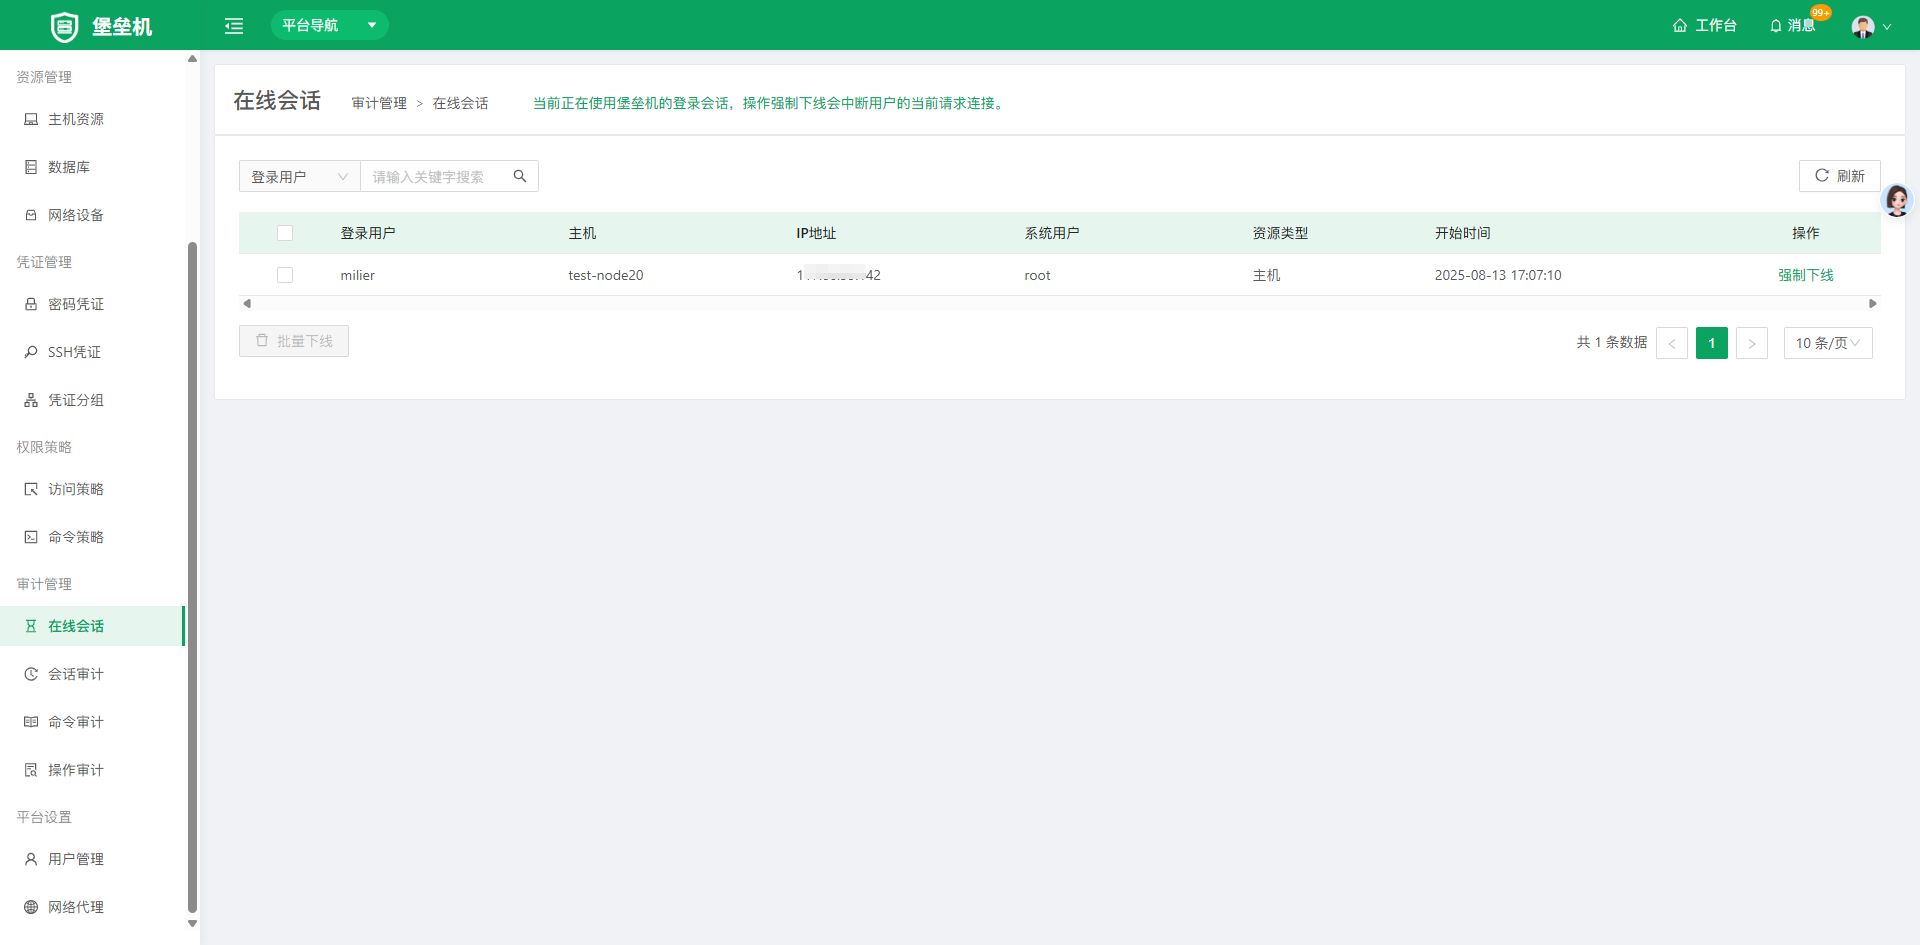
After O&M staff log in to resources through Bastion Host, the audit administrator receives session records in real time and can view ongoing O&M sessions to prevent losses caused by non-compliant operations. For sessions currently using Bastion Host, forcing an offline operation interrupts the user's current request connection.
4.2 Session Audit
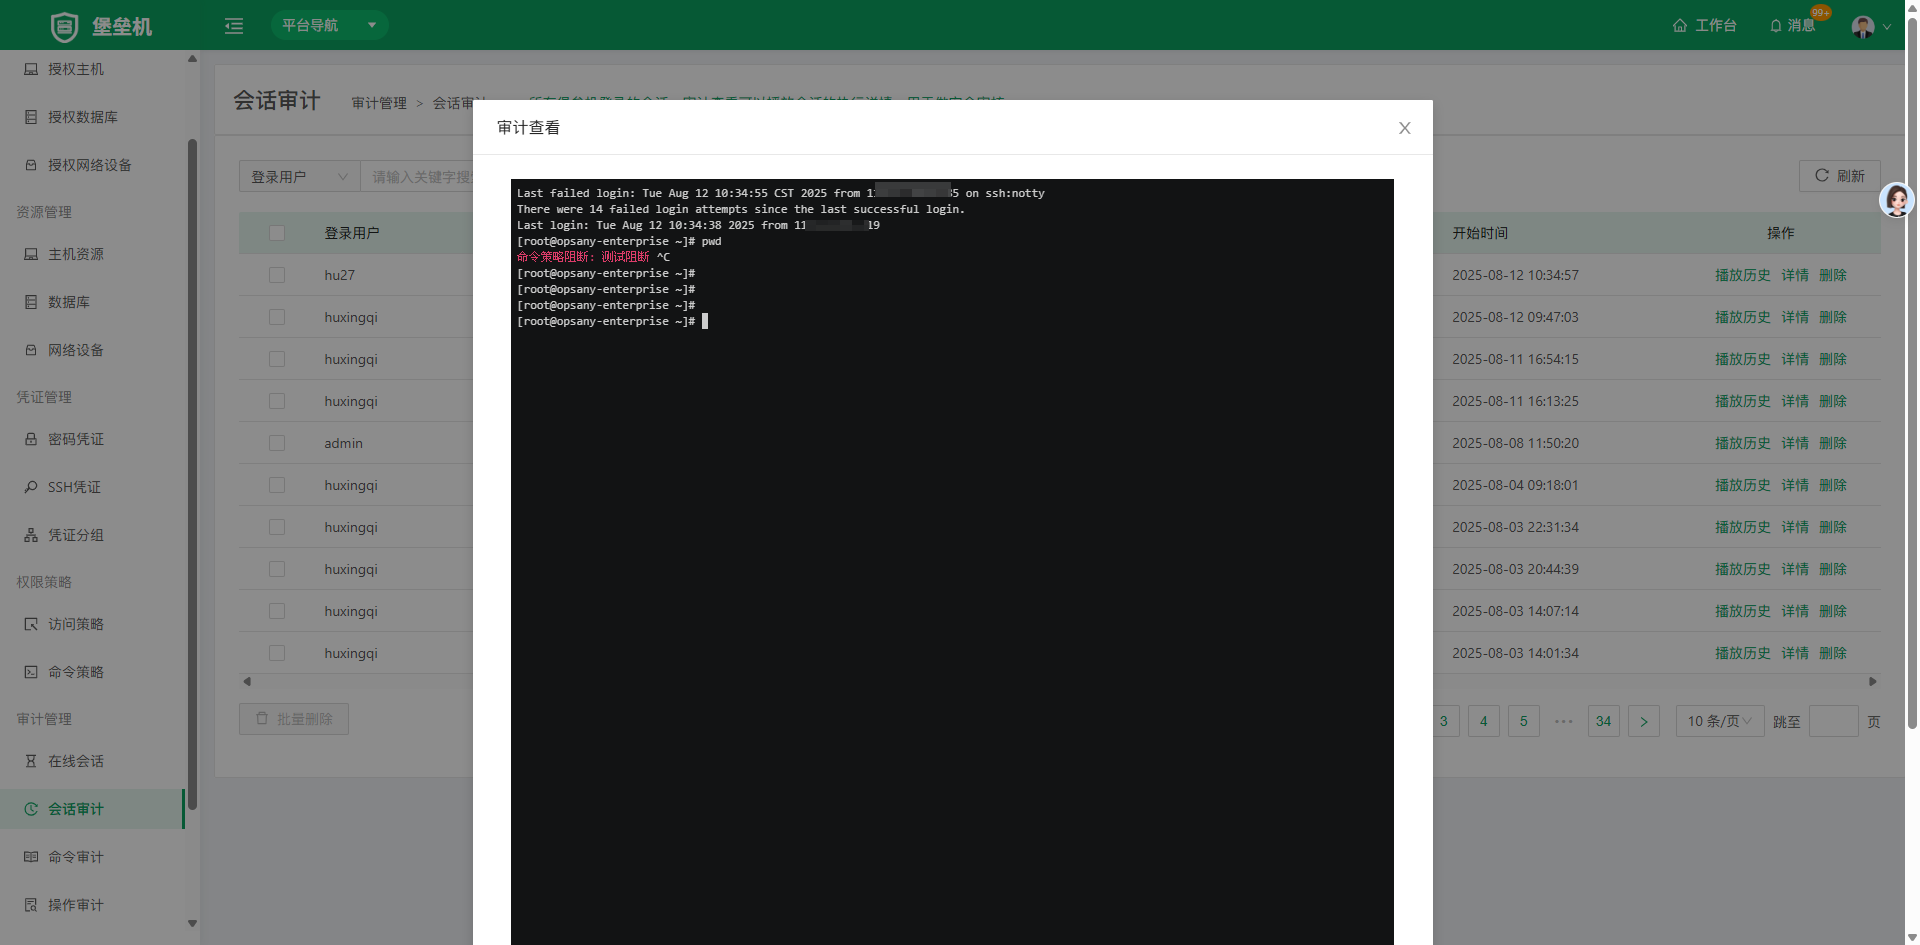
After O&M staff finish logging in to resources through Bastion Host, the audit administrator receives historical session records. From these records, detailed operation logs can be queried and historical sessions audited online.
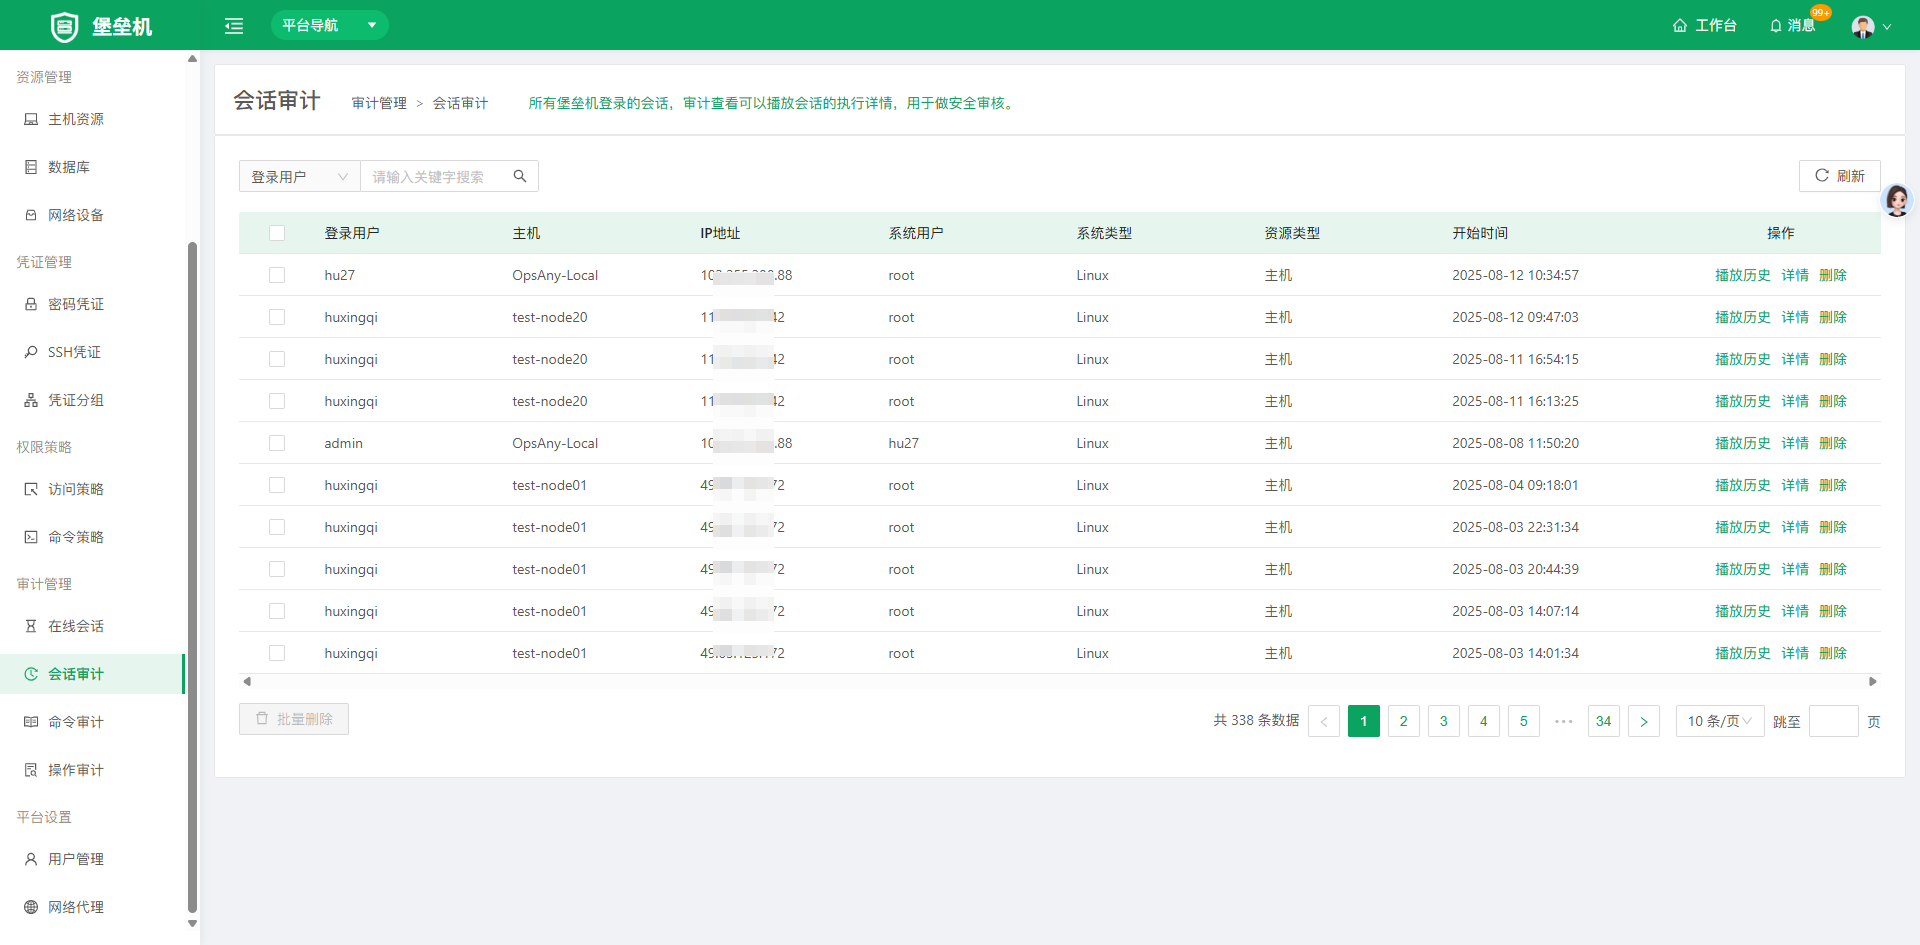
For all bastion login sessions, auditors can play back execution details for security review.
4.3 Command Audit
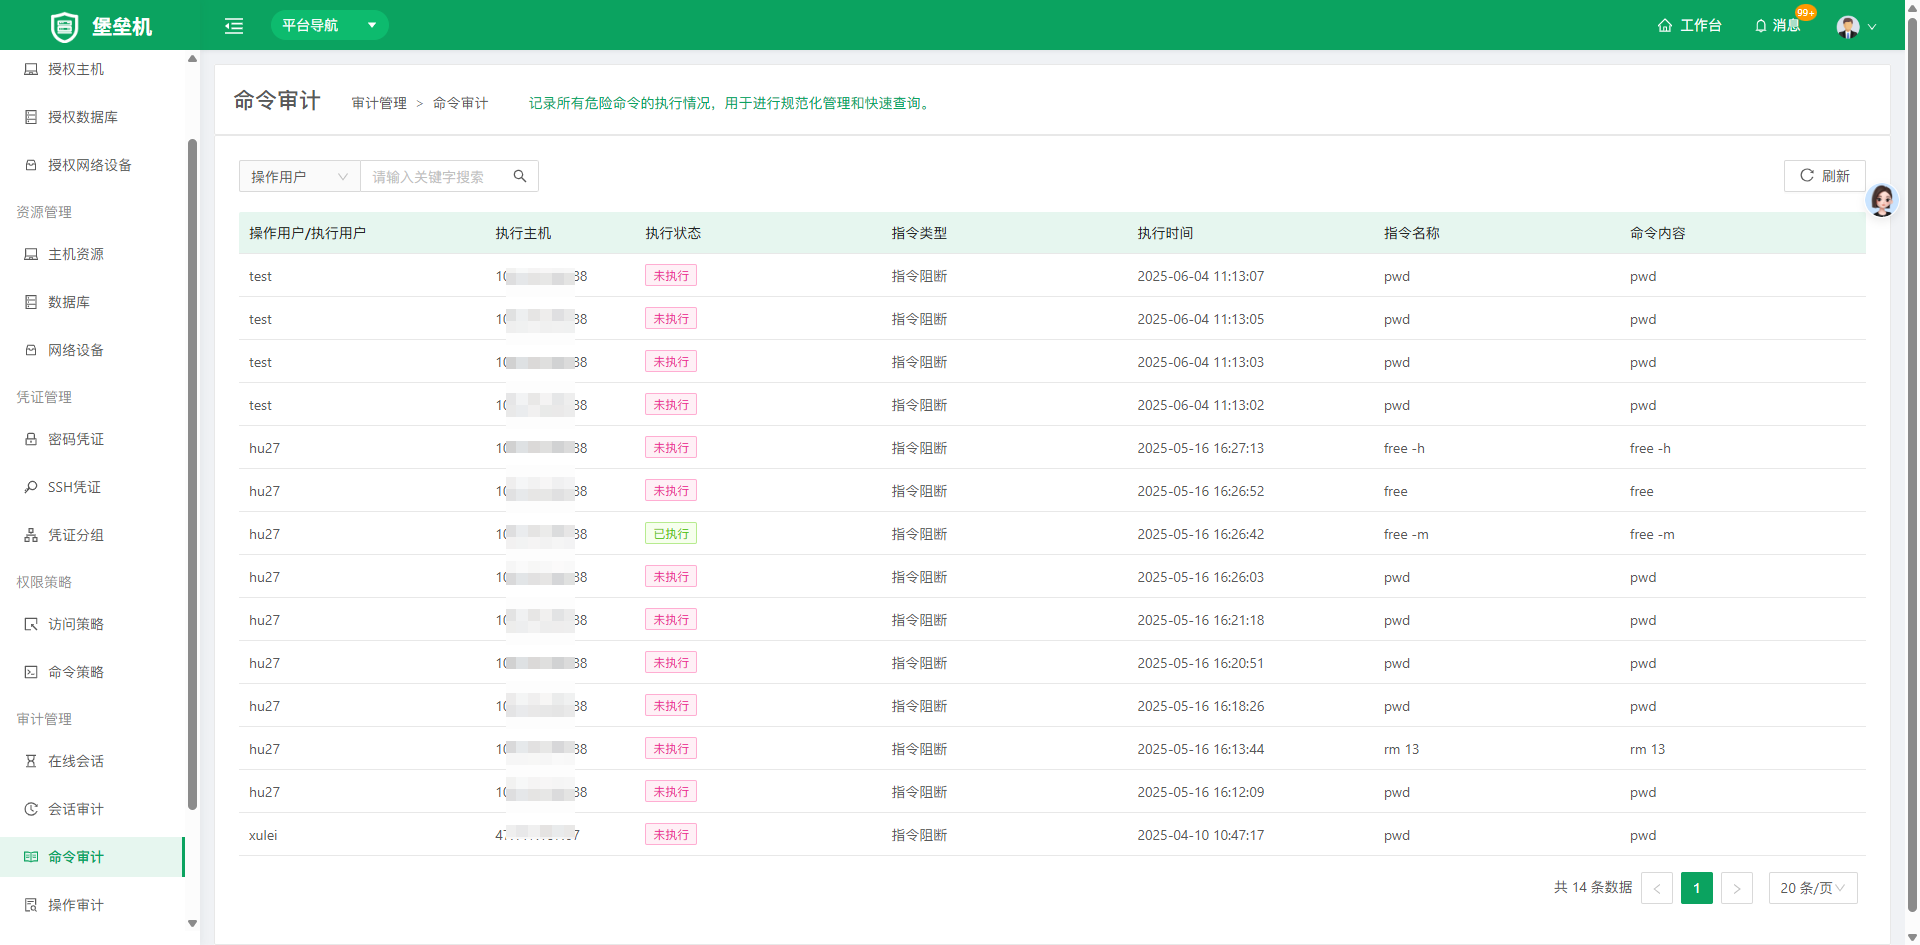
After O&M staff log in to Bastion Host and perform operations such as configuring permissions and audit management, the audit administrator receives system command log records. From these records, detailed system login and operation records can be queried and system operation logs audited online. The execution of all high-risk commands is recorded for standardized management and quick queries.
4.4 Operation Audit
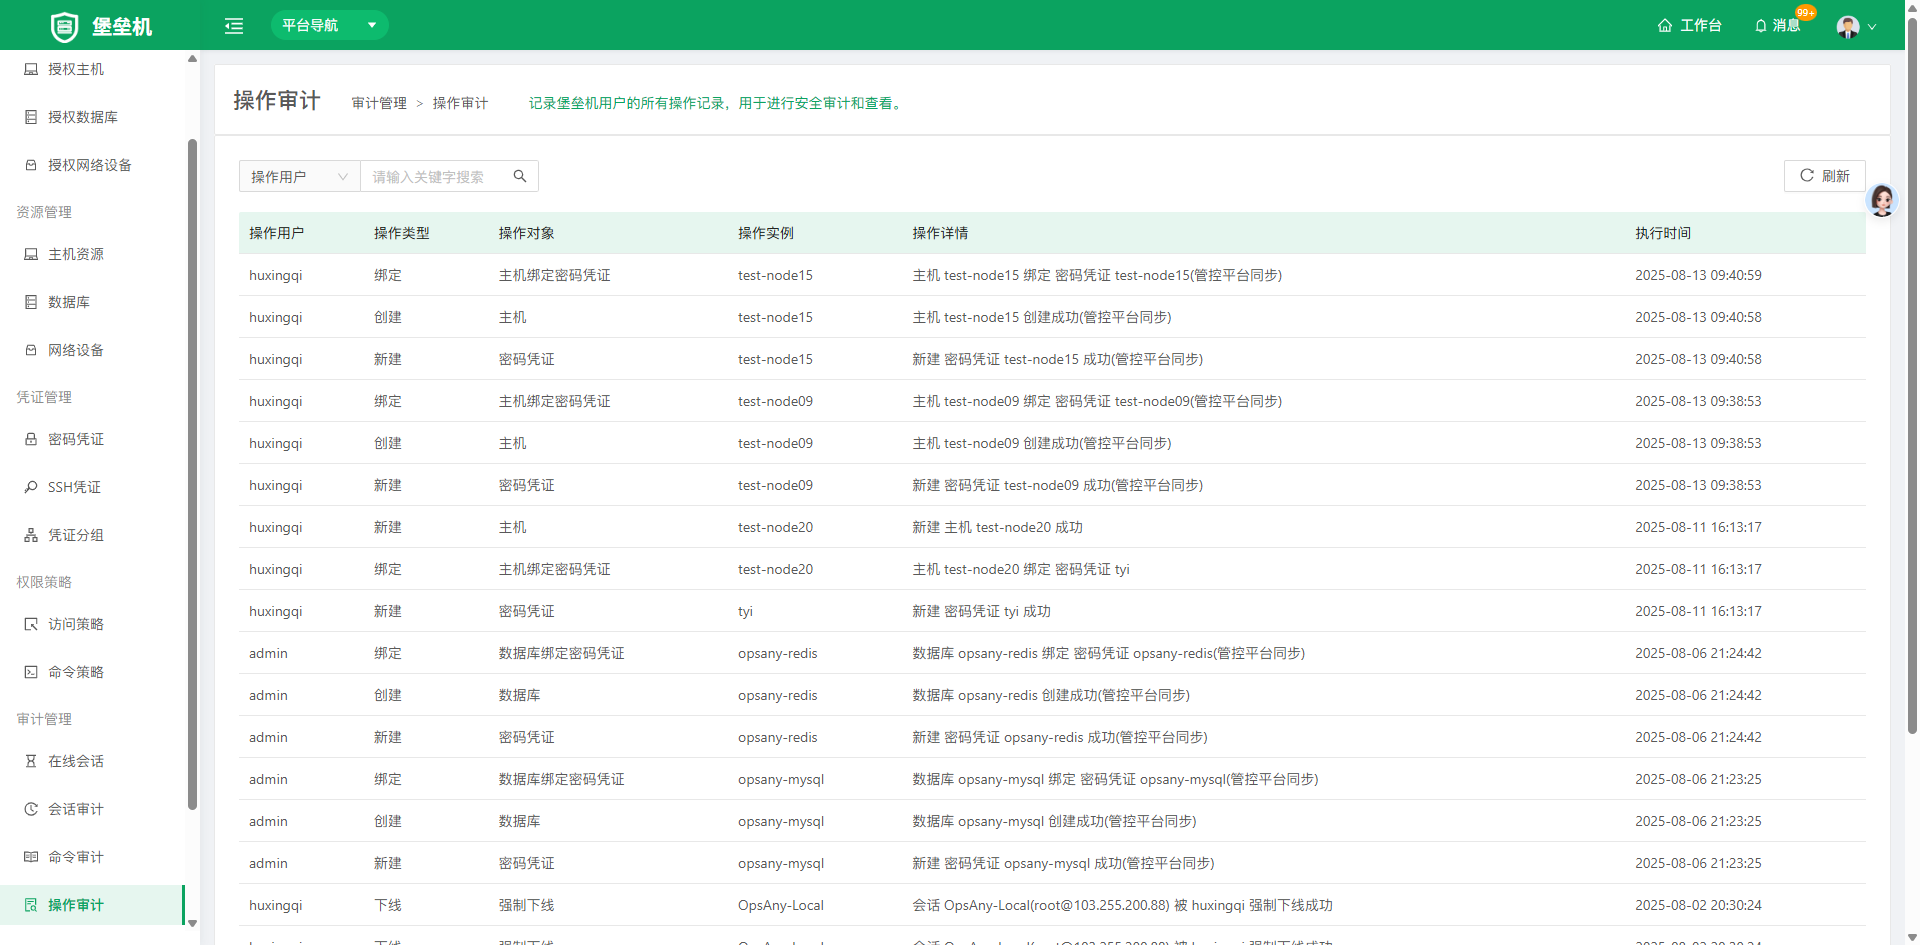
Records all operations of Bastion Host users for security audit and review.
5. Platform Settings
5.1 User Management
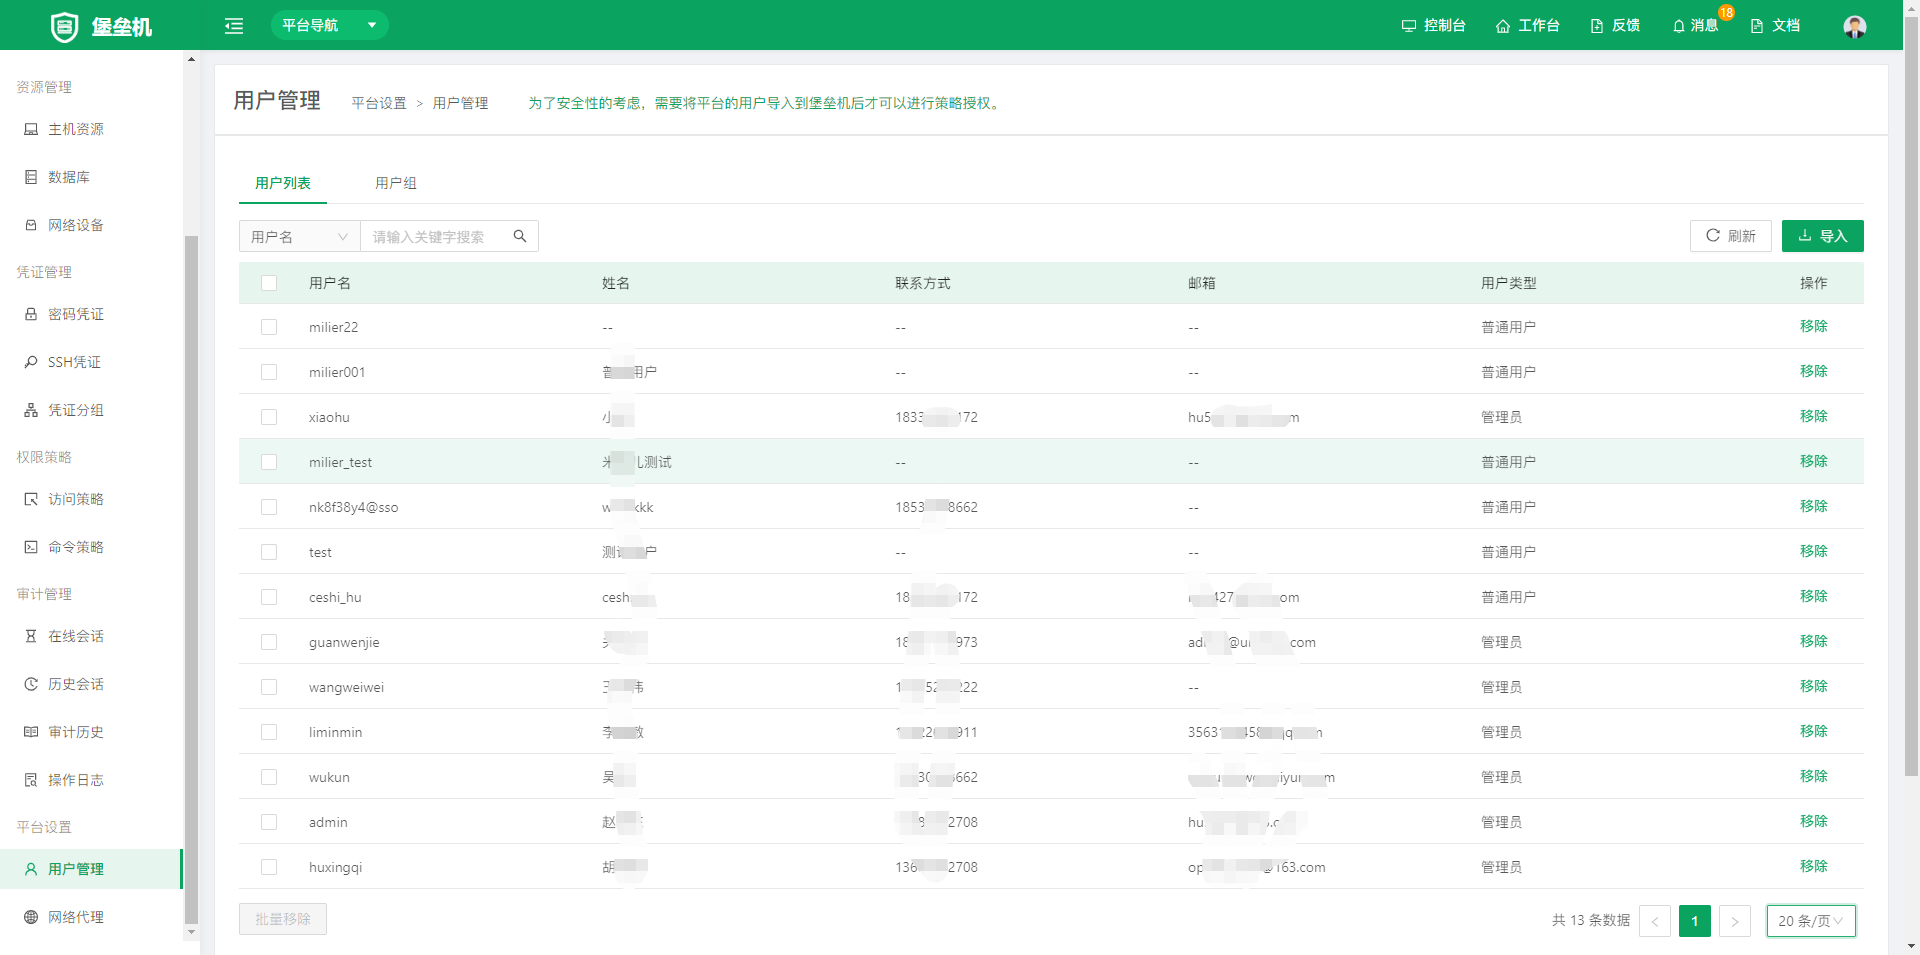
Bastion Host users mainly come from users in unified permissions. You must import users before using other Bastion Host features. For security reasons, platform users must be imported into Bastion Host before policy authorization can be performed.
-
Import user list: go to User Management > User List, click Import in the upper-right corner, and complete user import on the Import Users page.
-
Import user group: go to User Management > User Groups, click Import in the upper-right corner, and complete user group import on the Import User Groups page.
5.2 Network Proxy
By adding network proxies, Bastion Host can manage hosts and database resources in different networks. Note: the Bastion Host proxy is not directly related to Proxy, although we usually recommend deploying the Bastion Host proxy on the host where Proxy is deployed. However, the Bastion Host proxy is completely independent and is provided for Bastion Host only.
Create a Network Proxy
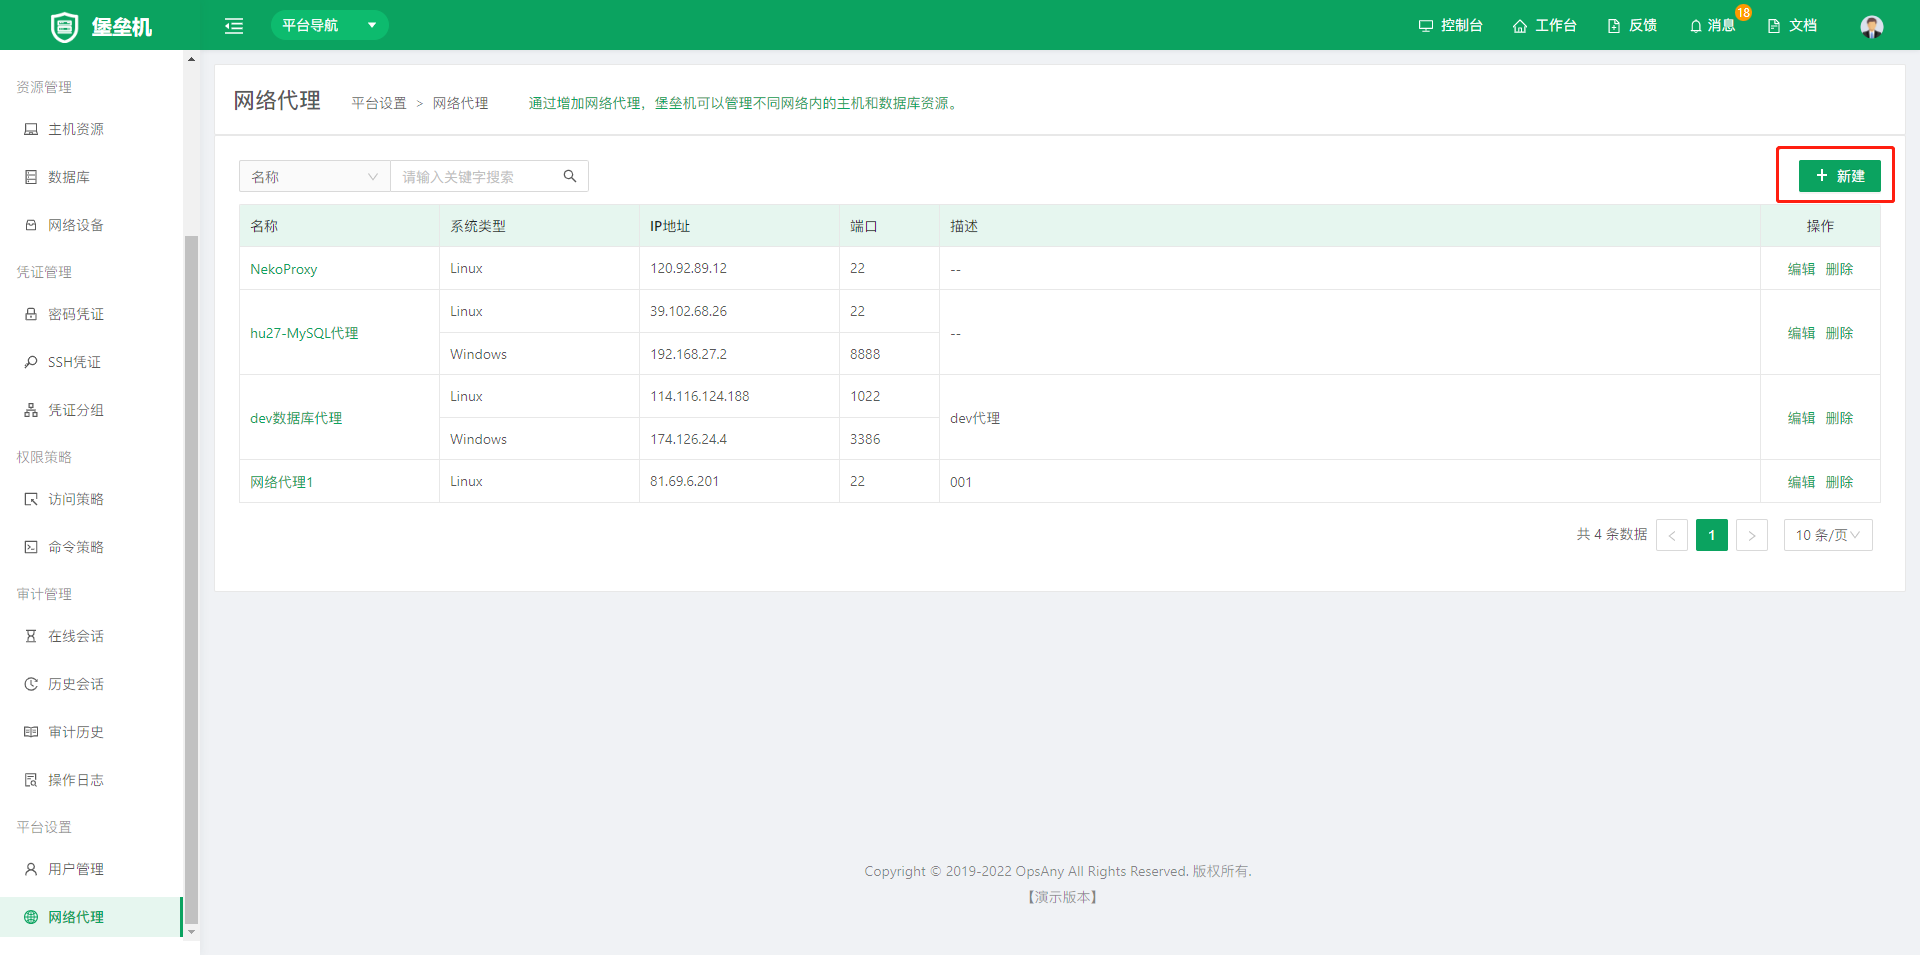
- Create network proxy: go to the Network Proxy page, click Create in the upper-right corner, and complete creation on the New Network Proxy page.
Info
Open source technology statement: OpsAny actively embraces open source technology and encourages everyone to protect the intellectual property rights of open source technology and use it lawfully. Bastion Host uses the following open source technologies.
- Guacamole: http://guacamole.apache.org/
- Asciiplayer: https://github.com/qeesung/asciiplayer