













OpsAny Digital R&D Platform — Community Edition Deployment
Deploying the R&D Platform
The OpsAny Digital R&D Platform manages application resources, CI/CD pipelines, continuous deployment, and artifact repositories. It depends on third-party open-source tools — you must either prepare dedicated hosts for GitLab, Jenkins, Nexus, and StackStorm, or integrate the tools your organization already runs. Version compatibility matters, and there is a learning curve. If you are unfamiliar with DevOps, or your host has less than 16 GB of memory, do not deploy it. 【Life is short — don't go looking for trouble. — OpsAny】
- Set the admin password
Before installing, check whether you have already changed the admin password. By default it is read from $INSTALL_PATH/conf/.passwd_env. If you have changed the password, update the corresponding value in that file.
INSTALL_PATH=/data/opsany
vim $INSTALL_PATH/conf/.passwd_env
- Deploy the application platform with the automation script.
Before deploying the Digital R&D Platform, check the host's available memory. At least 4 GB must remain free to add the R&D Platform modules to an existing host. Alternatively, use 【Dedicated host deployment】 below to deploy the R&D Platform on its own host.
- Deploy the application platform with the automation script.
# This command deploys four platforms: Application, Pipeline, Continuous Deployment, and Artifact Repository.
cd /opt/opsany-paas/install/
./saas-ce-install.sh dev
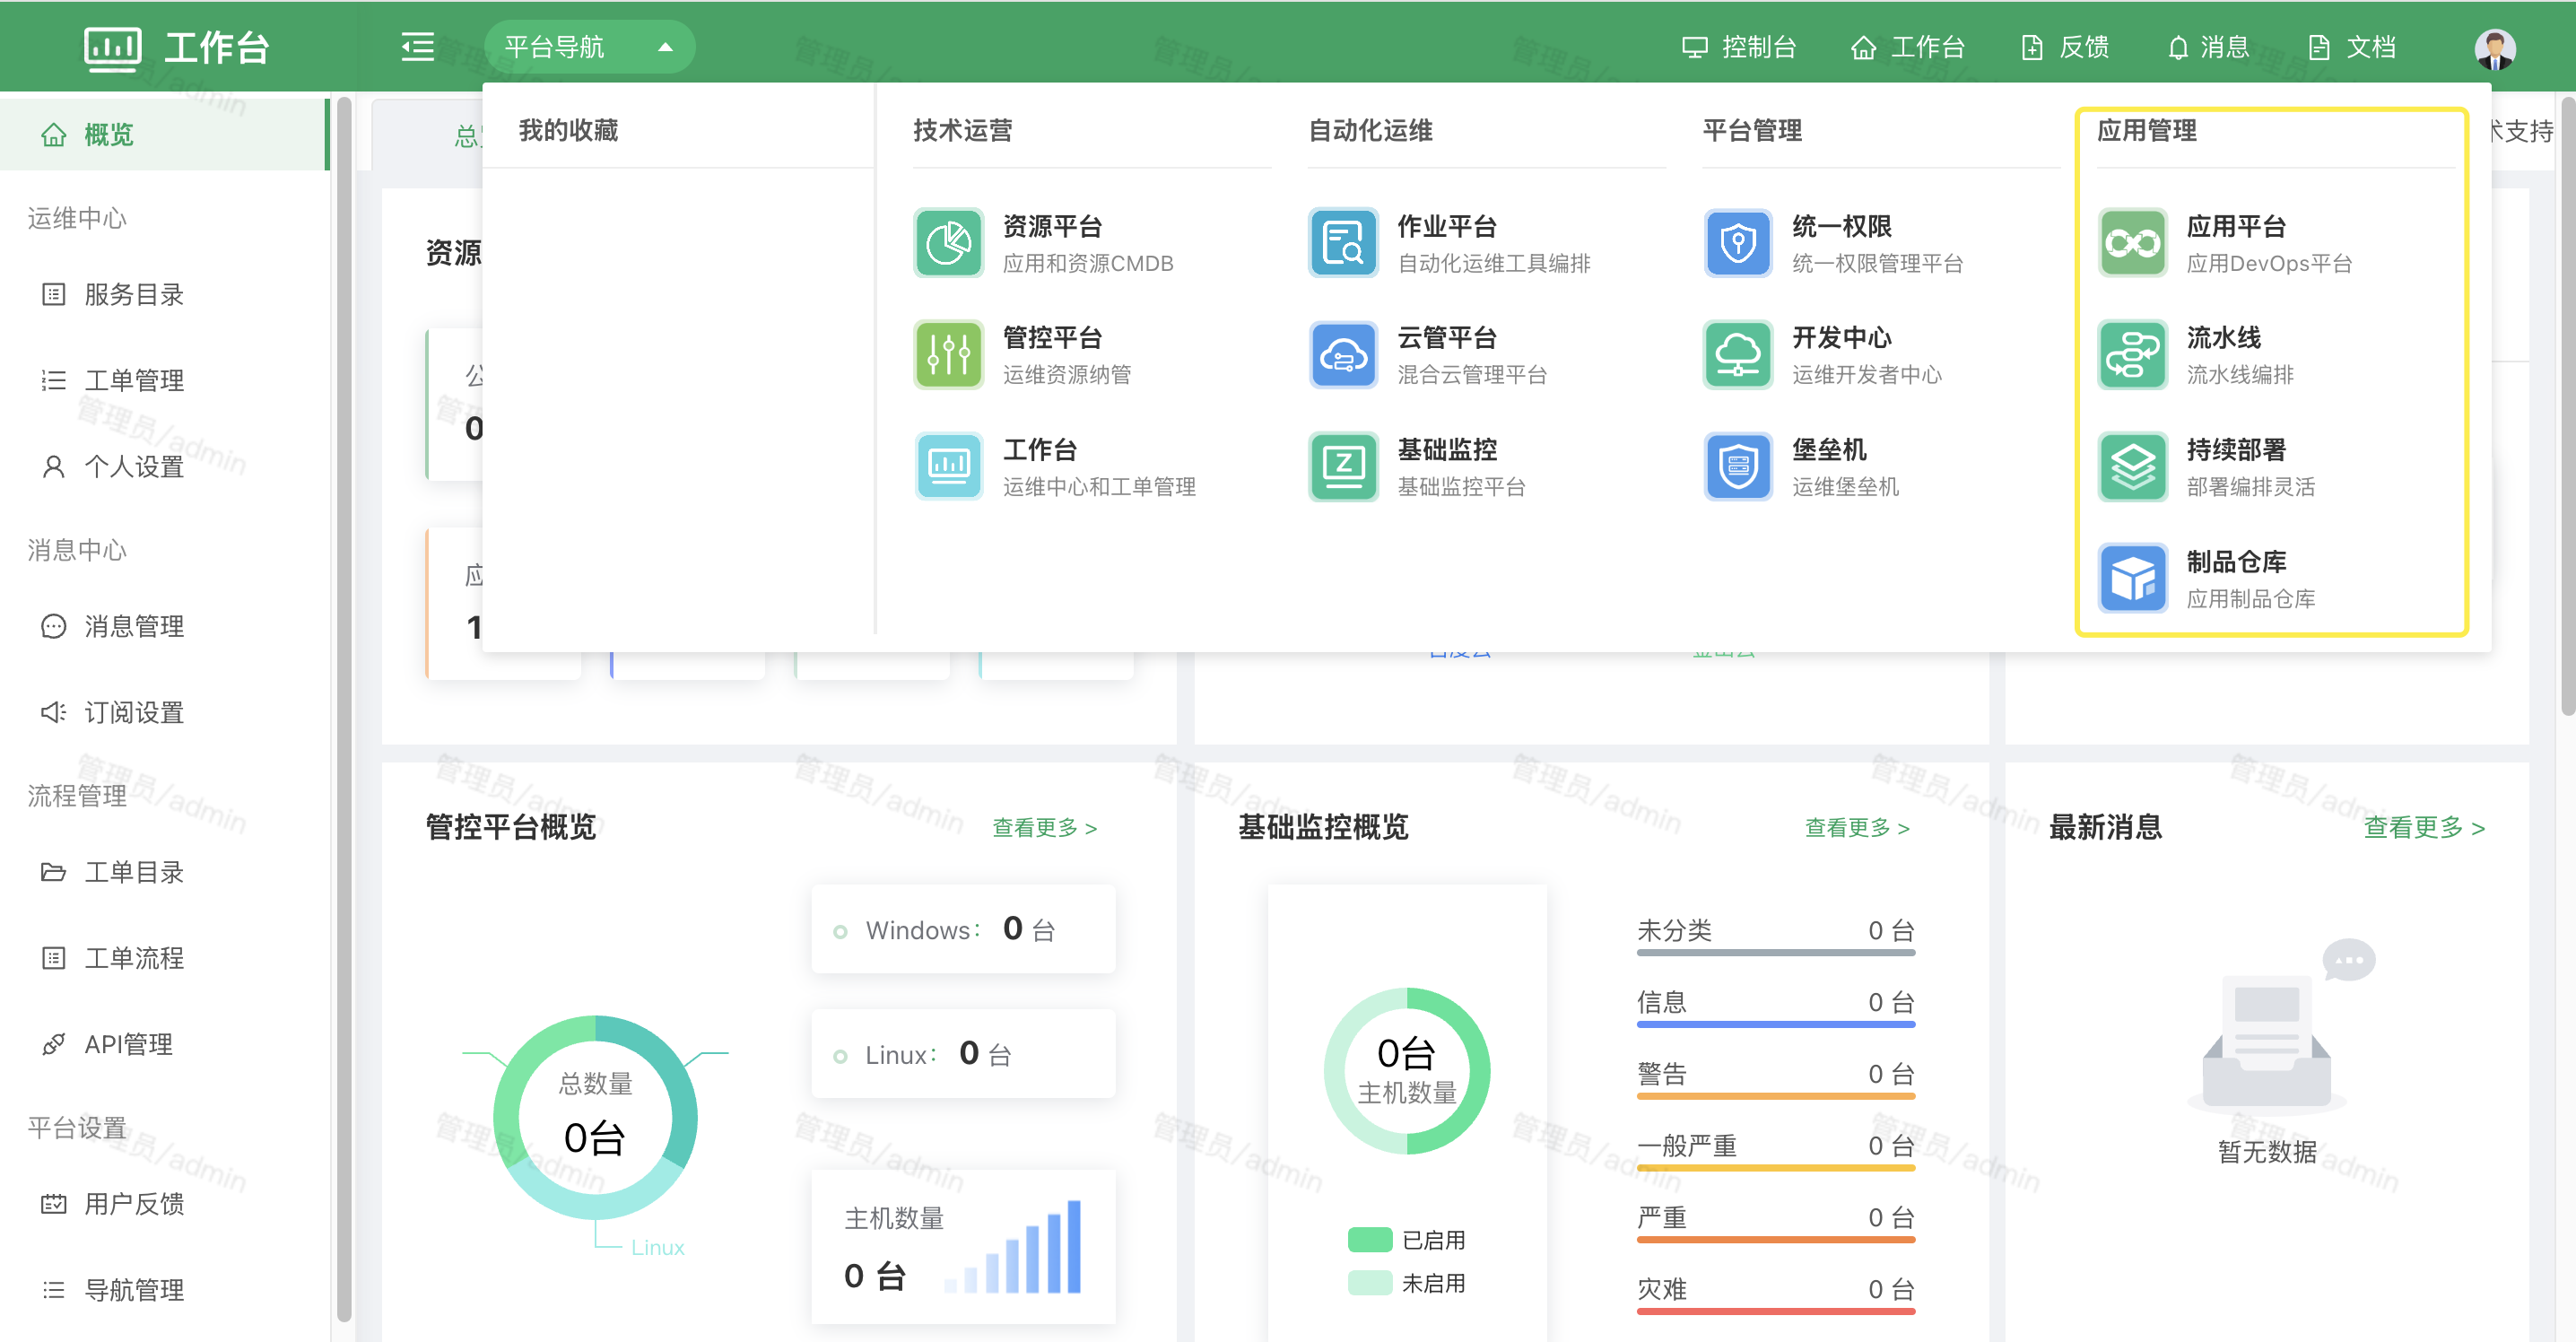
Refresh the Workbench, or sign out and sign in again, and the new platforms appear in the navigation menu.
You can deploy the OpsAny Digital R&D Platform on a dedicated host. In the example below the original host is 192.168.56.11 and the new host is 192.168.56.12. The main change is pointing MySQL, Redis, and MongoDB at the original host.
- Copy the installation package from the original host
# Run on the ORIGINAL host
$ scp -r /opt/opsany-paas root@192.168.56.12:/opt/
- Configure the new host
# Edit the configuration file on the NEW host
vim /opt/opsany-paas/install/install.config
# Set LOCAL_IP to the new host's IP address
LOCAL_IP="192.168.56.12"
MYSQL_SERVER_IP="192.168.56.11"
REDIS_SERVER_IP="192.168.56.11"
MONGO_SERVER_IP="192.168.56.11"

# Create the installation directory on the NEW host
mkdir /data/opsany/
- Copy the configuration directory from the original host to the new host, then update the Nginx configuration
scp -r /data/opsany/conf root@192.168.56.12:/data/opsany/
scp -r /data/opsany/esb root@192.168.56.12:/data/opsany/

# Change the IP addresses to the new host's IP address
vim /data/opsany/conf/nginx-conf.d/opsany_paas.conf
    upstream SAAS_DEVOPS {
        server 192.168.56.12:7009 max_fails=1  fail_timeout=30s;
    }
    upstream SAAS_PIPELINE {
        server 192.168.56.12:7017 max_fails=1  fail_timeout=30s;
    }
    upstream SAAS_DEPLOY {
        server 192.168.56.12:7018 max_fails=1  fail_timeout=30s;
    }
    upstream SAAS_REPO {
        server 192.168.56.12:7020 max_fails=1  fail_timeout=30s;
    }
    upstream SAAS_CODE {
        server 192.168.56.12:7010 max_fails=1  fail_timeout=30s;
    }
# Restart Nginx
docker restart opsany-base-openresty
- Run the installation on the new host
cd /opt/opsany-paas/install/
source install.config
mkdir -p ${INSTALL_PATH}/logs/{devops,pipeline,repo,code,deploy,llmops}

# Start the container used to run Python scripts
docker run -d --restart=always --name opsany-paas-websocket \
-p 8004:8004 -v ${INSTALL_PATH}/logs:/opt/opsany/logs \
-v ${INSTALL_PATH}/uploads:/opt/opsany/uploads \
-v ${INSTALL_PATH}/conf/opsany-paas/websocket/settings_production.py.websocket:/opt/opsany/websocket/config/prod.py \
-v ${INSTALL_PATH}/conf/opsany-paas/websocket/settings_production.py.websocket.init:/opt/opsany/websocket/config/__init__.py \
-v ${INSTALL_PATH}/conf/opsany-paas/websocket/websocket.ini:/etc/supervisord.d/websocket.ini \
-v /usr/share/zoneinfo:/usr/share/zoneinfo \
-v /etc/localtime:/etc/localtime:ro \
${PAAS_DOCKER_REG}/opsany-paas-websocket:3.3.3

# Copy the initialization scripts into the container
docker cp ../saas/ opsany-paas-websocket:/opt/opsany/
docker cp ./init/ opsany-paas-websocket:/opt/opsany/

# Run the installation script
./saas-ce-install.sh dev
- Open 【Platform Navigation】 → 【Pipeline / Continuous Deployment / Artifact Repository】 → 【System Settings】 to integrate the tools. If you do not have the tools yet, deploy them according to the instructions below. Note: GitLab and Jenkins use API tokens; Nexus currently uses username and password authentication.
Deploying the Application Platform Dependencies
Watch out for the port conflicts listed below and resolve them yourself. A dedicated host is recommended: 8 vCPU, 16 GB memory, 100 GB disk.
- GitLab: version must be greater than 13.12. Listening ports: 80, 8080, and others.
- Jenkins: required by Pipeline, version must be greater than 2.328. The GitLab plugin must be installed. Listening ports: 8008, 8009.
- Nexus: required by Artifact Repository, version must be 3.x. Listening ports: 8014, 8015.
- StackStorm: required by Continuous Deployment, version must be 3.6.0. Listening ports: 8005, 9100, 9102, 9202.
- SonarQube: code scanning, version must be 9.9.6. Listening port: 8016.
Deploying the Docker Base Environment
1.1 Environment checks
- Confirm the host can reach the internet and has at least 8 GB of memory.
- Disable the firewall, set a normalized hostname, and make sure the hostname resolves.
- OpsAny can be accessed by IP address. If you use a domain name, make sure the domain genuinely resolves (editing hosts does not work).
1.2 Install Docker and the MySQL client
# Do not paste and run the whole block at once — some commands may fail without you noticing.
# step 1: install the required system tools
sudo apt-get -y update
sudo apt-get -y install apt-transport-https ca-certificates curl software-properties-common
# step 2: install the GPG key
curl -fsSL https://mirrors.aliyun.com/docker-ce/linux/ubuntu/gpg | sudo apt-key add -
# Step 3: add the software source
sudo add-apt-repository "deb [arch=amd64] https://mirrors.aliyun.com/docker-ce/linux/ubuntu $(lsb_release -cs) stable"
# Step 4: update and install Docker-CE
sudo apt-get -y update
sudo apt-get -y install docker-ce jq uuid wget git ntpdate mysql-client
systemctl enable --now docker
ln -sf /usr/share/zoneinfo/Asia/Shanghai /etc/localtime
ntpdate time1.aliyun.com
1.1 Environment checks
- Confirm the host can reach the internet and has at least 8 GB of memory.
- Disable SELinux and the firewall, set a normalized hostname, and make sure the hostname resolves.
- OpsAny can be accessed by IP address. If you use a domain name, make sure the domain genuinely resolves (editing hosts does not work).
1.2 Install Docker and the MySQL client
# Do not paste and run the whole block at once — some commands may fail without you noticing.
curl -o /etc/yum.repos.d/epel.repo http://mirrors.aliyun.com/repo/epel-7.repo
curl -o /etc/yum.repos.d/docker-ce.repo https://mirrors.aliyun.com/docker-ce/linux/centos/docker-ce.repo
yum install -y git uuid wget docker-ce mariadb jq ntpdate unzip
systemctl enable --now docker
ln -sf /usr/share/zoneinfo/Asia/Shanghai /etc/localtime
ntpdate time1.aliyun.com
1.1 Environment checks
- Confirm the host can reach the internet and has at least 8 GB of memory.
- Disable SELinux and the firewall, set a normalized hostname, and make sure the hostname resolves.
- OpsAny can be accessed by IP address. If you use a domain name, make sure the domain genuinely resolves (editing hosts does not work).
1.2 Install Docker and the MySQL client
# Install Docker and the required packages
dnf config-manager --add-repo=http://mirrors.aliyun.com/docker-ce/linux/centos/docker-ce.repo
dnf -y install docker-ce --nobest
dnf -y install mariadb jq git uuid unzip
systemctl enable --now docker
ln -sf /usr/share/zoneinfo/Asia/Shanghai /etc/localtime
1.1 Environment checks
- Confirm the host can reach the internet and has at least 8 GB of memory.
- Disable SELinux and the firewall, set a normalized hostname, and make sure the hostname resolves.
- OpsAny can be accessed by IP address. If you use a domain name, make sure the domain genuinely resolves (editing hosts does not work).
1.2 Install Docker and the MySQL client
# Install Docker
dnf config-manager --add-repo=http://mirrors.aliyun.com/docker-ce/linux/centos/docker-ce.repo
dnf -y install docker-ce --nobest
systemctl enable --now docker

# Install the packages required for deployment
dnf -y install mariadb jq git uuid unzip wget
ln -sf /usr/share/zoneinfo/Asia/Shanghai /etc/localtime
1.1 Environment checks
- Confirm the host can reach the internet and has at least 8 GB of memory.
- Disable SELinux and the firewall, set a normalized hostname, and make sure the hostname resolves.
- OpsAny can be accessed by IP address. If you use a domain name, make sure the domain genuinely resolves (editing hosts does not work).
1.2 Install Docker and the MySQL client
# Install Docker and the required packages
yum -y install docker mariadb jq git uuid unzip wget
systemctl enable --now docker
ln -sf /usr/share/zoneinfo/Asia/Shanghai /etc/localtime
1.1 Environment checks
- Confirm the host can reach the internet and has at least 8 GB of memory.
- Disable SELinux and the firewall, set a normalized hostname, and make sure the hostname resolves.
- OpsAny can be accessed by IP address. If you use a domain name, make sure the domain genuinely resolves (editing hosts does not work).
1.2 Install Docker and the MySQL client
# Install Docker and the required packages
zypper refresh
zypper install -y docker mariadb jq git uuid unzip wget
systemctl enable --now docker
ln -sf /usr/share/zoneinfo/Asia/Shanghai /etc/localtime
Pipeline — Integrating Jenkins
Jenkins is an independent open-source project: a Java-based continuous integration and continuous delivery tool. Jenkins began life as Hudson, an extensible continuous integration engine. Official website: https://jenkins.io/
1. Install Jenkins
Jenkins currently ships two main release lines: LTS (long-term support) and weekly. Choose according to your needs. This guide uses the current LTS release; the latest version and installation instructions are available at https://pkg.jenkins.io/redhat/.
# Step1: prepare the runtime environment
INSTALL_PATH=/data/opsany
PAAS_DOCKER_REG=registry.cn-beijing.aliyuncs.com/opsany
mkdir -p ${INSTALL_PATH}/jenkins-home && chmod -R 777 ${INSTALL_PATH}/jenkins-home

# Step2: start the Jenkins Master
docker run --restart=always --name opsany-devops-jenkins -t \
  -v /etc/localtime:/etc/localtime:ro \
  -v ${INSTALL_PATH}/jenkins-home:/var/jenkins_home \
  -p 8008:8080 -p 8009:5000 \
  -d ${PAAS_DOCKER_REG}/jenkins:2.516.2-lts-jdk21
1. Install Jenkins
wget -O /etc/yum.repos.d/jenkins.repo https://pkg.jenkins.io/redhat/jenkins.repo
rpm --import https://pkg.jenkins.io/redhat/jenkins.io.key
yum install -y fontconfig java-11-openjdk jenkins
2. Start Jenkins
[root@linux-node2 ~]# vim /etc/sysconfig/jenkins
# Change the port to 8008 to avoid conflicts with other services
JENKINS_PORT="8008"

[root@linux-node2 ~]# vim /usr/lib/systemd/system/jenkins.service
Environment="JENKINS_PORT=8008"

[root@linux-node2 ~]# systemctl daemon-reload
[root@linux-node2 ~]# systemctl restart jenkins && systemctl enable jenkins
2. Access Jenkins
Open http://192.168.56.12:8008 in a browser to access Jenkins and complete initialization — all default values are fine. On a cloud host, open ports 8008 and 8009 in the security group first, then access it to initialize.
- The first visit asks for the initial admin password, which you can read directly from the mounted path.
cat ${INSTALL_PATH}/jenkins-home/secrets/initialAdminPassword
- When selecting plugins, choose 【Recommended plugins】 and make sure every plugin installs successfully. Retry any that fail.
3. Install Jenkins plugins
After Jenkins initialization, install the following plugins:
- Pipeline: Stage View
- Gitlab
- Nexus Artifact Uploader
The pipeline depends on these three plugins, so all of them must install successfully.
4. Integrate Jenkins into the Pipeline platform
Open 【Pipeline】 → 【System Settings】, click 【Add Tool】 in the top-right corner, and fill in the information as prompted.
- Jenkins address: the access address of Jenkins; an internal IP address works, for example http://192.168.56.12:8008.
- Username: a Jenkins administrator account — the admin user configured when Jenkins was installed.
- API Token: open the settings page from the dropdown menu under the Jenkins user avatar, then create one under the API Token section.
5. Integration notes
- Every application created on the application platform automatically creates a folder on Jenkins named after the 【application unique identifier】.
- Every pipeline created on the Pipeline platform creates a "job" inside the corresponding application's folder.
- If you already had Jenkins before deploying OpsAny, create the folders as described above, then create the application, and they map automatically. (The folder name is the application's unique identifier.)
- You must configure the build environment yourself — for example installing Git, Maven, or other build requirements.
6. Building with Jenkins
We generally do not recommend running pipeline builds on the Jenkins Master. Prepare a separate Jenkins Slave host instead. If you just want a quick pipeline demo, you can install a runtime inside the Master container, for example:
Install Maven
docker exec -it --user root opsany-devops-jenkins /bin/bash
sed -i 's/deb.debian.org/mirrors.aliyun.com/g' /etc/apt/sources.list.d/debian.sources
apt update -y && apt install -y vim wget git
cd /usr/local/src
wget https://archive.apache.org/dist/maven/maven-3/3.9.9/binaries/apache-maven-3.9.9-bin.tar.gz
tar zxf apache-maven-3.9.9-bin.tar.gz
mv apache-maven-3.9.9 /usr/local/
ln -s /usr/local/apache-maven-3.9.9/ /usr/local/maven
Pipelines can then use the absolute path /usr/local/maven/bin/mvn. Note that the first run downloads dependencies and takes a while. For example:
# Run unit tests
/usr/local/maven/bin/mvn test

# Compile the code
/usr/local/maven/bin/mvn compile

# Build the deployment package
/usr/local/maven/bin/mvn package
DevOps Java sample: https://gitee.com/unixhot/devops-demo-java.git
Artifact Repository — Integrating Nexus
OpsAny supports the Nexus artifact repository. Nexus is a very popular free artifact repository that manages artifacts in many languages. It uses ports 8014 and 8015.
1. Prepare the runtime environment.
INSTALL_PATH=/data/opsany
PAAS_DOCKER_REG=registry.cn-beijing.aliyuncs.com/opsany
mkdir -p ${INSTALL_PATH}/nexus-data && chmod -R 777 ${INSTALL_PATH}/nexus-data
2. Start Nexus, set the memory size, and mount the data volume.
Adjust the memory size to your situation —
-Xms500m -Xmx500m. If memory allows, do not go below 4 GB. Note that this sets the JVM heap size: 500 MB is acceptable for testing, while roughly 2 GB is recommended for production.
docker run -d -p 8014:8081 -p 8015:8015 --restart=always --name opsany-devops-nexus \
-v ${INSTALL_PATH}/nexus-data:/nexus-data  \
-e INSTALL4J_ADD_VM_PARAMS="-Xms500m -Xmx500m -XX:MaxDirectMemorySize=500m" \
${PAAS_DOCKER_REG}/nexus3:3.37.0
3. Access Nexus and set the admin password.
-
- Initialize the system
1) The first login requires setting the Admin password. For example: http://192.168.56.12:8014
cat ${INSTALL_PATH}/nexus-data/admin.password
2) Regular users should disable anonymous access: choose "Disable anonymous access".
On a cloud host, open ports 8014 and 8015 in the security group first, then access it to initialize. After creating a business and an application in OpsAny, click into the application detail page to see its pipeline and artifact repository features.
4. Integrate Nexus into the Artifact Repository platform
Open 【Artifact Repository】 → 【System Settings】, click 【Add Tool】 in the top-right corner, and fill in the information as prompted.
- Access address: the access address of Nexus; an internal IP address works, for example http://192.168.56.12:8014.
- Username: a Nexus administrator account,
adminby default. - Password: the password of the admin user.
- Click 【Test Connection】; once it succeeds, save.
Open 【Artifact Repository】 → 【Repositories】 to manage artifacts.
By default Nexus creates 7 repositories — 4 Maven repositories and 4 NuGet repositories. Delete them if you do not need them.
Nexus repository types:
- hosted: local storage, providing a local private repository just like the official Docker registry.
- proxy: proxies another repository, such as Docker Hub.
- group: groups multiple repositories behind a single address.
The OpsAny artifact repository currently supports only hosted repositories; other types must be configured manually in Nexus for now.
5. Configure the Docker trusted registry
If you create a Docker image repository, note that the port must be 8015 — the Docker-based Nexus deployment maps that port by default. Change the IP address below to the Nexus address.
[root@linux-node1 ~]# vim /etc/docker/daemon.json
{
    "insecure-registries" : ["http://192.168.56.11:8015"]
}
[root@linux-node1 ~]# systemctl restart docker
Continuous Deployment — Integrating StackStorm
StackStorm is an open-source, event-driven automation tool that connects applications, services, and workflows. OpsAny uses StackStorm workflows for deployment orchestration.
Check whether it is already deployed in the current environment. If not, follow the steps below.
# Check whether st2 is already deployed; any output means it was deployed automatically.
docker ps | grep st2
1. Deploy StackStorm
-
- Understand the script arguments
st2-install.sh takes two arguments:
st2: for deploying StackStorm and OpsAny on the same host, reusing OpsAny's MongoDB and Redis.all: for deploying StackStorm on a dedicated host that cannot conveniently reach OpsAny's MongoDB and Redis for network or other reasons — it starts new local MongoDB and Redis instances.-
Either argument additionally installs RabbitMQ; StackStorm relies on the RabbitMQ message queue to process events.
-
- Deploy ST2
Choose the argument that fits your situation.
# StackStorm is integrated into the Control Platform automatically at the end
cd /opt/opsany-paas/install/
./st2-install.sh st2
-
- Test st2
docker exec -it opsany-st2-client /bin/bash
st2 action list --pack=core

# The following output means st2 was deployed successfully
+---------------------+------+----------------------------------------------------------------------+
| ref                 | pack | description                                                          |
+---------------------+------+----------------------------------------------------------------------+
| core.announcement   | core | Action that broadcasts the announcement to all stream consumers.     |
| core.ask            | core | Action for initiating an Inquiry (usually in a workflow)             |
| core.echo           | core | Action that executes the Linux echo command on the localhost.        |
| core.error          | core | Action that executes the Linux echo command (to stderr) on the       |
|                     |      | localhost.                                                           |
| core.http           | core | Action that performs an http request.                                |
| core.inject_trigger | core | Action which injects a new trigger in the system.                    |
| core.local          | core | Action that executes an arbitrary Linux command on the localhost.    |
| core.local_sudo     | core | Action that executes an arbitrary Linux command on the localhost.    |
| core.noop           | core | Action that does nothing                                             |
| core.pause          | core | Action to pause current thread of workflow/sub-workflow.             |
| core.remote         | core | Action to execute arbitrary linux command remotely.                  |
| core.remote_sudo    | core | Action to execute arbitrary linux command remotely.                  |
| core.sendmail       | core | This sends an email                                                  |
| core.uuid           | core | Generate a new UUID (default uuid4)                                  |
| core.winrm_cmd      | core | Action to execute arbitrary Windows Command Prompt command remotely  |
|                     |      | via WinRM.                                                           |
| core.winrm_ps_cmd   | core | Action to execute arbitrary Windows PowerShell command remotely via  |
|                     |      | WinRM.                                                               |
+---------------------+------+----------------------------------------------------------------------+
-
- Access ST2
Test it in a browser:
- http://IP-address:8005
- Default account: st2admin/OpsAny@2023
For bare-metal deployment, refer to the official documentation: https://docs.stackstorm.com/install/index.html
Use the MongoDB, Redis, and RabbitMQ that OpsAny has already deployed. If StackStorm runs on the same host as OpsAny, make sure the ports are changed away from 80.
-
- Configure the yum repository
curl -s https://packagecloud.io/install/repositories/StackStorm/stable/script.rpm.sh | sudo bash
- Configure the yum repository
-
- Install st2 and RabbitMQ
# Deploy St2
yum install -y st2 crudini

# Deploy RabbitMQ
RABBITMQ_DEFAULT_USER=opsany
RABBITMQ_DEFAULT_PASS=OpsAny@2020

docker run -d --restart=always --name opsany-base-rabbitmq \
    -e RABBITMQ_DEFAULT_USER="$RABBITMQ_DEFAULT_USER" \
    -e RABBITMQ_DEFAULT_PASS="$RABBITMQ_DEFAULT_PASS" \
    -p 15672:15672 -p 5672:5672 -p 15692:15692 \
    -v /etc/localtime:/etc/localtime:ro \
    registry.cn-beijing.aliyuncs.com/opsany/rabbitmq:3.8.9-management-alpine
-
- Configure st2
You can reuse the RabbitMQ, Redis, and MongoDB that OpsAny has already deployed. Replace the addresses, usernames, and passwords in the example below with the correct values.
vim /etc/st2/st2.conf

# Update the following to point at the RabbitMQ installed above.
[messaging]
url = amqp://opsany:OpsAny@2020@192.168.56.11:5672/

# Update the following to use OpsAny's Redis. Note that the Redis password must not contain @
[coordination]
url = redis://:OpsAny2020@192.168.56.11:6379

# Add the following configuration; it is absent by default. You can use the MongoDB bundled with OpsAny.
[database]
host = 192.168.56.11
port = 27017
db_name = event
username = event
password = OpsAny@2020
-
- Set up data encryption
DATASTORE_ENCRYPTION_KEYS_DIRECTORY="/etc/st2/keys"
DATASTORE_ENCRYPTION_KEY_PATH="${DATASTORE_ENCRYPTION_KEYS_DIRECTORY}/datastore_key.json"

sudo mkdir -p ${DATASTORE_ENCRYPTION_KEYS_DIRECTORY}
sudo st2-generate-symmetric-crypto-key --key-path ${DATASTORE_ENCRYPTION_KEY_PATH}

# Make sure only st2 user can read the file
sudo chgrp st2 ${DATASTORE_ENCRYPTION_KEYS_DIRECTORY}
sudo chmod o-r ${DATASTORE_ENCRYPTION_KEYS_DIRECTORY}
sudo chgrp st2 ${DATASTORE_ENCRYPTION_KEY_PATH}
sudo chmod o-r ${DATASTORE_ENCRYPTION_KEY_PATH}

# set path to the key file in the config
sudo crudini --set /etc/st2/st2.conf keyvalue encryption_key_path ${DATASTORE_ENCRYPTION_KEY_PATH}

sudo st2ctl restart-component st2api
This deliberately departs from the official setup: SSH is not configured; instead, calls go through the Control Platform and the Job Platform.
-
- Start the services
st2ctl start
-
- Register sensors, rules and actions:
st2ctl reload
-
- Configure authentication
yum -y install httpd-tools
echo 'OpsAny@2020' | sudo htpasswd -i /etc/st2/htpasswd st2admin

# Update the configuration to enable authentication.
vim /etc/st2/st2.conf
[auth]
# Change to enabled
enable = True
backend = flat_file
backend_kwargs = {"file_path": "/etc/st2/htpasswd"}
# ...

# Restart and test
st2ctl restart-component st2api
st2 login st2admin --write-password
-
- Verify the installation
st2 action list
-
- Configure the web UI
Note: if you install st2 on the same host as GitLab, resolve the port 80 conflict yourself. Change the Nginx port, comment out port 80, and move 443 to another port.
yum install -y st2web nginx

# Create a self-signed certificate under /etc/ssl/st2
mkdir -p /etc/ssl/st2
openssl req -x509 -newkey rsa:2048 -keyout /etc/ssl/st2/st2.key -out /etc/ssl/st2/st2.crt \
-days 365 -nodes -subj "/C=US/ST=California/L=Palo Alto/O=StackStorm/OU=Information \
Technology/CN=$(hostname)"

# Copy the configuration file into the configuration directory.
cp /usr/share/doc/st2/conf/nginx/st2.conf /etc/nginx/conf.d/

# Disable default_server configuration in existing /etc/nginx/nginx.conf
sed -i 's/default_server//g' /etc/nginx/nginx.conf

# If this is not a dedicated deployment, change the Nginx port and comment out port 80
vim /etc/nginx/nginx.conf
#    server {
#        listen       80;
#        listen       [::]:80;
#        server_name  _;
#        root         /usr/share/nginx/html;

        # Load configuration files for the default server block.
#        include /etc/nginx/default.d/*.conf;

#        error_page 404 /404.html;
#        location = /404.html {
#        }

#        error_page 500 502 503 504 /50x.html;
#        location = /50x.html {
#        }
#    }


# If this is not a dedicated deployment, change the Nginx port, comment out port 80, then move st2 to port 8005.
vim /etc/nginx/conf.d/st2.conf
...
server {
listen       *:8005 ssl;
...

systemctl restart nginx
systemctl enable nginx
-
- Download the OpsAny core st2 Pack.
OpsAny continuous deployment relies on StackStorm's orchestration capabilities. We have developed a Pack for StackStorm that must be initialized. Run the following commands on the server where StackStorm is installed. This is important.
# Run on the host where OpsAny is deployed.
mkdir -p /opt/stackstorm-packs && cd /opt/stackstorm-packs
git clone --depth=1 https://gitee.com/opsany/opsany_core.git
git clone --depth=1 https://gitee.com/opsany/opsany_workflow.git
-
- Run initialization
Run the following commands on the server where OpsAny is installed. Change the addresses and passwords accordingly, but do not change the username. Note that ST2 deployed with Docker Compose uses http on port 80.
# Run initialization; change the platform address, the ST2 address, and the ST2 password below.
source /opt/opsany-paas/install/install.config
source ${INSTALL_PATH}/conf/.passwd_env
DEVOPS_SECRET_KEY=$(cat ${INSTALL_PATH}/conf/.devops_secret_key)
ST2_URL=http://www.opsany.com:8005
ST2_PASSWD="OpsAny@2023"
cd /opt/opsany-paas/saas/
python3 init-ce-st2.py --domain https://${DOMAIN_NAME} --username admin  --password ${ADMIN_PASSWORD} --st2_url ${ST2_URL}  --st2_username st2admin --st2_password ${ST2_PASSWD} --app_code devops --app_secret ${DEVOPS_SECRET_KEY} --st2_core_pack_source gitee

# Output similar to the following means initialization succeeded; otherwise the feature will not work.
[SUCCESS] init devops st2 success.
Downloading the OpsAny core package is expected to take 60 seconds...
[SUCCESS] init st2 pack success.
[SUCCESS] config core pack success.
Once initialization finishes, the URL and API key are filled in automatically under 【Control Platform】 → 【Collection Management】 → (StackStorm integration). You can now create a deployment task in Continuous Deployment and test it.
3. How the integration works
OpsAny integrates StackStorm to take advantage of its workflow orchestration. From an enterprise best-practice perspective, there are two kinds of workflows:
- Business workflows: what we usually call BPM. The open-source Activiti leads in this space, but it does not fit operational execution well.
- Execution workflows: their main scenarios are atomic operations orchestration (file distribution, command execution, data collection). Here OpsAny chose StackStorm's Orquesta.
OpsAny's deployment orchestration in the Continuous Deployment platform relies on StackStorm's Orquesta.
- First, OpsAny integrates the Job Platform's script execution and file distribution into StackStorm as Actions.
- Then, when a user creates a continuous deployment task, OpsAny automatically generates a StackStorm workflow.
- Finally, when a user runs a continuous deployment task, OpsAny calls StackStorm to execute the corresponding workflow.
Code Repository
If you need a lightweight Git code repository, Gogs works well. If you need a full-featured one, GitLab remains the best choice. The deployment example below uses Gogs.
- Prepare the Gogs database. MySQL and PostgreSQL are supported; the example below uses MySQL.
cd /opt/opsany-paas/install/
source install.config
mysql -h "${MYSQL_SERVER_IP}" -P ${MYSQL_SERVER_PORT} -u root -e "create database gogs DEFAULT CHARACTER SET utf8 COLLATE utf8_general_ci;"
mysql -h "${MYSQL_SERVER_IP}" -P ${MYSQL_SERVER_PORT} -u root -e "CREATE USER 'gogs'@'%' identified by "123456.coM";"
mysql -h "${MYSQL_SERVER_IP}" -P ${MYSQL_SERVER_PORT} -u root -e "grant all on gogs.* to gogs@'%';"
- Start Gogs in a Docker container.
# Step1: prepare the runtime environment
    INSTALL_PATH=/data/opsany
    PAAS_DOCKER_REG=registry.cn-beijing.aliyuncs.com/opsany
    mkdir -p ${INSTALL_PATH}/gogs-volume

# Step2: start the Gogs container
    docker run --restart=always --name opsany-devops-gogs -t \
    -v /etc/localtime:/etc/localtime:ro \
    -v ${INSTALL_PATH}/gogs-volume:/data \
    -p 8016:3000 -p 8017:22 \
    -d ${PAAS_DOCKER_REG}/gogs:0.14.2
-
Access port 8016 in a browser to run the installation wizard. Note that Gogs listens on port 3000 internally and uses port 22 for SSH — do not change those. You do need to change the access address.
-
Disable Gogs registration.
# Step 1: edit the configuration file
vim /data/opsany/gogs-home/gogs/conf/app.ini
DISABLE_REGISTRATION        = true

# Step 2: restart the container
docker restart opsany-devops-gogs

# Step 1: edit the configuration file
vim /data/opsany/gogs-home/gogs/conf/app.ini
DISABLE_REGISTRATION = true
# Step 2: restart the container
docker restart opsany-devops-gogs