












Cloud Management Platform (CMP)
The Cloud Management Platform (CMP) provides unified onboarding of cloud resources for enterprises, helping customers provision and manage multi-cloud resources. Through unified management of infrastructure resources and data resources in the enterprise cloud architecture, it delivers an integrated solution for unified resource orchestration across departments. It also provides integrated management of the operation and sustainability of the enterprise cloud architecture, helping the enterprise continuously optimize that architecture.
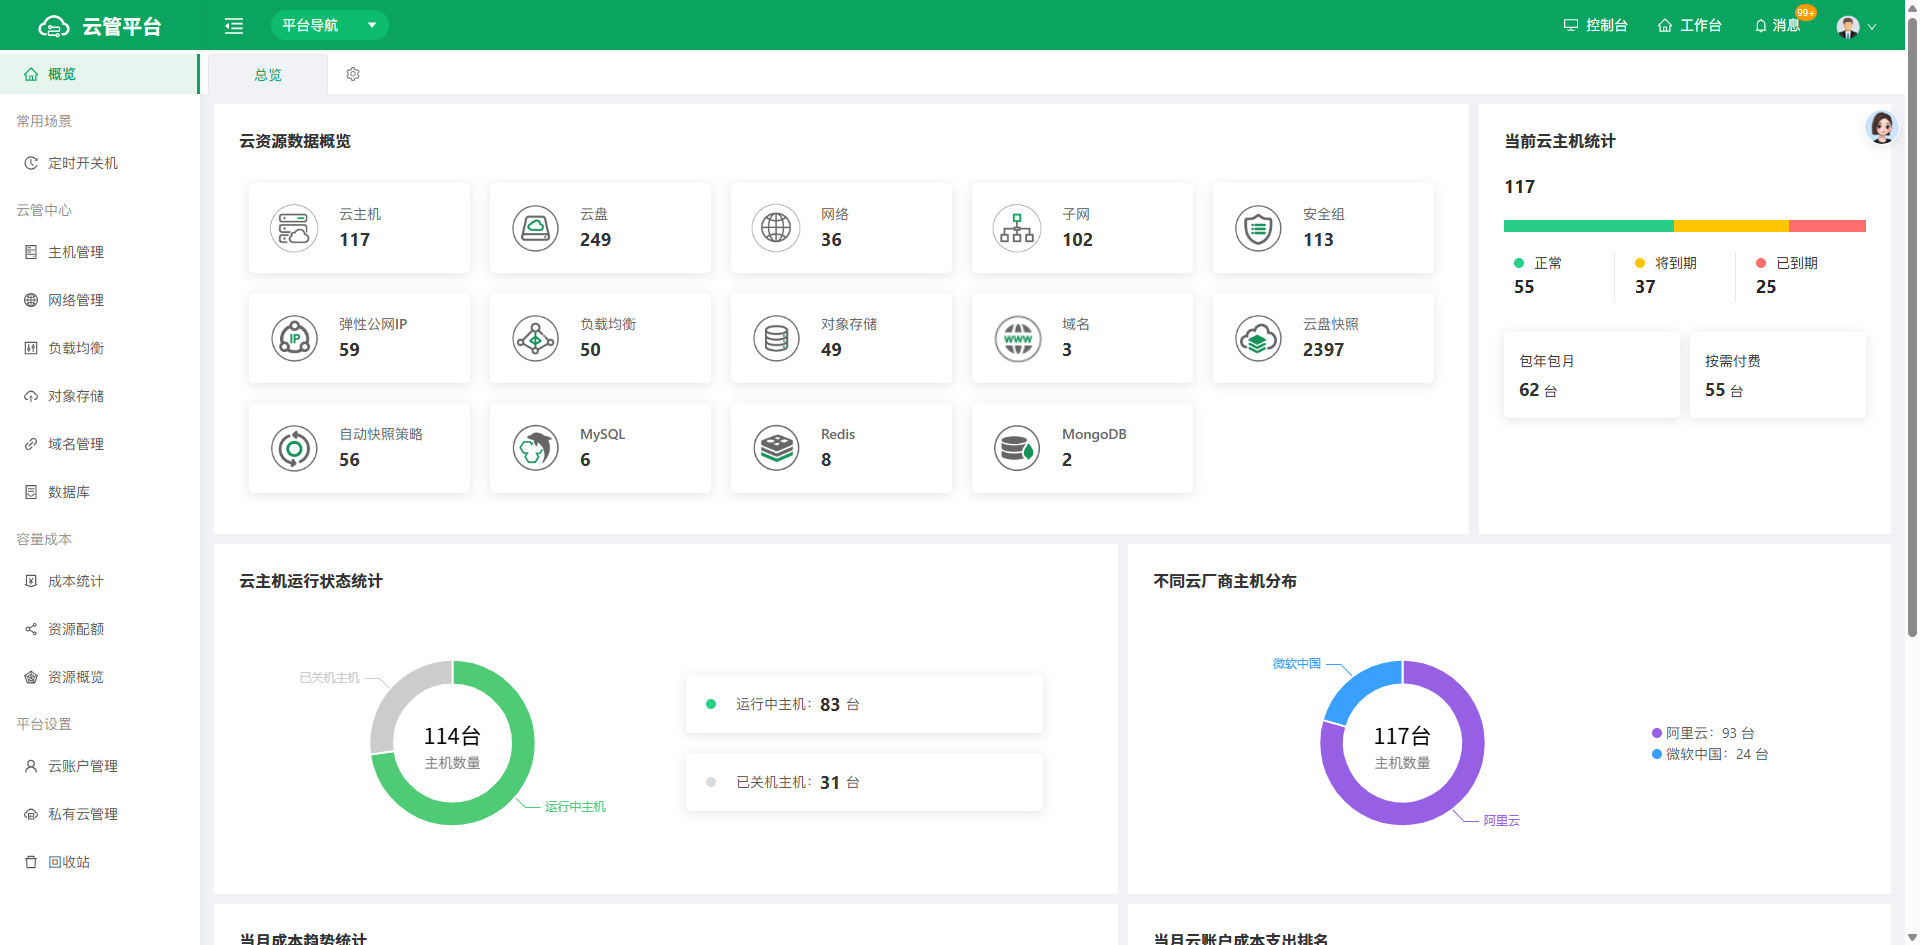
Overview of cloud resources supported through cloud provider integration
| Cloud Product | Alibaba Cloud | Tencent Cloud | Huawei Cloud | Volcano Engine | China Telecom Cloud | Azure Global | Azure China | AWS Global | AWS China | Kingsoft Cloud | Baidu Cloud | Inspur Cloud | Inspur Dedicated Cloud | Qiniu Cloud |
|---|---|---|---|---|---|---|---|---|---|---|---|---|---|---|
| Auto Scaling | View | - | - | - | - | - | - | - | - | - | - | - | - | - |
| Cloud Host | View, Release, Operate | View, Operate | View, Operate | View, Operate | View | View | View | View | View | View | View | View | View | - |
| Network | View | View | View | View | View | View | View | View | View | View | View | View | View | - |
| Subnet | View | View | View | View | View | View | View | View | View | View | View | View | View | - |
| Security Group | View | View | View | View | View | View | View | View | View | View | View | View | View | - |
| Security Group Rule | View, Create, Modify, Delete | View, Create, Modify, Delete | View, Create, Modify, Delete | View | View | View | View | View | View | View, Create, Modify, Delete | View | View | View | - |
| Elastic IP | View | View | View | View | View | - | - | - | - | View | View | View | View | - |
| Shared Bandwidth | View | - | - | - | - | - | - | - | - | - | - | - | View | - |
| Cloud Disk | View | View | View | View | View | View | View | View | View | View | View | View | View | - |
| Load Balancer | View | View | - | - | - | - | View | - | - | - | - | - | View | - |
| Object Storage | View | - | - | - | - | - | View | - | - | - | - | - | - | View |
| Domain Name | View | View | - | - | - | - | - | - | - | - | - | - | - | - |
| Private DNS | View | - | - | - | - | - | View | - | - | - | - | - | - | - |
| Database - MySQL | View | - | View | - | - | - | View | - | - | - | - | - | View | - |
| Database - Redis | View | - | View | - | - | - | View | - | - | - | - | - | View | - |
| Database - Mongo | View | - | View | - | - | - | View | - | - | - | - | - | - | - |
| Database - PostgreSQL | View | - | - | - | - | - | View | - | - | - | - | - | - | - |
| Database - SQLServer | View | - | - | - | - | - | View | - | - | - | - | - | - | - |
| Data Management DMS | View | - | - | - | - | - | - | - | - | - | - | - | - | - |
| Cloud Disk Snapshot | View | View | - | View | View | - | - | - | - | - | - | - | - | - |
| Snapshot Policy | View | View | - | View | View | - | - | - | - | - | - | - | - | - |
| Cloud Enterprise Network | View | - | - | - | - | - | - | - | - | - | - | - | - | - |
| Container Image Service | View | - | - | - | - | - | - | - | - | - | - | - | - | - |
| Cloud Image Repository | View | - | - | - | - | - | View | - | - | - | - | - | - | - |
| Web Application Firewall | View | - | - | - | - | - | View | - | - | - | - | - | - | - |
| VPN Gateway | View | - | - | - | - | - | View | - | - | - | - | - | - | - |
| Cloud Firewall | View | - | - | - | - | - | View | - | - | - | - | - | - | - |
| Direct Connect Gateway | View | - | - | - | - | - | View | - | - | - | - | - | - | - |
| Physical Direct Connect | View | - | - | - | - | - | - | - | - | - | - | - | - | - |
| Border Router | View | - | - | - | - | - | - | - | - | - | - | - | - | - |
| Container Service | View | - | - | - | - | - | View | - | - | - | - | - | - | - |
| Container Service Node | View | - | - | - | - | - | - | - | - | - | - | - | - | - |
| Cost | View | View | View | - | - | - | - | - | - | View | - | - | - | - |
| Tag | View | - | - | - | - | - | View | - | - | - | - | - | - | - |
1. Common Scenarios
1.1 Scheduled Power On/Off
Periodic power-on and power-off tasks can be configured for cloud hosts. This is commonly used for pay-as-you-go instances.
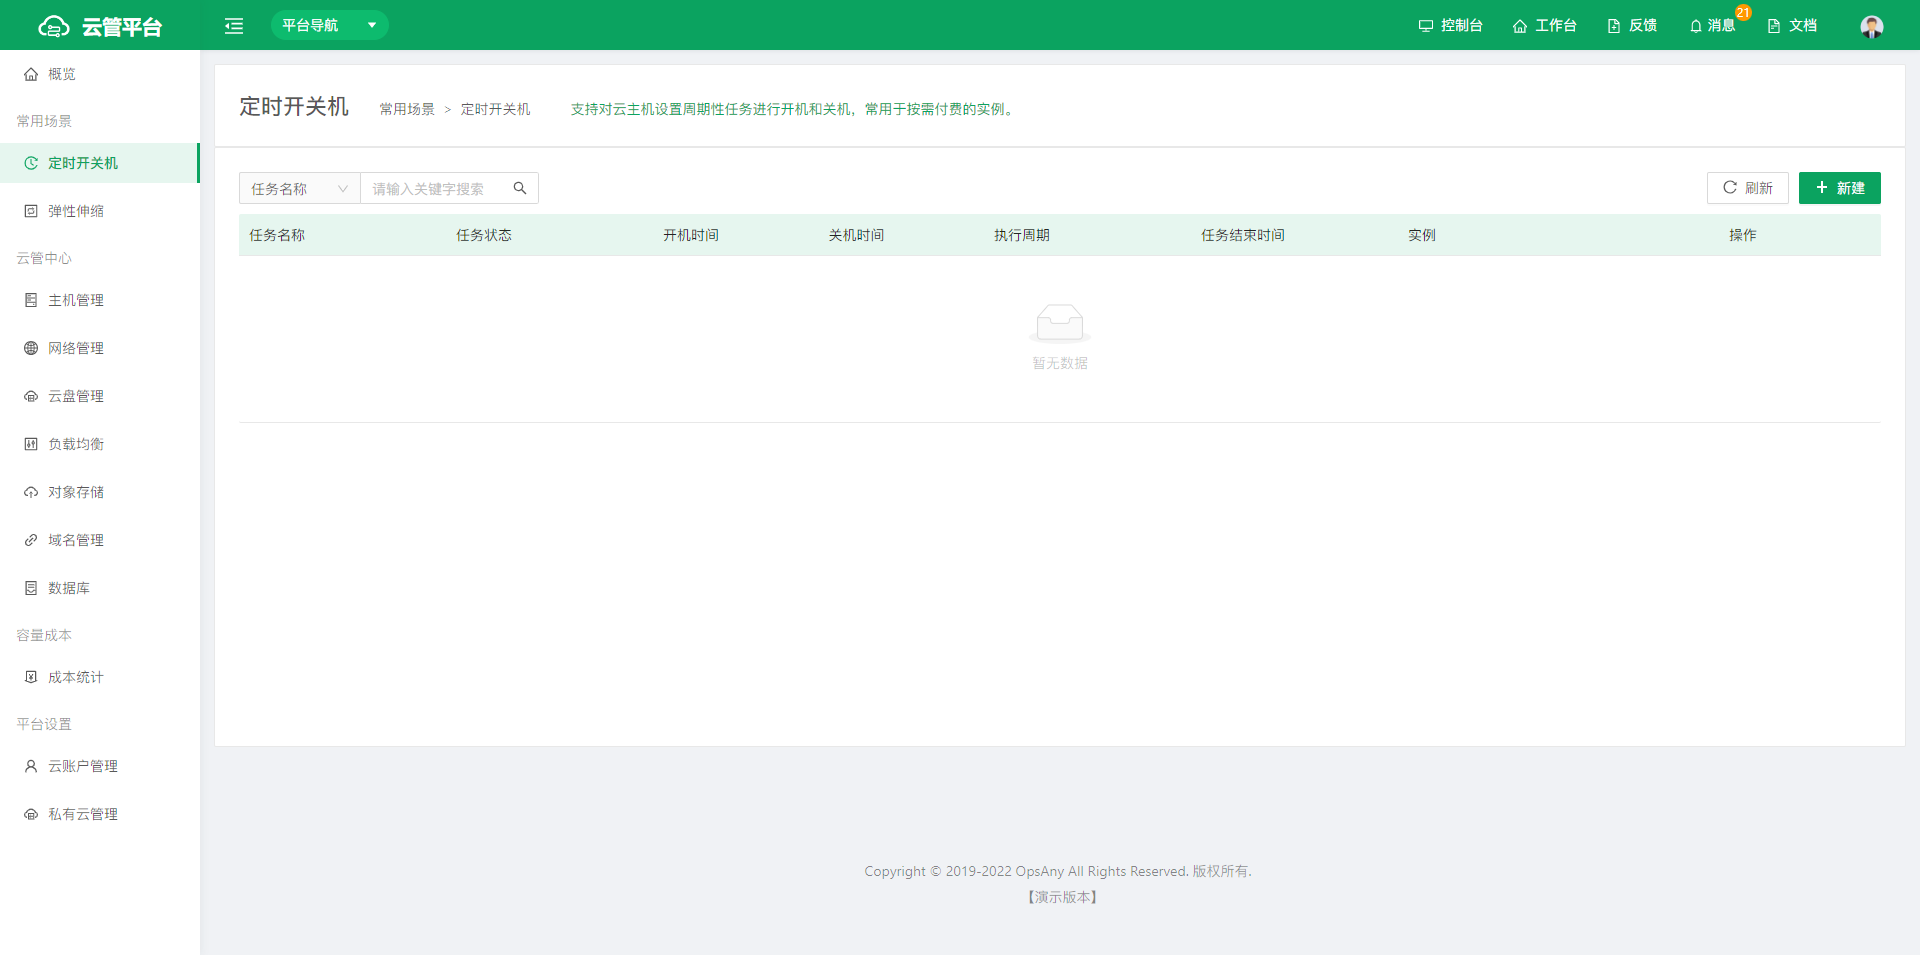
- Go to the Scheduled Power On/Off page, click New in the upper-right corner, and complete the creation in the New Scheduled Power On/Off page.
1.2 Auto Scaling
Auto Scaling is a service that automatically adjusts computing capacity (that is, the number of instances) based on business requirements and policies. You can specify the instance type, either ECS instances or ECI instances. When business demand grows, Auto Scaling automatically adds instances of the specified type to guarantee computing capacity; when business demand drops, it automatically removes instances of the specified type to save costs. Auto Scaling is suitable not only for applications with constantly fluctuating traffic, but also for applications with stable traffic.
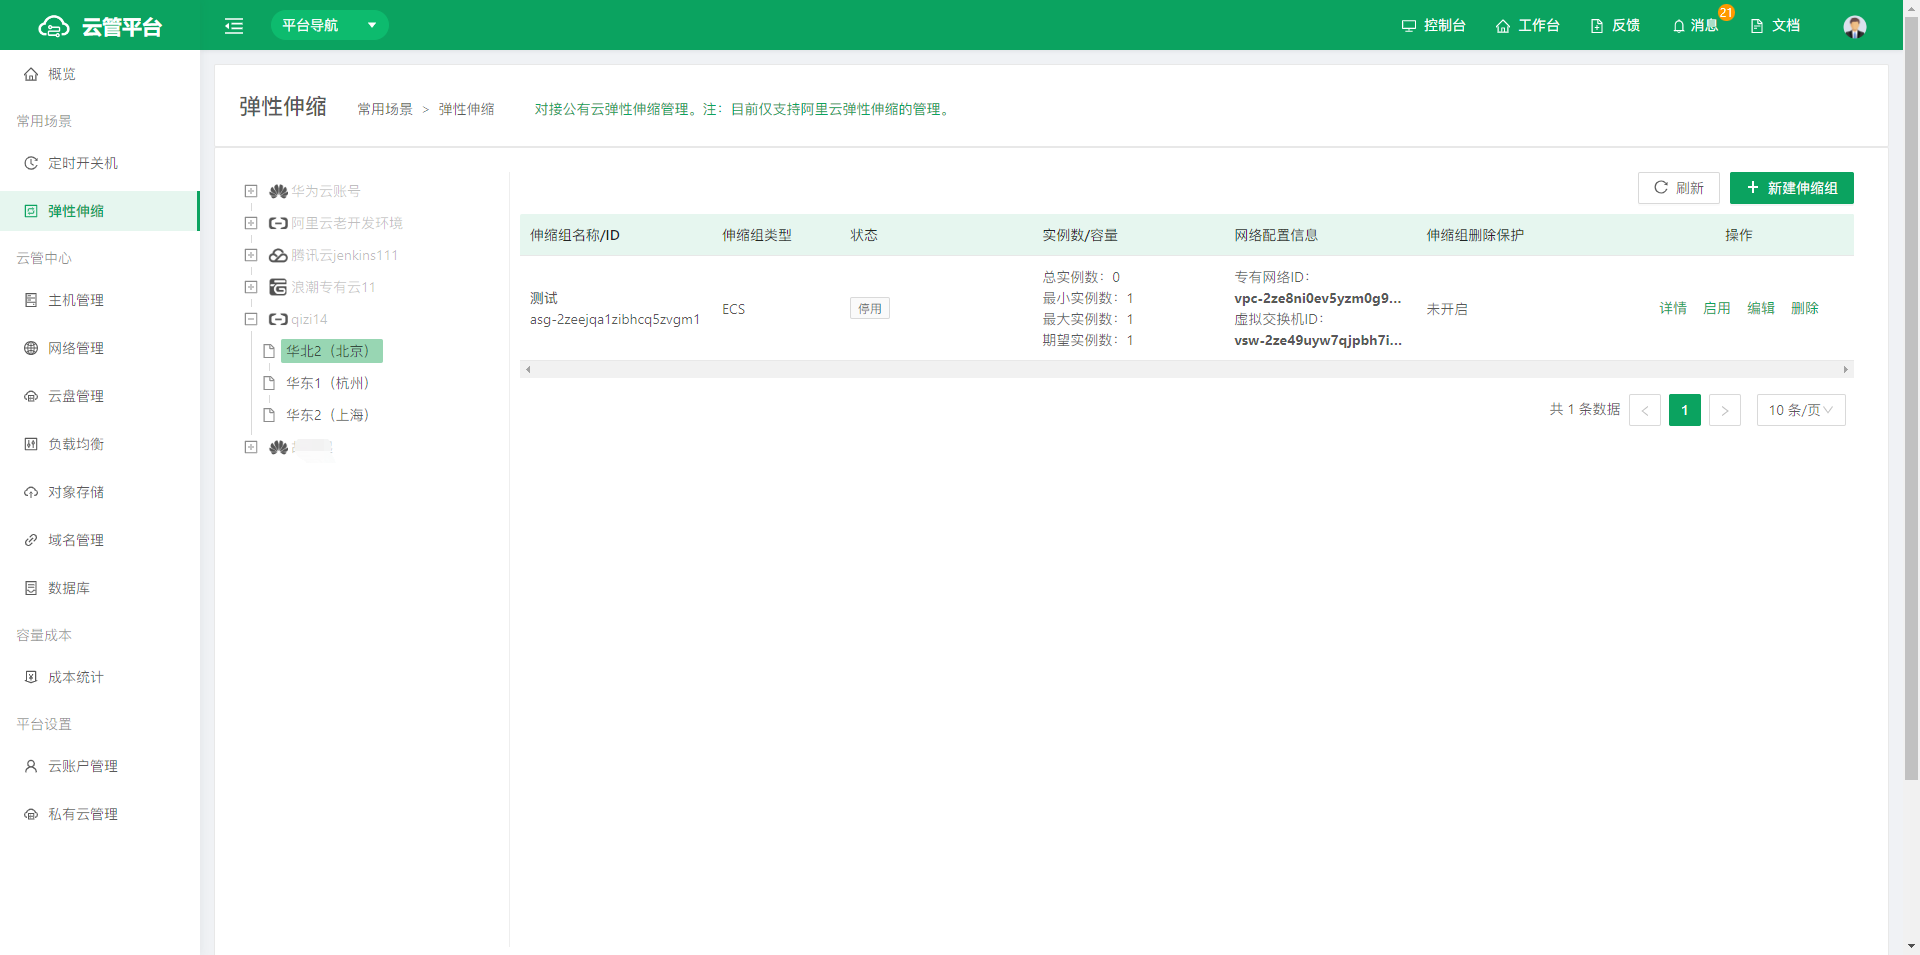
Procedure:
- Create a scaling group.
- Create a scaling configuration.
- Enable the scaling group.
- Create a scaling rule.
- Create an automatic scaling task.
2. CMP Center
The CMP Center mainly covers resource management for common public cloud platforms, including cloud hosts, networks, cloud disks, and more. It provides flexible, elastic resource sets that quickly and conveniently support the ever-changing needs of enterprise business.
2.1 Host Management
Host Management displays a user's public cloud and private cloud resources. For public cloud resources, you can view instance lists for hosts, cloud disks, snapshots, automatic snapshot policies, and other resources.
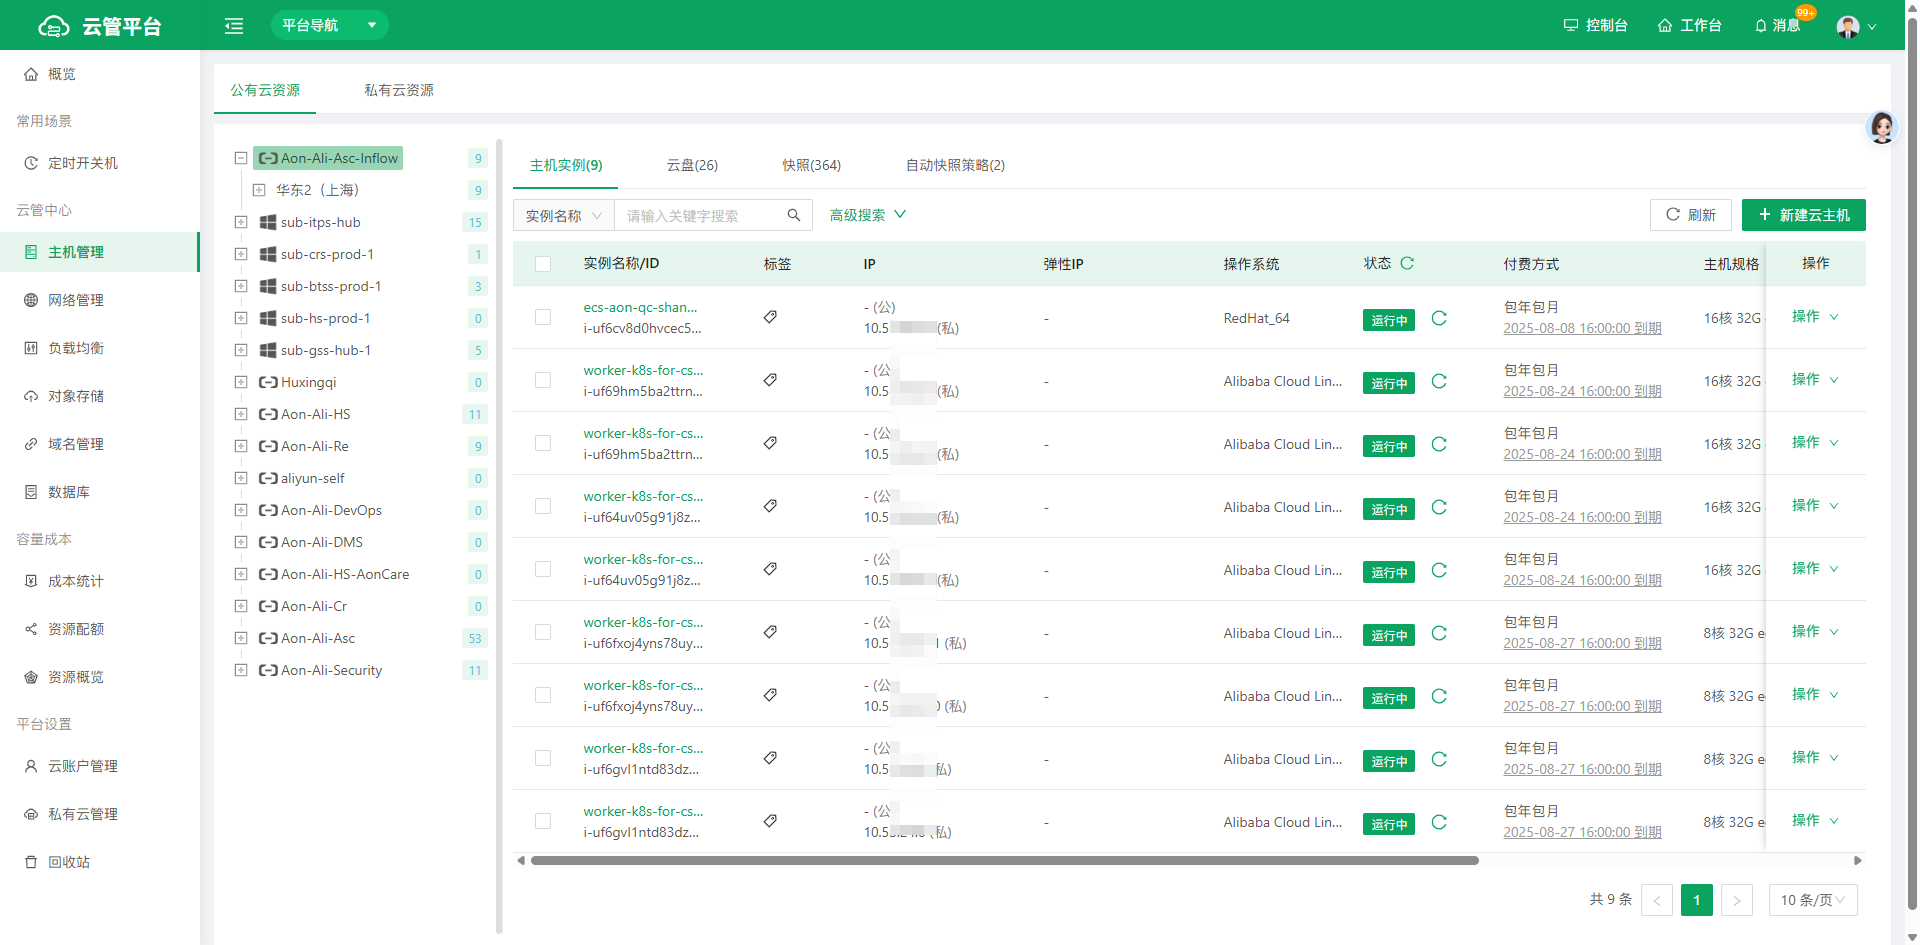
The directory tree on the left shows the cloud accounts created by the user. Click a cloud account to see its cloud regions and availability zones; the corresponding hosts are displayed under the availability zone.
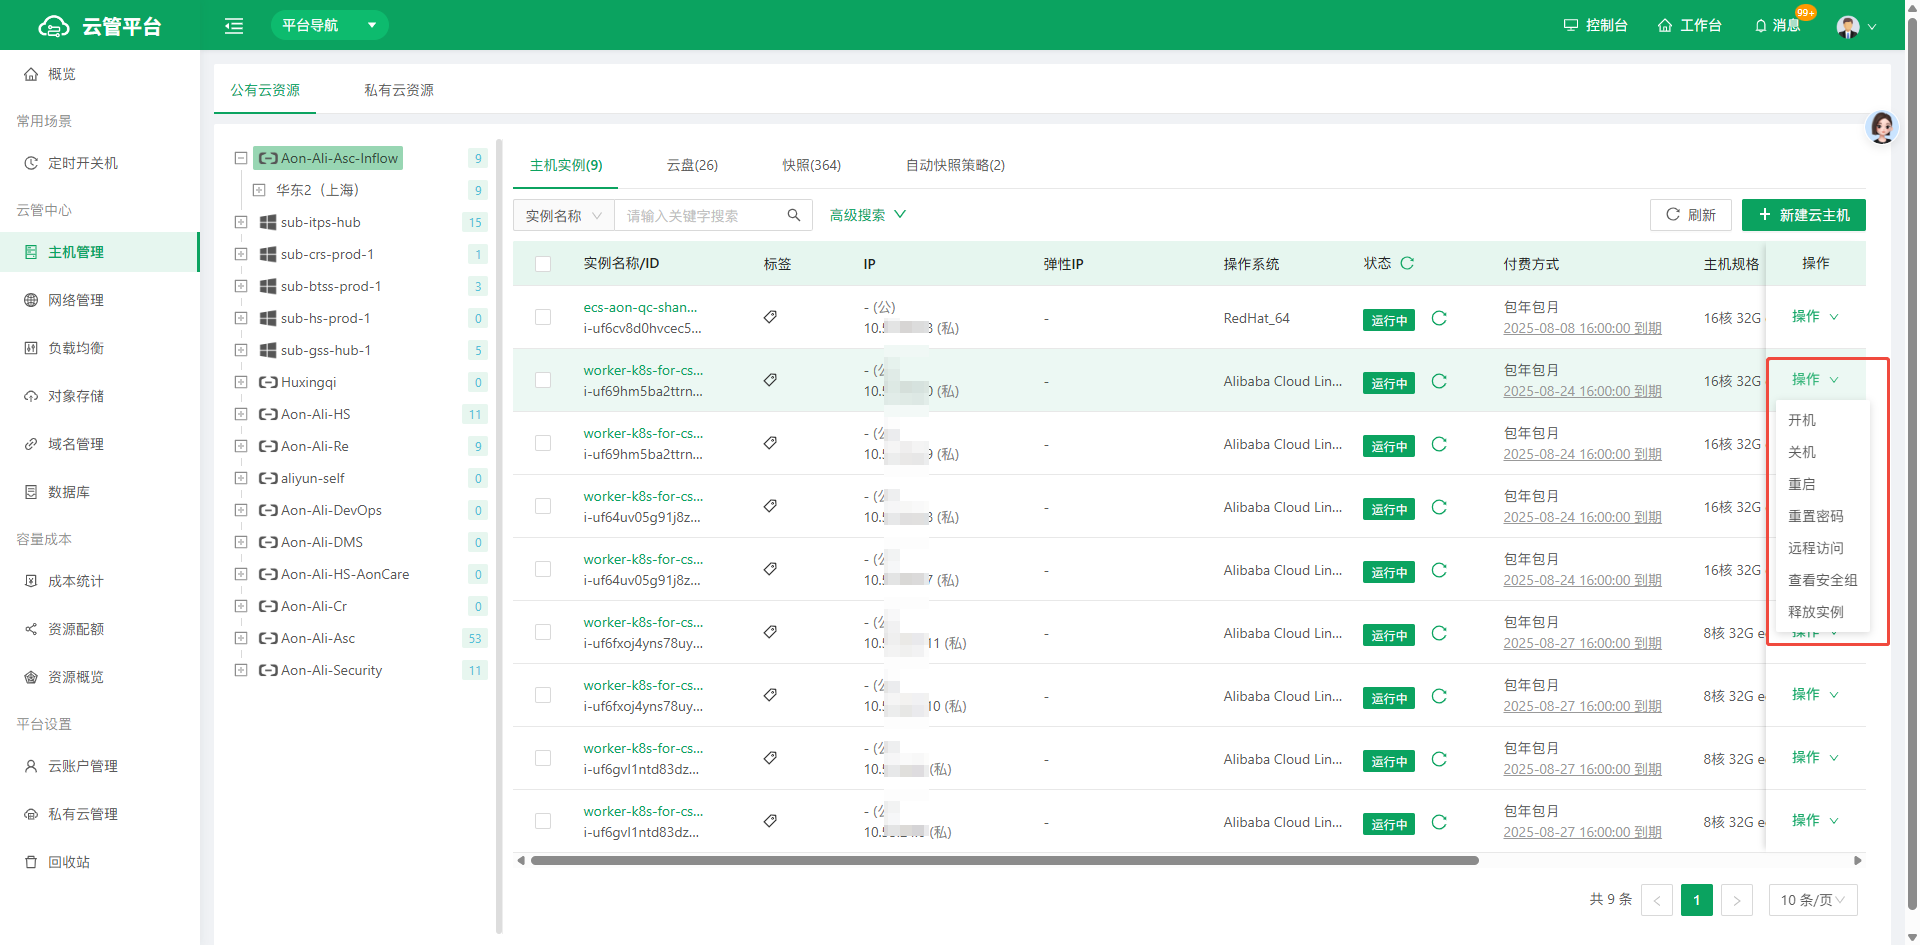
- Click the action button to perform operations on a host, such as power on, power off, restart, reset system password, remote access, view security groups, and release instance.
-
Click Power On to power on the current host instance on the actual cloud (perform with caution).
-
Click Power Off to power off the current host instance on the actual cloud (perform with caution).
-
Click Restart to restart the current host instance on the actual cloud (perform with caution).
-
Click Release Instance to release the current host instance on the actual cloud (perform with caution).
-
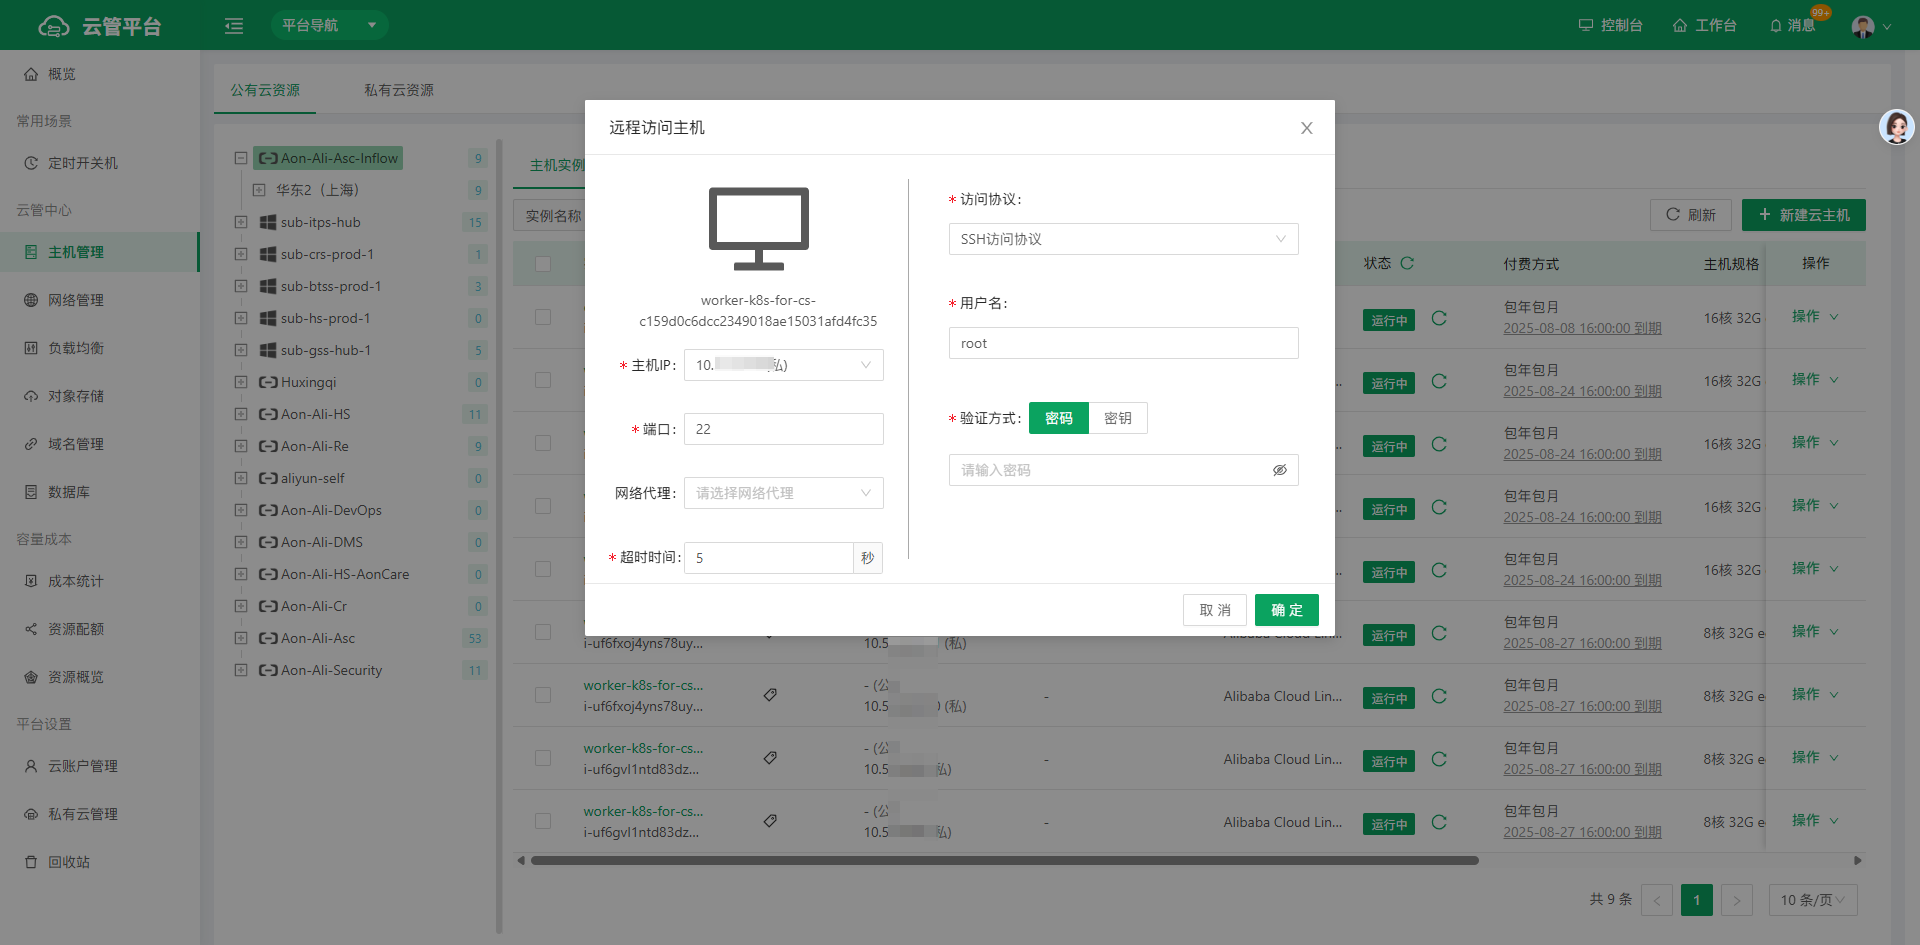
Click Remote Login to log in to the Bastion Host client by entering the host access password.
-
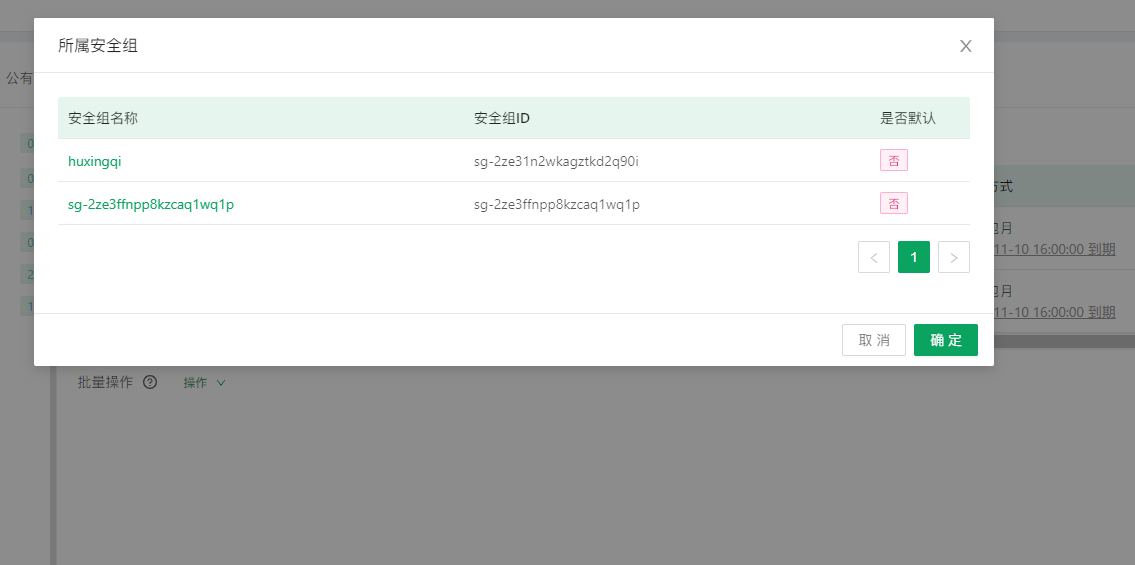
Click View Security Groups to view the security group information in use by the current host.
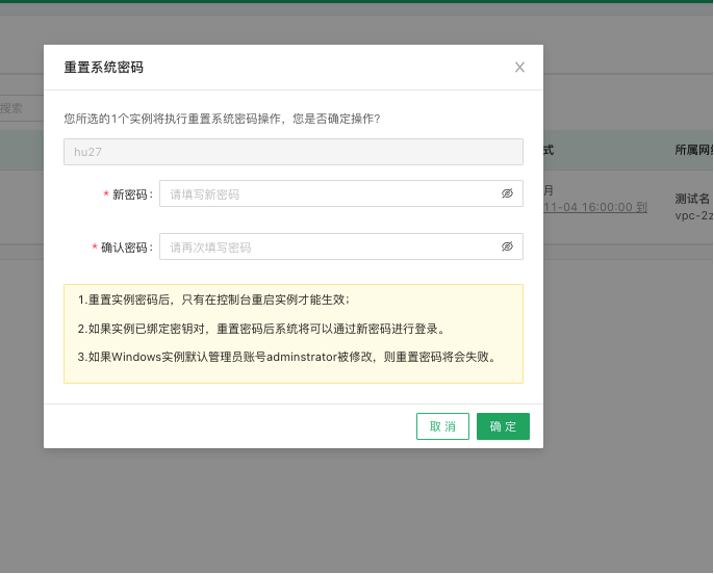
- Click Reset System Password and confirm the password twice to update the host login password (perform with caution).
-
Cloud Disk: Syncs the cloud disks of a cloud account for day-to-day cloud disk management. Cloud disks exist as attachments to cloud hosts; you can view information such as disk type, disk status, and capacity.
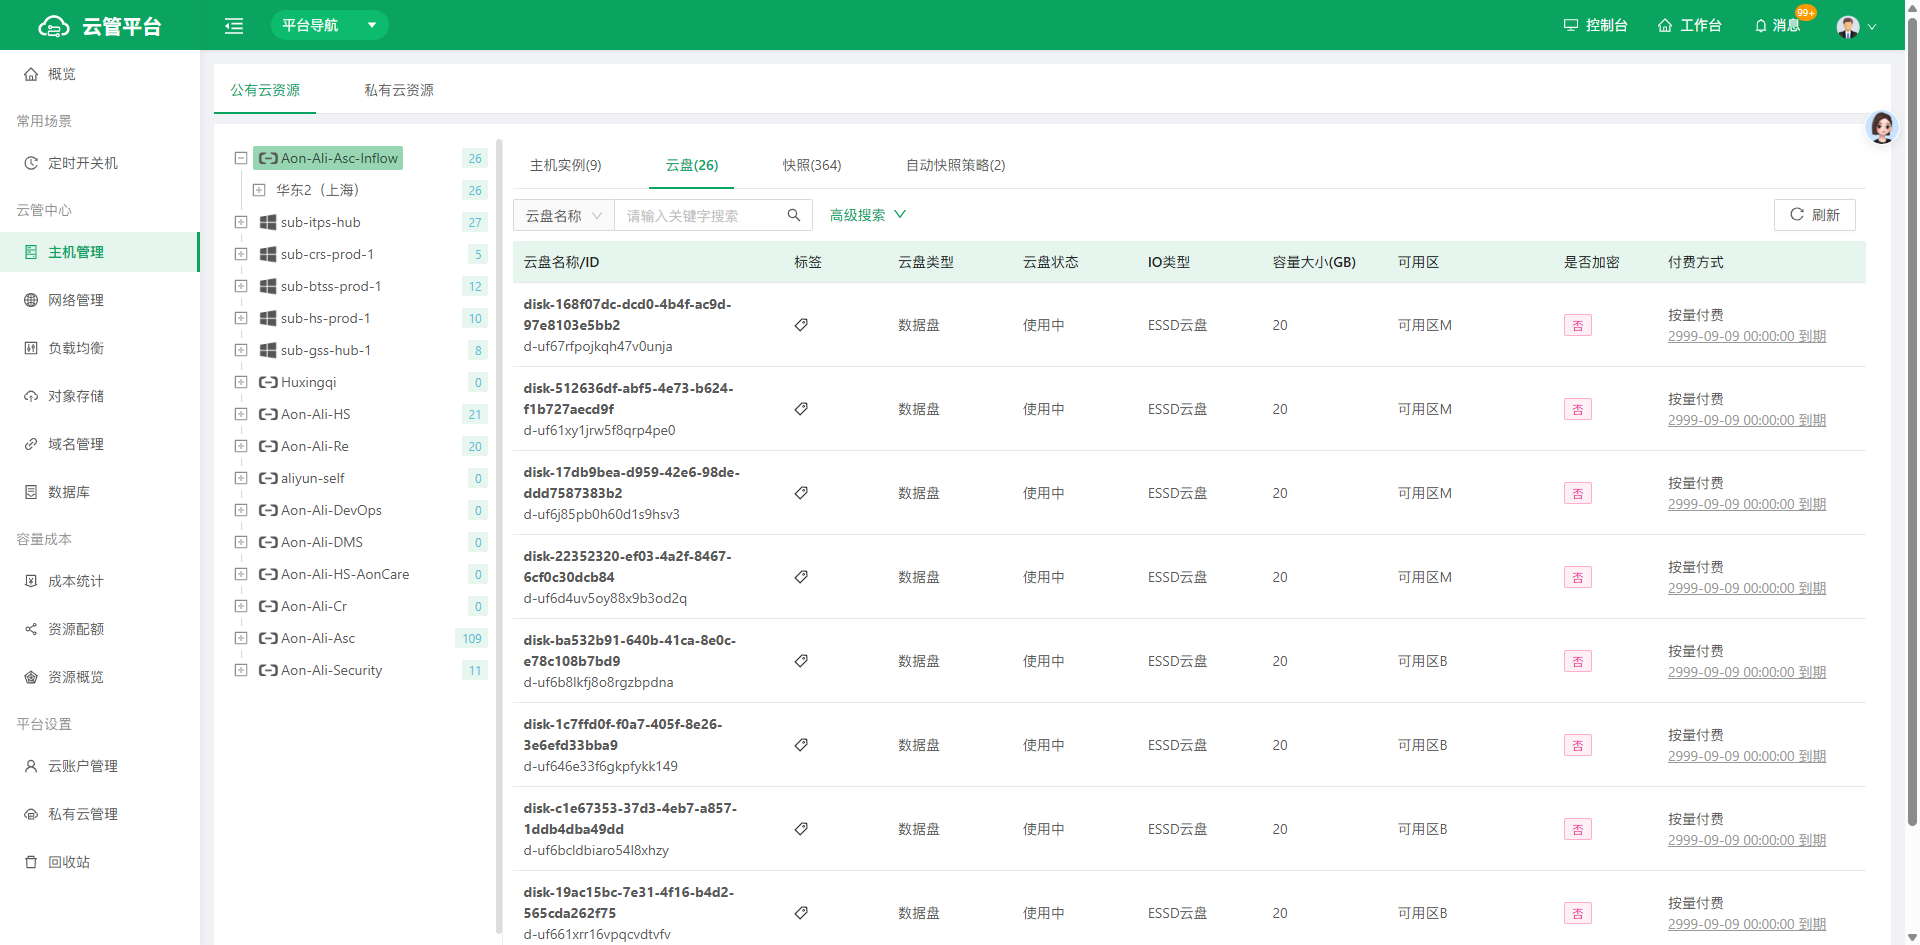 The directory tree on the left shows the cloud account information of all users. Click a cloud account to view all of its cloud regions, then click a cloud region to view the cloud disks in that region, including disk name, type, and status.
-
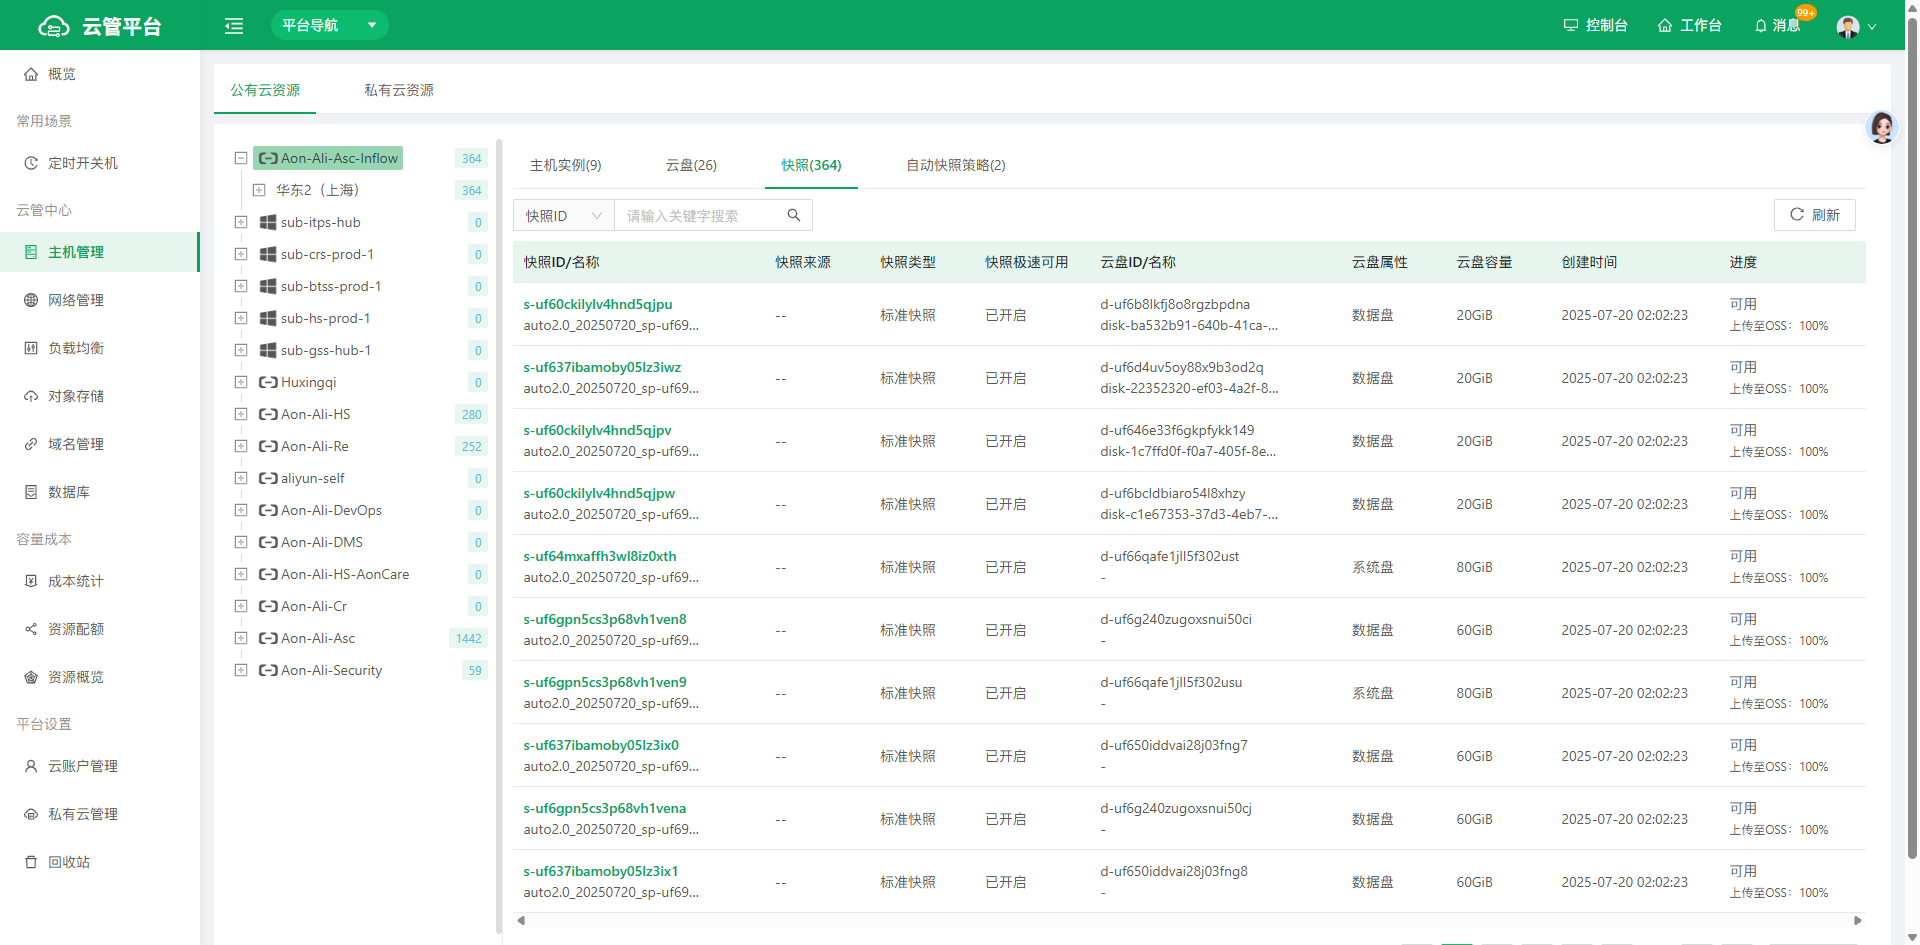
Snapshot: Syncs the snapshot data of a cloud account so you can view disk attributes, disk capacity, creation time, and other information at a specific point in time.
-
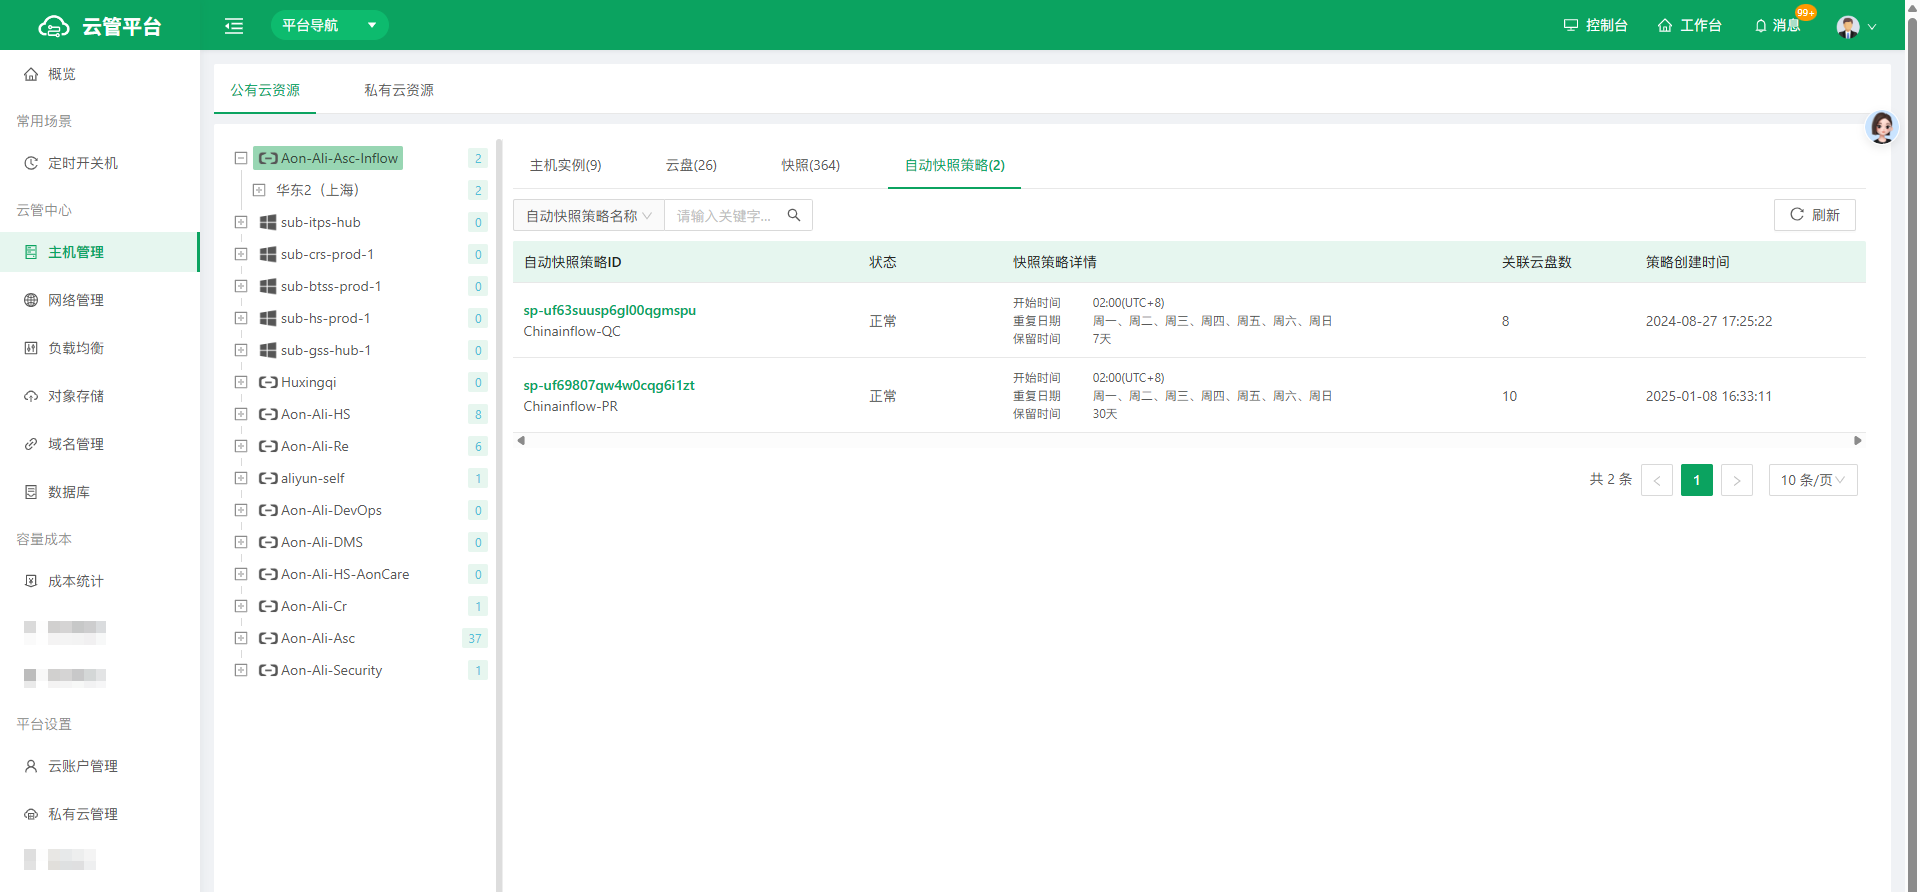
Automatic Snapshot Policy: Syncs the automatic snapshot policy data of a cloud account so you can view details, status, the number of associated cloud disks, and other information for each snapshot policy.
2.2 Network Management
To meet the need for managing IT resources across networks, Network Management lets you manage network systems by viewing the networks, subnets, and security groups of the corresponding region.
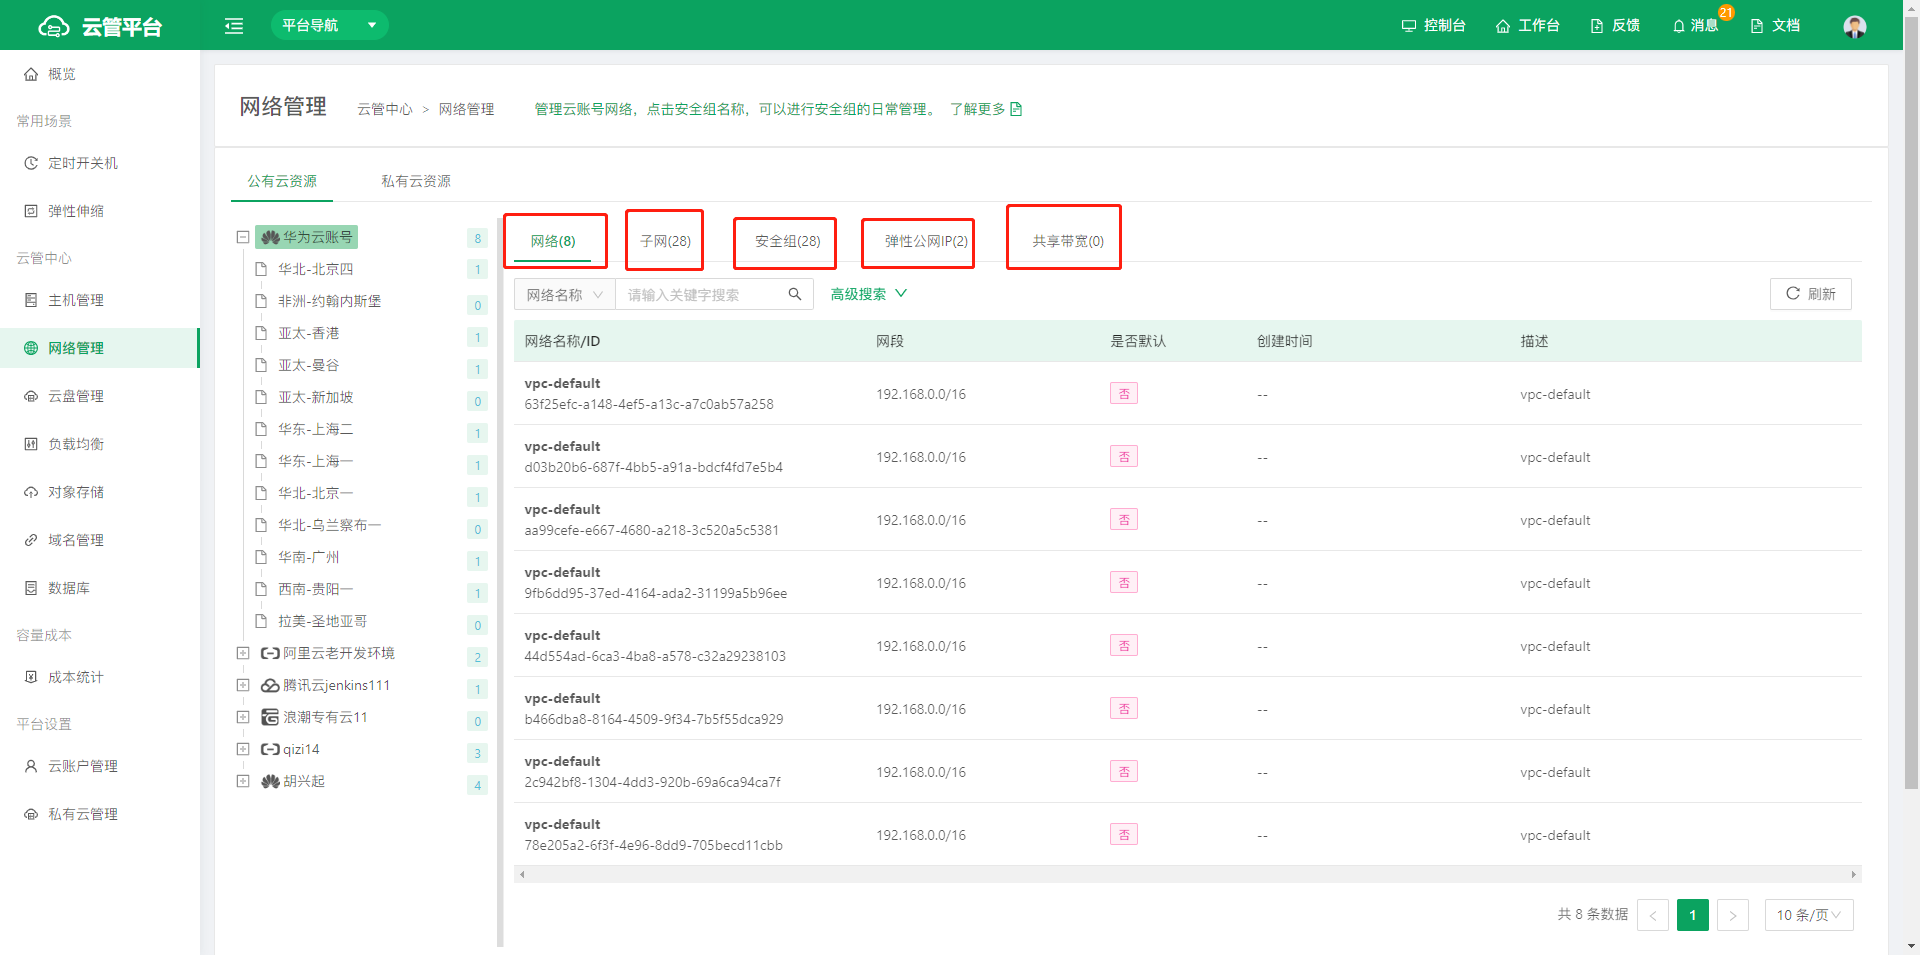
The directory tree on the left shows the cloud account information of all users. Click a cloud account to display its cloud regions, then click a cloud region to display all network information in that region, including network resources, subnet resources, security group resources, elastic public IPs, and shared bandwidth. Switch tabs to view the corresponding content.
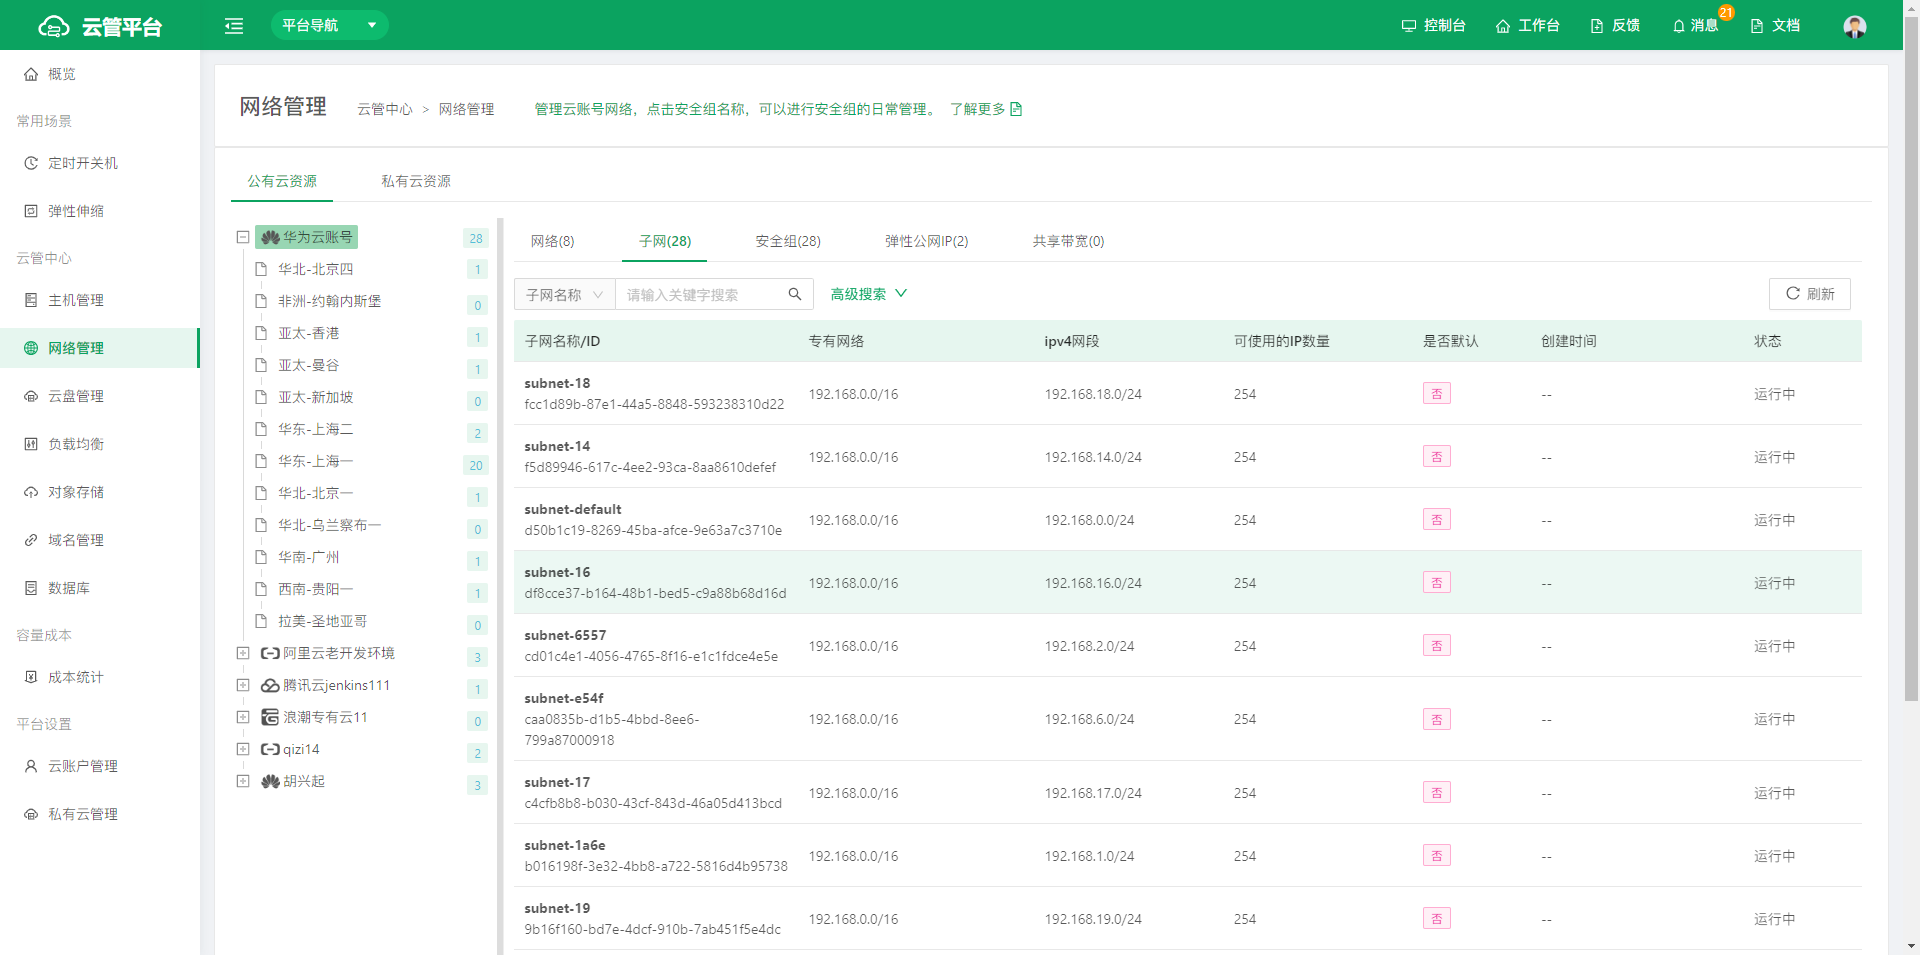
2.2.1 Security Groups
- Click a security group to view its details, including security group rules and associated instances.

2.2.1.1 Add Inbound/Outbound Access Rules
- Click Add, set the access rule you need, and then click Save.

2.2.1.2 Delete Inbound/Outbound Access Rules
- Click Delete to delete the specified security group access rule.

2.2.1.3 Associate Instances
- Click Associate Instance to associate or disassociate host instances.


2.3 Load Balancer
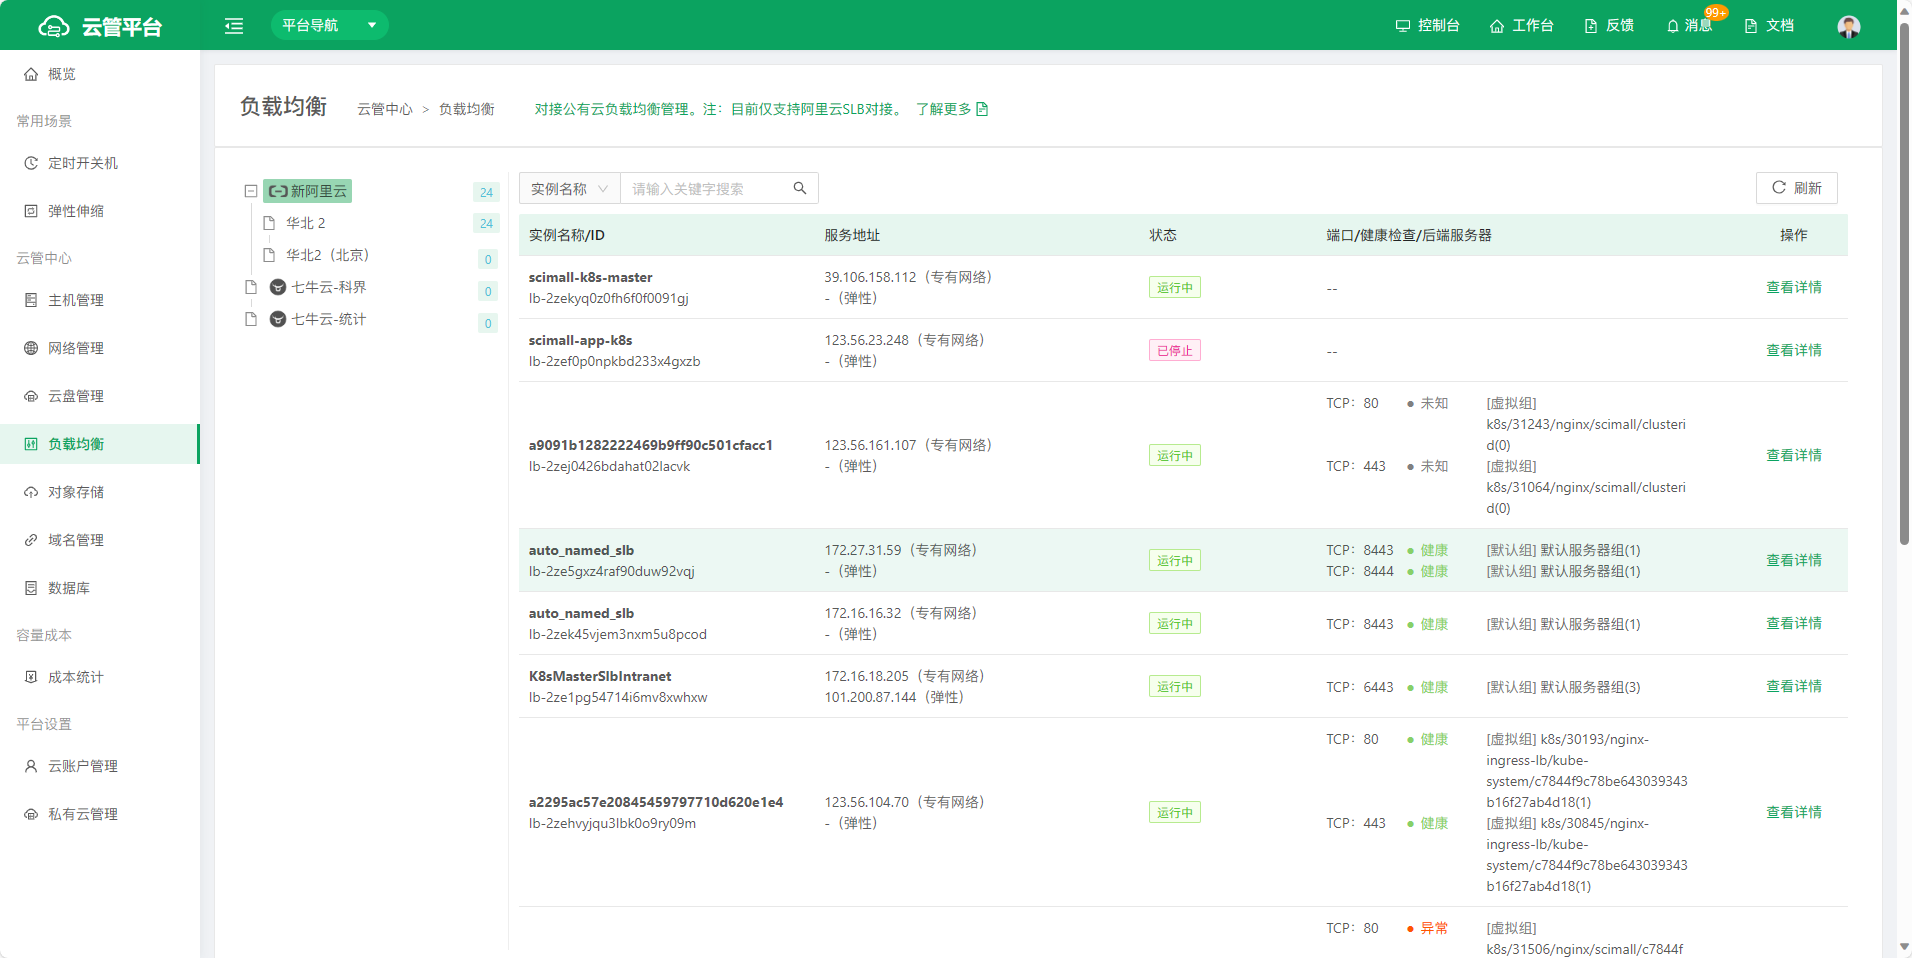
A load balancer works by setting up a virtual service address that virtualizes multiple ECS instances added in the same region into a high-performance, highly available backend service pool, and distributes client requests to the ECS instances in the backend server pool according to forwarding rules.
By default, the load balancer checks the health status of the ECS instances in the cloud server pool and automatically isolates unhealthy ECS instances, eliminating single points of failure on individual ECS instances and improving the overall service capability of the application. In addition, the load balancer is resistant to DDoS attacks, which strengthens the protection of application services.
2.4 Object Storage
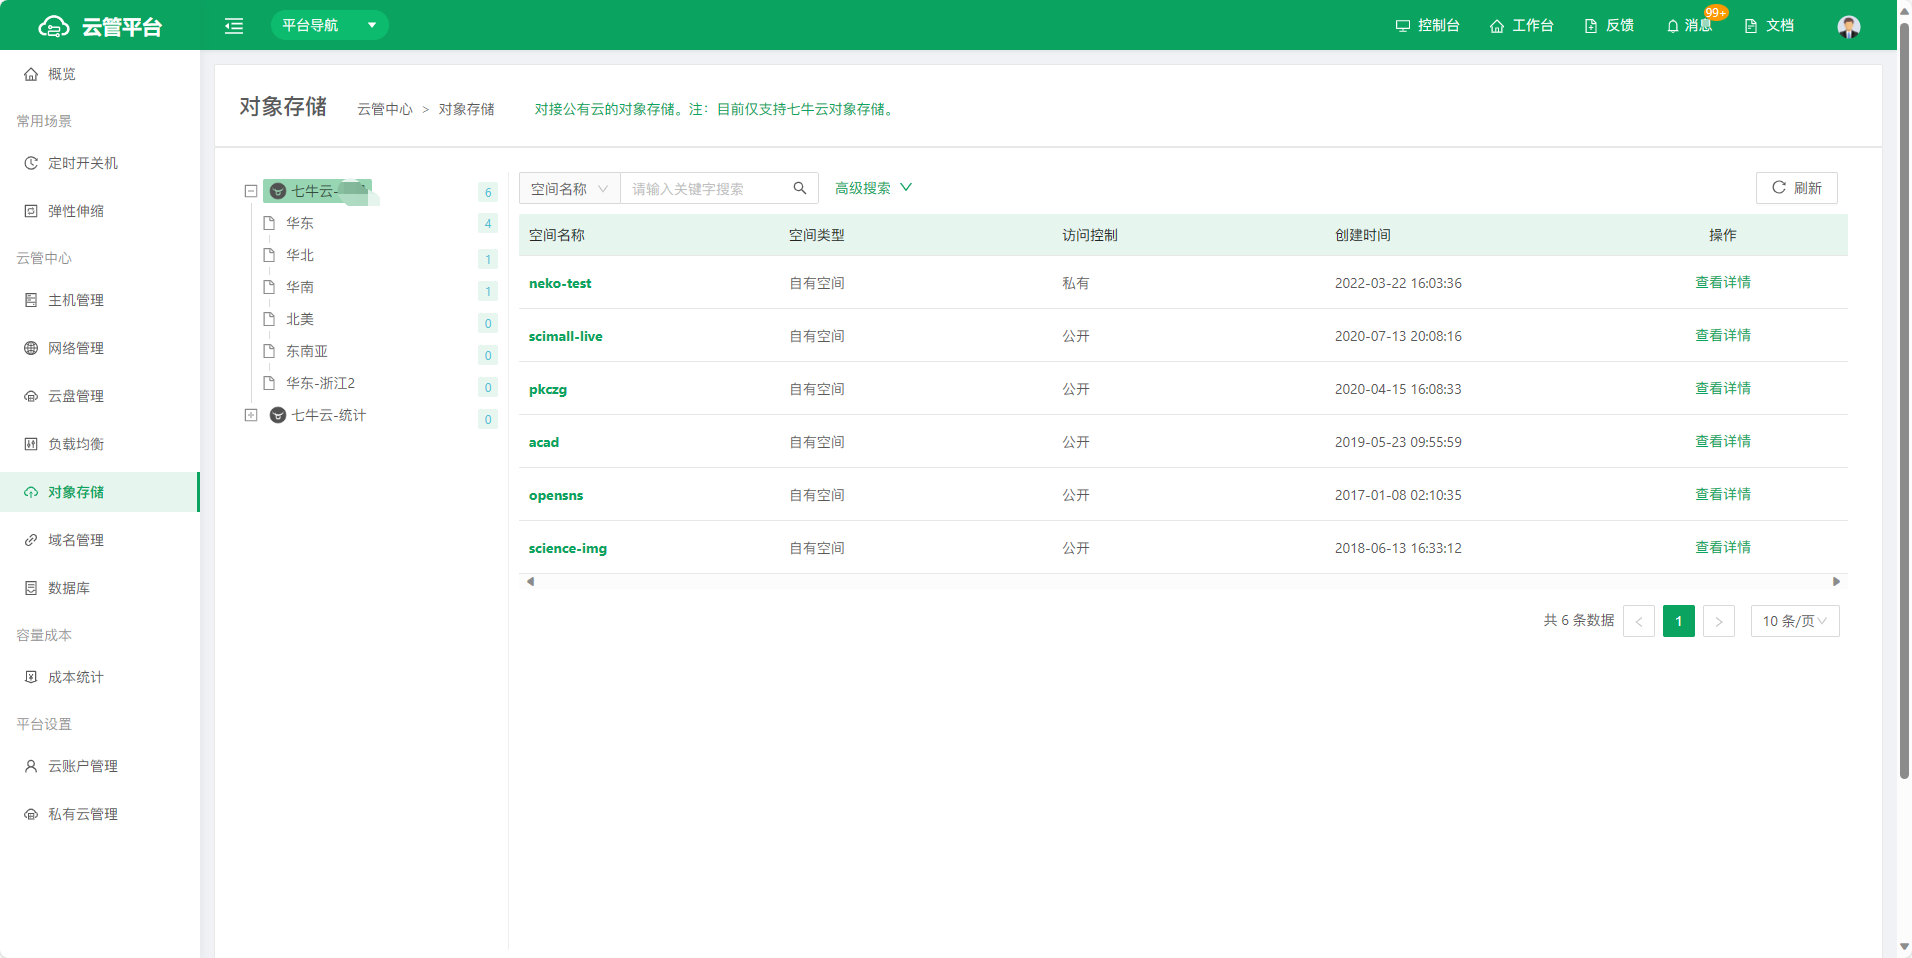
Related Concepts
-
Storage Class --- OSS provides four storage classes: Standard, Infrequent Access, Archive, and Cold Archive, covering data storage scenarios from hot to cold. The Standard class provides highly durable, highly available, high-performance object storage for frequent data access; the Infrequent Access class is suitable for long-term storage of data that is not accessed often (on average once or twice a month) and costs less per unit than the Standard class; the Archive class is suitable for archived data that needs long-term storage (six months or longer is recommended); the Cold Archive class is suitable for extremely cold data that must be stored for an extended period.
-
Bucket --- A bucket is the container you use to store objects. Every object must belong to a bucket. A bucket has various configuration properties, including region, access permissions, and storage class. You can create buckets of different types to store different data according to your actual needs.
-
Object --- An object is the basic unit of data stored in OSS and is also referred to as an OSS file. An object consists of object metadata (Object Meta), user data (Data), and a file name (Key). An object is identified by a unique Key within its bucket. Object metadata is a set of key-value pairs that describes object attributes such as the last modified time and size; you can also store custom information in the metadata.
-
Region --- A region is the physical location of the OSS data center. You can choose an appropriate region to create a bucket based on cost, request origin, and other factors.
-
Endpoint --- An endpoint is the domain name through which OSS provides services externally. OSS provides services in the form of HTTP RESTful APIs, and different regions require different domain names. Accessing the same region over the internal network and the internet also requires different domain names.
-
AccessKey --- AccessKey (AK) refers to the AccessKey ID and AccessKey Secret used for access authentication. OSS verifies the identity of a request sender using symmetric encryption with the AccessKey ID and AccessKey Secret. The AccessKey ID identifies the user; the AccessKey Secret is the key the user uses to encrypt the signature string and OSS uses to verify it, and it must be kept confidential.
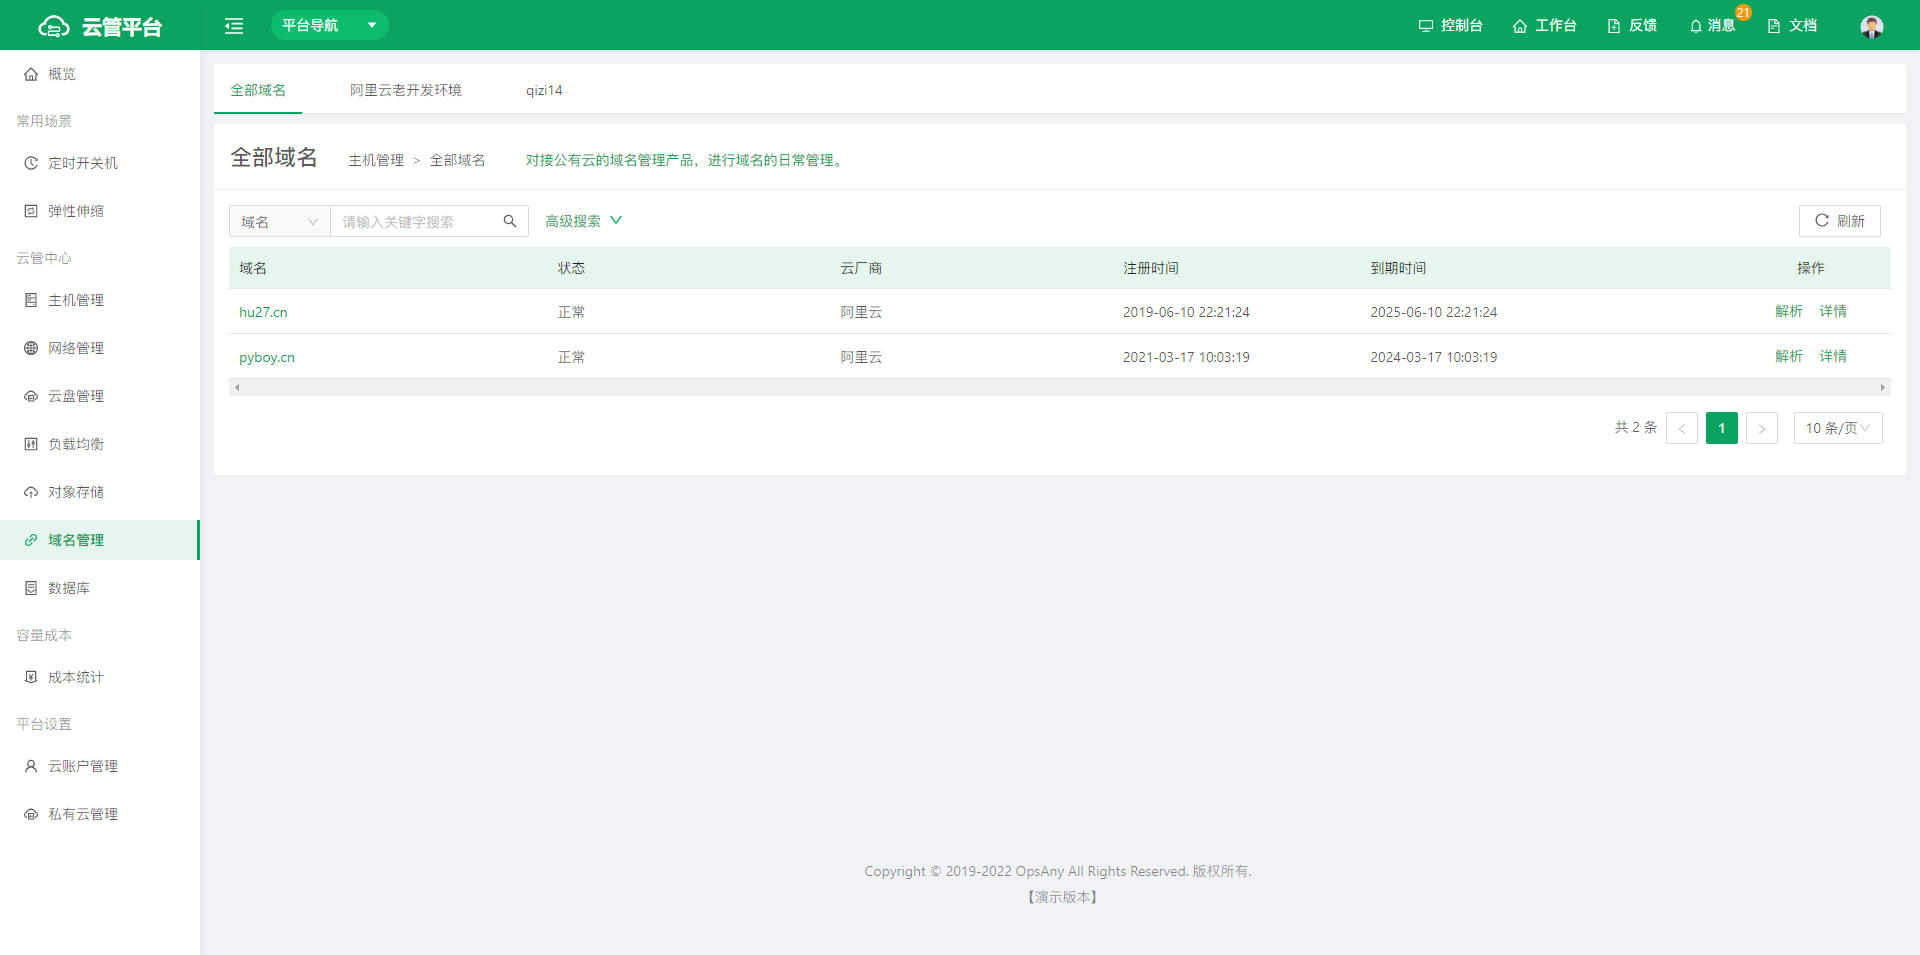
2.5 Domain Name Management
Integrates with public cloud domain name products for day-to-day domain name management.
2.5.1 Basic Domain Information
- Click a domain name to enter the basic domain information page.

2.5.2 Domain Resolution
- Click Domain Resolution to add, edit, delete, remark, or pause domain resolution records.

2.5.3 Domain Operation Logs
- Click Operation Logs to view the operation history of the current domain name.

2.6 Databases
Integrates with public cloud database products for day-to-day database management.
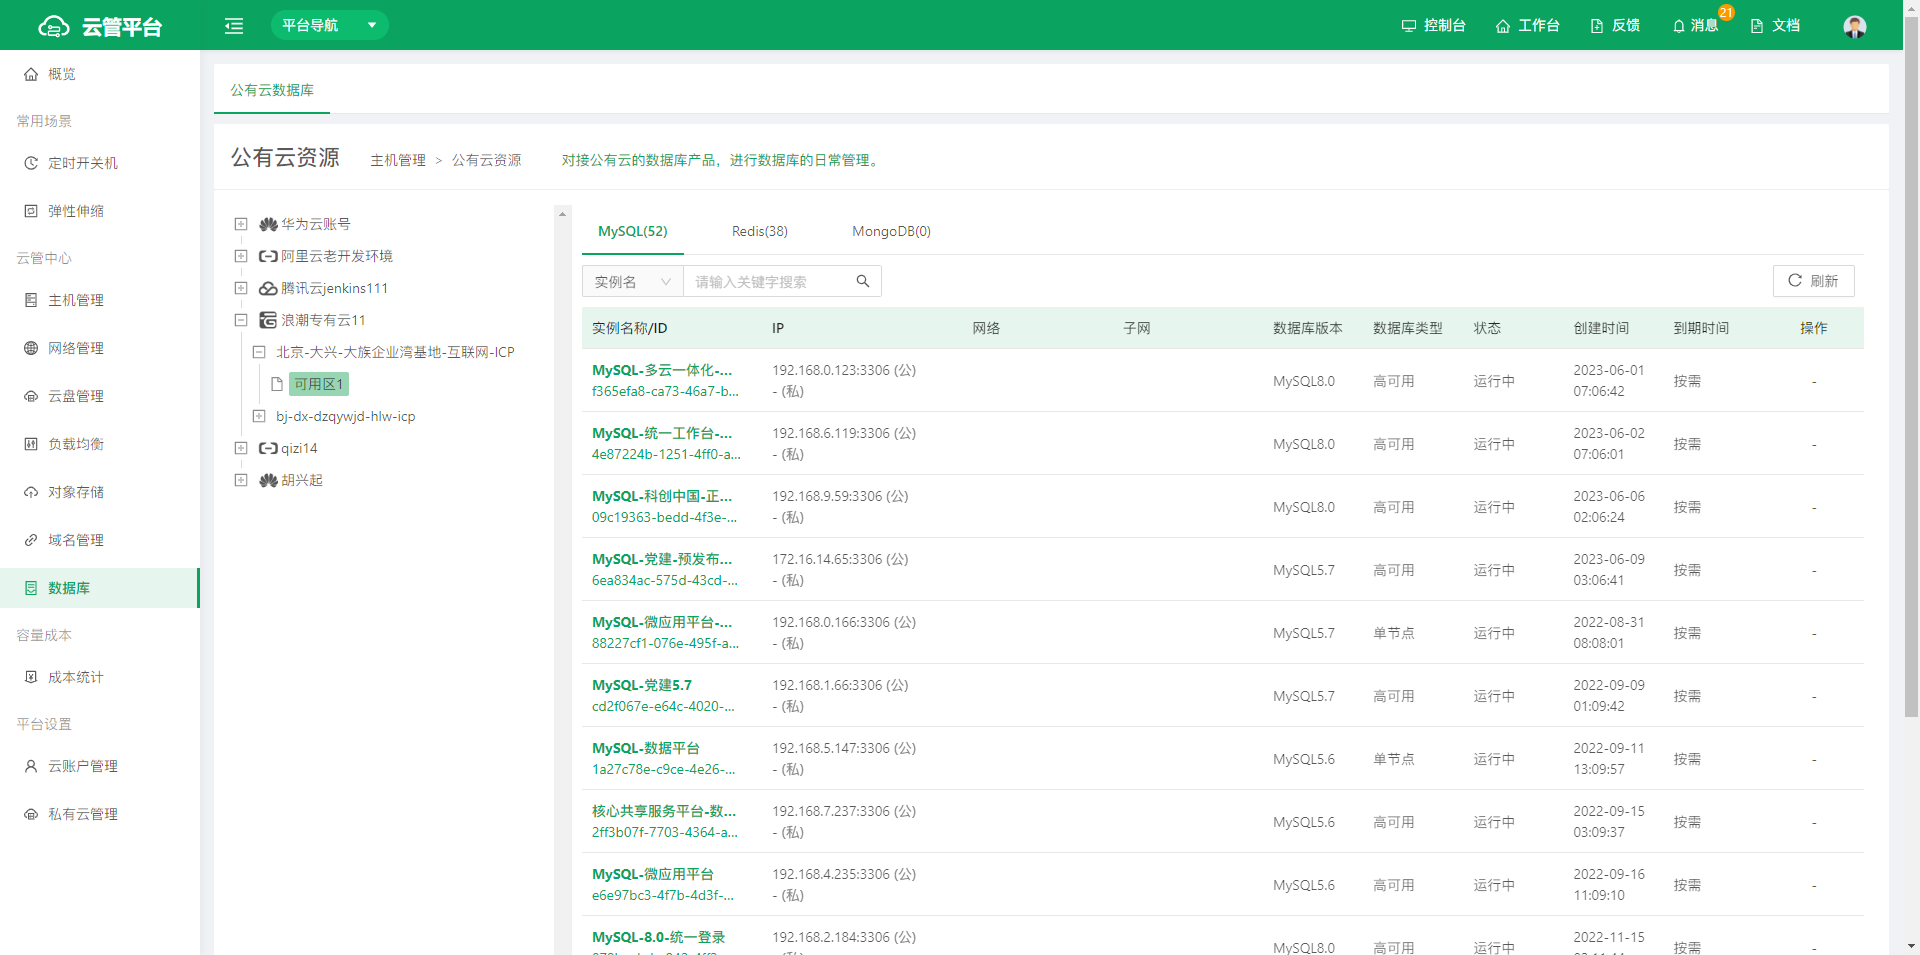
The directory tree on the left shows the cloud account information of all users. Click a cloud account to view all of its cloud regions, then click a cloud region to view the database information in that region, including MySQL, Redis, and MongoDB databases.
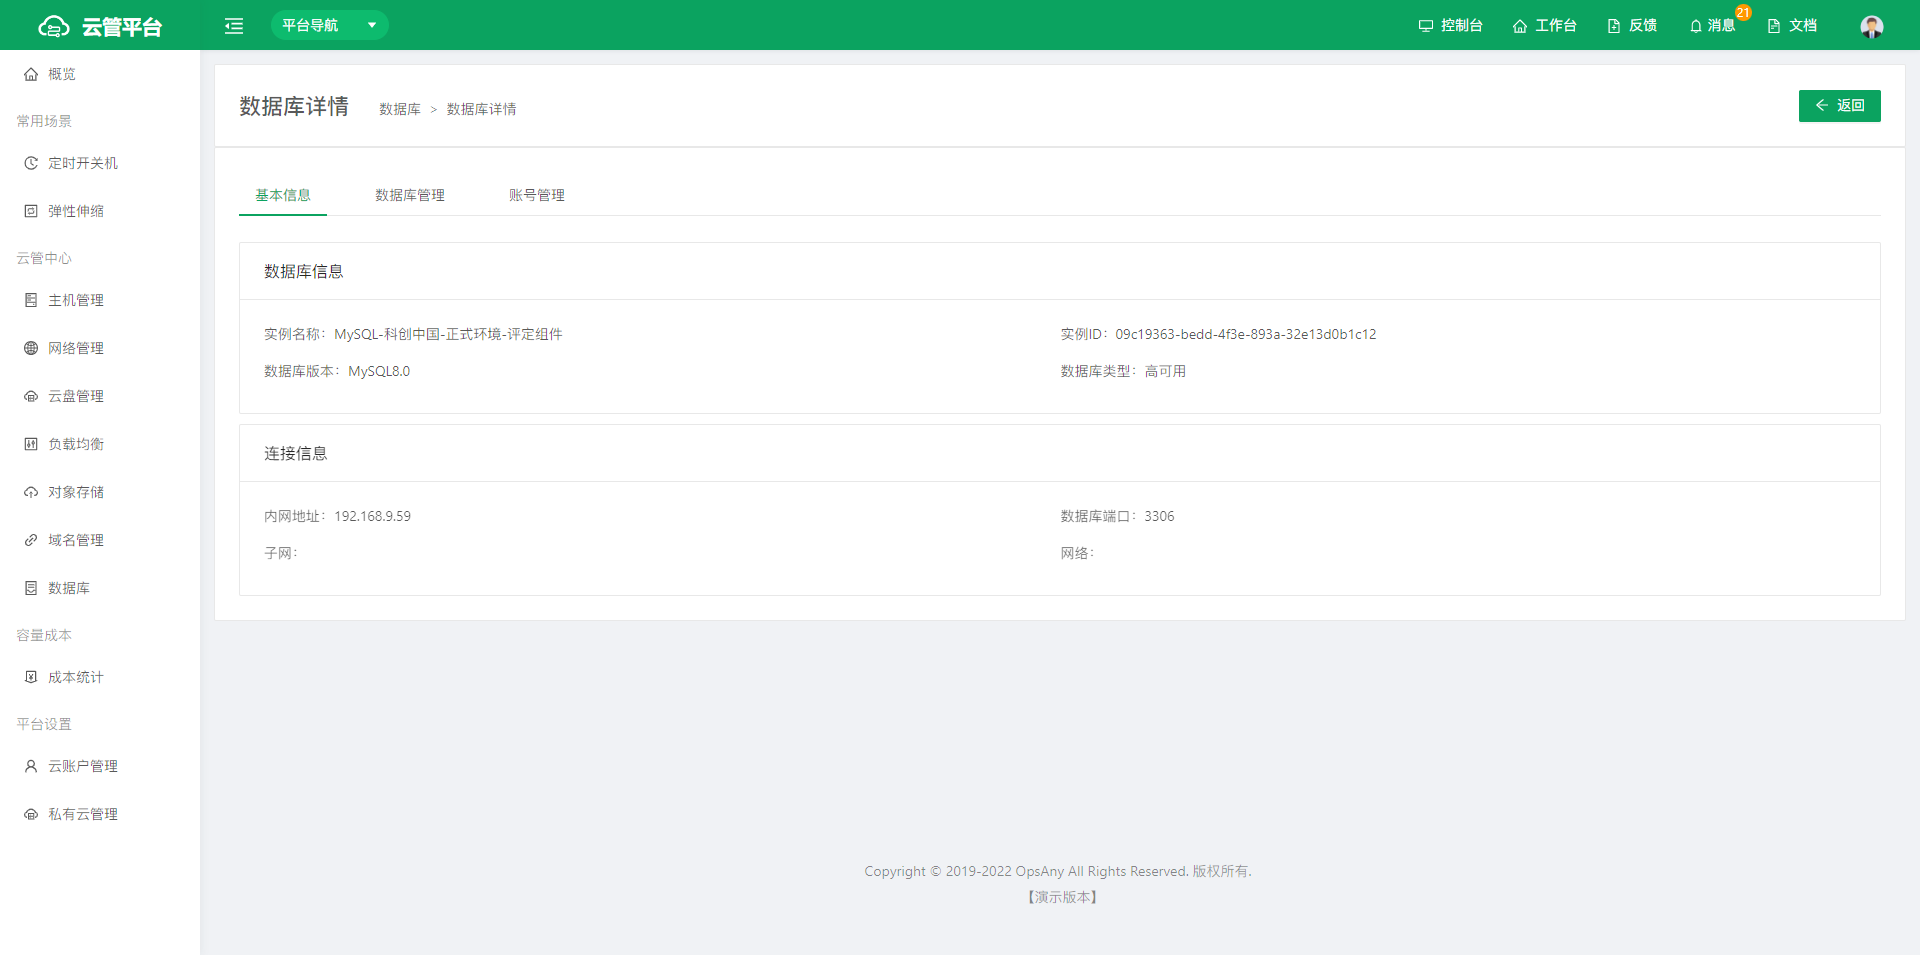
- Click an instance name or ID to open the database details page, where you can view basic information, database management, account management, and more.
3. Capacity and Cost
Capacity and Cost helps users calculate the actual consumption cost of all cloud resources, including daily, monthly, and yearly consumption statistics. It helps enterprises allocate cloud resources reasonably and plan future cost accounting figures, and it also displays cloud account balances and consumption rankings.
3.1 Cost Statistics
Cost Statistics calculates the total monthly cost based on the existing cloud resources under the user's cloud accounts and the cloud provider's billing standards, giving users a clear picture of their spending.
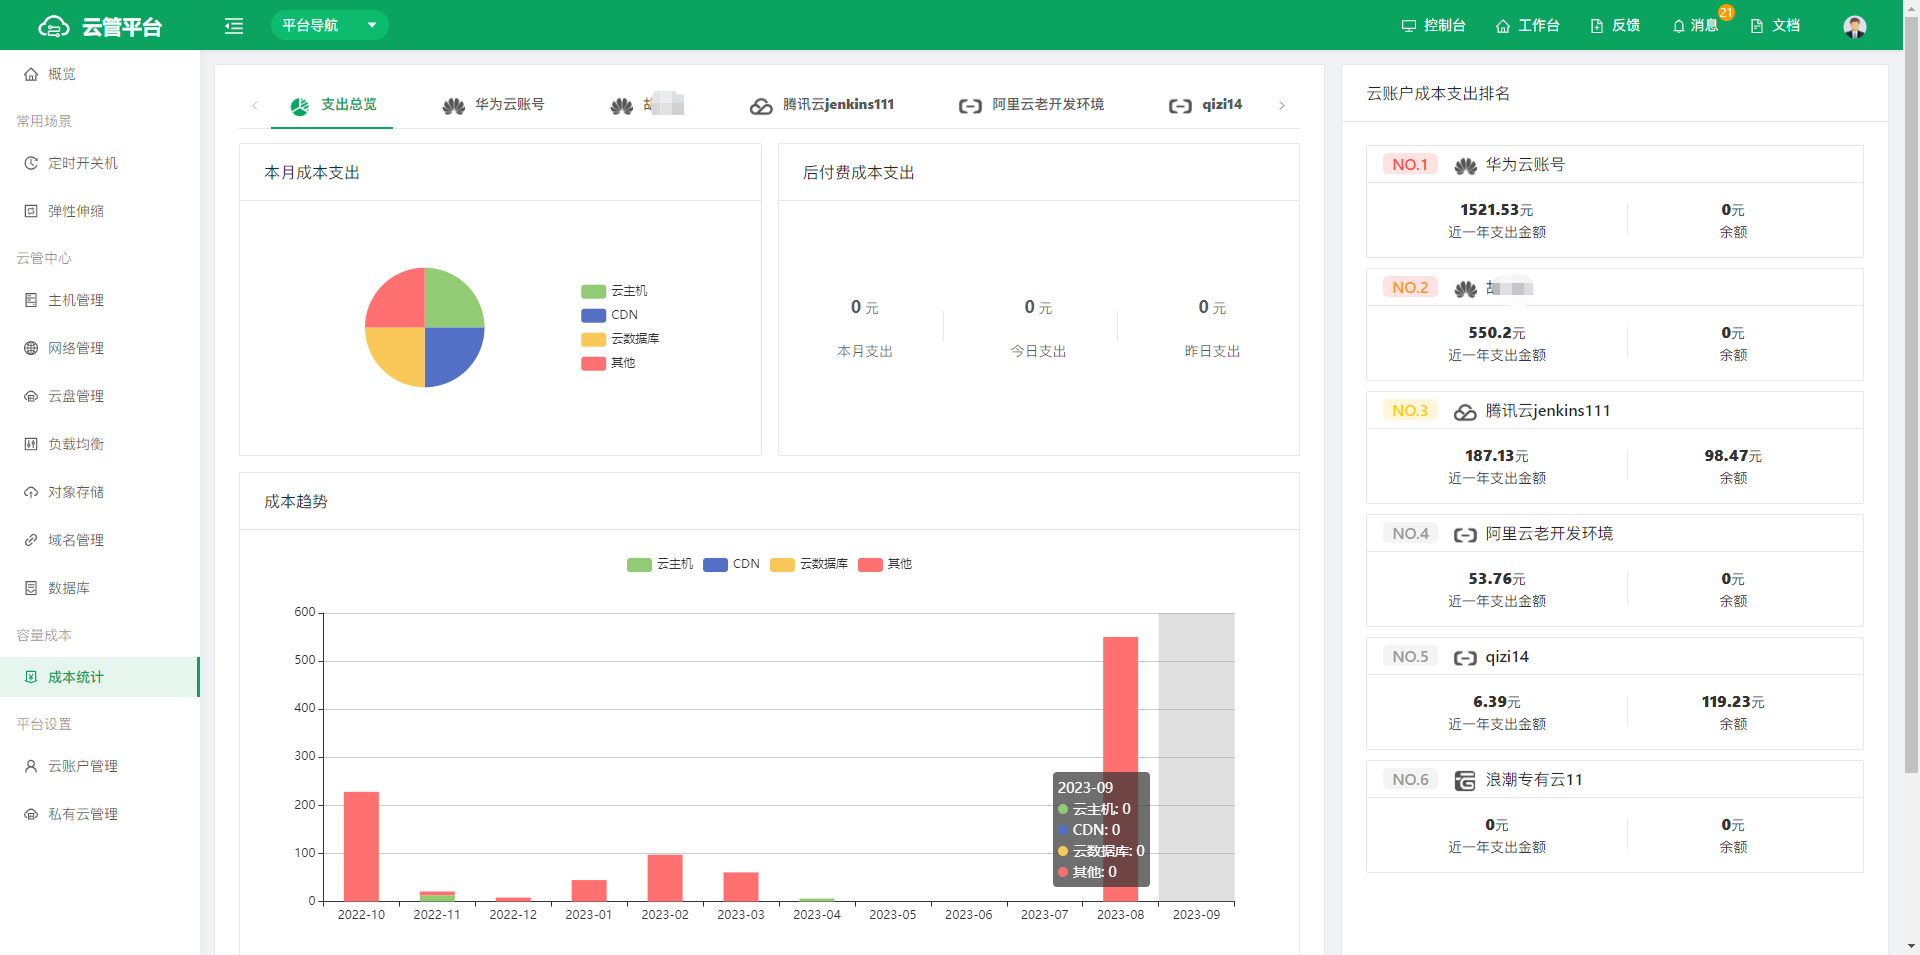
- The upper-left panel displays different statistics depending on the selected cloud account.
- The lower-left panel visualizes cost data so you can understand cost trends through charts.
- The right panel ranks the cost spending of all cloud accounts.
4. Platform Settings
4.1 Cloud Account Management
Cloud Account Management is the data source of the CMP. Supported cloud providers currently include Alibaba Cloud, Tencent Cloud, Huawei Cloud, AWS Global, AWS China, Microsoft Global, Microsoft China, Kingsoft Cloud, Baidu Cloud, Qiniu Cloud, Inspur Cloud, Inspur Dedicated Cloud, and more.
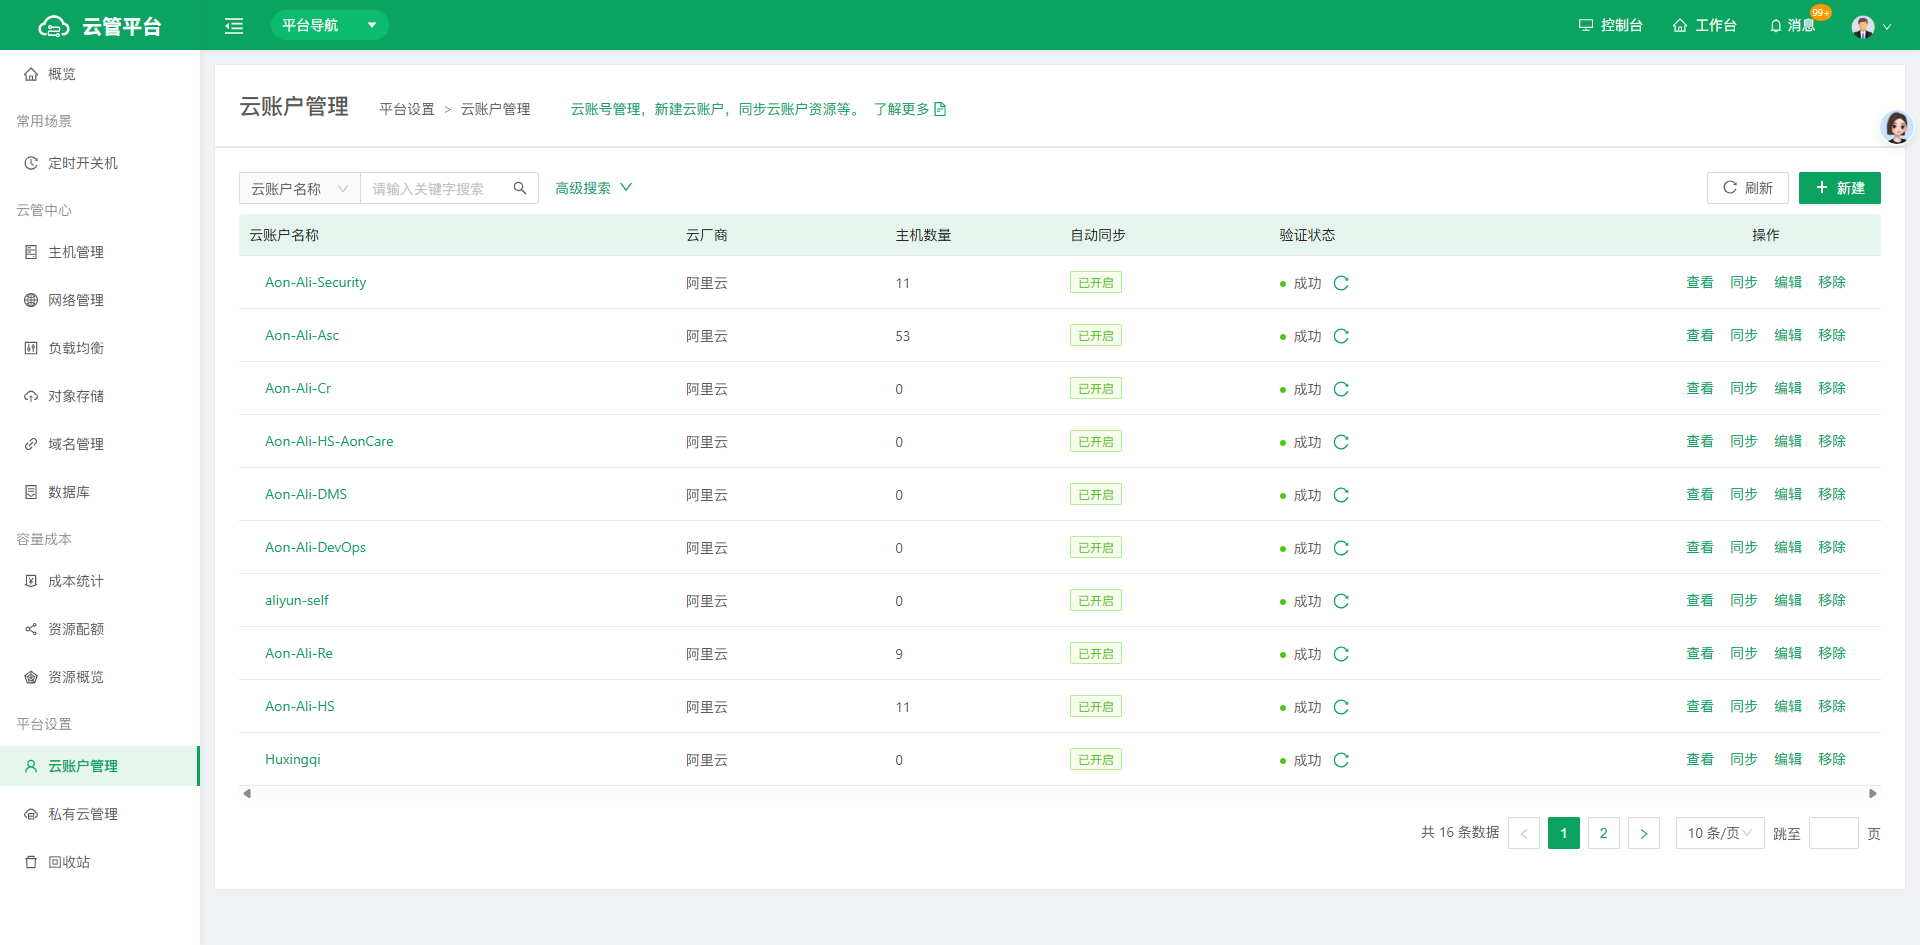
Click Create to go to the cloud account creation page.
- Step 1: Select a cloud provider.
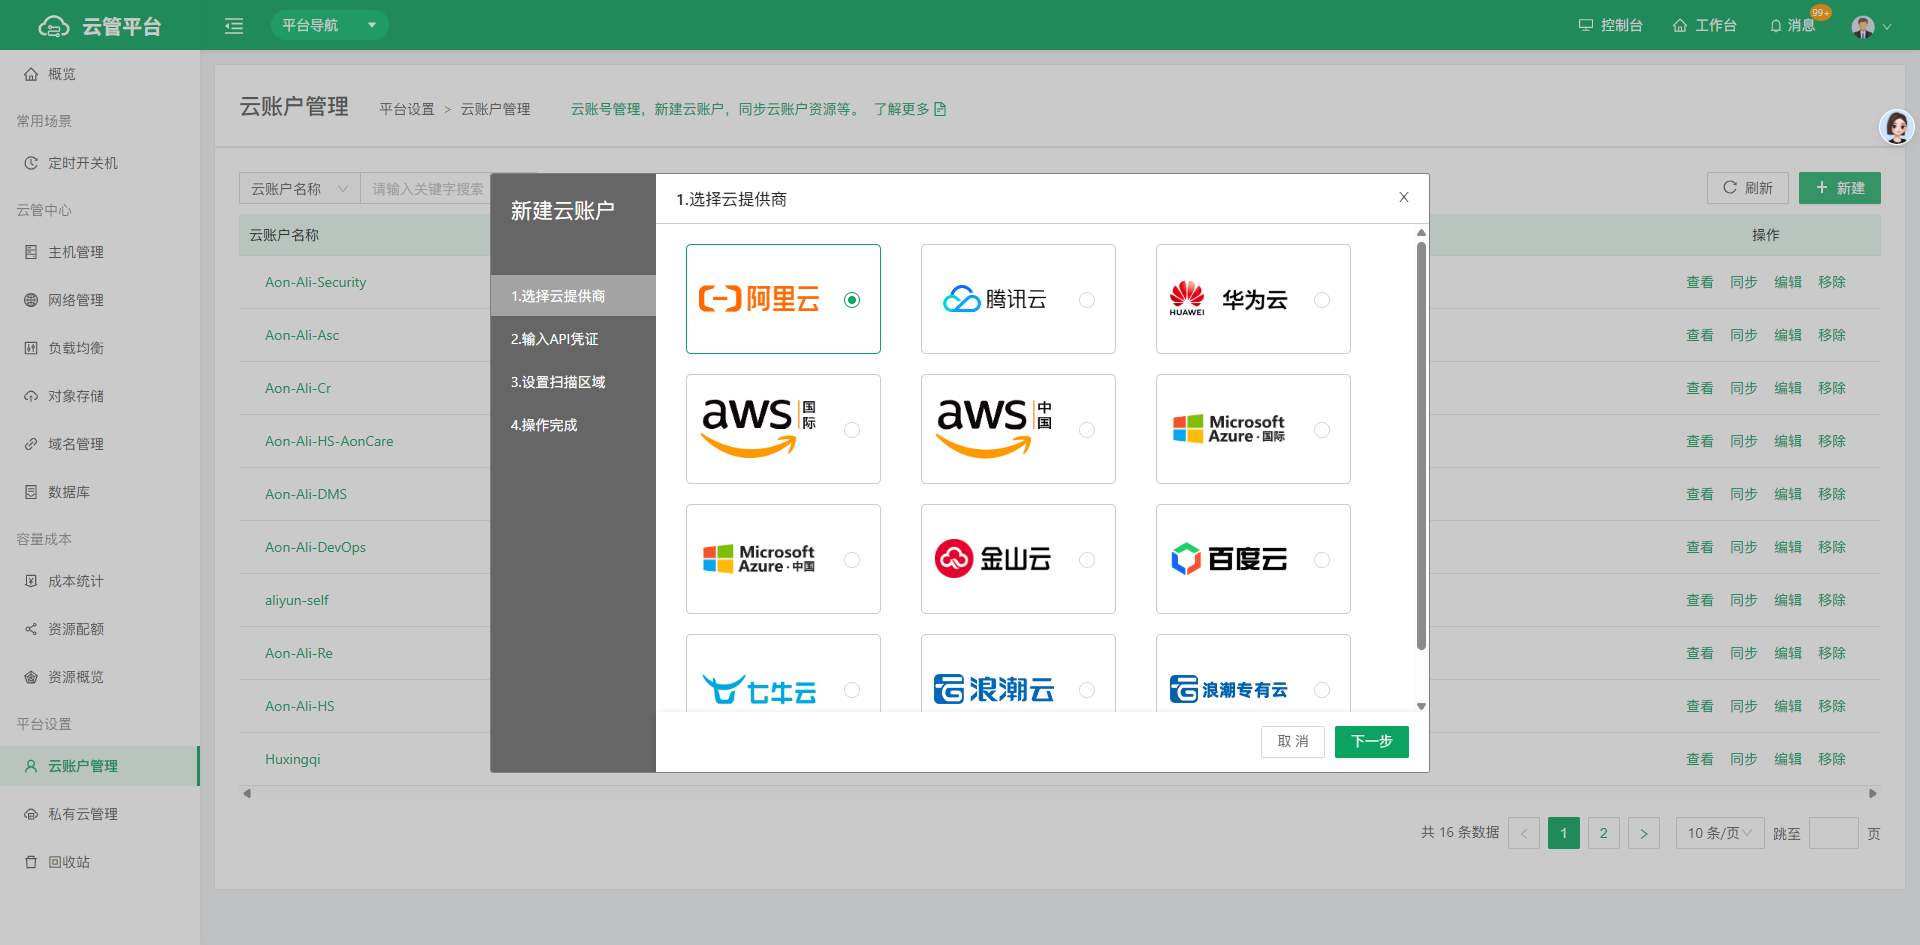
- Step 2: Enter the account information. You can define the account name to make it easier to manage.

Automatic sync can be enabled or disabled, involving two scenarios. In the first scenario, you decide whether to import all cloud host data of the current account. If enabled, all cloud hosts are imported by default, so you do not select individual hosts to import. In the second scenario, enabling automatic sync syncs host data every 30 minutes by default.
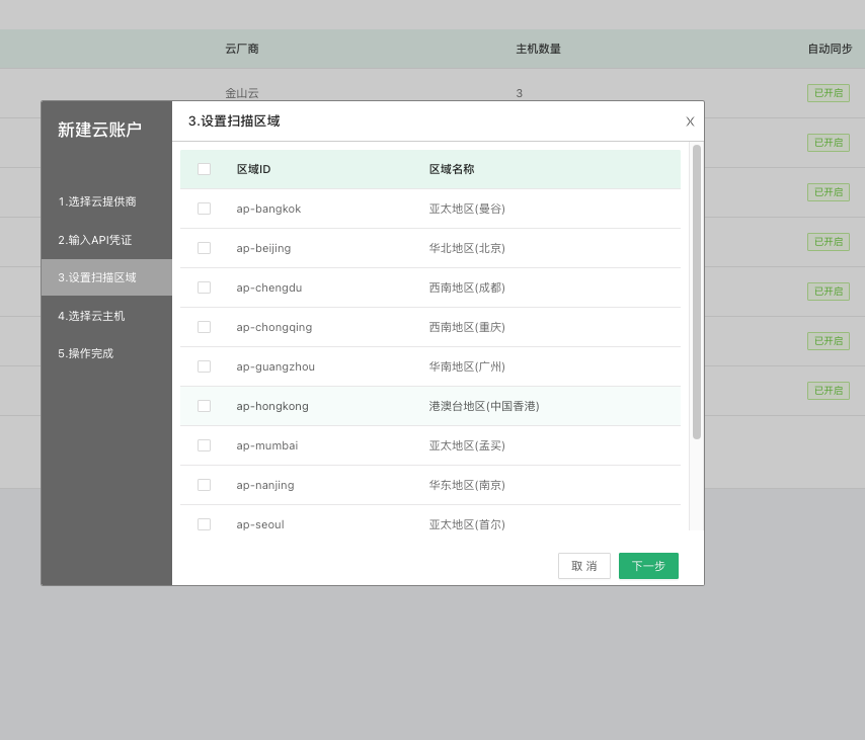
- Step 3: Select the cloud regions to scan.
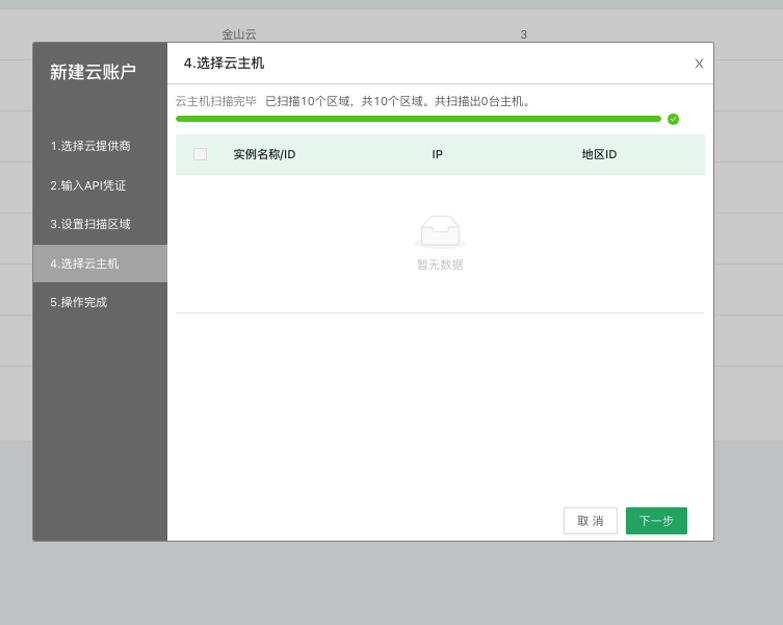
- Step 4: Select the hosts to import.
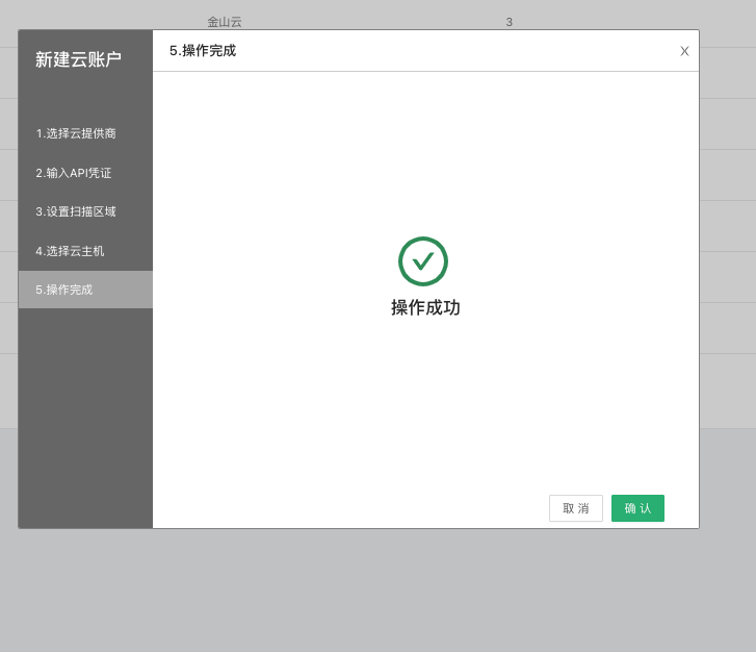
- Step 5: Host data import is complete.
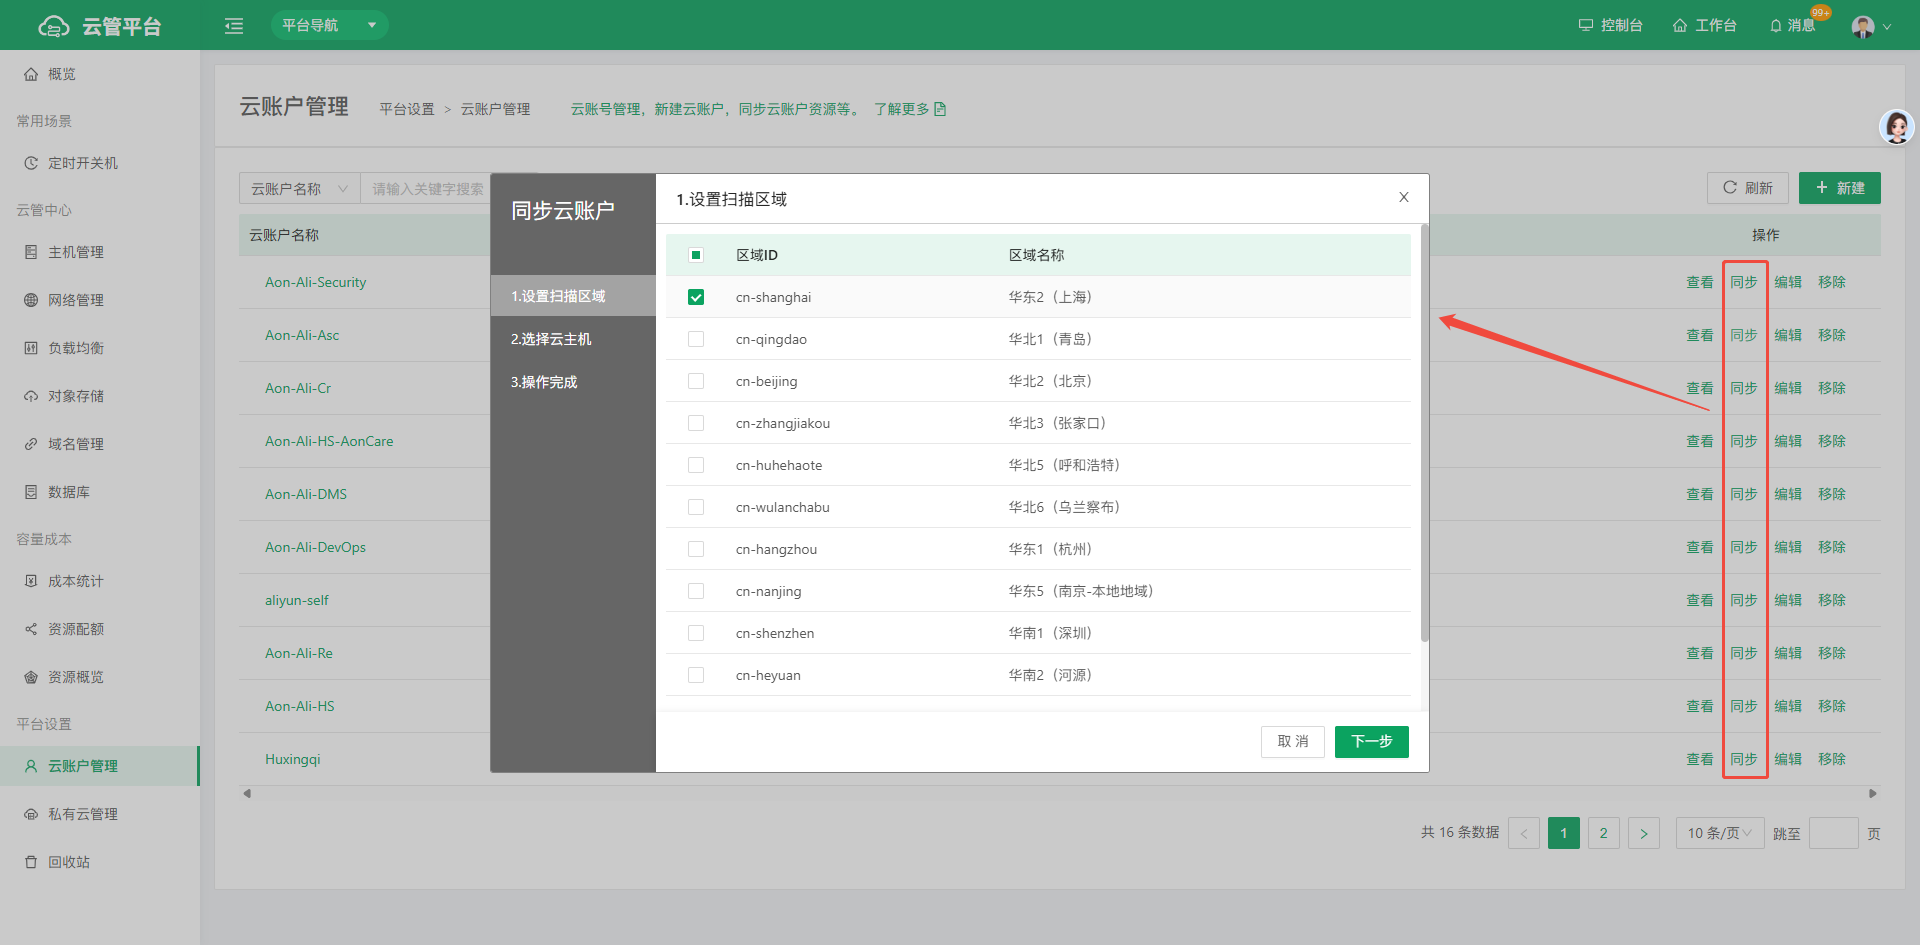
Click Sync to quickly sync the resources of the current cloud account.
Click the cloud account name or the View button in the Actions column to view the basic information and sync settings of the current cloud account.
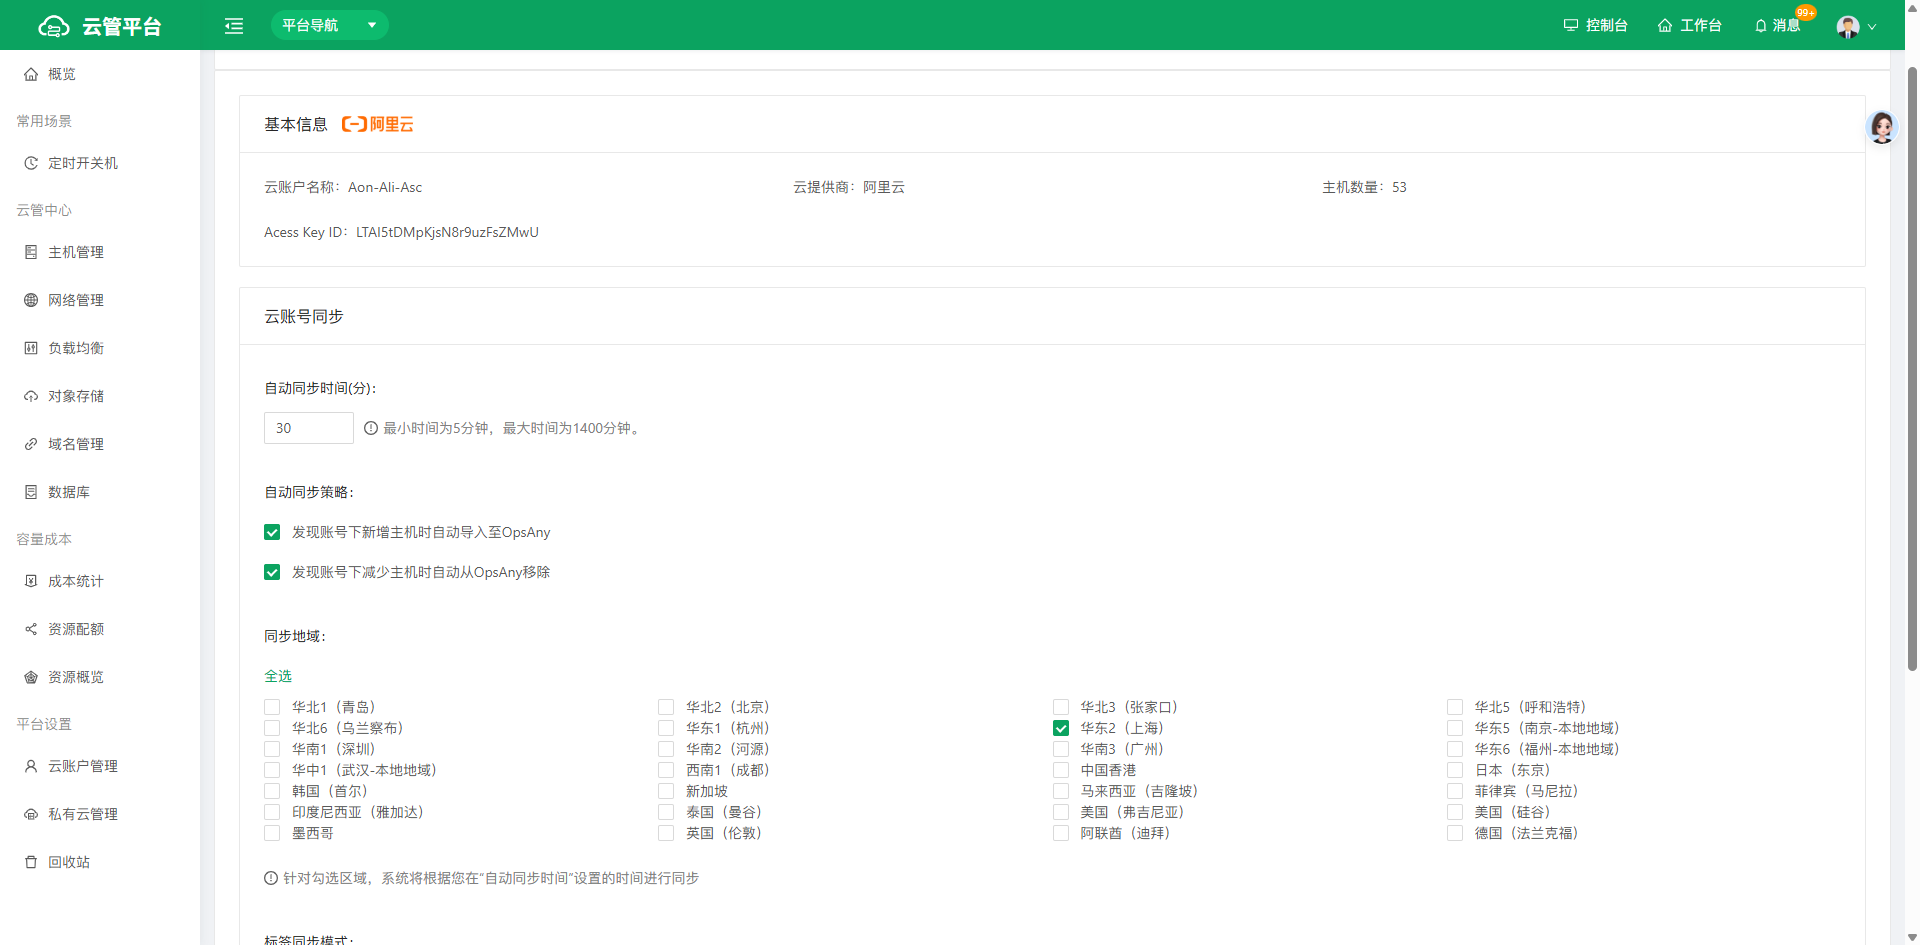
- Automatic Sync Interval: Set the interval for automatic sync.
- Automatic Sync Policy: Set the sync policy with different options.
- Sync Regions: Define the regions to sync.
- Enable MFA: After MFA is enabled, users are prompted for identity verification when performing operations or accessing cloud hosts.
- Tag Sync Mode: Choose how cloud resource tags are synced to this platform. The supported mode is Cloud platform as primary, overwriting the Resource Platform.
- Enable Cost Statistics: When enabled, the cost statistics viewing permission for the current cloud account is displayed on the Cost Statistics page.
4.1.1 How to Obtain an Alibaba Cloud Access Key
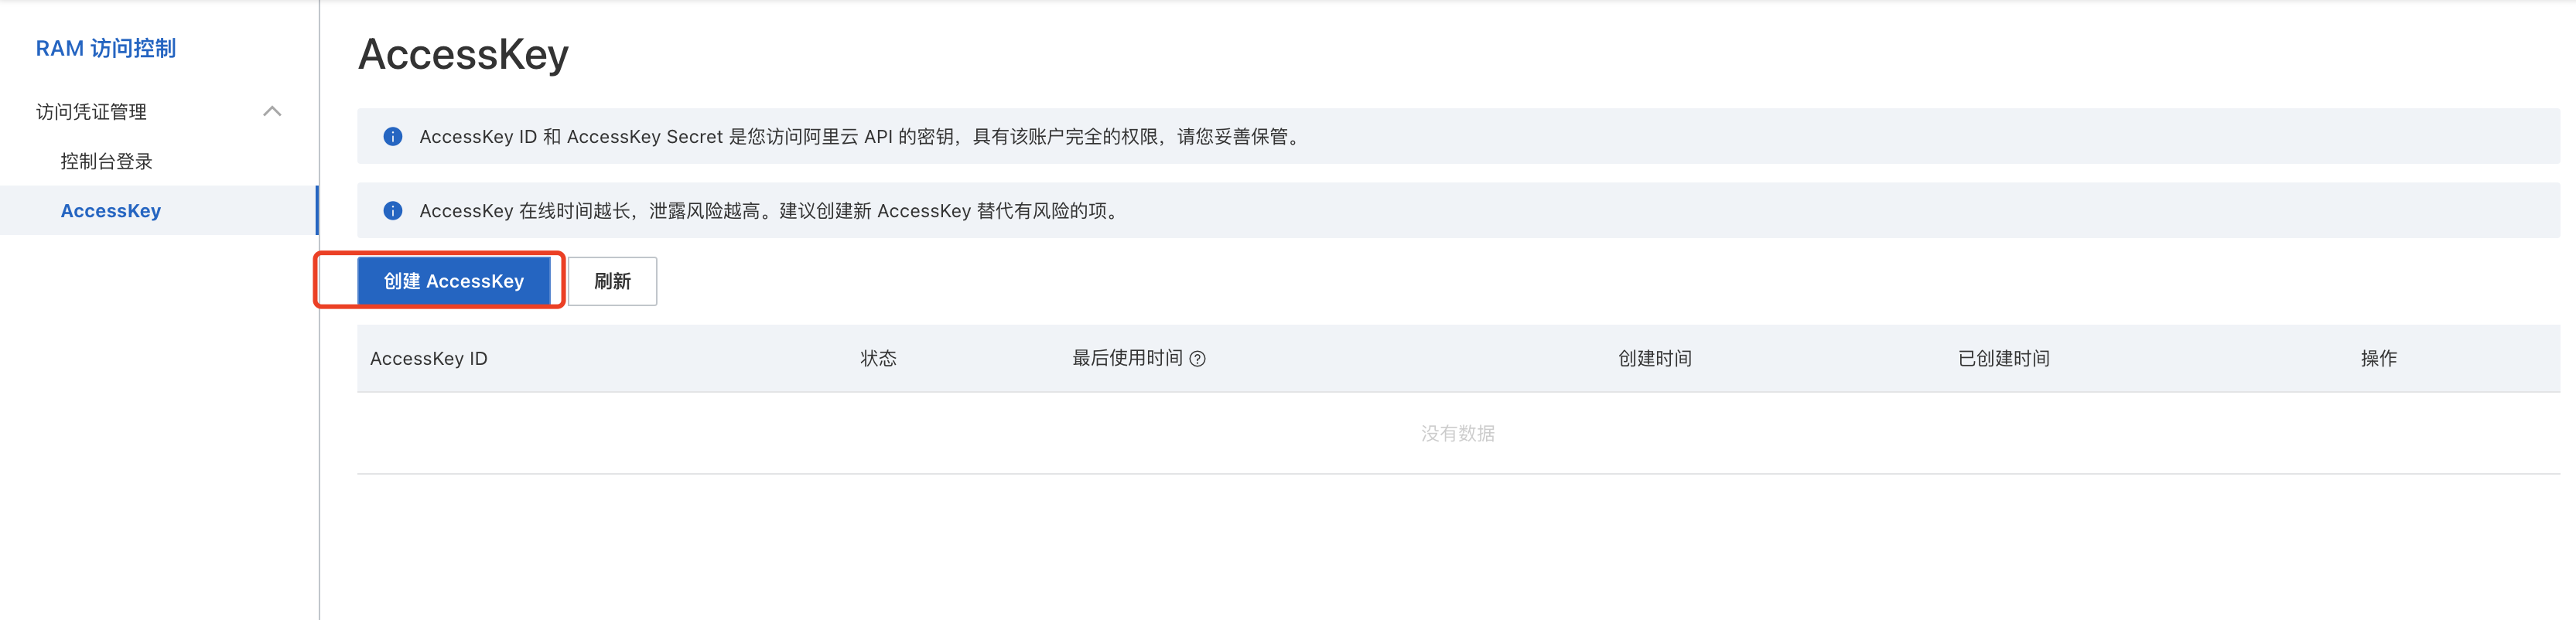
- Log in to your Alibaba Cloud Management Console, move the mouse over the personal information icon in the upper-right corner, expand the panel, and select accesskeys. Alternatively, go directly to https://ak-console.aliyun.com.
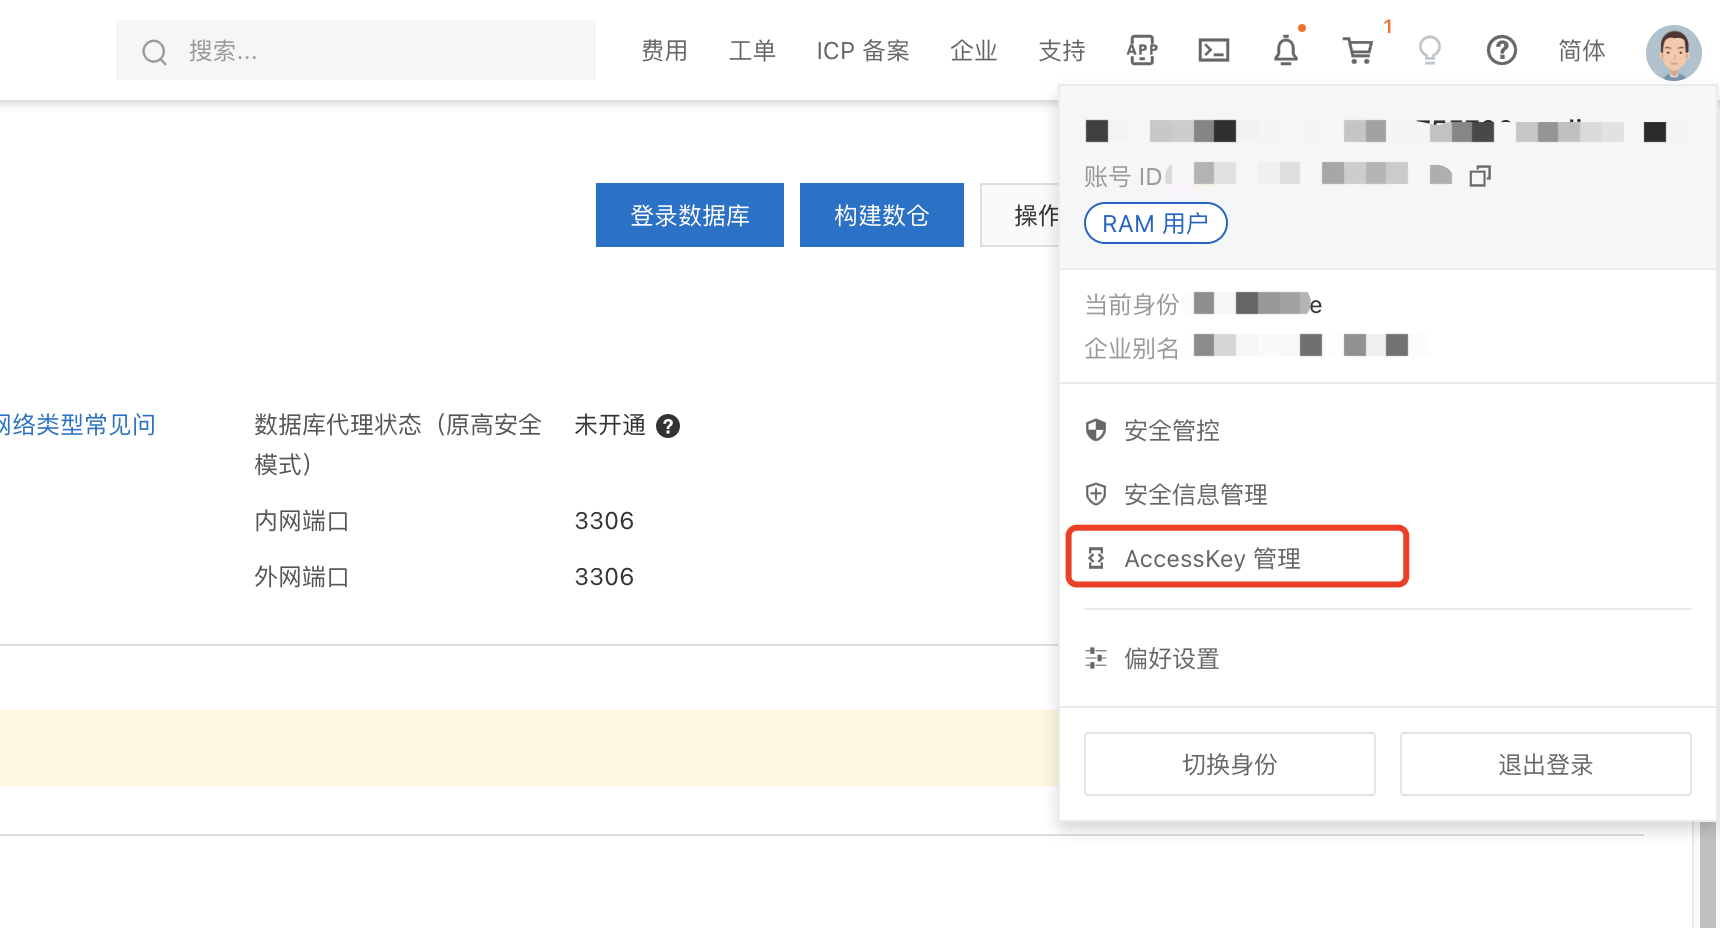
- In the AccessKeys management page, view your AccessKey list. If the list is empty, you can create one (the creation process is omitted here).
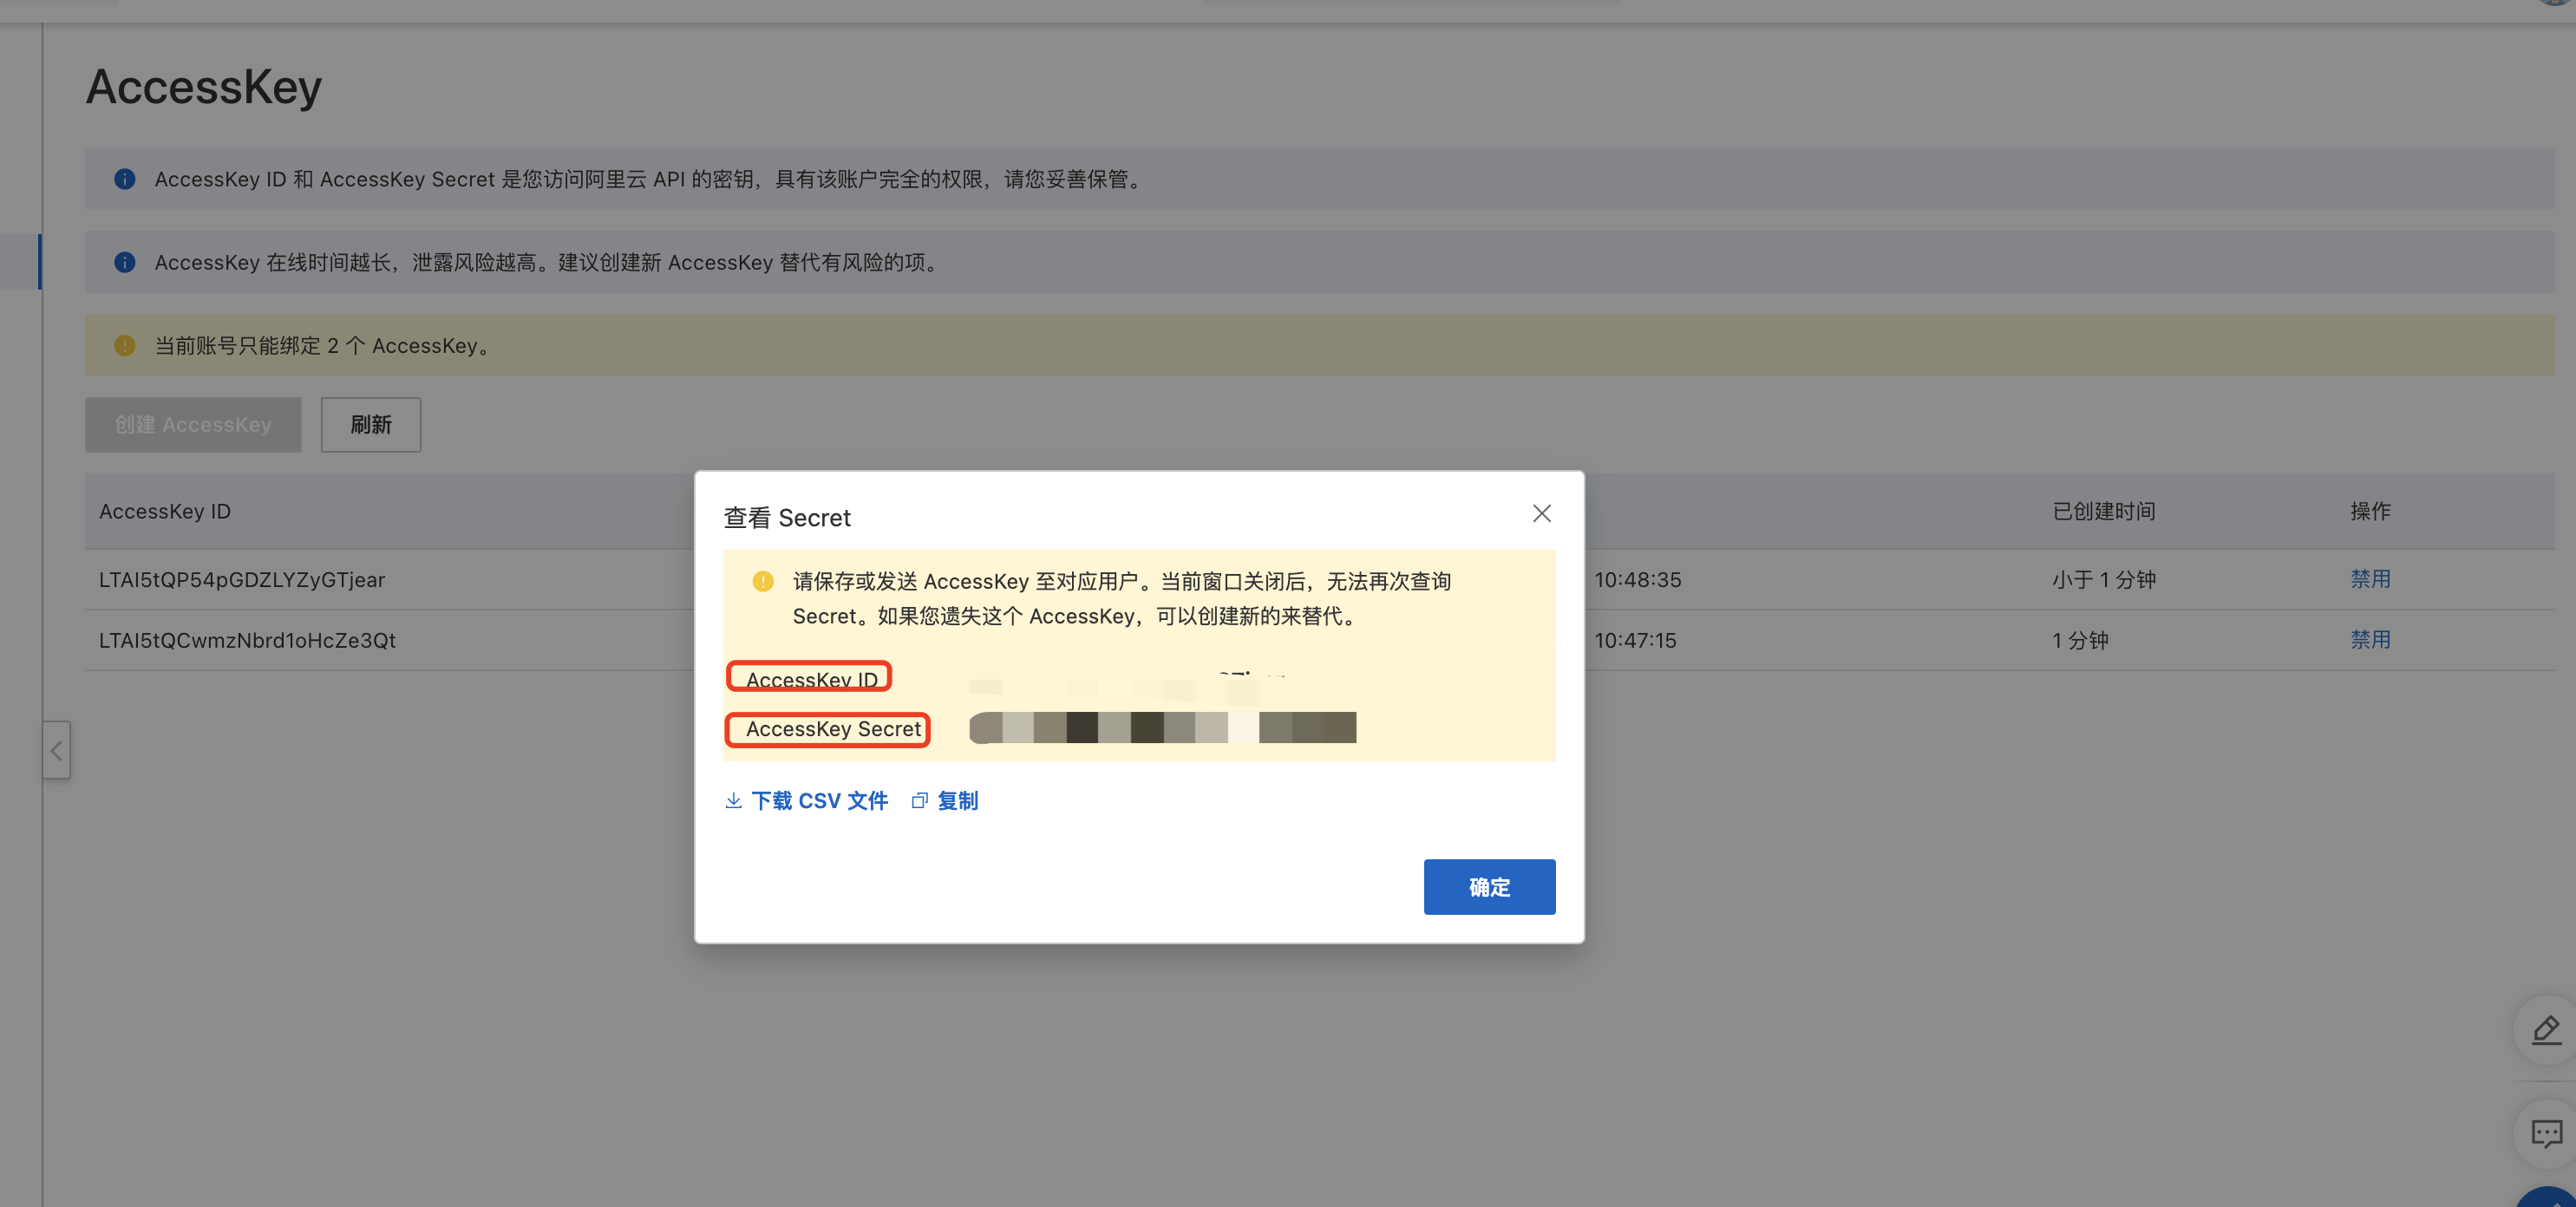
- Access Key Secret is hidden by default. Click the Show link, and Alibaba Cloud sends a verification code to your contact mobile number. After verification, you can see the Access Key Secret.
①: Access Key ID, ②: Access Key Secret.
4.1.2 How to Obtain a Tencent Cloud Access Key
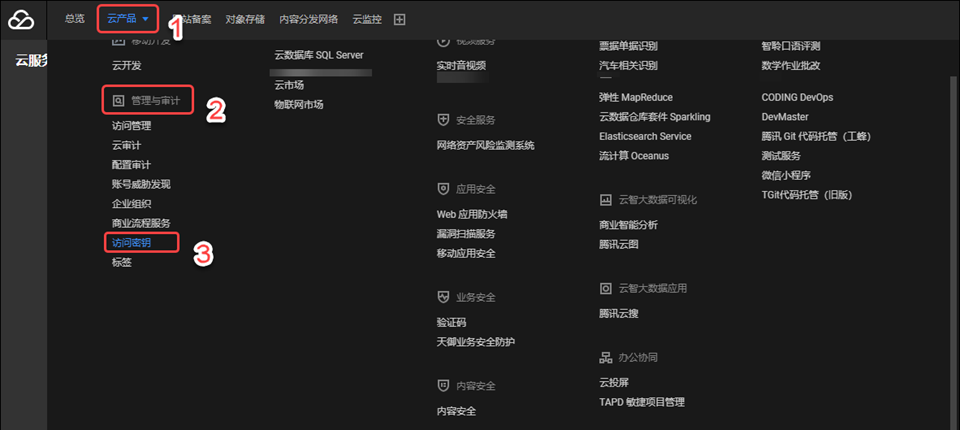
- Log in to your Tencent Cloud Console, click Cloud Products in the upper-left corner, and find Cloud API Keys under Management and Audit in the panel that appears. Alternatively, go directly to https://console.qcloud.com/capi.
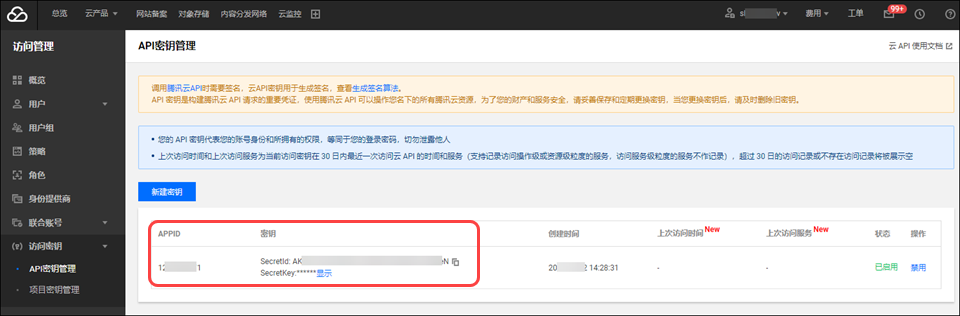
- In the Cloud API Keys management page, you will see your API key list. An API key consists of the APPID, SecretId, and SecretKey. If the list is empty, click Create Key to create one.
4.1.3 How to Obtain a Huawei Cloud Access Key
- Log in to your Huawei Cloud Console, click the personal information icon in the upper-right corner, expand the panel, and select My Credentials.
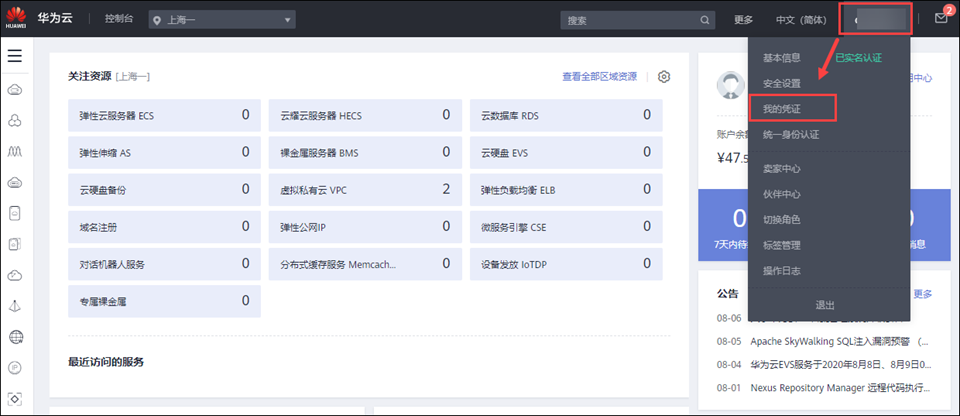
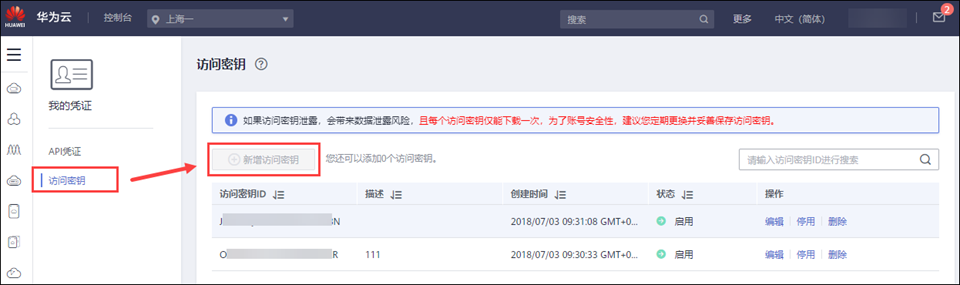
- In My Credentials, click Access Keys, then click Add Access Key to open the Add Access Key window.
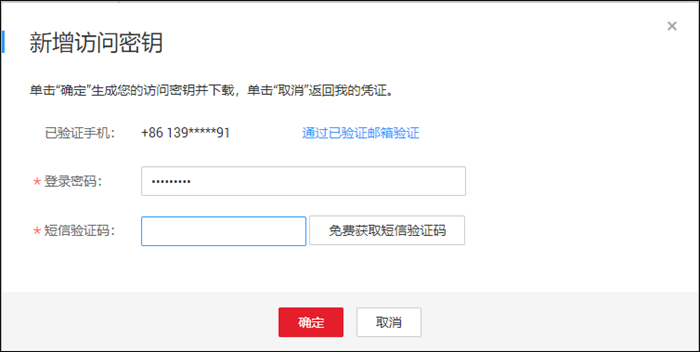
- In the window, enter your account login password and the SMS verification code received on your phone, then click OK.
- If the login password and SMS verification code are correct, the browser automatically downloads the key file: credentials.csv. Note that the key file is downloaded only once. Open credentials.csv to view the access key information, where 1 is the Access Key ID and 2 is the Secret Access Key.

4.1.4 How to Obtain an AWS Access Key
- Log in to the Management Console with the AWS root account (or a sub-account with the AdministratorAccess policy), click Services, and then click IAM under Security & Identity in the panel that appears to enter the IAM console.
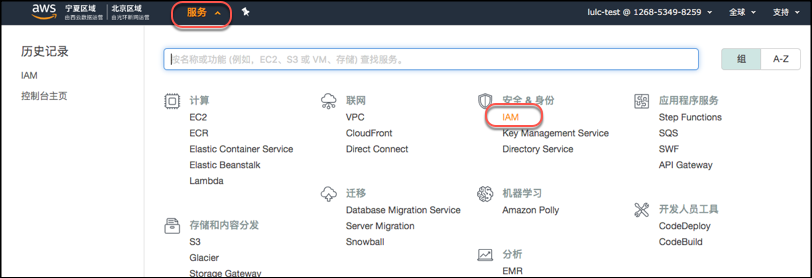
- In the IAM console, click Users to view the list of all users.
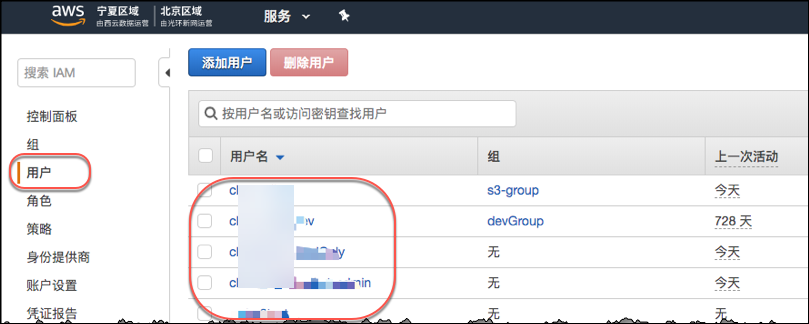
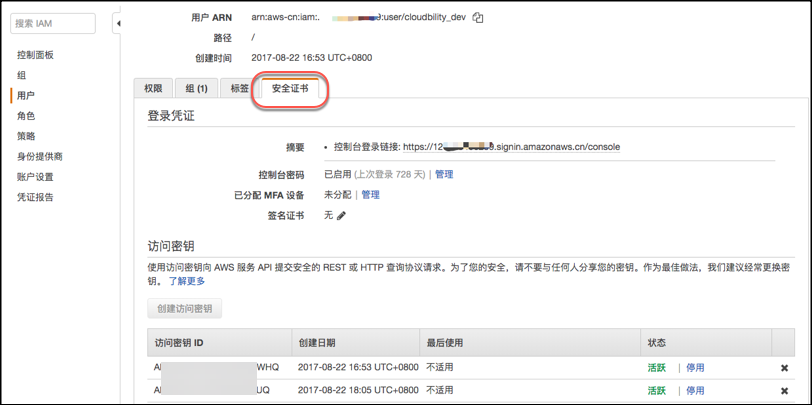
- To import cloud resources into the CMP, the Access Key must have sufficient resource permissions. Therefore, select a user with the appropriate permissions (see which policy permissions are required to use the CMP), click the user name, open the user details page, and then click the Security Credentials tab.
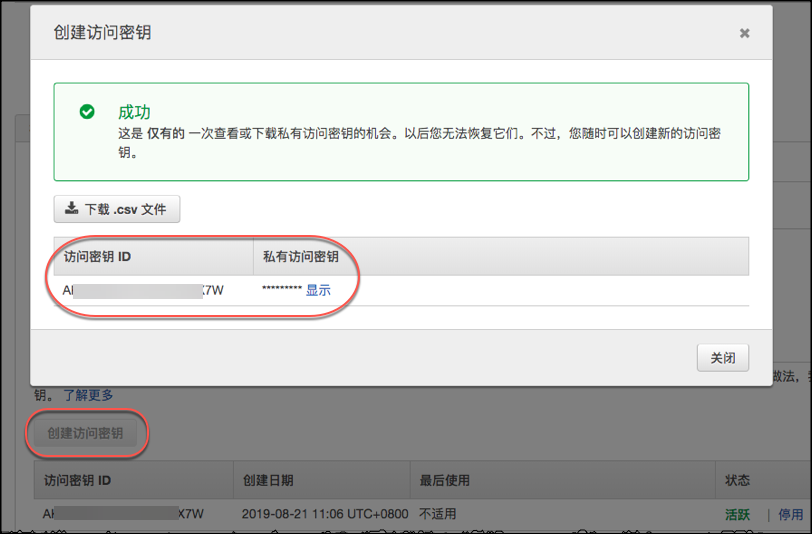
- Click Create Access Key to open the key information window. Note that in the AWS console, you can view an access key only once, so be sure to save the key information after the access key is created successfully. In the figure, the access key ID is the Access Key ID used when importing cloud hosts, and the secret access key is the Secret Access Key (hidden by default; click the Show link).
4.1.5 How to Obtain a Kingsoft Cloud Access Key
-
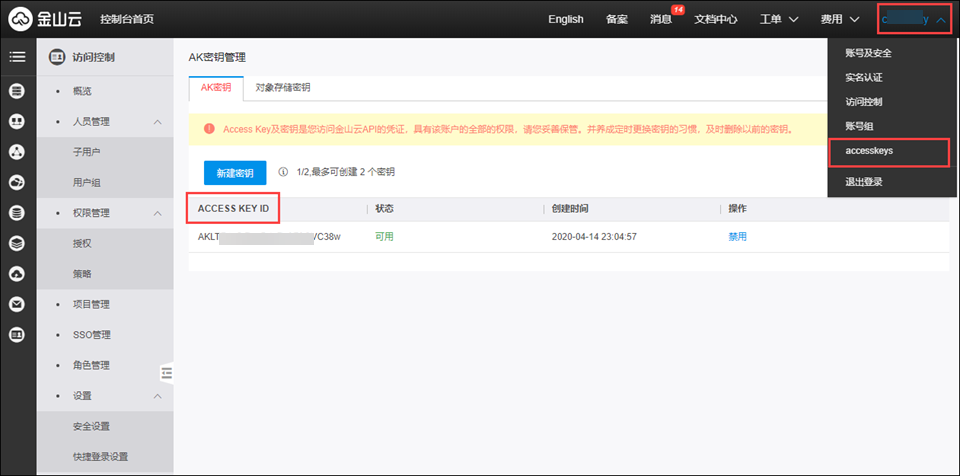
Log in to your Kingsoft Cloud Management Console at https://www.ksyun.com.
-
In the Access Key management page, you can view your Access Key ID. The Access Key Secret is shown only when you create a new key.
4.1.6 How to Obtain a Microsoft Cloud Access Key
- Log in to your Microsoft Cloud portal. Four parameters are required: subscription ID, tenant ID, client ID (ak), and client secret (sk).
4.1.6.1 Obtain the Subscription ID
- Click Subscriptions to go to the Subscriptions page, where you can see the subscription ID.


4.1.6.2 Obtain the Client ID and Tenant ID
- Open App Services and select an application (there may be more than one; select any of them). The client ID and tenant ID are the values to use.

- The application's role must be Reader or higher.

4.1.6.3 Obtain the Client Secret
- Open App Services, click the application selected in the previous step, and click Certificates & secrets. The client secret is the value to use (the client secret can be viewed only at creation time; if a previously saved secret is lost, create a new one).

4.1.7 How to Obtain a Baidu Cloud Access Key
-
Log in to Baidu AI Cloud and open the Security Authentication page.
-
Here you can view your ak/sk. The sk value is visible after SMS verification.

4.1.8 How to Obtain a Qiniu Cloud Access Key
-
Log in to Qiniu Cloud and open the Personal Center.
-
Click Key Management. The sk value is visible after email or SMS verification.

4.1.9 How to Obtain a Volcano Engine Access Key
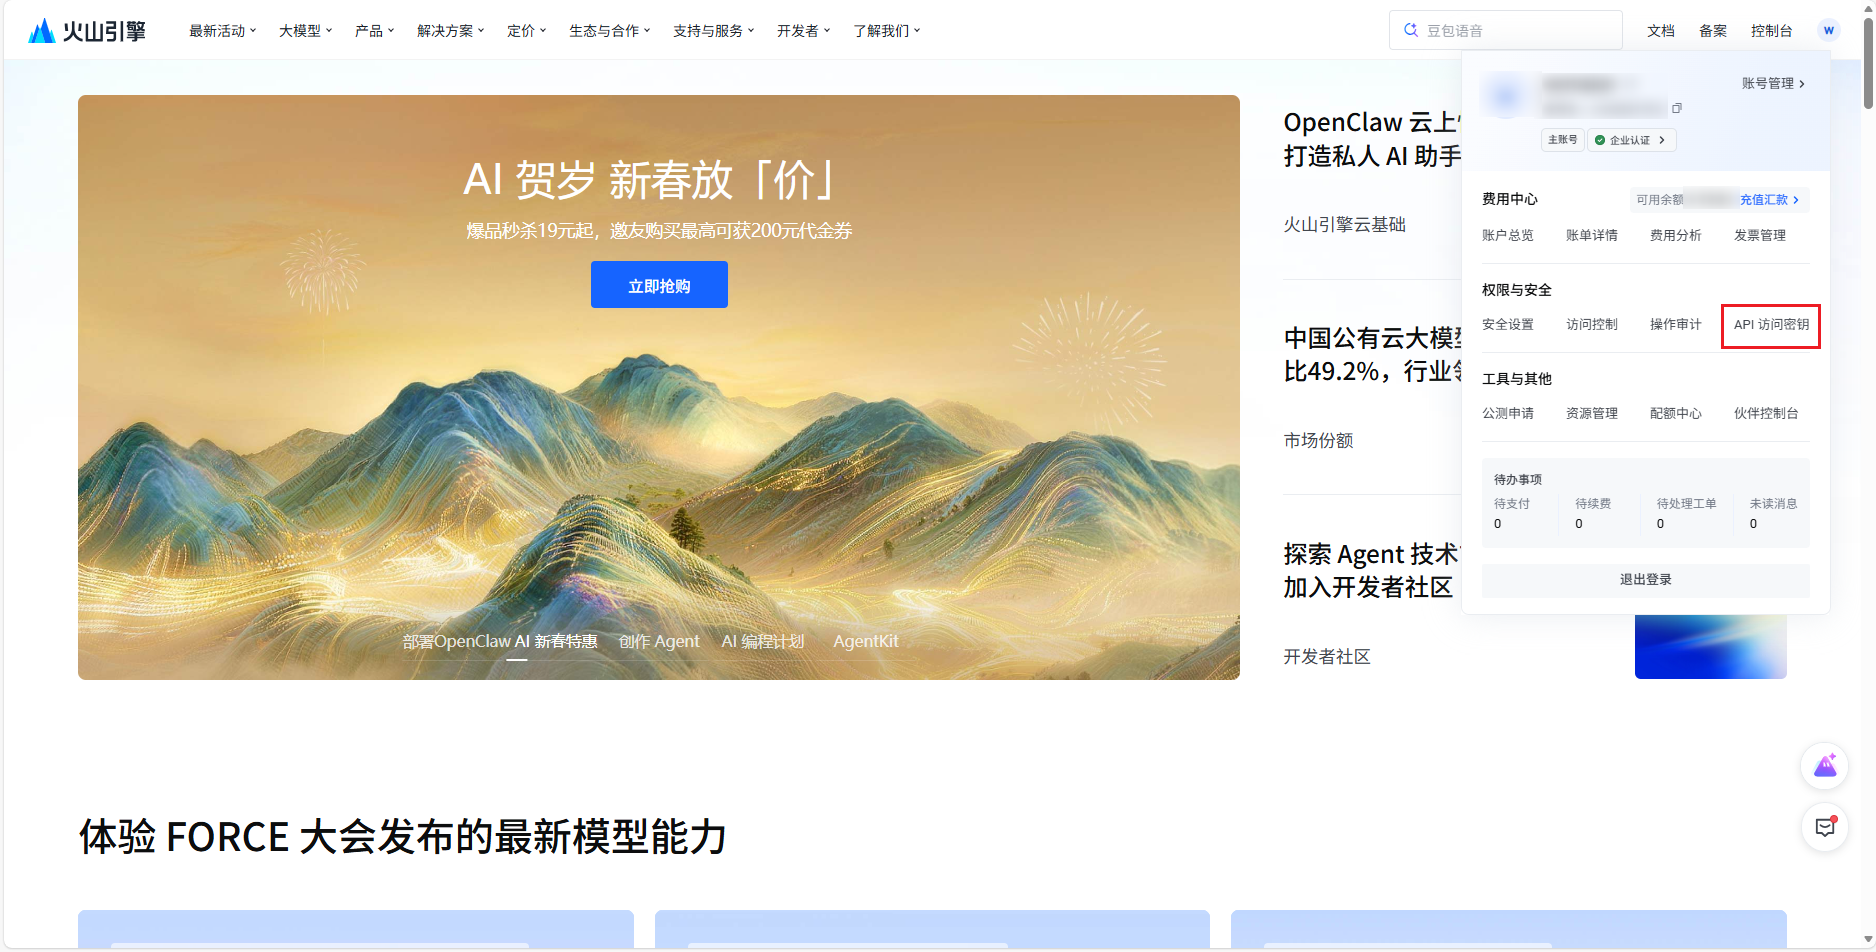
- Log in to Volcano Engine and click the upper-right corner to select API Access Keys.
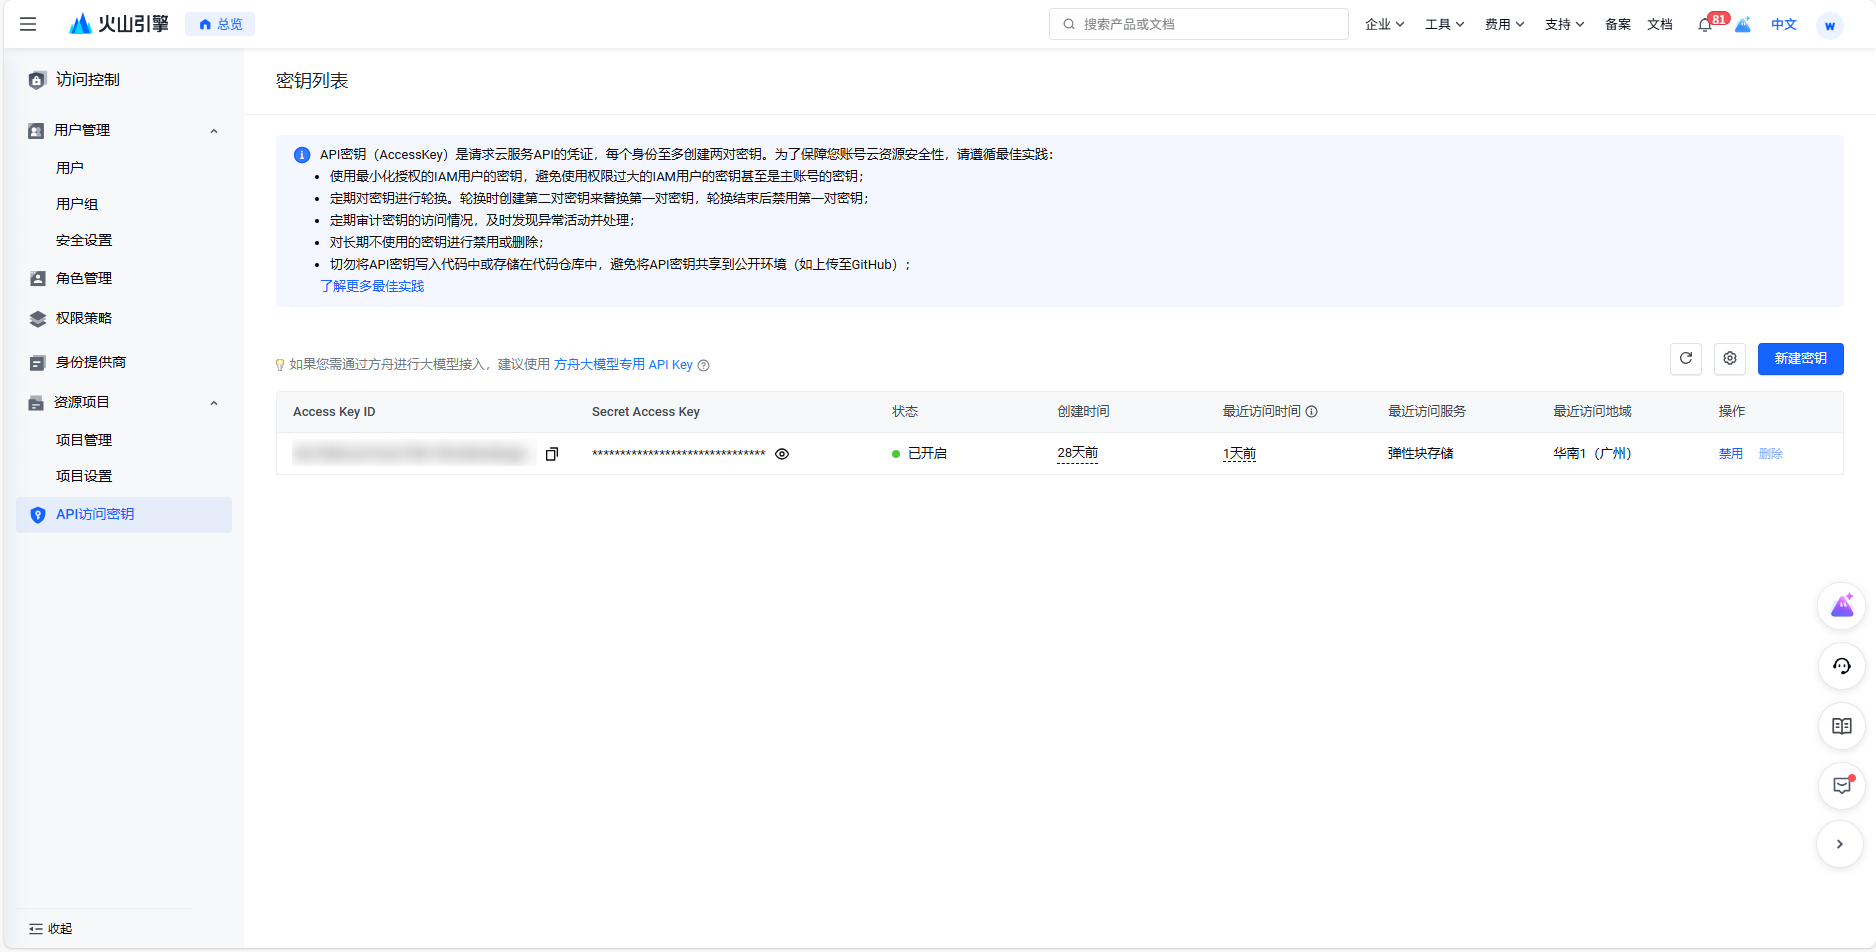
- In the API Access Key management page, view your AccessKey. If the list is empty, you can create one.
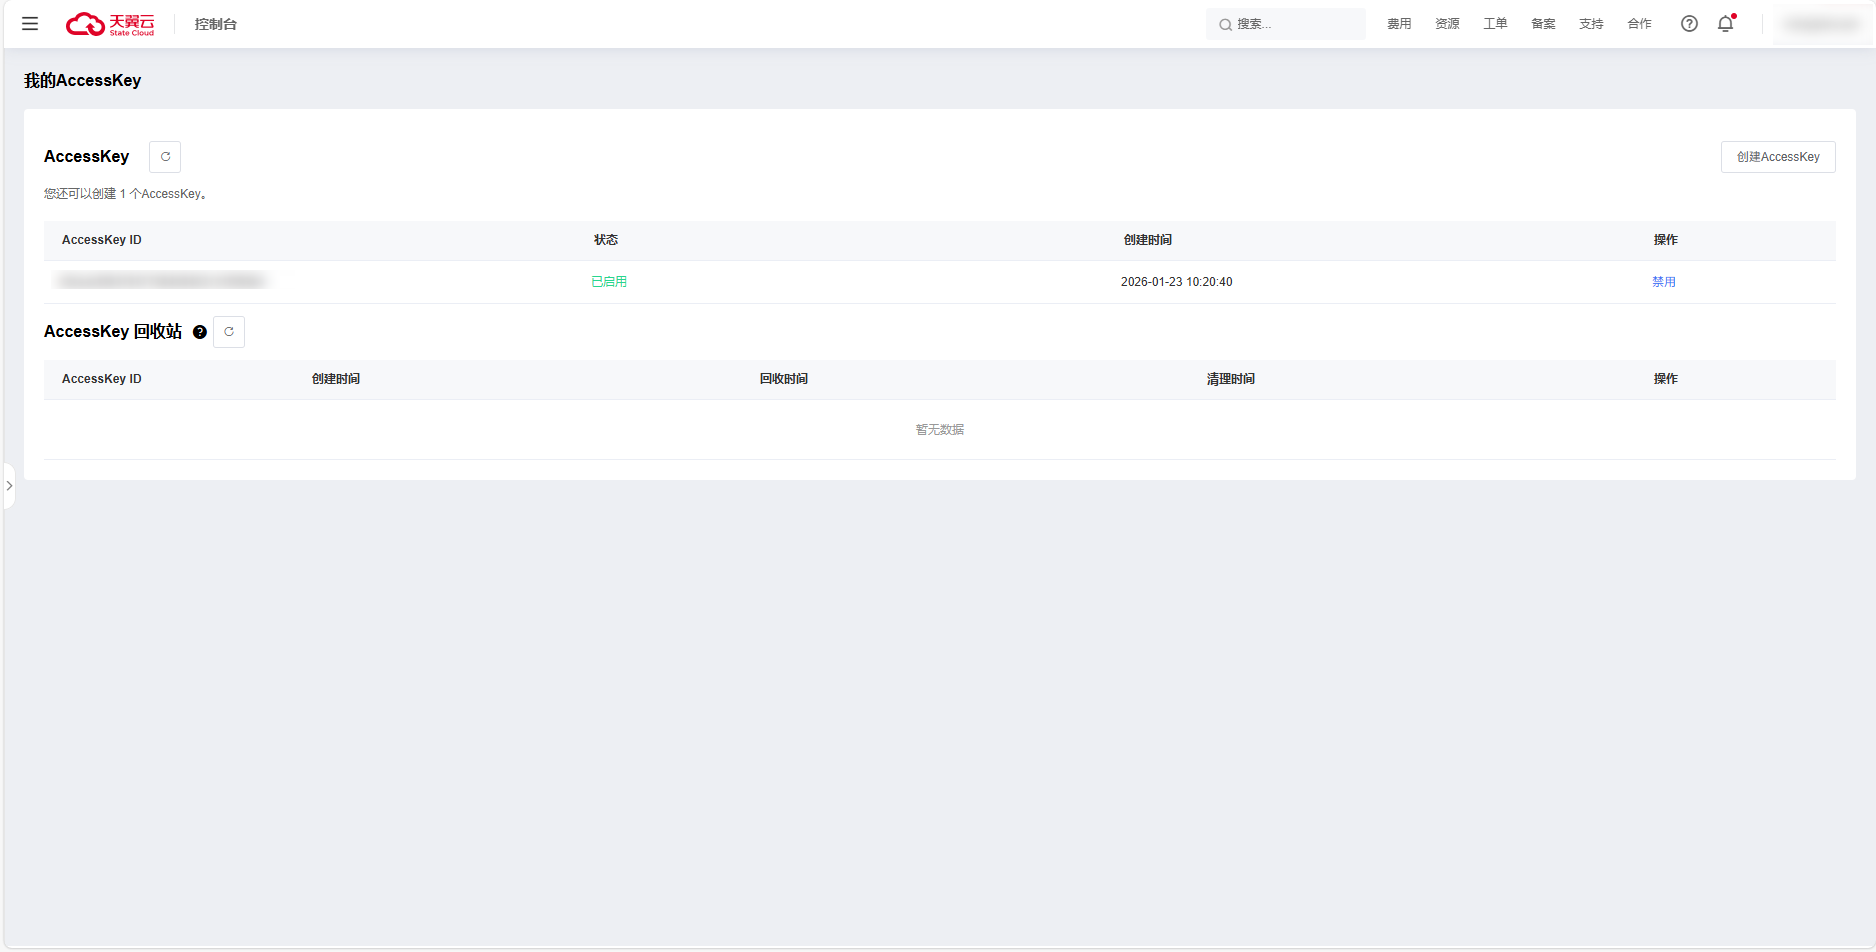
4.1.10 How to Obtain a China Telecom Cloud Access Key
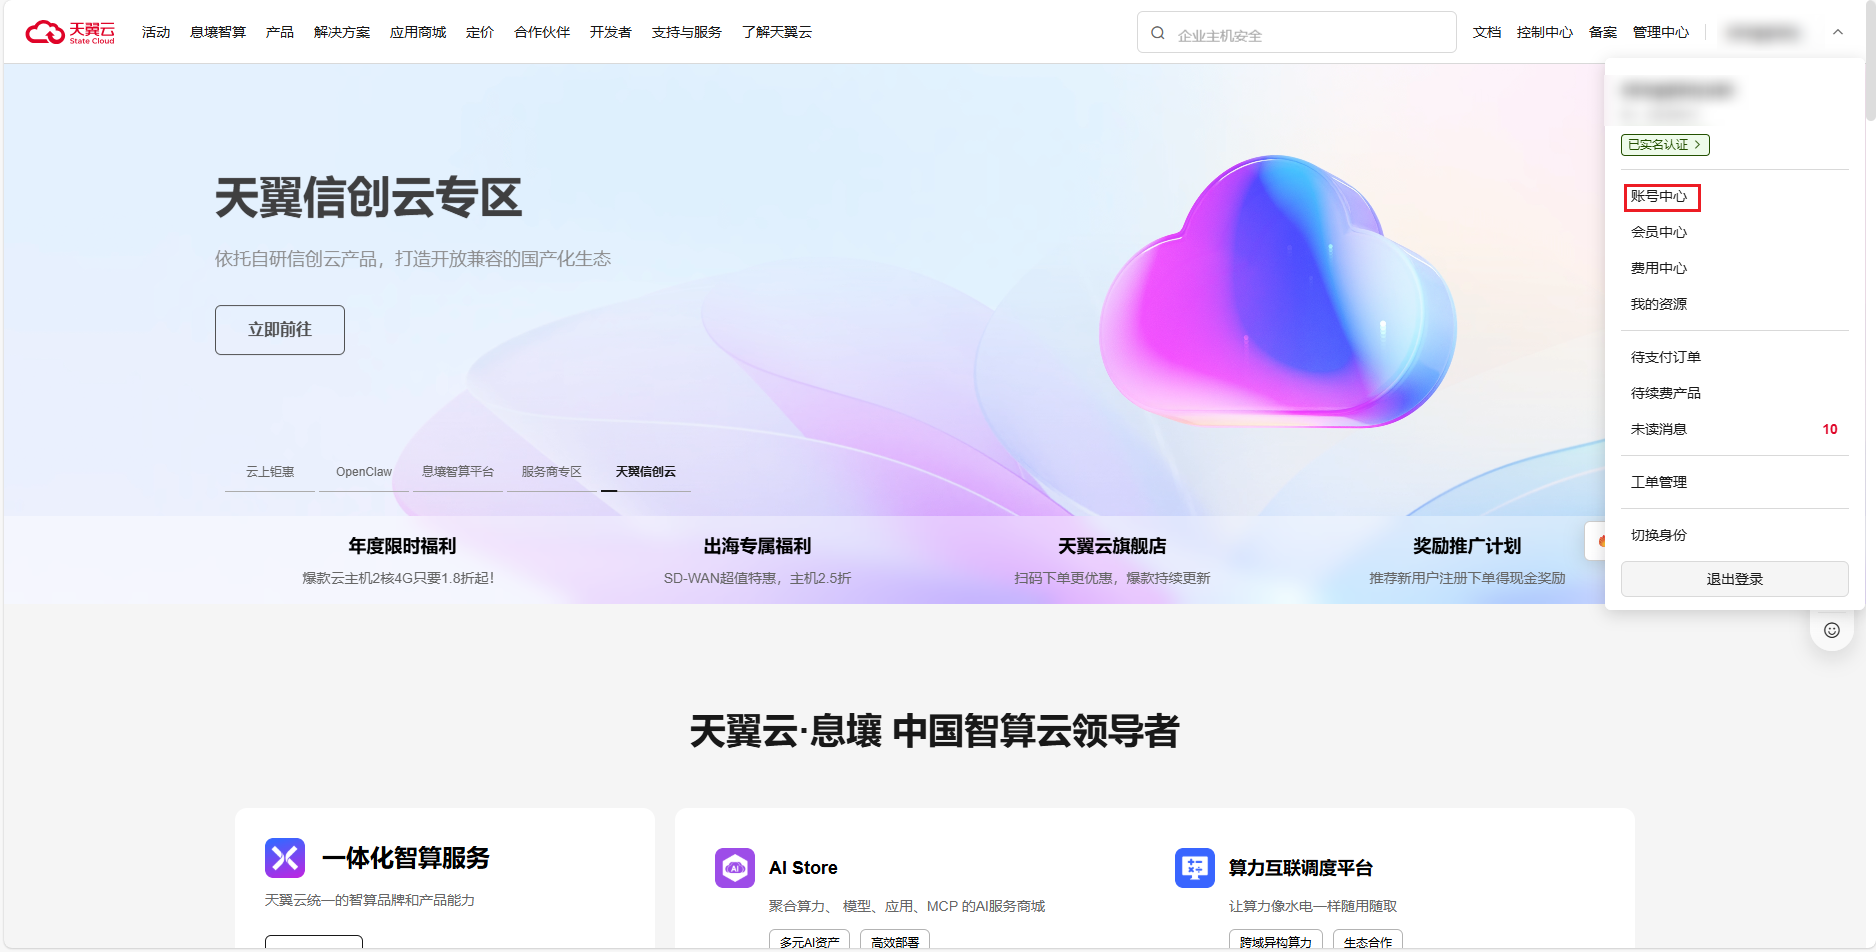
- Log in to China Telecom Cloud and click the upper-right corner to select Account Center.
- Click Security Settings → Login Protection → User AccessKey, and then click View.
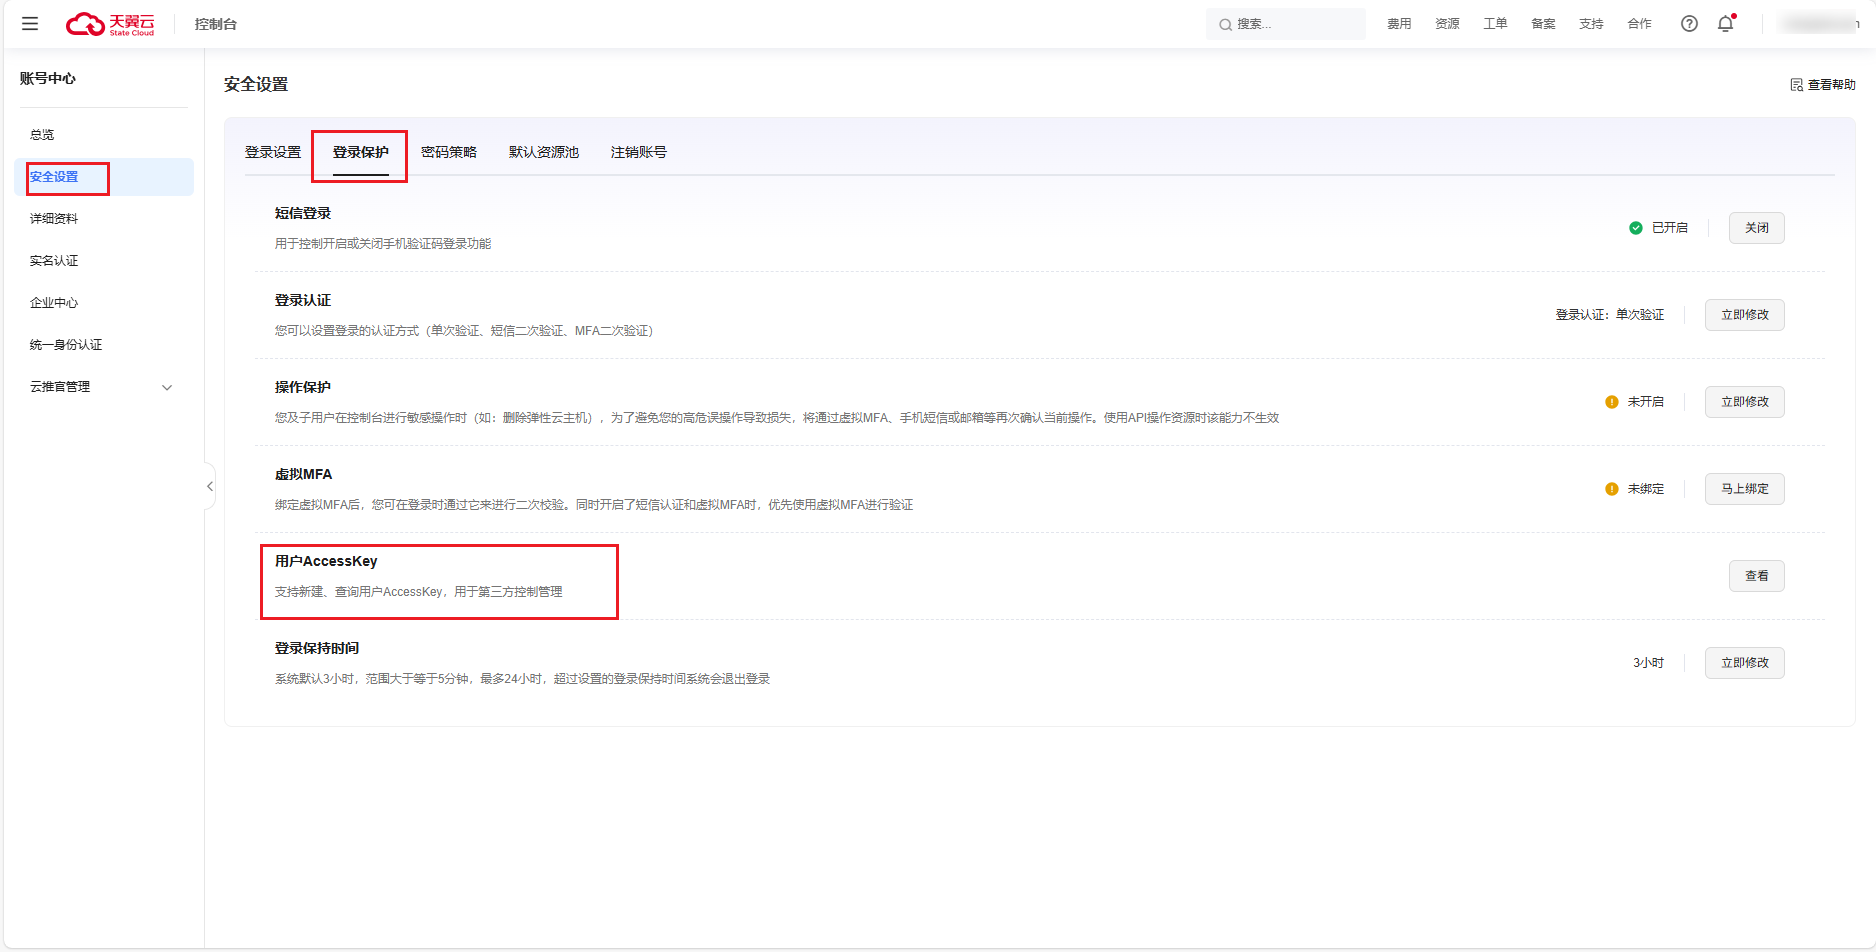
- View your AccessKey. If the list is empty, you can create one.
4.2 Private Cloud Management
Private cloud account management supports integration with private cloud platforms such as OpenStack, VMware, Huawei Dedicated Cloud, GRGBanking, SmartX, Xiyun, and Jindouyun.
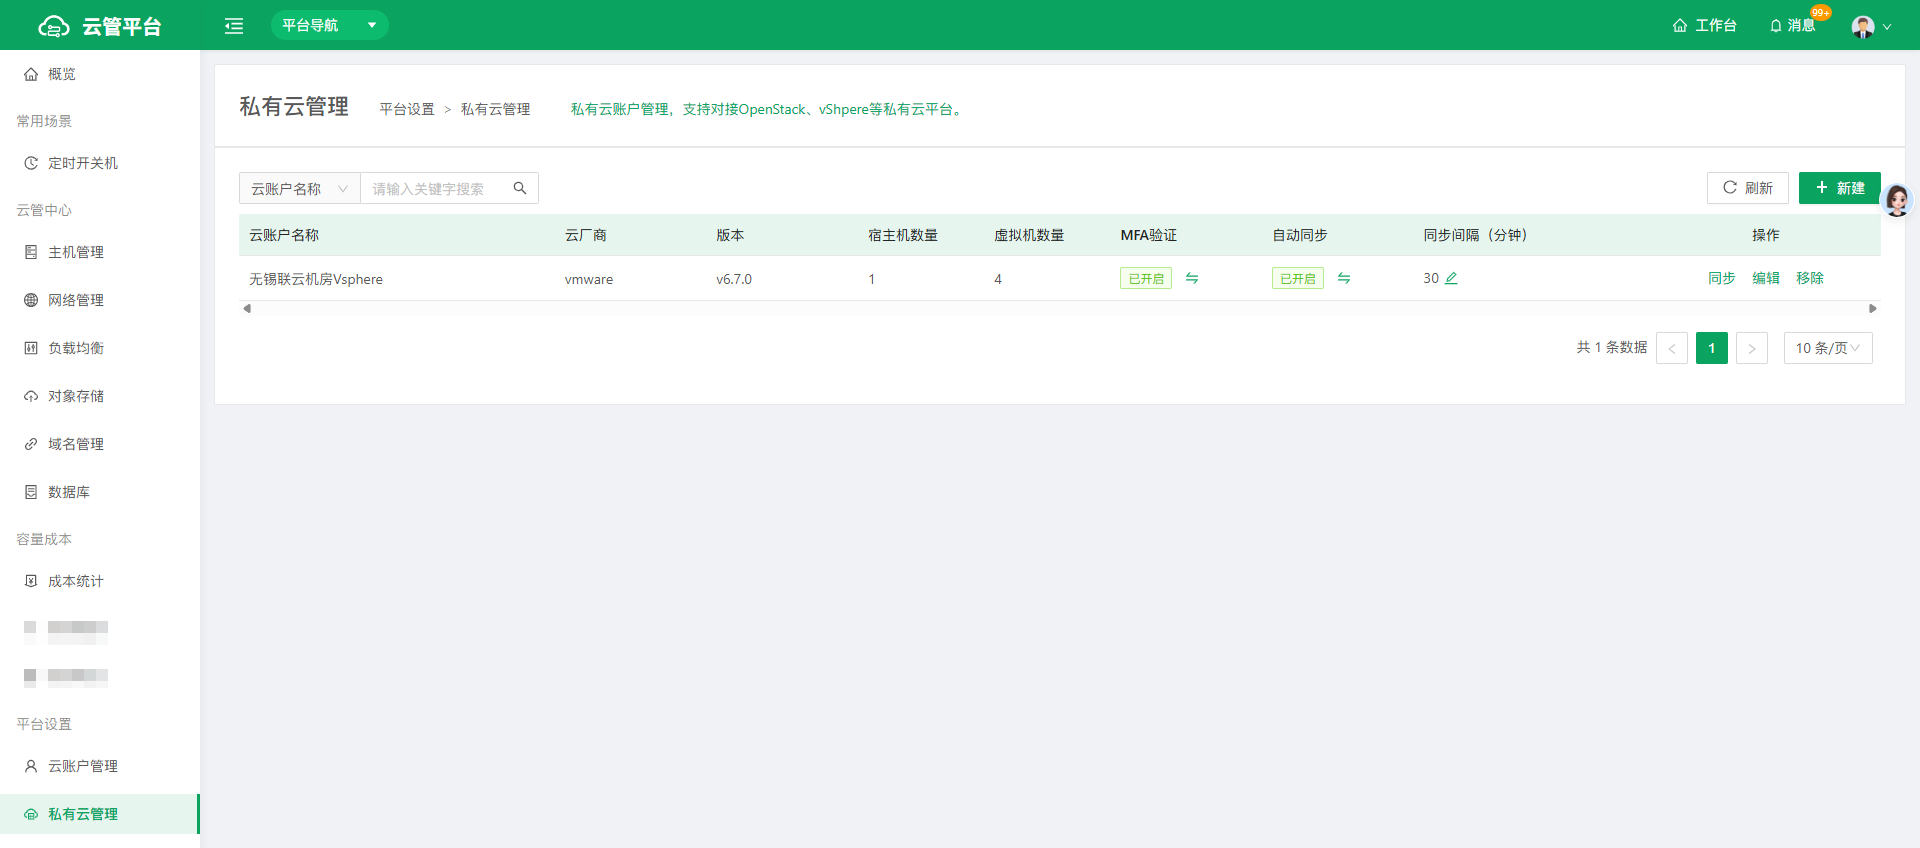
Go to the Private Cloud Management page, click New in the upper-right corner, and complete the creation by following the steps on the New Private Cloud Account page.
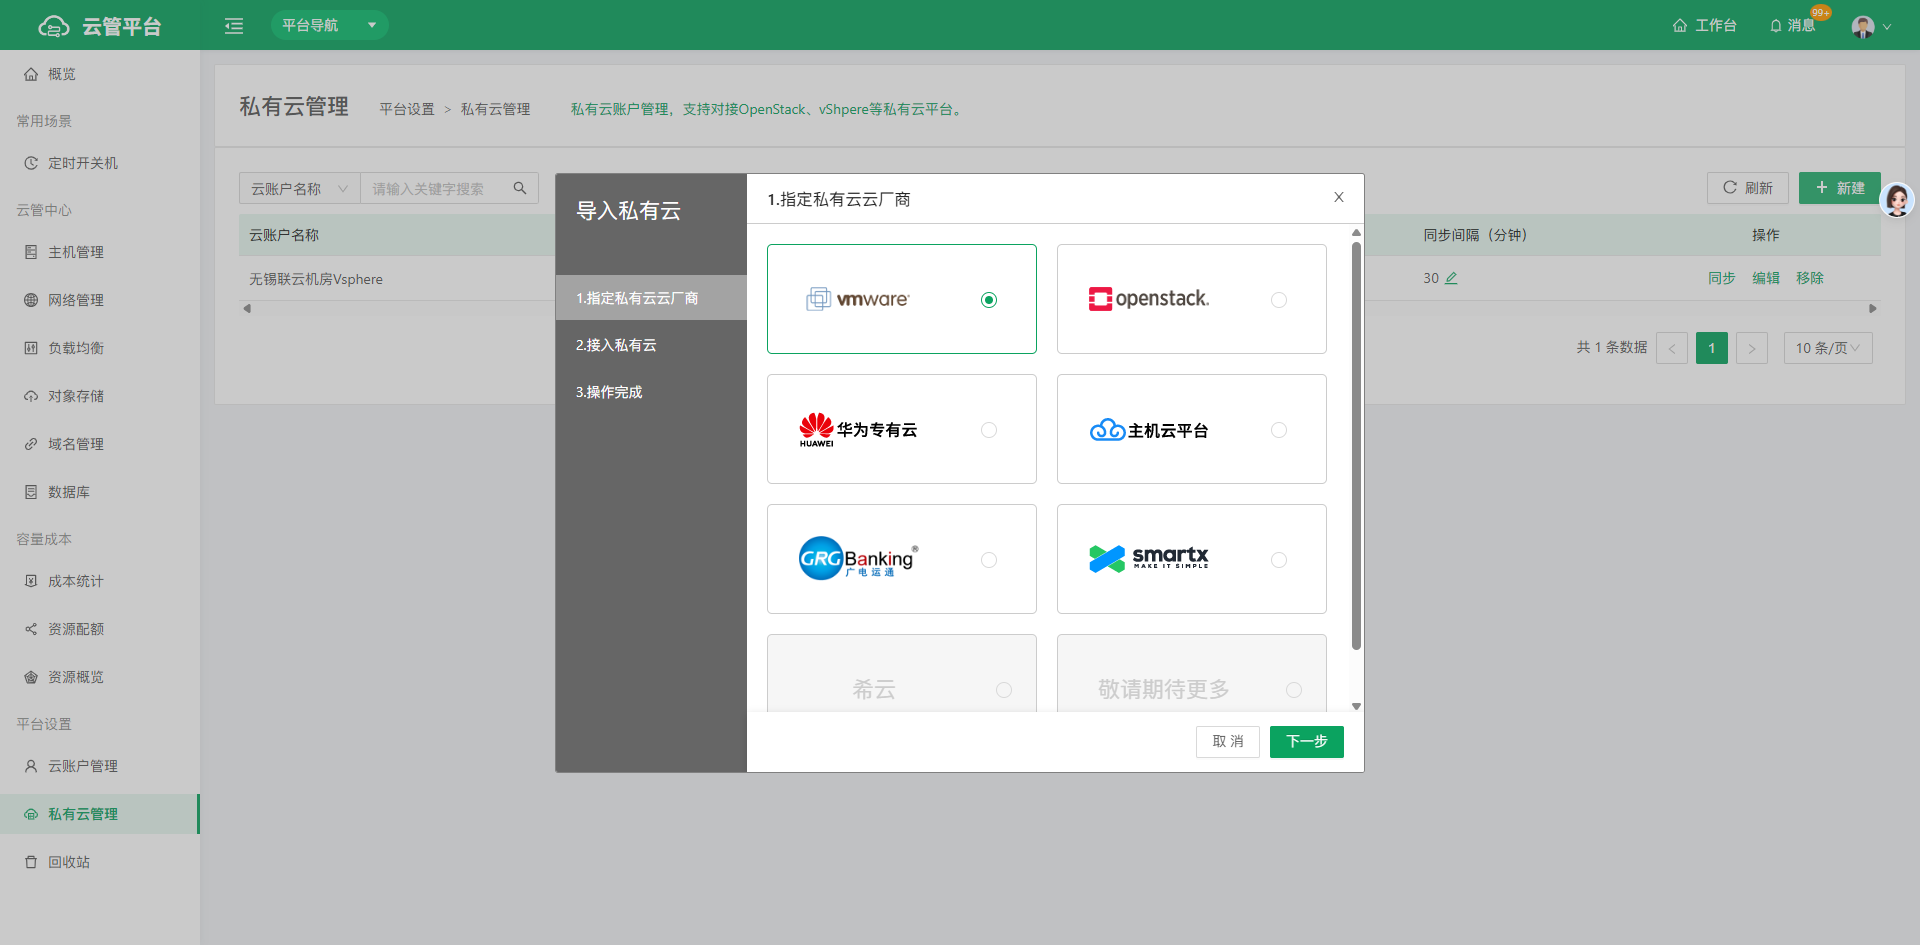
- Private Cloud Management currently supports integration with OpenStack, VMware, Huawei Dedicated Cloud, GRGBanking, SmartX, Xiyun, Jindouyun, and more.